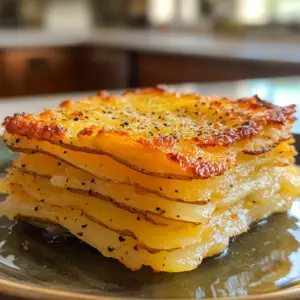
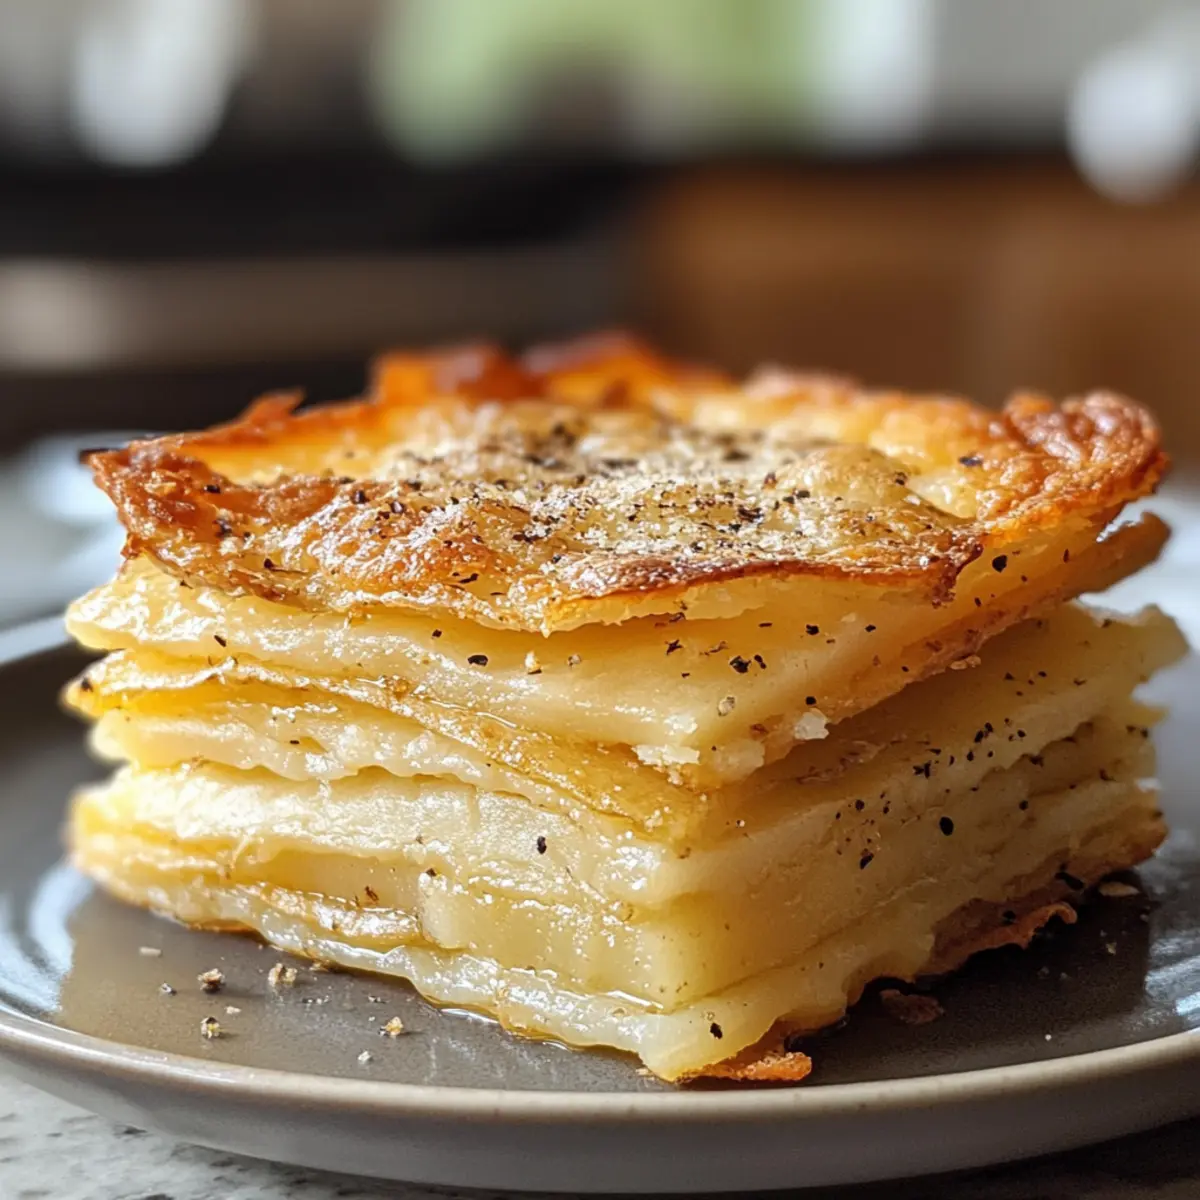
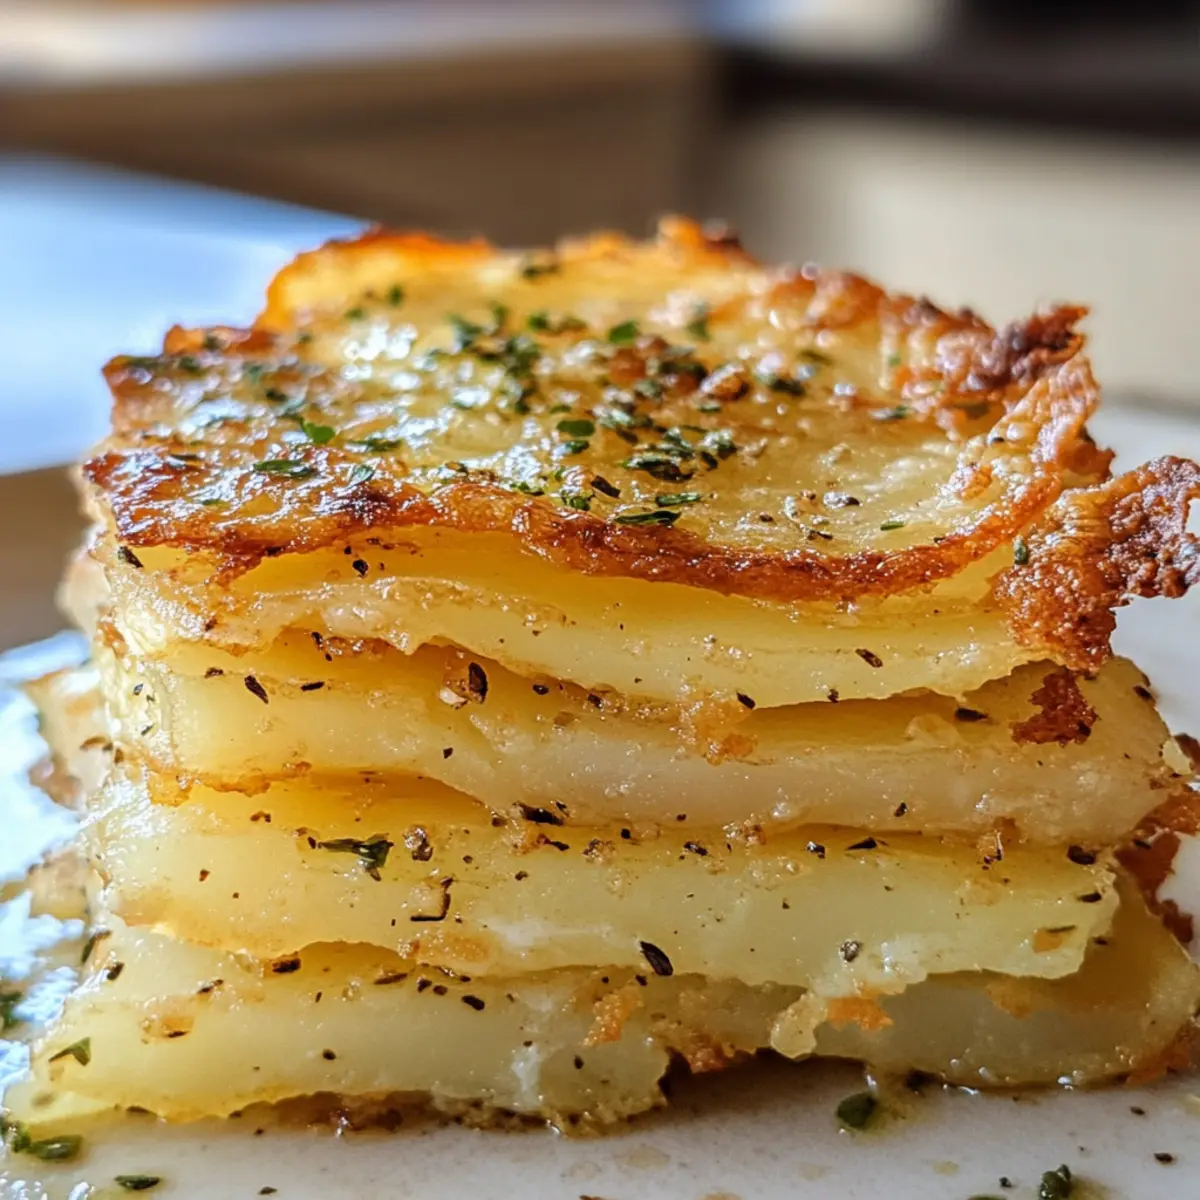
As I stood in my kitchen, a humble bag of Yukon Gold potatoes caught my eye, whispering promises of warmth and comfort. Enter the Crispy Potato Pave—a recipe that transforms basic spuds into an elegant side dish that steals the show at any gathering. With its glorious layers, beautifully crispy edges, and creamy interior, this dish is not just visually stunning; it’s also gluten-free and makes-ahead friendly, allowing you to impress guests without the last-minute chaos. Whether served alongside a juicy roast or as part of a festive brunch, you’ll find yourself reaching for seconds, or even thirds! Ready to elevate your dinner game and create unforgettable moments around the table? Let’s dive into making this delightful Potato Pave together!
Why is Potato Pave so special?
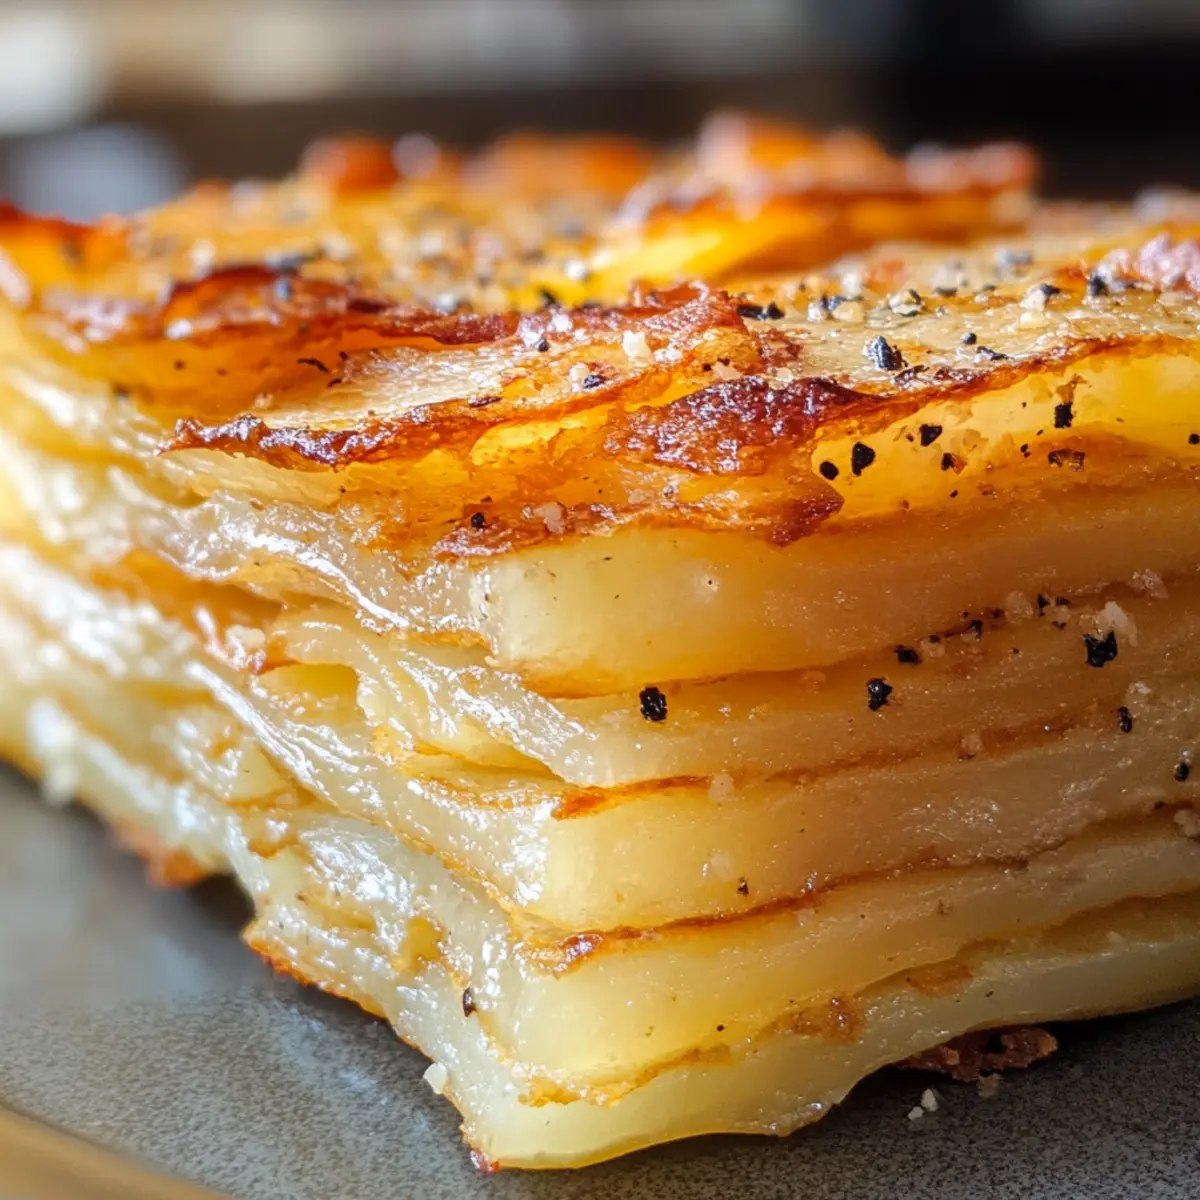
Buttery Layers: The use of clarified butter adds a rich depth that elevates the flavor of the potatoes, enhancing every bite with its luxurious taste.
Crispy Perfection: With a golden, crunchy exterior, this dish is a textural delight that contrasts beautifully with its soft, creamy center.
Make-Ahead Convenience: Easily prepare this dish in advance, allowing you more time to enjoy with your loved ones without the rush.
Crowd Pleaser: Whether at a formal dinner or a cozy family meal, Potato Pave impresses guests with its elegant presentation and delightful flavor.
Versatile Pairing: It makes a fabulous side dish to roasted meats or as part of a festive brunch spread, engaging everyone’s taste buds.
Gluten-Free Goodness: Naturally free from gluten, this dish is perfect for serving a wider audience, accommodating diverse dietary needs while still being a total showstopper!
Crispy Potato Pave Ingredients
For the Potato Layers
• Yukon Gold Potatoes – Essential for their creamy texture and ability to hold shape when layered.
• Salt – Enhances the natural flavor of the potatoes; adjust to your taste.
• Black Pepper – Adds a subtle kick; feel free to adjust based on your preference.
• Garlic (optional) – Infuses a delicious, savory aroma; try using smashed cloves for a milder flavor.
• Fresh Herbs (optional, e.g., thyme or rosemary) – Sprinkle in fragrant herbs every few layers to elevate the dish’s essence.
• Parmesan Cheese (optional) – Adds richness between layers; a sprinkle can enhance the savory profile of the dish.
For Layering & Cooking
• Clarified Butter – Provides rich flavor and prevents burning; a must for achieving that crispy potato pave perfection! Substitute with high-quality olive oil or duck fat for a dairy-free version, though crispiness may vary.
• Olive Oil or Additional Butter – Use for searing each piece post-baking, giving that glorious crispy finish to your Potato Pave.
This delightful Crispy Potato Pave is not only gluten-free but also a show-stopping elegant side dish that you can easily prepare ahead of time for any gathering!
Step-by-Step Instructions for Crispy Potato Pave
Step 1: Preheat and Prepare
Begin by preheating your oven to 325°F (160°C). While the oven warms, line a loaf pan with parchment paper, ensuring it overlaps the edges for easy removal later. This is your mold for the Crispy Potato Pave, which will help create the beautiful layers you desire.
Step 2: Slice the Potatoes
Peel and slice Yukon Gold potatoes into thin, 1/16-inch rounds using a mandoline for uniform thickness. Place the slices into a bowl of cold water to prevent browning. Once all potatoes are sliced, dry them thoroughly with a clean kitchen towel—this is key for achieving that crispy exterior once baked.
Step 3: Layer the Potatoes
Start layering the potato slices in the prepared loaf pan, brushing each layer lightly with clarified butter. Season generously with salt and black pepper to enhance the flavors. For added depth, consider incorporating optional garlic or fresh herb sprinkles every few layers, ensuring a delicious aroma throughout the Crispy Potato Pave.
Step 4: Continue Layering
Repeat the layering process with the remaining potato slices, using the clarified butter and seasonings as you go. Keep building the layers until all potato slices are used up, ensuring an even distribution. If using Parmesan cheese, sprinkle it between layers for added richness and flavor.
Step 5: Compress and Cover
Once layered, cover the top of the loaf pan snugly with parchment paper. Then, tightly wrap the entire pan with aluminum foil and place a weight on top, such as another small pan or a heavy dish. This compression will help the layers meld together beautifully during baking.
Step 6: Bake to Perfection
Place the weighted loaf pan in the preheated oven and bake for 1 hour and 45 minutes to 2 hours. Check for doneness by inserting a knife; it should glide through the potatoes without resistance, indicating they are tender.
Step 7: Cool and Chill
Once baked, remove the Potato Pave from the oven and let it cool to room temperature. For best results, transfer it to the refrigerator and chill overnight. This step helps firm up the dish, making it easier to slice cleanly.
Step 8: Slice the Pave
After chilling, carefully unmold the Crispy Potato Pave from the pan by lifting the parchment. Place it on a cutting board and slice it into elegant squares or rectangles, revealing those beautifully layered potatoes.
Step 9: Sear for Crispiness
Heat a nonstick pan over medium-high heat and add clarified butter. Once sizzling, place the cut pieces of Potato Pave in the pan, searing them until golden brown on both sides—about 3-4 minutes per side. This step enhances the crispy texture we love!
Step 10: Serve and Enjoy
Once nicely browned, transfer the Crispy Potato Pave to a serving platter. Serve warm, and consider garnishing with fresh herbs or a drizzle of truffle oil for an extra touch of elegance. Your stunning dish is now ready to impress at your next gathering!
Variations & Substitutions for Potato Pave
Feel free to infuse your personal touch into this delightful recipe and create something truly unique!
-
Sweet Potato Twist: Swap Yukon Gold for sweet potatoes, adding 1 tsp cornstarch for improved texture. This variation brings a hint of sweetness that balances beautifully with savory dishes.
-
Dairy-Free Delight: Replace clarified butter with high-quality olive oil or duck fat. While this keeps the dish rich, note that crispiness may vary slightly but still delivers delicious flavors.
-
Herb Enhancements: Experiment with different herbs like dill or oregano for unique flavor profiles. Each herb can transform your Potato Pave, offering something new each time you prepare it.
-
Cheese Substitution: Try using a plant-based cheese option in place of Parmesan for a vegan-friendly take—maintaining creaminess while accommodating dietary needs.
-
Garlic-Infused Layers: For extra flavor, mix in crushed garlic cloves between layers. This addition will take your Pave to a whole new level of savory goodness!
-
Zesty Lemon Kick: Add a touch of lemon zest to the potato layers for a fresh, citrusy brightness that cuts through the richness elegantly.
-
Spice it Up: Include red pepper flakes or smoked paprika while layering. This simple twist introduces a delightful kick while maintaining that beloved buttery essence.
-
Mushroom Medley: Incorporate sautéed mushrooms between layers for added texture and earthiness. This not only boosts flavor but also pairs beautifully with roasted meats, offering a gourmet flair.
By embracing these variations, you can adapt the Potato Pave to suit your cravings or dietary preferences. Make it your own, and enjoy this versatile dish time and time again!
What to Serve with Crispy Potato Pave?
Creating a meal around the heavenly Crispy Potato Pave allows you to delight your guests with a symphony of tastes and textures.
- Herb-Crusted Roasted Chicken: Juicy, tender chicken, perfectly seasoned with herbs, complements the buttery layers of the pave and adds a rustic charm.
- Creamy Spinach Salad: The fresh crunch of greens, paired with a creamy dressing, provides a beautiful contrast to the crispy texture of the pave.
- Roasted Garlic Asparagus: These tender, charred spears add a vibrant, earthy flavor that harmonizes wonderfully with the richness of the potatoes.
- Beef Wellington: An elegant choice for special occasions, the flaky pastry and succulent beef pair beautifully with the creamy layers of Potato Pave.
- Charred Brussels Sprouts with Bacon: The savory, smoky notes of bacon and the slight bitterness of Brussels sprouts perfectly balance the buttery richness of the pave.
- Zesty Citrus Salad: A refreshing blend of citrus and greens brightens up the plate while cutting through the dish’s richness.
- Chardonnay or Red Wine: Choose a crisp Chardonnay to enhance the buttery flavors or a light red wine to complement the earthy tones of the pave.
- Chocolate Fondant Cake: End on a sweet note with a rich, warm chocolate cake that provides a decadent finish to your meal, leaving guests begging for more!
How to Store and Freeze Potato Pave
Fridge: Store leftover Potato Pave in an airtight container for up to 3 days. Allow it to cool completely before locking it away to maintain texture.
Freezer: If you want to keep it longer, you can freeze the baked and cooled Potato Pave. Wrap individual slices tightly in plastic wrap and then place them in a freezer bag for up to 2 months.
Reheating: To reheat, thaw overnight in the fridge and warm in a 350°F (175°C) oven for about 15-20 minutes, or until heated through. This will help revive that delightful crispy texture.
Make-Ahead Tip: You can prepare the Potato Pave up to 3 days in advance before re-heating, ensuring a stress-free serving at your next gathering!
Expert Tips for Crispy Potato Pave
• Clarified Butter Magic: Use clarified butter instead of regular butter; it has a higher smoke point and helps prevent the potatoes from burning.
• Slicing Uniformly: A mandoline is ideal for slicing potatoes evenly. Consistent thickness ensures that they cook uniformly and create that beautiful layered effect.
• Chill for Success: Refrigerate the Potato Pave overnight after baking. This helps it firm up, making slicing easier and cleaner for serving later.
• Layering Wisely: Don’t skip seasoning each layer with salt, pepper, and optional garlic or herbs. This simple step enhances the flavor profile of your crispy potato pave.
• Perfect Crispy Finish: When searing, resist the urge to flip the slices too soon. Allow them to form a golden crust for that delightful, crunchy exterior.
• Make-Ahead Marvel: Take advantage of the make-ahead nature of this recipe. Prepare it up to three days in advance, giving you more time with loved ones!
Make Ahead Options
These Crispy Potato Pave are perfect for busy home cooks looking to save time and streamline meal prep! You can prepare the entire dish up to 3 days in advance. After baking, allow the Potato Pave to cool to room temperature, then refrigerate it tightly wrapped in plastic wrap to maintain freshness. This chilling step not only makes slicing easier, ensuring clean edges, but also enhances the flavors. When ready to serve, simply unmold, slice, and sear in a hot pan with clarified butter until golden brown on both sides, bringing back that delightful crispiness. Your guests will be none the wiser that this elegant side dish was made ahead!
Crispy Potato Pave Recipe FAQs
How do I choose the right potatoes for Potato Pave?
For Potato Pave, I recommend using Yukon Gold potatoes. Their creamy texture and balanced starch content provide the ideal structure for achieving those beautiful layers. When picking your potatoes, look for those that are firm without any dark spots or blemishes, which could indicate spoilage.
How should I store leftover Potato Pave?
Absolutely! Store any leftover Potato Pave in an airtight container in the refrigerator for up to 3 days. Make sure it’s completely cooled before sealing to maintain its delightful texture. When ready to serve, simply reheat it in the oven for best results.
Can I freeze Potato Pave?
Yes! You can freeze Potato Pave for longer storage. Here’s how: once it’s baked and cooled, wrap individual slices tightly in plastic wrap, and then place them in a freezer bag. This method can keep your Potato Pave good for up to 2 months! To reheat, thaw overnight in the fridge and warm in a preheated oven at 350°F (175°C) for about 15-20 minutes, until heated through and crispy.
What if my Potato Pave isn’t crispy enough?
If you find that your Potato Pave isn’t as crispy as you’d like, try this: ensure you’re using clarified butter, as it has a higher smoke point and helps with browning. While searing, allow the pieces to develop a golden crust before flipping them—about 3-4 minutes on each side should do the trick. If you prefer a crisper finish, you can also broil them for an additional minute or two after searing.
Is Potato Pave suitable for those with dietary restrictions?
Very much so! Potato Pave is naturally gluten-free, making it a fantastic option for those with gluten sensitivities. However, just be mindful of any additions, like cheese or certain condiments, which may not be gluten-free. You can easily create a dairy-free version by substituting the clarified butter with a high-quality olive oil or duck fat.
Can I make Potato Pave in advance?
You bet! This dish is perfect for make-ahead preparation. You can assemble it up to 3 days in advance, then bake and chill it to firm up the layers. This not only saves you time on the day of your gathering but also enhances the flavors as they meld together beautifully in the fridge!

Crispy Potato Pave: A Buttery, Elegant Side Dish Delight
Ingredients
Equipment
Method
- Preheat your oven to 325°F (160°C) and line a loaf pan with parchment paper.
- Peel and slice Yukon Gold potatoes into thin, 1/16-inch rounds using a mandoline. Soak in cold water and then dry thoroughly.
- Layer potato slices in the loaf pan, brushing each layer with clarified butter and seasoning with salt and pepper.
- Continue layering the potato slices until all are used, adding optional garlic or herbs between layers.
- Cover the top with parchment and aluminum foil, placing a weight on top for compression.
- Bake in the preheated oven for 1 hour and 45 minutes to 2 hours until tender.
- Remove from the oven, let cool to room temperature, then refrigerate overnight to firm up.
- Unmold the Potato Pave and slice into squares or rectangles.
- Sear slices in a hot nonstick pan with clarified butter until golden brown, about 3-4 minutes per side.
- Serve warm, garnished with fresh herbs or truffle oil as desired.