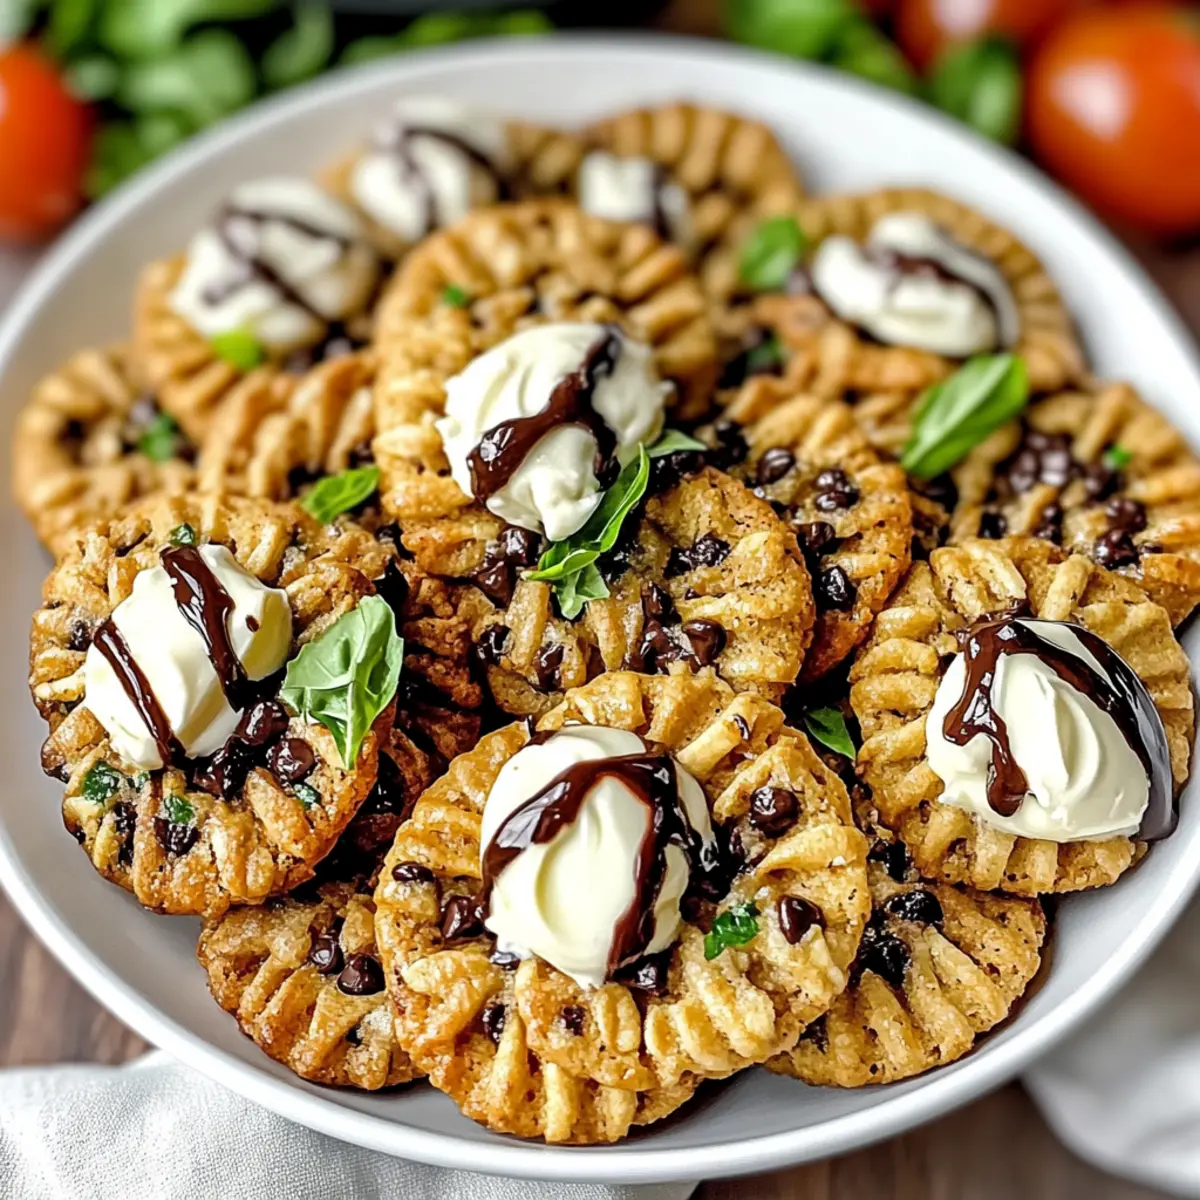
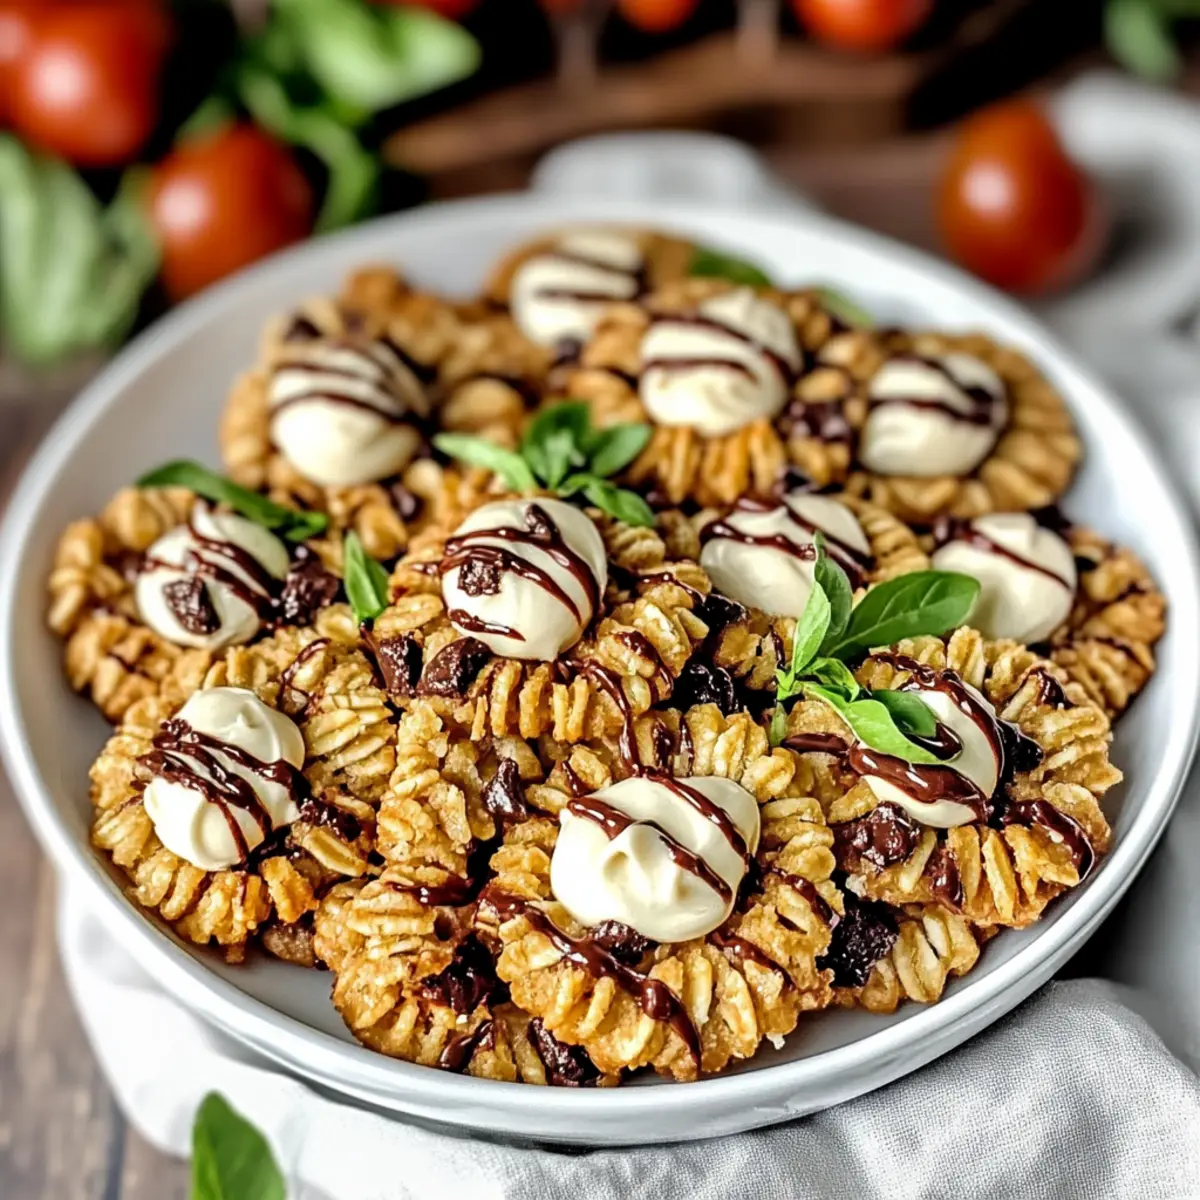
As I stood in my kitchen, the sweet aroma of melting chocolate began to weave its magic through the air, reminiscent of childhood baking afternoons. Today, I’m delighted to share my recipe for 4-Ingredient Crispy Chocolate Oat Cookies, a quick and easy treat that’s perfect for satisfying those chocolate cravings without the fuss. These gluten-free cookies come together in less than 20 minutes and require minimal effort, making them the ideal snack for busy days or spontaneous dessert moments. With their delightful crunch and hearty oats, they offer a satisfying bite to enjoy anytime. Excited to give these a try? Let’s dive into the simple steps to create your own batch!
Why are these cookies a must-try?
Simplicity: With just four ingredients, you’ll whip these up in no time, making them perfect for busy schedules or last-minute cravings.
Crunchy Delight: Each bite features a satisfying crunch that’s perfect for oatmeal lovers, giving your snack time a hearty twist.
Gluten-Free: Enjoy guilt-free snacking with a gluten-free option that doesn’t sacrifice taste, allowing everyone to indulge!
Versatile Spirit: Feel free to customize with your favorite nut butters or additional mix-ins like dried fruit or different flavored chocolate chips. They can easily adapt to your cravings!
Quick Treat: Ready in under 20 minutes, these cookies are the perfect solution for satisfying your sweet tooth without the long wait.
Crowd-Pleasing: Whether for a family gathering or a quiet evening treat, these cookies are sure to impress and please everyone at the table. Enjoy a batch with a glass of milk for the ultimate snack experience!
Crispy Chocolate Oat Cookies Ingredients
For the Cookie Mix
• Rolled Oats – Provide structure and chewiness; substitute with gluten-free oats if needed.
• Peanut Butter – Acts as a binding agent and adds richness; almond butter can be used for a nut-free version.
• Honey or Maple Syrup – Sweetens the cookies naturally; agave syrup can replace it for a vegan option.
• Chocolate Chips – Adds flavor and texture; opt for dark chocolate for a richer taste or milk chocolate for sweetness.
Step‑by‑Step Instructions for Crispy Chocolate Oat Cookies
Step 1: Preheat the Oven
Begin by preheating your oven to 350°F (175°C). While the oven warms up, prepare a baking sheet by lining it with parchment paper. This will prevent the cookies from sticking and ensure a nice, even bake. You’ll know the oven is ready when the light indicates it has reached the desired temperature.
Step 2: Combine Oats and Peanut Butter
In a large mixing bowl, combine the rolled oats and peanut butter. Use a sturdy mixing spoon or spatula to blend these together until they are well combined and the oats are evenly coated with the peanut butter. This step is crucial for achieving the right texture in your Crispy Chocolate Oat Cookies.
Step 3: Add Sweetener
Next, pour in the honey or maple syrup into the oat and peanut butter mixture. Stir vigorously until all ingredients are fully incorporated, creating a sticky dough-like consistency. Make sure there are no dry spots; this sweetness will enhance the flavor and provide moisture to your cookies.
Step 4: Fold in Chocolate Chips
Gently fold in the chocolate chips, ensuring they are evenly distributed throughout the dough. Be careful not to overmix, as you want those delightful pockets of chocolate to stay intact when the cookies bake. This addition is what gives your Crispy Chocolate Oat Cookies their irresistible appeal.
Step 5: Scoop Cookies onto Baking Sheet
With a tablespoon, scoop out portions of the cookie dough and place them evenly spaced on the prepared baking sheet. Aim for about 2 inches apart, as the cookies will spread slightly while baking. You should have around 12 cookies. This will help ensure even baking without them sticking together.
Step 6: Bake to Golden Perfection
Once all the cookie dough is on the baking sheet, place it in the oven. Bake for 10-12 minutes, or until the edges turn a beautiful golden brown. Keep a close eye on them during the last few minutes to avoid overbaking, as this leads to a perfect crunch while keeping a chewy center.
Step 7: Cool and Transfer
After baking, remove the baking sheet from the oven and let the cookies cool for about 5 minutes. This resting time allows them to firm up slightly. Once cooled, gently transfer the cookies to a wire rack to cool completely. This will help to maintain their crispy texture as they cool down.
Expert Tips for Crispiness
-
Mix Well: Ensure the oats are thoroughly combined with the peanut butter. Any dry spots can lead to uneven texture in your crispy chocolate oat cookies.
-
Keep an Eye on Time: Don’t overbake; aim for that delightful golden edge. Overbaking can ruin the texture, making them too hard instead of perfectly crispy.
-
Proper Cooling: Allow cookies to cool on the baking sheet for the recommended time. This will help maintain their crispiness while cooling down.
-
Store Smart: Store in an airtight container to prevent losing that lovely crunch. Humid environments can soften your crispy cookies, so keep them sealed!
-
Customization is Key: Feel free to add your favorite mix-ins like nuts or dried fruits. This can enhance both flavor and nutrition, making your crispy chocolate oat cookies even more enjoyable!
What to Serve with 4-Ingredient Crispy Chocolate Oat Cookies
Imagine a cozy afternoon, delightful treats in hand, and the warmth of connection shared over good food.
- Cold Glass of Milk: A classic pairing, this drink complements the rich chocolate flavor and balances the cookie’s crunch. Perfect for dipping!
- Fresh Fruit Salad: Bright, juicy fruits bring a refreshing contrast, adding a burst of flavor and color that enhances every bite.
- Creamy Yogurt: Top with creamy Greek yogurt for a satisfying breakfast or snack. It adds protein and creaminess, beautifully offsetting the cookie’s crispness.
- Nutty Granola: Crumble them over your favorite granola for a delightful breakfast treat, adding a crunchy texture and taste that feels indulgent.
- Mint Tea: A soothing herbal tea can cleanse your palate and enhance the chocolate flavor, providing a delightful balance to every nibble.
- Dark Chocolate Drizzle: Elevate these cookies with a drizzle of melted dark chocolate. It enhances flavor and makes them feel more decadent and fancy.
- Ice Cream Sundae: Crumble cookies over a scoop of ice cream topped with your choice of sauce. It’s an indulgent finish to a lovely snack-time experience!
- Homemade Smoothie: Blend your favorite fruits with spinach and yogurt for a nutrient-packed smoothie that pairs well with every crunchy bite.
- Chai Latte: The warming spices in chai beautifully complement the rich chocolate flavors, making for a cozy pairing perfect for an afternoon treat.
Crispy Chocolate Oat Cookies Variations
Feel free to explore these scrumptious twists and substitutions that will elevate your cookie-making experience!
-
Nut-Free Option: Replace peanut butter with sunbutter to keep it school-safe. Enjoy the same texture with a different flavor profile!
-
Vegan Delight: Substitute honey or maple syrup with agave syrup for a completely vegan-friendly treat. Your cookies will still be perfectly sweet!
-
Fun Extras: Add ¼ cup of dried fruits like cranberries or raisins for a chewiness that complements the crispy oats beautifully. These add a delightful burst of flavor with every bite.
-
Flavor Fun: Try using different flavored chocolate chips, such as mint or butterscotch, to add a distinctive twist that’ll surprise your taste buds.
-
Protein Boost: Incorporate a scoop of protein powder into the mix to make your cookies even more nutritious. A great way to keep you energized throughout the day!
-
Slightly Spicy: Introduce a pinch of cinnamon or cayenne pepper to the dough for a subtle spiciness that pairs wonderfully with the sweet chocolate!
-
Oat Variety: Experiment with steel-cut oats for a heartier, chewier texture. They may take a bit longer to bake, but the result is totally worth it!
-
Chunky Chocolate: Swap regular chocolate chips for chocolate chunks for a richer chocolate experience. You’ll love the velvety pockets of chocolate in each cookie!
Dive into your creativity and let your taste buds guide you to the perfect cookie creation! You could also elevate your experience by pairing these cookies with a delightful glass of homemade nut milk or a warm cup of herbal tea. The possibilities are endless!
Make Ahead Options
These 4-Ingredient Crispy Chocolate Oat Cookies are perfect for meal prep, saving you time during busy weeknights! You can prepare the cookie dough up to 24 hours in advance. Simply follow the instructions until the dough is ready, then scoop it onto the baking sheet, cover it tightly with plastic wrap, and refrigerate. To maintain that satisfying crunch, bake the cookies right before serving, allowing them to warm up to room temperature for just a few minutes after baking. Alternatively, you can bake a batch and store them in an airtight container for up to 3 days, keeping that delightful crispiness intact. Enjoy freshly baked cookies without the fuss anytime you crave a sweet treat!
How to Store and Freeze Crispy Chocolate Oat Cookies
Fridge: Keep your cookies in an airtight container, where they’ll stay fresh for up to 1 week. This helps maintain their delightful crispiness while keeping them handy for snacking.
Freezer: For longer storage, freeze your cookies in a single layer on a baking sheet, then transfer to an airtight container or freezer bag, where they can last up to 3 months. This way, you can enjoy a quick treat whenever you crave it!
Reheating: To restore crispiness, reheat cookies in a preheated oven at 350°F (175°C) for about 5 minutes. This step brings back that crunchy texture, making your cookies taste freshly baked.
Room Temperature: Store them at room temperature for short periods (up to 3 days); just ensure they’re in an airtight container to avoid moisture. Enjoy your crispy chocolate oat cookies on the go!
Crispy Chocolate Oat Cookies Recipe FAQs
How should I choose the right rolled oats for this recipe?
Absolutely! When selecting rolled oats, look for those labeled as gluten-free if you’re sensitive to gluten. They should be whole and free of dark spots or a rancid smell. For this recipe, regular rolled oats will work as well, but gluten-free options ensure everyone can enjoy the cookies safely.
What’s the best way to store the cookies, and how long do they last?
To keep your crispy chocolate oat cookies fresh, store them in an airtight container at room temperature for up to 3 days. If you’d like to keep them longer, consider refrigerating them for up to a week or freezing them for up to 3 months. Just make sure they’re fully cooled before storing to maintain their texture!
Can I freeze these cookies? If so, how?
Yes, you can definitely freeze your crispy chocolate oat cookies! To do this, let them cool completely, then lay them in a single layer on a baking sheet. Place the sheet in the freezer for about 1-2 hours until the cookies are solid. After that, transfer them to an airtight container or a freezer bag, separating layers with parchment paper, and they’ll last up to 3 months.
What should I do if my cookies are too crumbly?
If your cookies turn out crumbly, it could be due to the mixture being too dry. Ensure that the ingredients are well combined, and consider adding a touch more peanut butter or honey to help hold them together. If you notice dry spots during mixing, work the mixture with your hands for better incorporation.
Are there any dietary considerations I should be aware of?
Definitely! If you or someone you’re baking for has nut allergies, replace peanut butter with sunflower seed butter to keep the gluten-free and tasty experience intact. Additionally, you can substitute honey and maple syrup with agave syrup for a vegan alternative. Always check for allergies related to chocolate chips as well, opting for dairy-free chips if needed.
Crispy Chocolate Oat Cookies: Healthy, Easy 4-Ingredient Treats
Ingredients
Equipment
Method
- Preheat your oven to 350°F (175°C) and prepare a baking sheet with parchment paper.
- In a large mixing bowl, combine the rolled oats and peanut butter until well combined.
- Pour in the honey or maple syrup and stir until fully incorporated, creating a sticky dough-like consistency.
- Gently fold in the chocolate chips, ensuring they are evenly distributed.
- Scoop out portions of the cookie dough and place them on the prepared baking sheet, about 2 inches apart.
- Bake for 10-12 minutes, or until the edges turn a golden brown.
- Remove from the oven and let the cookies cool for about 5 minutes before transferring them to a wire rack.