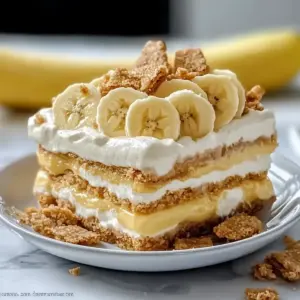
As I sift through my collection of cherished recipes, my heart always returns to that creamy no-bake banana pudding—a dessert that feels like an old friend. This indulgent treat, combining the sweetness of ripe bananas with the comforting crunch of vanilla wafers, is a blissful reminder of family gatherings and carefree summers. Not only is this creamy no-bake banana pudding incredibly easy to whip up, but it also offers a nostalgic journey back in time without the fuss of baking. Perfect for quick gatherings or simply indulging yourself, this delightful dessert requires minimal effort and promises maximum satisfaction. Ready to impress your loved ones with this timeless favorite? Let’s dive into the layers of joy that await!
Why is this banana pudding a must-try?
Simplicity makes this dessert an absolute winner—it requires no baking and only a handful of ingredients. Creamy, dreamy layers of pudding combined with ripe bananas and crunchy vanilla wafers create a rich flavor that’s simply irresistible. Nostalgic comfort takes center stage, making it a tasty trip down memory lane for anyone who enjoys homemade desserts. Quick preparation ensures you can whip it up for last-minute gatherings or cozy family nights. Plus, it’s perfect for both kids and adults, guaranteeing smiles all around!
Creamy No-Bake Banana Pudding Ingredients
Get ready to create a nostalgic dessert that everyone will love!
For the Pudding Base
- Instant Vanilla Pudding Mix – Provides the desired creamy texture and flavor; ideal for a no-bake option.
- Cold Whole Milk – Activates the pudding mix to create a silky base; low-fat can be used, but whole is best for richness.
- Sweetened Condensed Milk – Adds richness and sweetness, essential for the recipe’s creamy integrity.
- Cool Whip (or Whipped Topping) – Brings lightness and stability to the pudding; freshly whipped cream can be a tasty but less stable substitute.
For the Layers
- Vanilla Wafers – Forms the crunchy layers, giving structure to the pudding; Nilla Wafers or shortbread can be delicious variations.
- Ripe Bananas – Provide natural sweetness and vibrant flavor; choose firm yet ripe bananas for the best texture.
Step‑by‑Step Instructions for Creamy No-Bake Banana Pudding
Step 1: Prepare the Pudding Base
In a large mixing bowl, whisk together the instant vanilla pudding mix and cold whole milk for about 2 minutes until thickened to a creamy consistency. You’ll know it’s ready when the mixture has formed soft peaks that hold their shape. This creamy base is crucial for your no-bake banana pudding, so ensure it’s well combined before moving on.
Step 2: Blend in Sweetened Condensed Milk
Once the pudding mixture is thick, carefully fold in the sweetened condensed milk until fully incorporated. Use a spatula for gentle mixing to maintain the fluffy texture. This step adds a rich sweetness and helps create that luxurious mouthfeel in your creamy no-bake banana pudding. Look for a smooth, homogenous blend with no visible streaks of condensed milk.
Step 3: Incorporate Cool Whip
Gently add Cool Whip to the pudding mixture, using the spatula to fold it in until no white streaks remain. This step lightens the pudding, giving it a cloud-like texture. Aim for a smooth, airy consistency that’s perfectly creamy. Be careful not to over-mix, as you want to retain that airy fluffiness that makes this dessert so delightful.
Step 4: Begin Layering
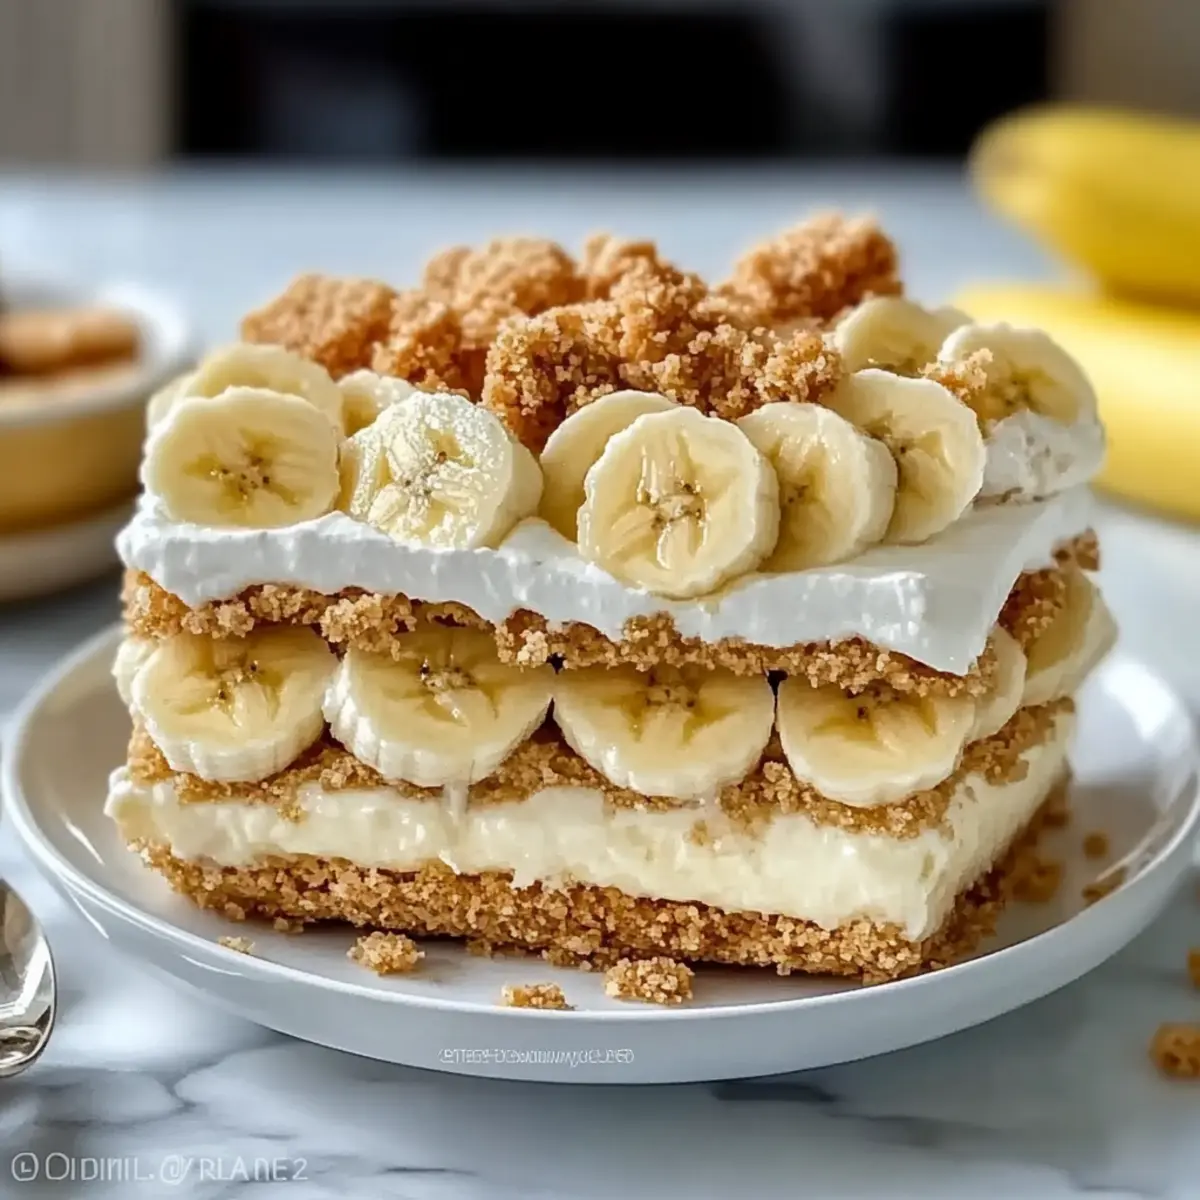
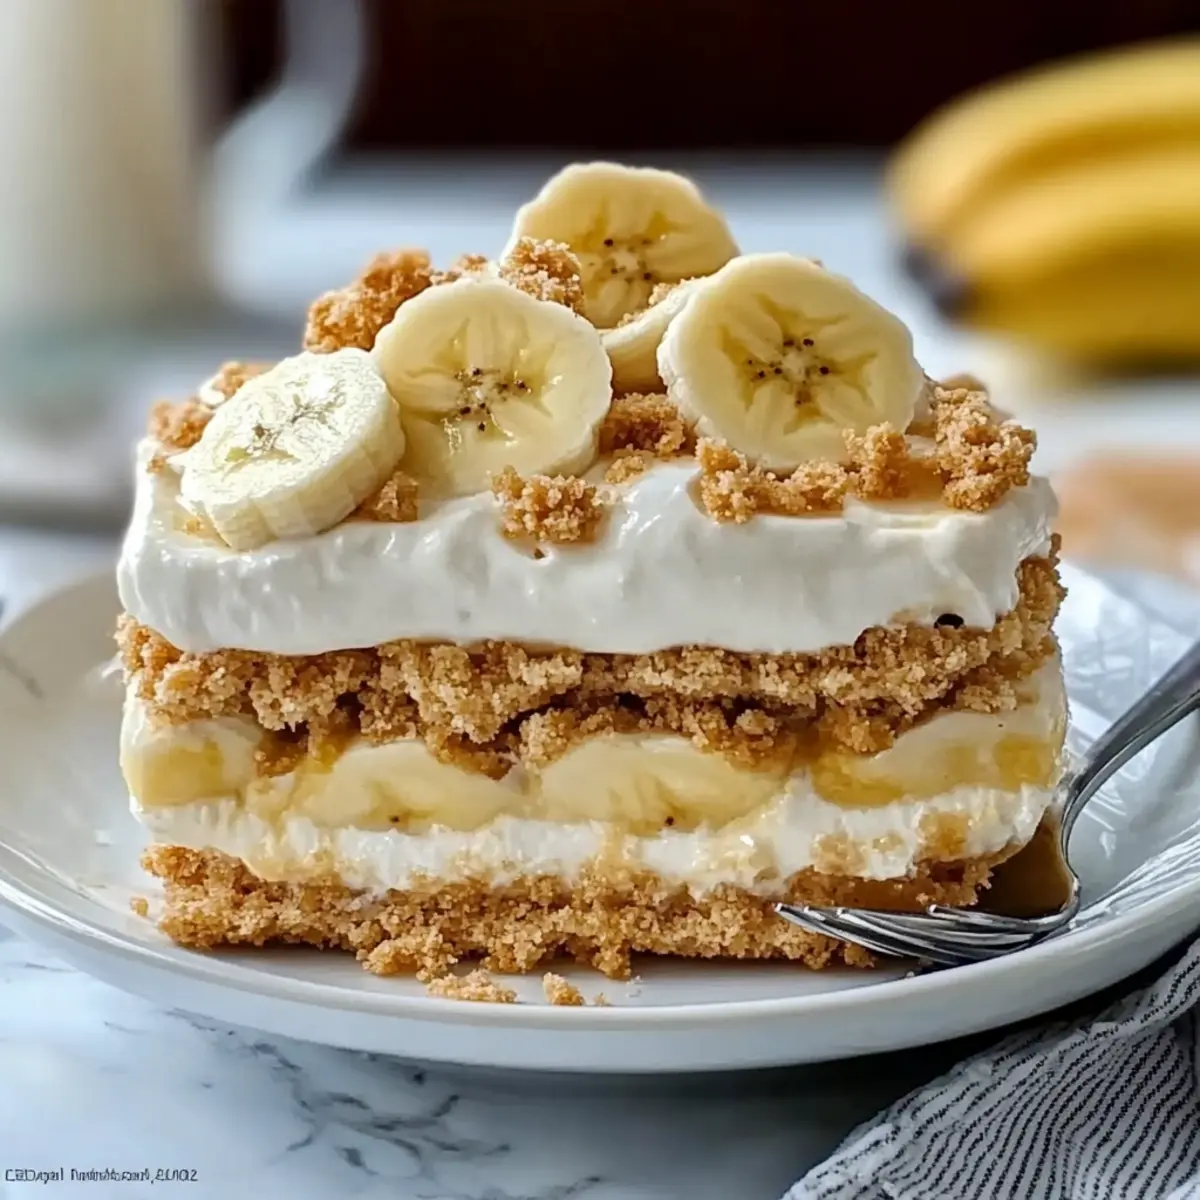
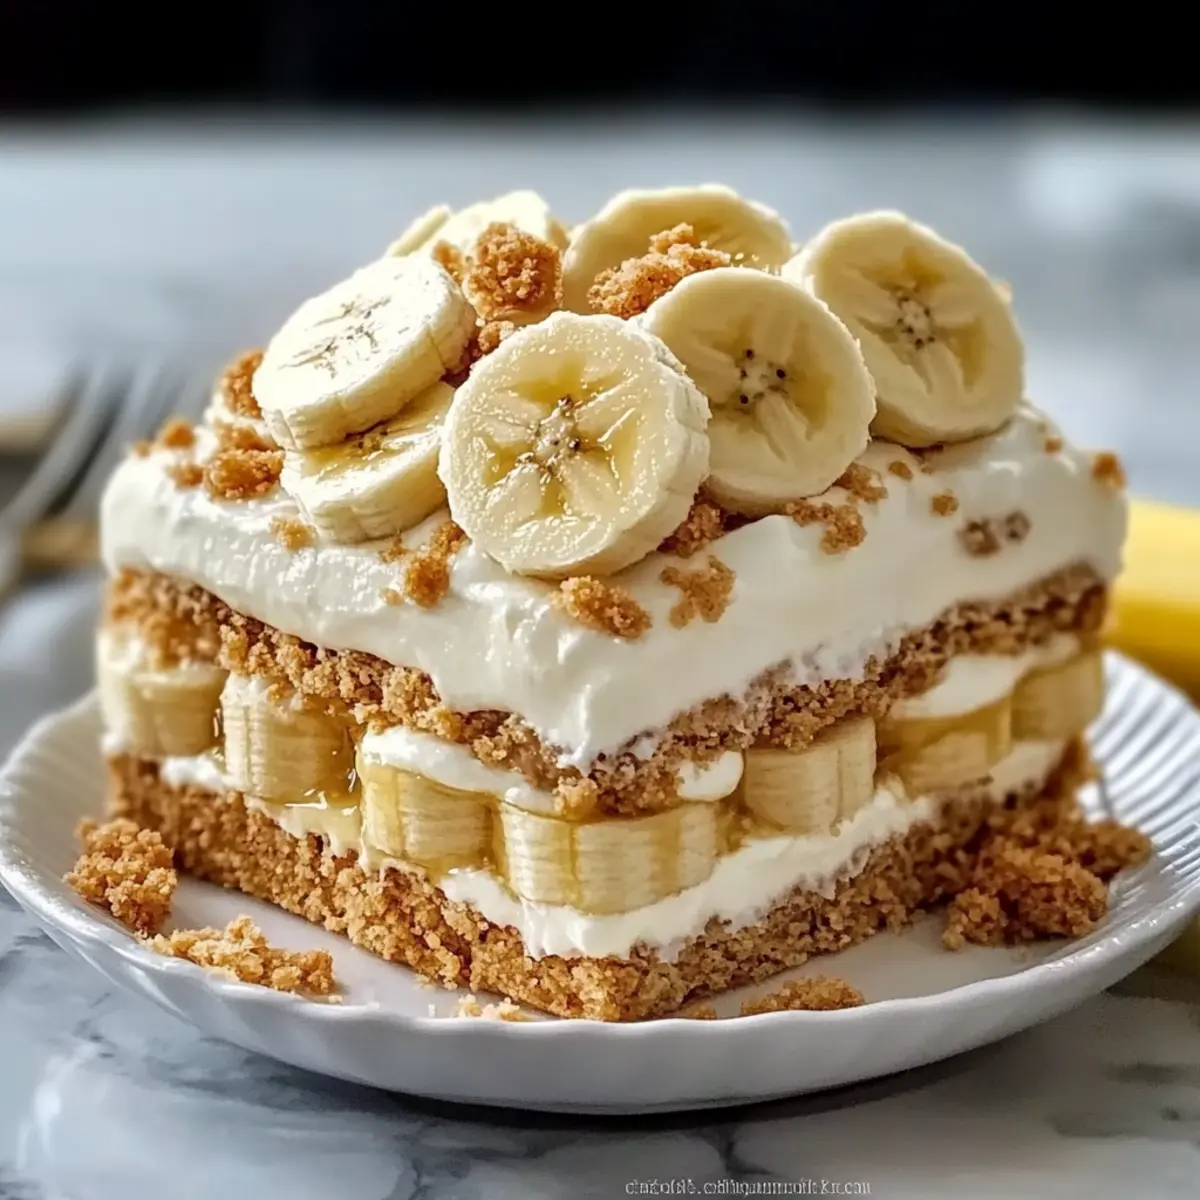
Grab a 9×13 inch glass dish to showcase your creamy no-bake banana pudding layers. Start by placing a layer of vanilla wafers at the bottom of the dish. Make sure to cover the base fully. Next, add a layer of fresh banana slices on top of the wafers, then spoon on about one-third of your pudding mixture, spreading it evenly. This layering creates the wonderful texture that everyone loves.
Step 5: Repeat the Layering Process
Continue the layering process by adding another layer of vanilla wafers followed by more banana slices and another third of the pudding mixture. Smooth it out gently with the spatula for an even surface. Repeat this step one more time to create a beautiful triple-layered effect. Each layer should be visible, showcasing those delicious banana slices and crunchy wafers.
Step 6: Finish with a Final Layer of Pudding
For your last layer, spread the remaining pudding mixture smoothly over the top, ensuring it’s even and covers everything nicely. This step is essential for creating a luscious finish to your creamy no-bake banana pudding. Consider reserving a few vanilla wafer halves for a decorative garnish right on top to make it visually appealing.
Step 7: Chill the Dessert
Cover your glass dish tightly with plastic wrap or a lid, and refrigerate your creamy no-bake banana pudding for at least 4 hours—or ideally overnight. This chilling time allows the flavors to meld beautifully and the dessert to firm up, ensuring a sliceable texture. When you’re ready to serve, you’ll be greeted by that perfectly layered beauty!
Expert Tips for Creamy No-Bake Banana Pudding
-
Whisk Thoroughly: Ensure you whisk the pudding mix with milk for a full 2 minutes, activating the thickening properties essential for creamy no-bake banana pudding.
-
Gentle Folding: When adding the Cool Whip, use a spatula and fold gently to keep the mixture airy and light. Avoid over-mixing.
-
Optimal Cooling: Allow the pudding to chill for at least 4 hours or overnight to achieve the proper texture. Serving it too soon can disrupt the layers.
-
Glass Dish Benefit: Use a glass dish for even cooling and beautiful presentation of the stunning layers in your banana pudding.
-
Banana Selection: Choose ripe but firm bananas, as they provide the best balance of sweetness and texture without turning mushy.
Variations & Substitutions for No-Bake Banana Pudding
Get creative with this creamy no-bake banana pudding by mixing in your favorite flavors and textures!
- Dairy-Free: Substitute coconut milk for a tropical twist; just choose a dairy-free whipped topping for the blend.
- Flavor Burst: Add a splash of vanilla extract or almond extract to elevate the pudding flavor delightfully.
- Nutty Crunch: Fold in crushed nuts like pecans or walnuts for a delightful crunch and added nutrition.
- Caramelized Bliss: Caramelize the banana slices in a bit of butter and brown sugar for a decadent, richer flavor.
- Chocolate Lovers: Layer in chocolate pudding or sprinkle mini chocolate chips between the pudding layers for a delightful chocolate twist.
- Spiced Delight: Dust with cinnamon or nutmeg in layers to deepen the flavor profile and add warmth.
- Texture Twist: Use crushed graham crackers instead of vanilla wafers for a different crunchy experience.
- Frozen Treat: Freeze the assembled pudding for a refreshing dessert option on a hot day; it’s like banana pudding ice cream!
Your journey to a perfect no-bake banana pudding doesn’t have to be the same every time! Enjoy these variations and make it your own with any additional twists you love. If you’re interested in nuanced flavors, you might also enjoy trying your hand at Chocolate Banana Pudding or mixing up a sweet and salty layer with Salted Caramel Banana Pudding.
Make Ahead Options
These creamy no-bake banana pudding is perfect for meal prep enthusiasts! You can assemble the entire dessert up to 24 hours in advance, allowing the flavors to meld beautifully. Prepare the pudding base, layer the vanilla wafers and banana slices, and then finish with the pudding mixture in a 9×13 inch dish. Cover tightly with plastic wrap and refrigerate to maintain freshness and prevent the bananas from browning. When it’s time to serve, simply garnish with reserved wafer halves, and you’ll have a delightful dessert ready to impress your guests or family, saving you time on busy days!
What to Serve with Creamy No-Bake Banana Pudding
Indulging in this luscious dessert invites the perfect opportunity to create a delightful spread that complements its rich, creamy goodness.
-
Fresh Fruit Salad: A medley of seasonal fruits adds a refreshing contrast, balancing the pudding’s lusciousness with vibrant colors and crisp textures.
-
Lightly Sweetened Whipped Cream: Enhance each serving of banana pudding with a dollop of homemade whipped cream for an extra touch of cloud-like softness.
-
Toasted Coconut Flakes: Sprinkling toasted coconut on top introduces a delightful crunch and a hint of tropical flair that pairs beautifully with the bananas.
-
Chocolate Sauce Drizzle: A rich chocolate sauce adds an alluring bitterness that contrasts perfectly with the sweet layers of pudding, creating a luscious harmony.
-
Savory Cheese Platter: Serve alongside a selection of cheeses like brie and gouda. The creaminess of the cheeses provides a savory counterpoint to the sweet pudding.
-
Iced Coffee or Sweet Tea: Refreshing beverages like sweetened iced tea or a smooth iced coffee complement the dessert’s flavors while inviting casual conversation.
-
Cinnamon Sugar Wafers: Offer crunchy treats dusted with cinnamon sugar for a familiar nod to vanilla wafers with a dynamic twist.
-
Mini Cheesecakes: These bite-sized delights echo the pudding’s creamy texture while adding a different flavor and visual appeal to your dessert table.
How to Store and Freeze Banana Pudding
Room Temperature: Banana pudding is best stored in the refrigerator to maintain its creamy texture, but if needed, it can sit out for no longer than 2 hours.
Fridge: Store any leftovers tightly covered in the refrigerator for up to 3 days. The banana pudding will keep its rich flavor, making it a delightful treat for a few days.
Freezer: It’s not recommended to freeze banana pudding since the texture can change and the bananas may become mushy. If you must freeze it, store it in an airtight container for up to 1 month, but expect altered quality.
Reheating: If you’ve chilled banana pudding for a while, there’s no need to reheat; simply enjoy it cold! If the layers settle, give it a gentle stir before serving.
Creamy No-Bake Banana Pudding Recipe FAQs
What kind of bananas should I use for banana pudding?
Absolutely! Use ripe but firm bananas. Avoid overly ripe bananas with dark spots all over, as they can turn mushy in the pudding. The right banana should have a nice yellow color with just a hint of green at the ends, providing both sweetness and a good texture.
How should I store leftover banana pudding?
Very simple! Store any leftovers in the refrigerator, tightly covered, for up to 3 days. This will keep the pudding fresh and delicious. When you’re ready to enjoy it again, simply scoop out what you want and savor that creamy goodness!
Can I freeze banana pudding?
While it’s not ideal to freeze banana pudding due to texture changes, you can do so if necessary! Use an airtight container and store it for up to 1 month. Just remember, the bananas might become mushy when thawed, so the taste may differ. To serve, let it thaw in the fridge overnight and enjoy cold.
What should I do if my pudding mixture isn’t thickening?
Don’t worry! If your pudding isn’t thickening after whisking for the full 2 minutes, it might need a bit more time or more mixing to activate the thickening properties. Ensure you’re using instant pudding mix and cold milk. If it still won’t thicken, you can whisk in a bit more pudding mix until it firms up.
Are there any dietary considerations I should keep in mind?
Yes! If you’re serving this creamy no-bake banana pudding to guests, be mindful of potential allergies to dairy or gluten, especially if you use certain brands of vanilla wafers. For those with dairy sensitivities, you can try substitutes like non-dairy whipped topping or plant-based milk, though the creaminess may vary. Always check labels for specific allergens!
Can I make this banana pudding ahead of time?
Absolutely! This banana pudding is perfect for making ahead. I often assemble it a day in advance to allow the flavors to meld beautifully. Just be sure to store it in the refrigerator, covered tightly, for the best results when serving. Enjoy the blend of flavors that deepens overnight!

Irresistibly Creamy No-Bake Banana Pudding for Sweet Memories
Ingredients
Equipment
Method
- In a large mixing bowl, whisk together the instant vanilla pudding mix and cold whole milk for about 2 minutes until thickened to a creamy consistency.
- Once the pudding mixture is thick, carefully fold in the sweetened condensed milk until fully incorporated.
- Gently add Cool Whip to the pudding mixture, using the spatula to fold it in until no white streaks remain.
- Grab a 9x13 inch glass dish to layer the vanilla wafers at the bottom, followed by banana slices and one-third of the pudding mixture.
- Repeat the layering with more wafers, banana slices, and another third of the pudding mixture.
- Spread the remaining pudding mixture smoothly over the top for a luscious finish.
- Cover the dish tightly with plastic wrap or a lid and refrigerate for at least 4 hours or overnight.