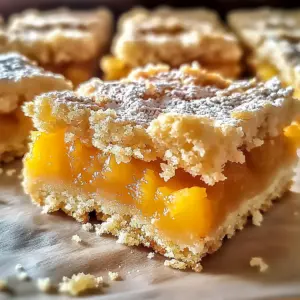
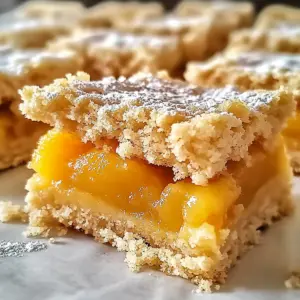
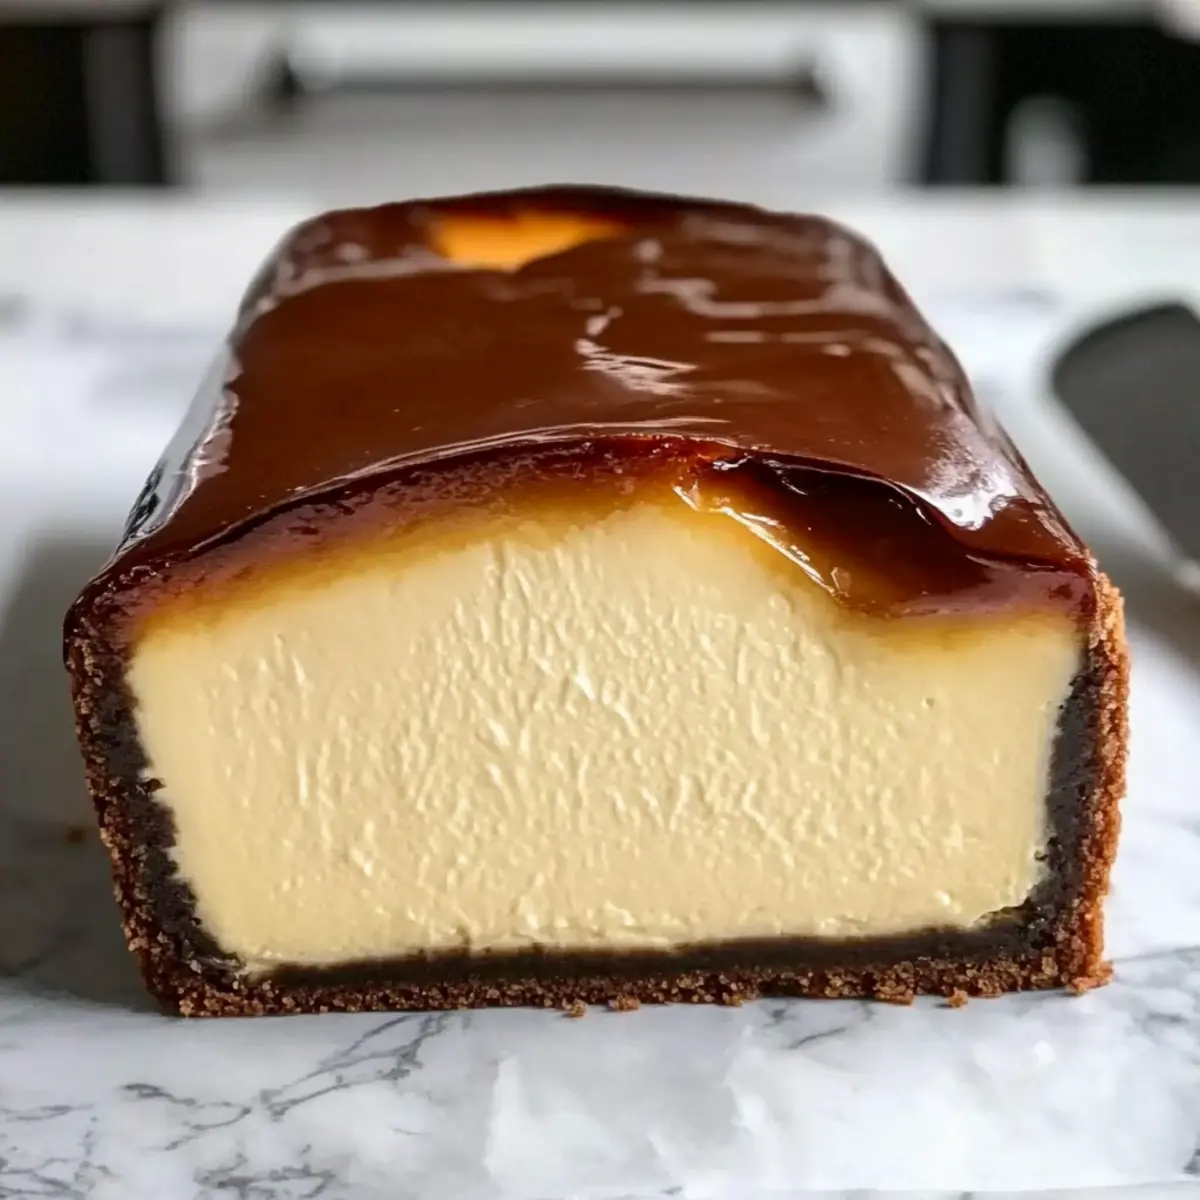
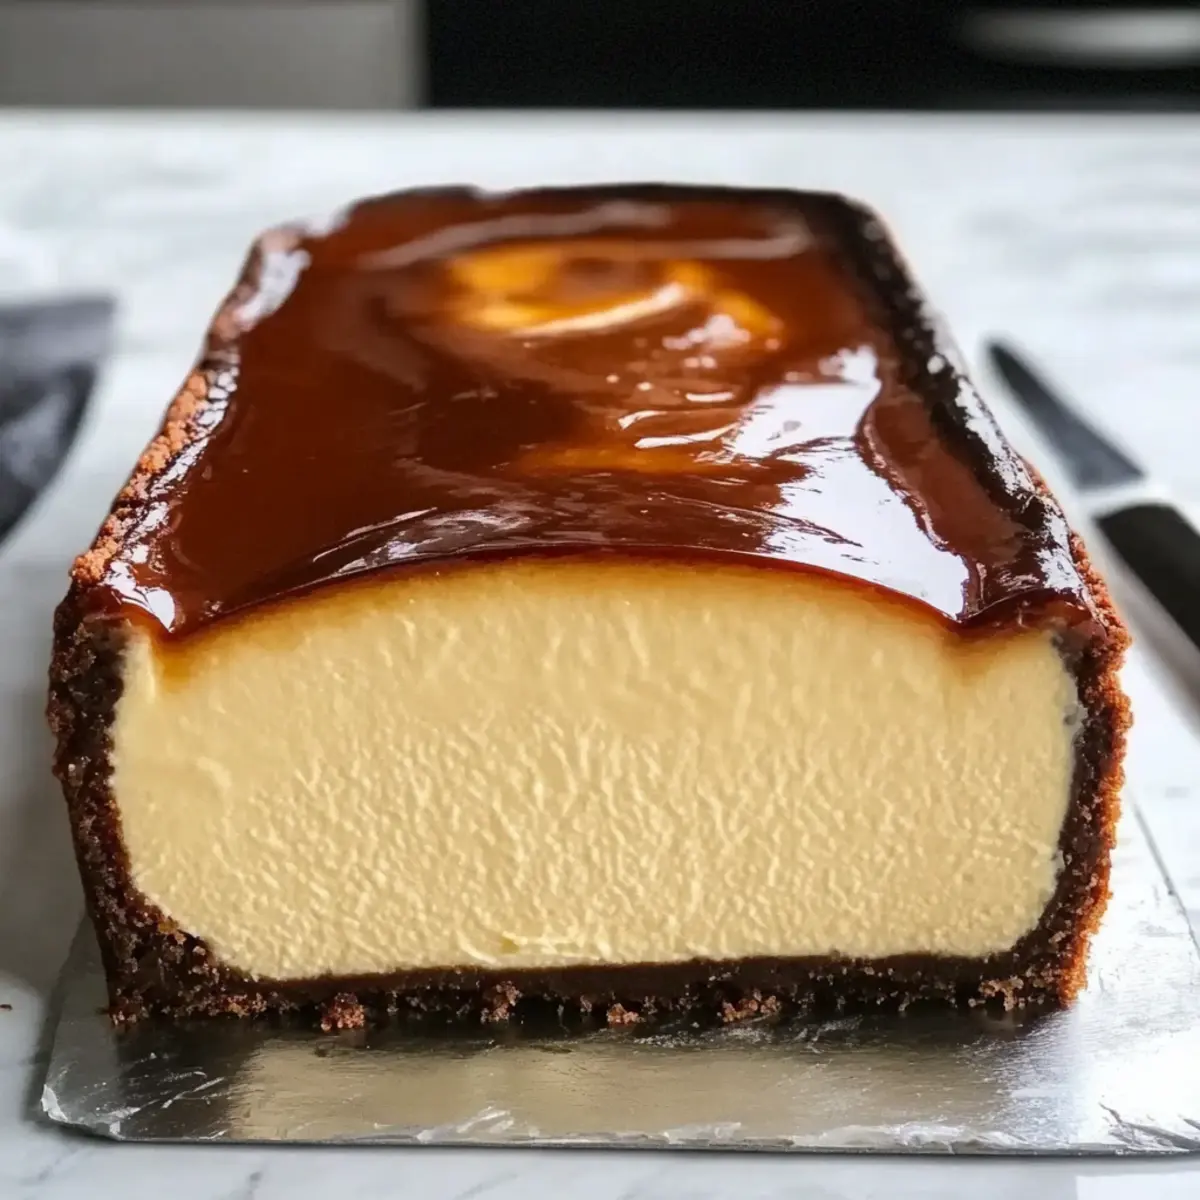
As I pulled the Burnt Basque Cheesecake from the oven, I couldn’t help but marvel at its beautiful, charred top, hinting at the creamy treasure hidden beneath. This crustless wonder is a tribute to indulgence, perfectly capturing the essence of Spanish dessert culture in every bite. What I love most is how simple it is to make—minimal ingredients come together in a flash, making it an ideal treat for busy weeknights or special gatherings. You’ll be amazed at how this velvety-rich cheesecake not only satisfies your sweet tooth but also dazzles your guests. Curious about how to create this spectacular dessert with ease? Let’s dive into the recipe!
Why is Burnt Basque Cheesecake so beloved?
Creamy Perfection: This cheesecake features a sumptuous, velvety texture that’s simply irresistible. The smooth, custard-like center paired with a striking burnt top creates a dessert that’s as delicious as it is visually captivating.
Effortless Preparation: With just a handful of ingredients, this recipe is perfect for both novice cooks and seasoned chefs looking for an easy dessert option. It proves that simplicity doesn’t mean sacrificing flavor!
Versatile Indulgence: Top it with fresh berries or a drizzle of caramel for an elegant touch, or enjoy it plain for that classic taste. No matter how you serve it, it’s sure to impress!
Cultural Delight: Originating from the Basque region of Spain, this rich dessert invites you to explore the world of flavors right in your kitchen. It’s not just dessert; it’s an experience!
Crowd-Pleasing Treat: Perfect for family gatherings or a simple weeknight dessert, this cheesecake will have everyone coming back for seconds—making it a guaranteed hit!
Irresistibly Creamy Burnt Basque Cheesecake Ingredients
For the Cheesecake
- Full-Fat Cream Cheese – Essential for a rich, creamy texture; avoid low-fat versions for the best results.
- Granulated Sugar – Adds sweetness and aids in caramelizing the top for that gorgeous burnt finish.
- Large Eggs (3) – Ensure eggs are well-beaten; they provide structure and richness to the cheesecake.
- All-Purpose Flour (1/4 cup) – Contributes to the structure; can be substituted with a gluten-free blend if necessary.
- Salt (1 pinch) – Enhances the flavor of the cheesecake, bringing out the creaminess.
- Vanilla Extract (1 teaspoon) – Elevates the overall taste with a touch of aromatic sweetness.
Optional Toppings
- Fresh Berries – Brighten up the cheesecake with a splash of color and fresh flavor.
- Caramel Sauce – Drizzle on top for a luxurious, indulgent treat that complements the rich cheesecake.
- Whipped Cream – A dollop of whipped cream adds a light touch, balancing the cheesecake’s richness.
This Burnt Basque Cheesecake not only offers creamy delights but also invites you to be creative with toppings and presentations!
Step‑by‑Step Instructions for Creamy Burnt Basque Cheesecake
Step 1: Preheat the Oven
Begin by preheating your oven to 400°F (200°C). While the oven warms up, lightly butter a 9×5-inch loaf pan and line it with parchment paper, ensuring some overhang for easy removal later. This preparation is key to achieving that perfect burnt top while keeping the inside creamy and rich.
Step 2: Mix the Cream Cheese
In a large mixing bowl, beat the full-fat cream cheese using an electric mixer until it’s smooth and free of lumps, about 2-3 minutes. Gradually add in the granulated sugar, mixing until fully incorporated. This creates a luscious base for your Burnt Basque Cheesecake, so take your time to achieve that velvety consistency.
Step 3: Add the Eggs
Next, add the large eggs one at a time, making sure to mix well after each addition. This process infuses the batter with structure and richness. Scrape down the sides of the bowl as needed, ensuring every bit of creamy goodness is combined. The mixture should look glossy and thick once all the eggs are blended in.
Step 4: Incorporate Dry Ingredients
In a separate bowl, sift together the all-purpose flour and a pinch of salt. Gently fold this mixture into the cream cheese batter until just combined; avoid over-mixing to keep the texture light and airy. Finally, stir in the vanilla extract, which adds a warm, aromatic depth to the overall flavor profile of your cheesecake.
Step 5: Bake the Cheesecake
Pour the cheesecake batter evenly into your prepared loaf pan, smoothing the top with a spatula. Bake in the preheated oven for approximately 45 minutes, or until the top is deeply golden and caramelized while the center remains slightly jiggly. The contrasting textures are essential for the perfect Creamy Burnt Basque Cheesecake.
Step 6: Cool the Cheesecake
Once baked, allow the cheesecake to cool at room temperature for about 30 minutes. This helps prevent cracking as it adjusts to cooler temperatures. After cooling, transfer it to the refrigerator and chill for at least 4 hours, or overnight if possible, to enhance the flavor and firm up its creamy center.
Step 7: Serve and Enjoy
To serve your delightful Creamy Burnt Basque Cheesecake, carefully lift it from the pan using the parchment overhang. Slice into generous pieces and serve chilled or at room temperature. Consider topping it with fresh berries or a drizzle of caramel for an extra touch, making your dessert experience one to remember!
Variations & Substitutions for Burnt Basque Cheesecake
Feel free to get creative with this delightful recipe and customize it to suit your taste preferences!
- Gluten-Free: Use a gluten-free flour blend instead of all-purpose flour for an equally delightful cheesecake.
- Dairy-Free: Substitute cream cheese with a vegan cream cheese alternative to enjoy a plant-based version.
- Chocolate Twist: Mix in a couple of tablespoons of cocoa powder for a rich chocolate flavor that compliments the cheesecake beautifully.
- Citrus Zest: Add a teaspoon of lemon or orange zest into the batter for a bright, refreshing note that lightens the rich cheesecake.
- Nutty Crunch: Fold in some finely chopped nuts, like almonds or pecans, into the batter for added texture and a nutty flavor kick.
- Caramel Swirl: Drizzle caramel sauce in the batter before baking for a sweet, gooey surprise in every slice.
- Seasonal Fruit: Incorporate seasonal fruits like raspberries or peaches for a fruity flavor that brightens the rich decadence.
- Espresso Boost: Add a teaspoon of instant espresso powder to the mix for a subtle coffee flavor that enriches the cheesecake experience.
Whichever variation you choose, remember, the world of flavors is your oyster—enjoy discovering new twists on this classic Spanish dessert! For more inspiration, consider pairing it with a delightful glass of Prosecco or even trying it alongside a delectable Greek Salad.
Expert Tips for Burnt Basque Cheesecake
-
Cooling Strategy: Allow the cheesecake to cool gradually in the oven for 10-15 minutes to prevent sinking. A slightly jiggly center will firm up beautifully as it chills.
-
Serve Chilled: Refrigerate overnight if possible; this will enhance the flavor and transform the creamy texture of your Burnt Basque Cheesecake.
-
Storage Know-How: Store in an airtight container for up to 5 days in the fridge. Alternatively, freeze tightly wrapped slices for up to 2 months to savor at a later date.
-
Ingredient Quality: Use full-fat cream cheese for the richest, creamiest texture. Low-fat options may result in a less satisfying cheesecake.
-
Baking Time Awareness: Keep an eye on baking time. The goal is a caramelized top with a jiggly center; overbaking can lead to a dry texture.
-
Presentation Tips: For a stunning serving, consider adding fresh berries, a drizzle of caramel sauce, or a dollop of whipped cream to enhance your Burnt Basque Cheesecake!
Make Ahead Options
These Creamy Burnt Basque Cheesecake options are a dream for busy home cooks! You can prepare the cheesecake batter up to 24 hours in advance by mixing all the ingredients and refrigerating it until you’re ready to bake. Additionally, once baked, the cheesecake can chill in the refrigerator for up to 3 days before serving—just be sure to keep it covered to maintain its creamy texture and prevent drying. When ready to enjoy, simply serve it chilled or at room temperature, and consider adding a topping of fresh berries or a drizzle of caramel for an extra touch. This way, you’ll have a delicious dessert ready with minimal effort on your busy weeknights!
What to Serve with Creamy Burnt Basque Cheesecake
Create a delightful spread that perfectly complements this rich dessert, balancing its flavors with complementary textures and tastes.
-
Fresh Berries: The tartness of strawberries or raspberries contrasts beautifully with the creamy cheesecake, adding a pop of freshness and color.
-
Espresso: A small cup of strong espresso provides a bold, rich flavor that cuts through the cheesecake’s creaminess, enhancing your dessert experience.
-
Shortbread Cookies: The buttery crunch of shortbread offers a delightful textural contrast to the soft, velvety cheesecake, making each bite more interesting.
-
Caramel Sauce: Drizzling caramel sauce over the cheesecake adds an indulgent, sweet touch that enhances its warmth while bringing a touch of complexity.
-
Prosecco: A light, sparkling glass of Prosecco elevates the dessert’s richness, cleansing the palate and enhancing the flavors with its refreshing bubbles.
-
Chocolate Shavings: Sprinkle some dark chocolate shavings on top for an added layer of richness that pairs gorgeously with the cheesecake’s sweetness.
Pair these treats with your Creamy Burnt Basque Cheesecake to create a memorable dessert experience that’s sure to impress your family or guests!
How to Store and Freeze Burnt Basque Cheesecake
Fridge: Keep your Burnt Basque Cheesecake in an airtight container for up to 5 days. This helps maintain its rich, creamy texture and flavor.
Freezer: Wrap slices tightly in plastic wrap or foil and store in a freezer-safe container for up to 2 months. Thaw in the fridge overnight before enjoying.
Serving After Storage: For the best taste, serve chilled or at room temperature. If frozen, let it sit out for 30 minutes to soften slightly before serving.
Avoid Moisture: To prevent condensation, always allow the cheesecake to cool completely before covering it for storage.

Creamy Burnt Basque Cheesecake Recipe FAQs
What type of cream cheese should I use for the cheesecake?
Absolutely! Using full-fat cream cheese is essential for achieving that rich and creamy texture. Low-fat versions may compromise the smoothness and flavor of your Burnt Basque Cheesecake, so stick with the full-fat variety for the best results.
How long can I store my Burnt Basque Cheesecake?
You can keep your Burnt Basque Cheesecake in an airtight container in the refrigerator for up to 5 days. Make sure it’s well covered to maintain its rich flavor and creamy texture. If you’re planning to enjoy it beyond that, consider freezing it!
Can I freeze slices of Burnt Basque Cheesecake?
Yes, you can freeze your cheesecake! Wrap individual slices tightly in plastic wrap or foil, then transfer them to a freezer-safe container. They will keep well for up to 2 months. When you’re ready to enjoy, simply thaw the slices in the refrigerator overnight for the best taste!
What if the cheesecake sinks in the middle?
Oh, no worries! If your Burnt Basque Cheesecake sinks in the middle, it’s likely due to rapid cooling. To prevent this, you can leave the cheesecake in the oven for an additional 10-15 minutes after baking (with the oven off) to let it cool gradually. This method keeps the center slightly jiggly, which firms up perfectly as it chills.
Are there any dietary considerations I should be aware of?
Very! If you or your guests have gluten sensitivities, you can easily substitute the all-purpose flour with a gluten-free blend. Always check ingredient labels for allergies, particularly regarding cream cheese and vanilla extract, to ensure everyone can enjoy this creamy delight.

Irresistibly Creamy Burnt Basque Cheesecake to Impress
Ingredients
Equipment
Method
- Preheat the oven to 400°F (200°C) and prepare a 9x5-inch loaf pan with butter and parchment paper.
- Beat the cream cheese until smooth, then gradually add the sugar and mix until fully incorporated.
- Add eggs one at a time, mixing well after each addition, ensuring the mixture is glossy and thick.
- Sift together the flour and salt, then fold into the batter and stir in the vanilla extract.
- Pour the batter into the prepared pan and bake for approximately 45 minutes until the top is deeply golden.
- Cool the cheesecake at room temperature for 30 minutes, then refrigerate for at least 4 hours.
- Lift the cheesecake from the pan and slice into pieces, serving chilled or at room temperature.