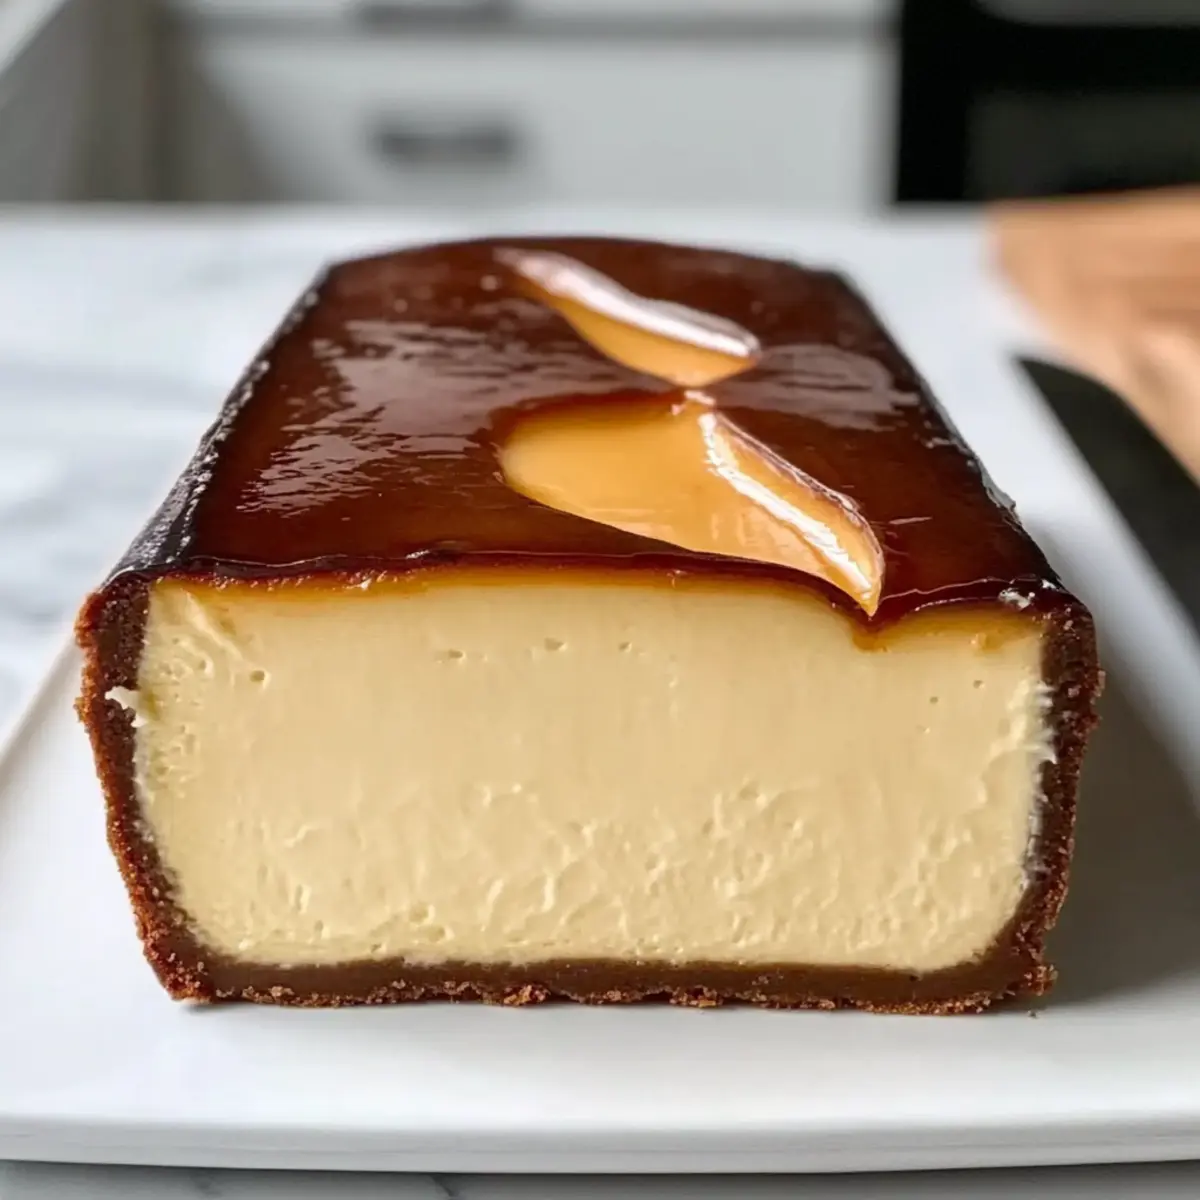
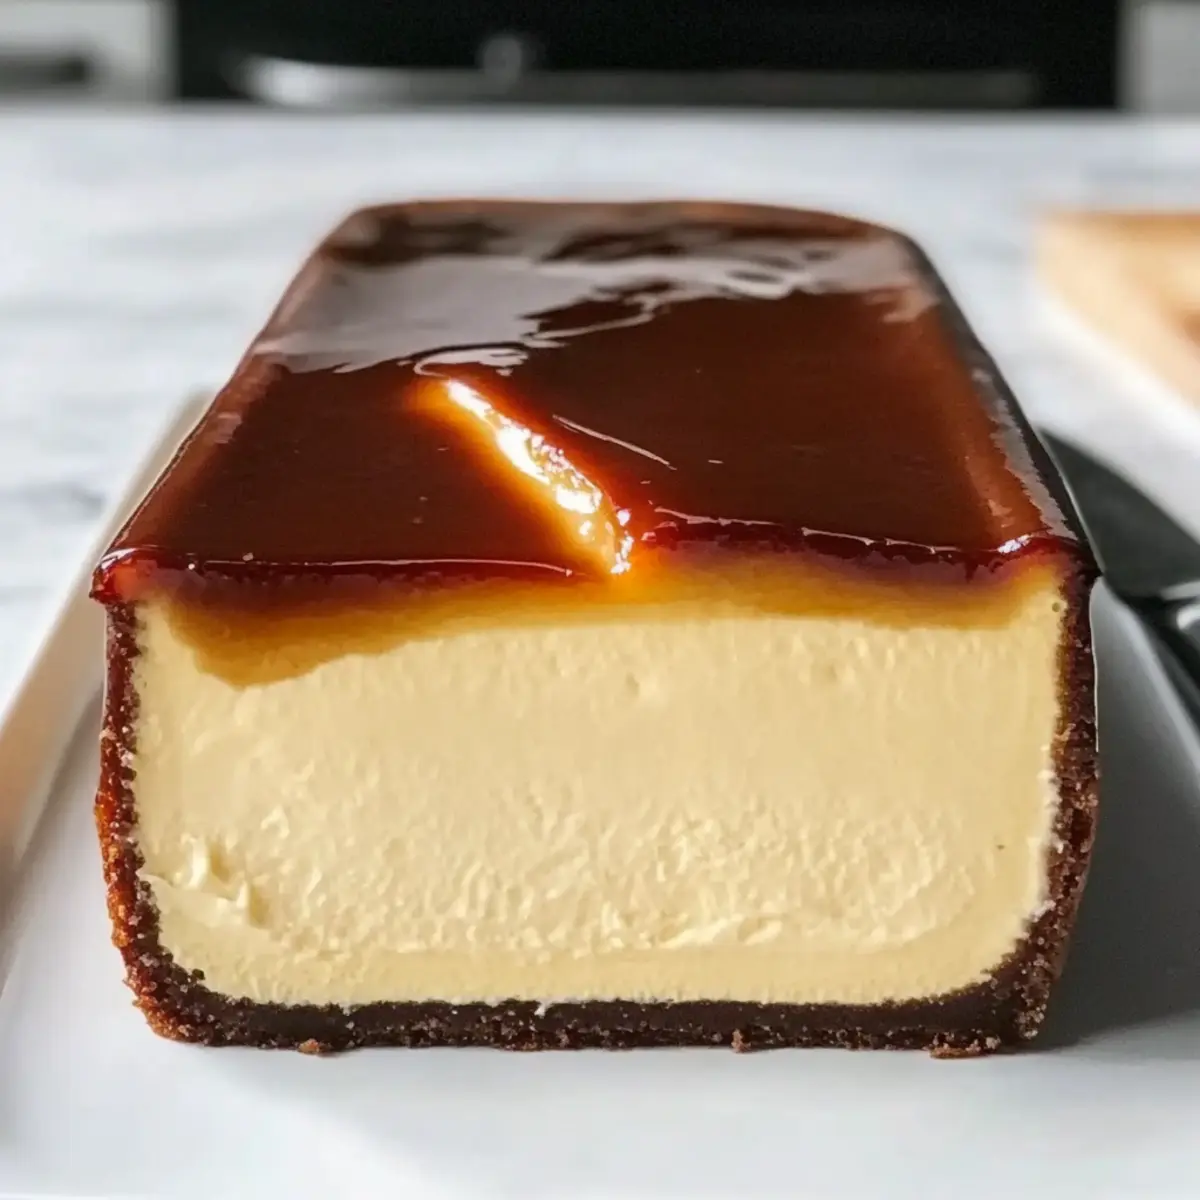
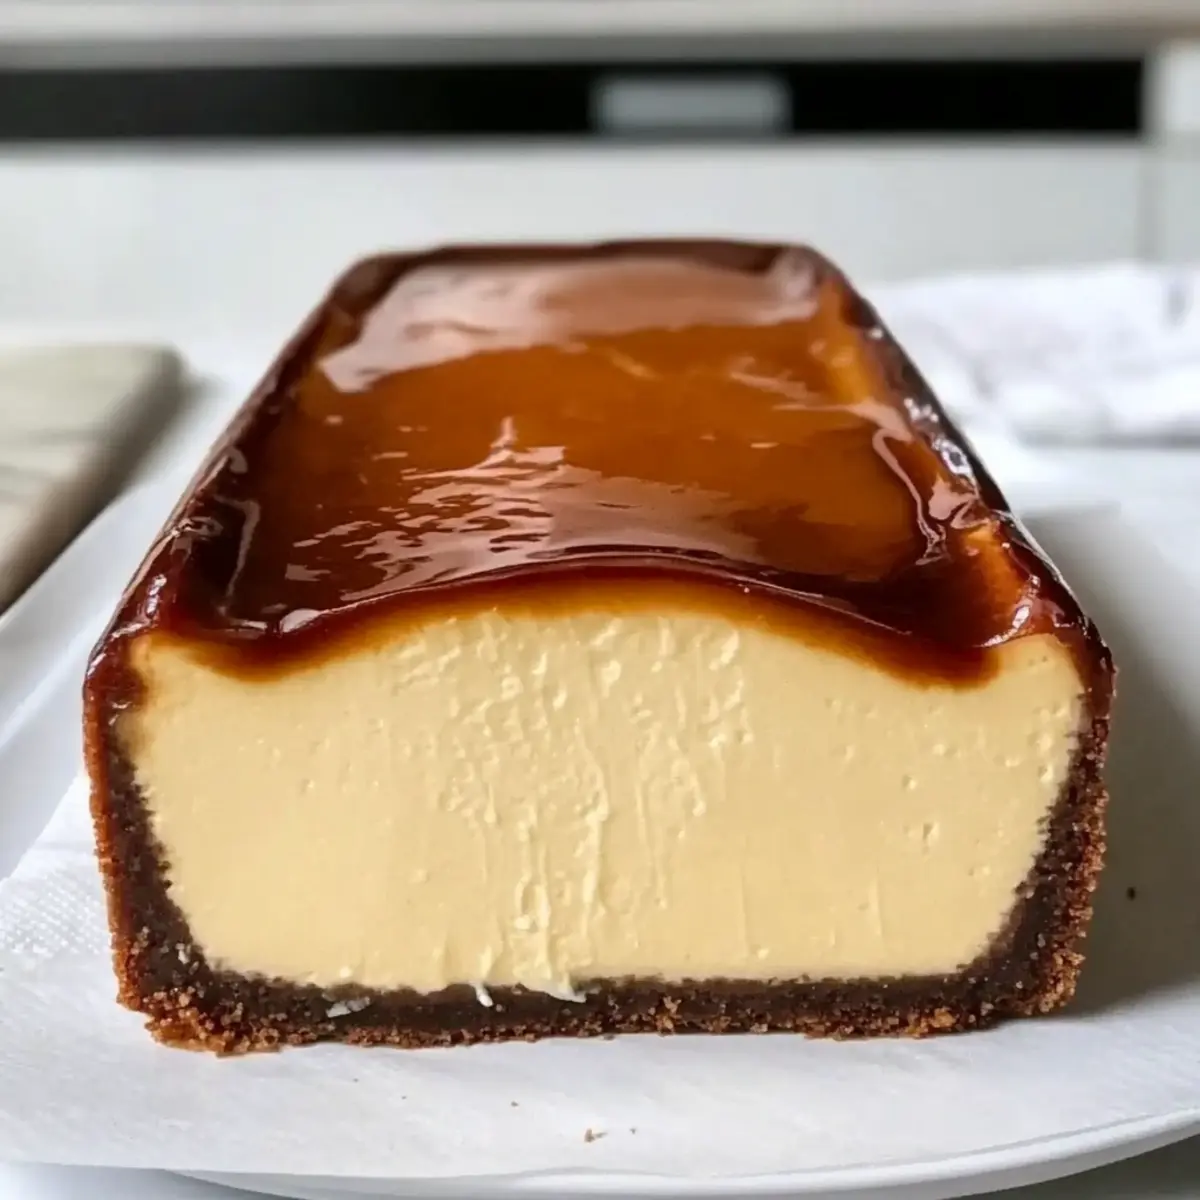
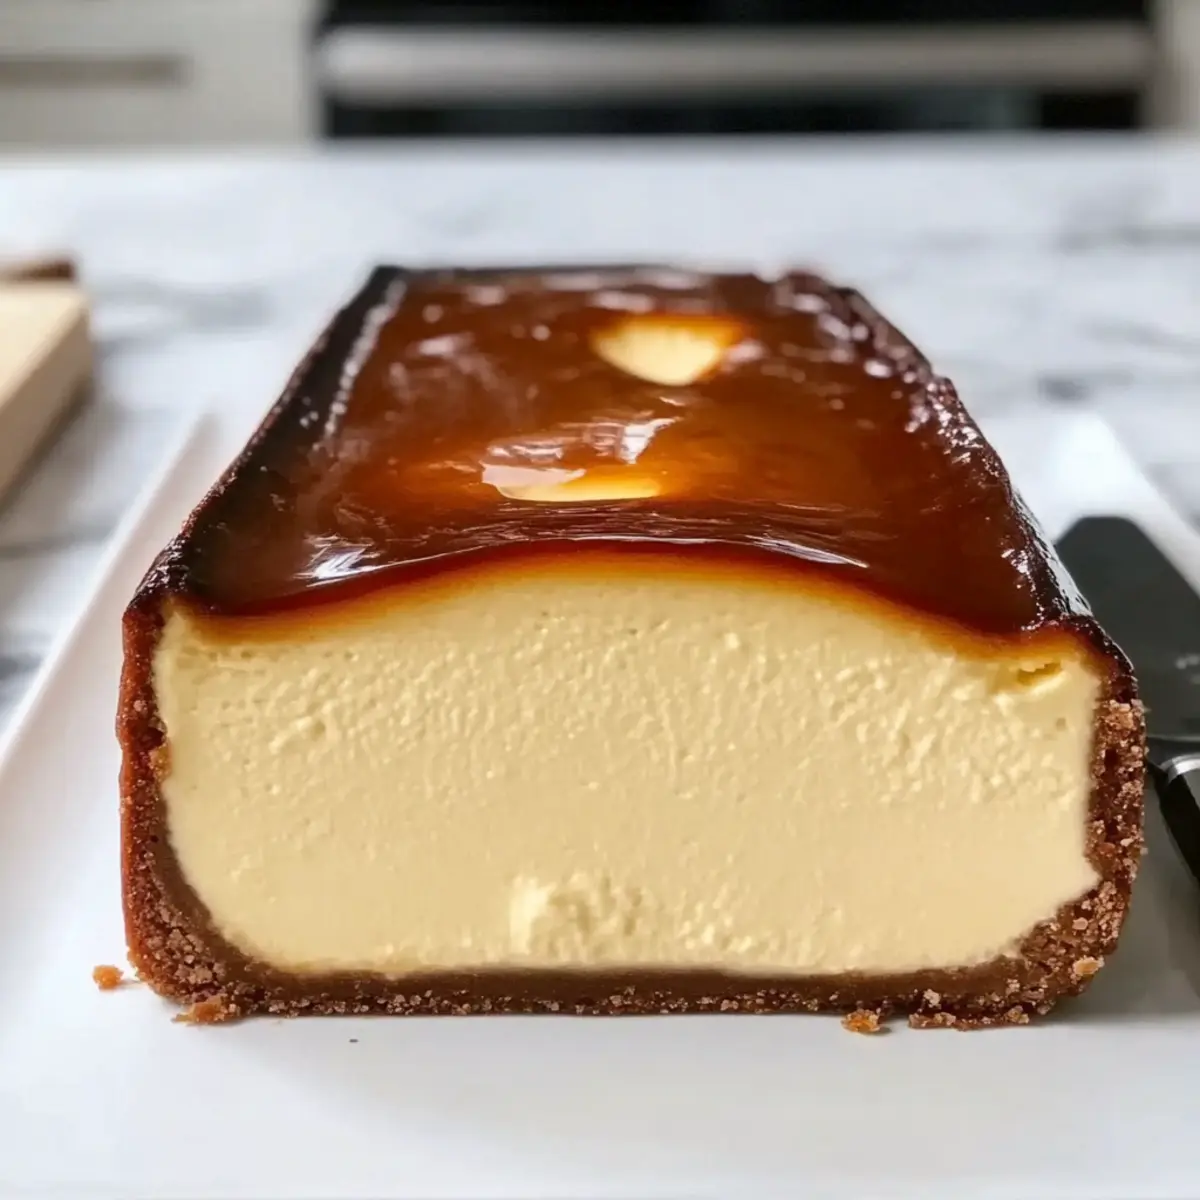
As I pulled the warm Burnt Basque Cheesecake from the oven, the sweet scent of caramelized cream filled my kitchen, evoking memories of cozy gatherings with loved ones. This delightful dessert is unlike any other, with its impressive outer layer that hints at a rich, custard-like center waiting to be discovered. What I love about this cheesecake is not just its creamy texture, but how incredibly quick it is to prepare—perfect for those last-minute dinner parties! With no crust to worry about, it’s a wonderfully adaptable recipe that can cater to various dietary needs, including gluten-free options. Whether you’re a seasoned home chef or just stepping into the kitchen, this Burnt Basque Cheesecake invites you to create a show-stopping dessert with ease. Ready to impress your friends and family with something truly special? Let’s dive into this easy yet elegant treat!
Why Is This Cheesecake So Irresistible?
Creamy Delight: The silky texture of this cheesecake melts in your mouth, offering a decadent experience that’s hard to forget.
Quick Preparation: With minimal ingredients and straightforward steps, you’ll have this dessert ready in no time, making it perfect for busy evenings.
Crowd-Pleasing Appeal: Friends and family will love the unique burnt top, which adds an unexpected yet delightful flavor, making it a sure hit at gatherings.
Versatile Flavors: Feel free to experiment by topping with fresh fruits or infusing with different extracts for a personalized twist!
Easy Adaptations: Whether you’re catering to gluten-free friends or simply looking for a simpler recipe, this cheesecake adapts easily to your needs.
Indulge in this creative twist on a classic, and discover how it can elevate your dessert game while still being incredibly simple to make!
Burnt Basque Cheesecake Ingredients
Here’s what you’ll need to whip up this creamy delight!
For the Cheesecake
- 16 ounces Full-Fat Cream Cheese – Essential for a rich texture; full-fat yields the best results.
- 1 cup Granulated Sugar – Adds sweetness and helps caramelize the top; coconut sugar can be used as a less processed alternative.
- 3 large Eggs – Beaten well for a smooth mixture; they provide structure and richness.
- 1/4 cup All-Purpose Flour – This gives structure; swap with gluten-free flour to make it gluten-free.
- 1 pinch Salt – Enhances overall flavor; it’s crucial for balancing the sweetness.
- 1 teaspoon Vanilla Extract – Adds depth to the flavor profile; feel free to use homemade vanilla for an extra touch.
Discover the joy of making this Burnt Basque Cheesecake and impress your loved ones with its incredible taste and creamy texture!
Step‑by‑Step Instructions for Creamy Burnt Basque Cheesecake
Step 1: Prep the Loaf Pan
Start by preheating your oven to 400°F (200°C). Take a 9×5 inch loaf pan and generously butter it, ensuring it’s well-coated to prevent sticking. Line the bottom and sides with parchment paper, leaving some overhang for easy removal later. This setup will make your Creamy Burnt Basque Cheesecake come out perfectly!
Step 2: Mix Ingredients
In a large mixing bowl, add the full-fat cream cheese and use a hand mixer or stand mixer to beat it until smooth and creamy. Gradually incorporate the granulated sugar, mixing until well combined. Next, add the eggs one at a time, mixing thoroughly after each addition until the batter is velvety and free of lumps. This step is vital for the cheesecake’s rich texture.
Step 3: Add Dry Ingredients
Once your mixture is smooth, fold in the all-purpose flour and a pinch of salt, mixing gently until just incorporated. Be careful not to overmix; you want to keep the airiness in the batter. Finally, stir in the vanilla extract, which will add a lovely depth of flavor to your Creamy Burnt Basque Cheesecake.
Step 4: Bake
Pour the cheesecake mixture into the prepared loaf pan, smoothing the top with a spatula to ensure an even surface. Place it in the preheated oven and bake for about 45 minutes. Keep an eye on it; the top should achieve a deep golden brown while the center remains slightly jiggly—a sign that your cheesecake is perfectly done.
Step 5: Cool and Chill
After baking, let the cheesecake cool in the pan for about 30 minutes at room temperature. This gradual cooling helps prevent sinking in the middle. Once cooled, transfer it to the refrigerator and chill for a minimum of 4 hours, preferably overnight, to enhance its flavor and allow it to set properly.
Step 6: Serve
When you’re ready to serve your Creamy Burnt Basque Cheesecake, carefully lift it out of the pan using the parchment overhang. Slice it into generous pieces and enjoy chilled or at room temperature. Consider adding fresh berries or a drizzle of caramel on top for an extra touch of sweetness as you share this delightful dessert with friends and family.
Expert Tips for Creamy Burnt Basque Cheesecake
Cooling Gradually: Allow the cheesecake to cool in the oven for about 10-15 minutes to prevent the middle from sinking.
Perfect Baking: Keep an eye on the baking time; the center should remain slightly jiggly. Overbaking can lead to a dry texture, so trust your instincts!
Chill Overnight: For the best flavor and texture, let your cheesecake chill overnight in the fridge. Good things come to those who wait!
Rustic Appeal: Embrace the burnt top—it not only adds character but also enhances the rich flavor profile of the cheesecake.
Gluten-Free Option: If you’re catering to gluten-free diets, simply substitute the all-purpose flour with a suitable gluten-free blend without compromising the creamy goodness.
Variations & Substitutions for Creamy Burnt Basque Cheesecake
Feel free to make this delightful cheesecake your own with these fun and tasty adaptations!
-
Gluten-Free: Substitute all-purpose flour with a gluten-free blend or almond flour for a nutty flavor without sacrificing texture.
-
Dairy-Free: Use cashew or almond cream cheese for a creamy, non-dairy version that keeps the cheesecake’s rich profile.
-
Sugar-Free: Opt for a sugar substitute like erythritol or stevia to create a guilt-free sweet treat without compromising on flavor.
-
Flavor Twist: Try adding zests of lemon or orange to brighten up the flavor. A dash of lavender extract can also elevate its aromatic notes.
-
Extra Creamy: Fold in sour cream or Greek yogurt into the batter for an even creamier texture that complements the original richness.
-
Fruit Topping: Serve with a fresh berry compote or a drizzle of homemade caramel for an added burst of flavor that visually enhances your cheesecake.
-
Nutty Crunch: Top with crushed nuts like pistachios or almonds for a delightful contrast in texture that adds a satisfying crunch.
Embrace creativity in the kitchen and let your imagination run wild with these variations! If you’re searching for more tips, check out my suggestions for making Mediterranean Quinoa Bowls or pairing with Grilled Lamb Chops for a whole feast experience!
How to Store and Freeze Burnt Basque Cheesecake
Fridge: Store leftover cheesecake in an airtight container for up to 5 days. This will keep it fresh while maintaining its creamy texture.
Freezer: For longer storage, wrap individual slices tightly in plastic wrap and then in aluminum foil. You can freeze them for up to 2 months without losing flavor or consistency.
Thawing: When you’re ready to enjoy again, simply place the wrapped slices in the refrigerator overnight to thaw. Then, remove the wrapping and savor the creamy delight at room temperature or chilled.
Reheating: This cheesecake is best served cold or at room temperature. Avoid reheating in the microwave to maintain its luscious texture—just let it sit for a bit after taking it out!
Make Ahead Options
These Creamy Burnt Basque Cheesecakes are perfect for meal prep and can save you valuable time during busy weeks! You can prepare the cheesecake batter up to 24 hours in advance; simply mix and pour it into the prepared loaf pan, then cover it tightly with plastic wrap and refrigerate. This keeps the ingredients fresh and flavorful. When you’re ready to bake, just remove it from the fridge and pop it into the preheated oven. After baking, let it cool for 30 minutes, then transfer it to the fridge to chill for at least 4 hours (overnight is best!). Following these steps ensures your cheesecake remains just as delicious and maintains its creamy texture while making your life easier!
What to Serve with Creamy Burnt Basque Cheesecake
As you prepare to unveil this stunning dessert, consider these delightful accompaniments to craft a full dining experience that tantalizes the taste buds.
- Fresh Berries: Juicy strawberries or tart raspberries add a refreshing contrast, brightening the rich flavors of the cheesecake.
- Whipped Cream: A dollop of lightly sweetened whipped cream enhances the creamy texture, making each bite feel indulgent and luxurious.
- Caramel Drizzle: A silky caramel sauce adds a touch of sweetness and complements the caramelized top, enhancing the burnt flavor beautifully.
- Citrus Salad: A zesty salad featuring oranges and grapefruit offers a fresh burst of flavor, balancing the sweetness of the cheesecake.
- Espresso or Coffee: The robust flavor of a freshly brewed cup of espresso pairs wonderfully, cutting through the richness while offering an energizing finish.
- Rosé Prosecco: This bubbly beverage adds a festive touch, making any gathering feel special while complementing the dessert with its light fruitiness.
- Chocolate Shavings: A sprinkle of dark chocolate shavings on top adds a touch of elegance and enhances the decadent experience of the cheesecake.
- Nutty Biscotti: Serve with crunchy biscotti for a delightful textural contrast that invites dipping and nibbling alongside each creamy slice.
Creamy Burnt Basque Cheesecake Recipe FAQs
What should I look for when selecting cream cheese?
Absolutely! When selecting cream cheese for your Burnt Basque Cheesecake, opt for full-fat varieties to ensure you achieve that rich, creamy texture. Check the expiration date and choose a block rather than spreadable cream cheese, as it has a firmer consistency that works best for this recipe.
How should I store leftover cheesecake?
Very good question! To store your leftover Burnt Basque Cheesecake, place it in an airtight container in the refrigerator. It should stay fresh for up to 5 days. If you can, try to avoid exposing it to air, as it can cause the cheesecake to dry out.
Can I freeze Burnt Basque Cheesecake?
Of course! To freeze your Burnt Basque Cheesecake, I recommend cutting it into individual slices for easier serving later on. Wrap each slice tightly in plastic wrap and then in aluminum foil. You can freeze them for up to 2 months. When you’re ready to enjoy, just thaw it overnight in the refrigerator before serving.
What if my cheesecake cracks while baking?
Don’t worry, it happens! If your Burnt Basque Cheesecake cracks during baking, it can be due to the temperature being too high or overmixing the batter. To prevent this, ensure your oven temperature is accurate and mix the batter just until combined. Remember, the rustic look of the cake can also add to its charm!
Is this cheesecake suitable for a gluten-free diet?
Yes, very much! To cater to gluten-free diets, simply substitute the all-purpose flour with a gluten-free flour blend. Alternatively, you can use almond flour for a different flavor profile. Always check your other ingredients as well to ensure they’re gluten-free, and enjoy this creamy delight worry-free.
What dietary considerations should I keep in mind when serving?
Great point! If you’re serving your Burnt Basque Cheesecake to guests, it’s essential to inquire about allergies. This recipe contains dairy and eggs, so make sure to check if anyone has lactose intolerance or egg allergies. For a safer option, consider providing alternatives like fruit toppings or a dairy-free version made with cream cheese substitutes.
Creamy Burnt Basque Cheesecake - Simple Indulgence Awaits
Ingredients
Equipment
Method
- Start by preheating your oven to 400°F (200°C). Take a 9x5 inch loaf pan and generously butter it, ensuring it’s well-coated to prevent sticking. Line the bottom and sides with parchment paper, leaving some overhang for easy removal later.
- In a large mixing bowl, add the full-fat cream cheese and use a hand mixer or stand mixer to beat it until smooth and creamy. Gradually incorporate the granulated sugar, mixing until well combined.
- Next, add the eggs one at a time, mixing thoroughly after each addition until the batter is velvety and free of lumps.
- Once your mixture is smooth, fold in the all-purpose flour and a pinch of salt, mixing gently until just incorporated.
- Finally, stir in the vanilla extract, which will add a lovely depth of flavor to your Creamy Burnt Basque Cheesecake.
- Pour the cheesecake mixture into the prepared loaf pan, smoothing the top with a spatula to ensure an even surface. Place it in the preheated oven and bake for about 45 minutes.
- After baking, let the cheesecake cool in the pan for about 30 minutes at room temperature. Then transfer it to the refrigerator and chill for a minimum of 4 hours, preferably overnight.
- Carefully lift it out of the pan using the parchment overhang. Slice it into generous pieces and enjoy chilled or at room temperature.