Introduction to Taco Dip
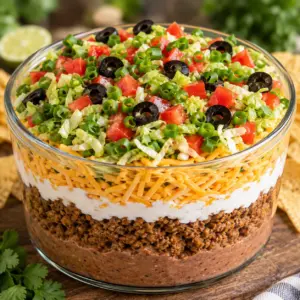
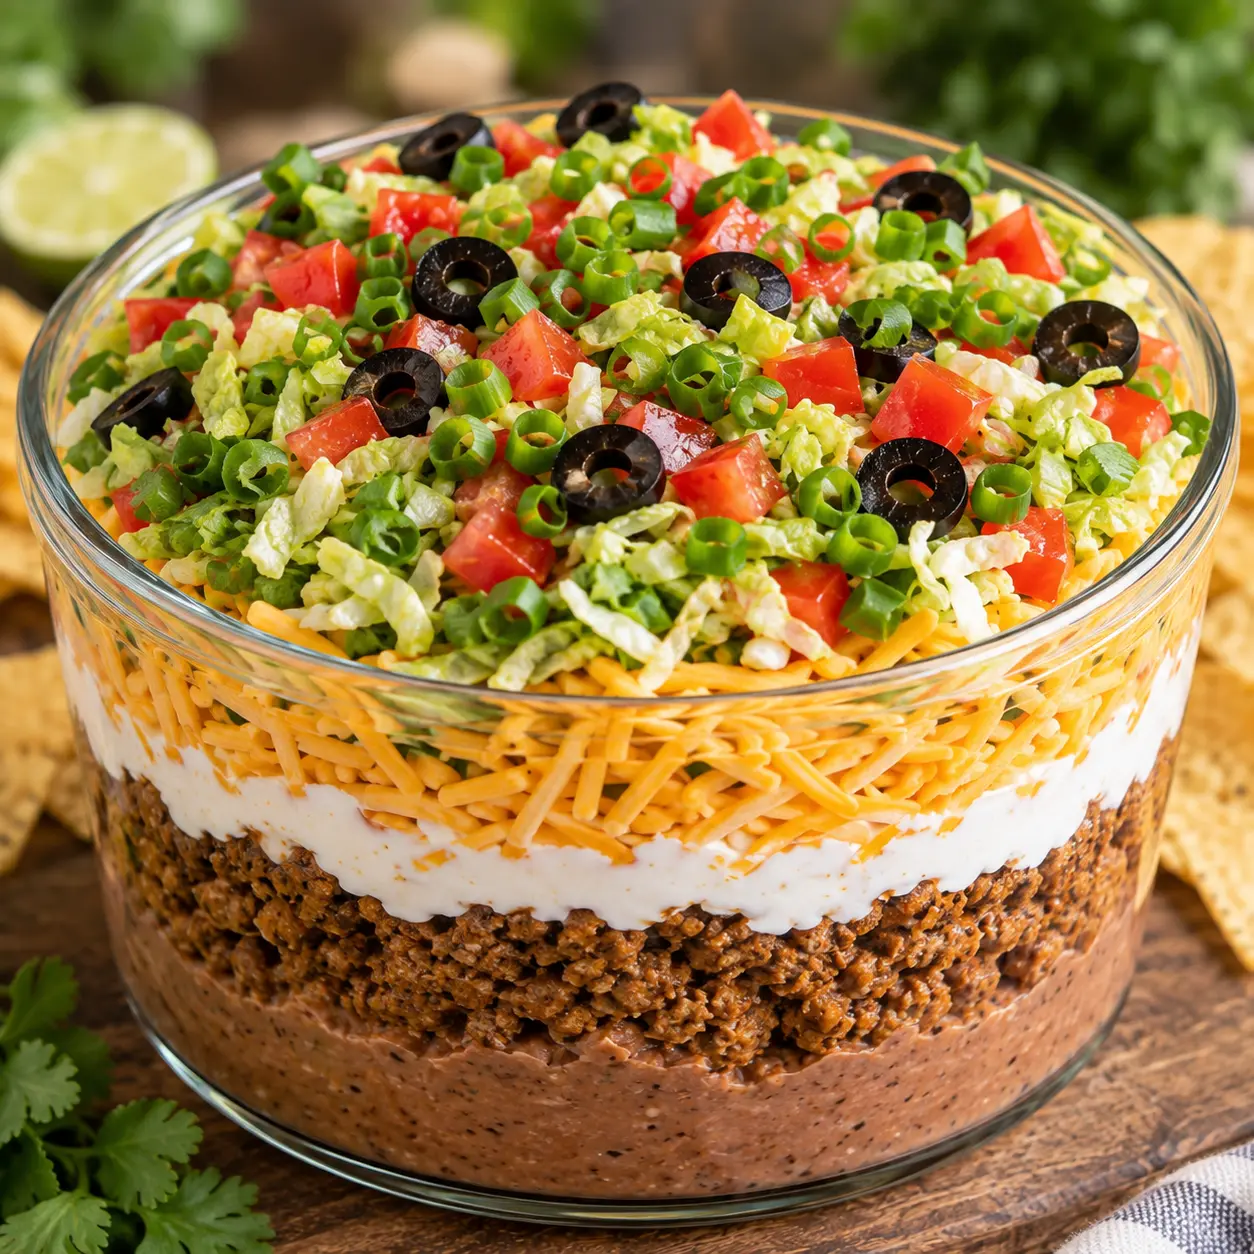
Taco dip is a simple layered appetizer that brings the familiar flavors of taco night to the table in individual jars. Seasoned ground beef forms the savory base, while refried beans, sour cream, salsa, cheese, tomatoes, green onions, and black olives add creamy, tangy, fresh, and salty layers.
This version belongs to the Dips in a Jar collection, so each serving is portioned before it reaches the refrigerator. The jars are convenient for parties, potlucks, game-day tables, and casual dinners. Prepare the beef ahead, assemble the jars, and chill them until you are ready to serve with tortilla chips.
Why You'll Love This Taco Dip
- The dip uses familiar ingredients that are easy to find at any grocery store.
- Individual jars make serving neat and help guests take just one portion at a time.
- The layers can be assembled several hours before serving, which makes party preparation easier.
- The seasoned beef and refried beans make the dip hearty enough to stand alongside other appetizers.
- Each bite combines creamy, savory, fresh, and crunchy-textured toppings in one scoop.
Ingredients for Taco Dip
- 1 lb ground beef
- 1 packet taco seasoning
- 1 cup refried beans
- 1 cup sour cream
- 1 cup salsa
- 1 cup shredded cheese
- ½ cup diced tomatoes
- ¼ cup green onions
- ¼ cup black olives
Use thick salsa rather than a very watery variety so the layers stay distinct in the jars. Drain the diced tomatoes and black olives well, and let the cooked beef cool before assembling so it does not warm the dairy layers.
How to Make Taco Dip
Step 1: Cook the Ground Beef
Place a large skillet over medium heat and add the ground beef. Cook for about 8 to 10 minutes, breaking it into small pieces with a spoon, until no pink remains. The beef should reach 160°F in the center, measured with an instant-read thermometer. Drain excess grease from the skillet.
Step 2: Season the Beef
Return the drained beef to the skillet and add the taco seasoning according to the packet directions. Stir until the seasoning is evenly distributed. If the packet calls for water, add the amount listed on the packet, then simmer the beef for the recommended time until the mixture is thick rather than watery. Remove the skillet from the heat and let the beef cool for about 15 minutes.
Step 3: Prepare the Toppings
While the beef cools, set out the refried beans, sour cream, salsa, and shredded cheese. Dice the tomatoes and green onions if they are not already prepared, and drain the black olives. For the cleanest layers, use a spoon or piping bag to portion the sour cream without pressing it into the sides of the jars.
Step 4: Build the First Layers
Set out eight clean, food-safe jars or small lidded containers. Divide the refried beans among the jars, spreading them into an even first layer. Add the cooled taco-seasoned beef next, dividing it as evenly as possible. Leave enough space at the top for the remaining layers and for dipping without overflowing the jars.
Step 5: Add the Creamy and Fresh Layers
Divide the sour cream among the jars, followed by the salsa. Sprinkle the shredded cheese over the salsa, then finish with the diced tomatoes, green onions, and black olives. Wipe the rims if needed, and cover the jars with lids. Do not seal hot beef inside the jars; it should be cooled before the dip is assembled.
Step 6: Chill and Serve
Refrigerate the covered jars for at least 30 minutes before serving so the dip is cold and the layers settle. Keep the jars refrigerated at 40°F or below, and serve them with tortilla chips. Do not leave the dip at room temperature for more than two hours, or more than one hour if the temperature is above 90°F. Refrigerate leftovers promptly and use them within 3 to 4 days.
Tips for Success
- Choose jars with wide openings so guests can reach every layer with a tortilla chip. Small straight-sided jars are especially easy to fill and clean.
- Let the cooked beef cool before adding it to the jars. Warm beef can soften the sour cream and raise the temperature of the finished dip.
- Drain watery toppings thoroughly. Excess liquid can collect at the bottom of the jars and make the dip difficult to scoop.
- For even portions, arrange the jars in a row and add each ingredient layer to all of them before moving to the next ingredient.
- If you are transporting the dip, keep the covered jars in an insulated cooler with ice packs until they are ready to serve.
Equipment Needed
- Large skillet
- Instant-read thermometer
- Eight small food-safe jars with lids
Variations
- For a meatless version, replace the cooked ground beef with an additional layer of refried beans, keeping the rest of the ingredients the same.
- For extra heat, use a spicy taco seasoning packet or a hot salsa. Add only one hotter ingredient at a time so the dip stays balanced.
- For a smoother texture, spread the sour cream over the salsa instead of under it, then add the cheese and fresh toppings at the end.
- For a party platter, assemble the layers in a shallow serving dish rather than individual jars. Chill it covered and serve with a wide serving spoon.
- For a portable lunch-style snack, use smaller jars and serve each portion with a small bag of tortilla chips packed separately to preserve their crunch.
Serving Suggestions
Serve the taco dip cold or well chilled with sturdy tortilla chips that can reach the bottom of the jars. Arrange the jars on a tray with extra chips and small spoons for guests who prefer to stir the layers before eating. Because the dip contains cooked beef and dairy, keep it refrigerated until serving and return it to the refrigerator promptly after the meal. The jars also make it easy to mark individual portions if you are serving a crowd with different preferences.
FAQs about Taco Dip
Can I make taco dip in a jar ahead of time? Yes. Assemble the covered jars up to 24 hours ahead and keep them refrigerated at 40°F or below. Add the fresh toppings shortly before serving if you want the tomatoes and green onions to look especially crisp.
How long does taco dip last in the refrigerator? Store the covered dip in the refrigerator and use it within 3 to 4 days. Keep the dip cold, and discard it if it has been left at room temperature for more than two hours, or more than one hour in temperatures above 90°F.
Can I freeze taco dip? Freezing is not recommended for this assembled dip because sour cream, salsa, and fresh vegetables can separate and become watery after thawing. For better results, freeze only the fully cooked seasoned beef for up to 3 months, thaw it in the refrigerator, and assemble the dip fresh.
What size jars should I use? Use eight small, wide-mouth food-safe jars or containers that hold about 8 ounces each. The exact size can vary, but leave room at the top for chips to dip without pushing the toppings over the rim.
Can I serve taco dip warm? This layered version is intended to be served cold or chilled. If you want a hot taco dip, use a separate baked recipe designed for heating the dairy and fresh toppings, rather than warming these assembled jars.
Final Thoughts
Taco dip in a jar turns a familiar party favorite into tidy, ready-to-serve portions. Cook the beef thoroughly, cool it before layering, and keep the jars cold until serving. With a few minutes of assembly, you have a practical appetizer that works for a gathering, a potluck, or an easy snack spread.
Looking for more? This recipe is part of our roundup of 6 Dips in a Jar That Make Party Tables Easy to Prep and Serve.
Taco Dip
Ingredients
Equipment
Method
- Cook the ground beef in a skillet over medium heat for 8 to 10 minutes, breaking it up, until it reaches 160°F and no pink remains.
- Drain the beef, stir in the taco seasoning according to the packet directions, and simmer until thick; cool for about 15 minutes.
- Divide the refried beans, seasoned beef, sour cream, salsa, and shredded cheese among eight jars in layers.
- Top each jar with diced tomatoes, green onions, and black olives, then cover and refrigerate for at least 30 minutes.
- Serve chilled with tortilla chips, keeping the dip at 40°F or below until serving.
Nutrition
Notes
- Drain the diced tomatoes and black olives so the dip does not become watery.
- Cool the cooked beef before assembling the jars.
- Refrigerate leftovers promptly and use within 3 to 4 days.