Introduction to Vintage Custard Pie
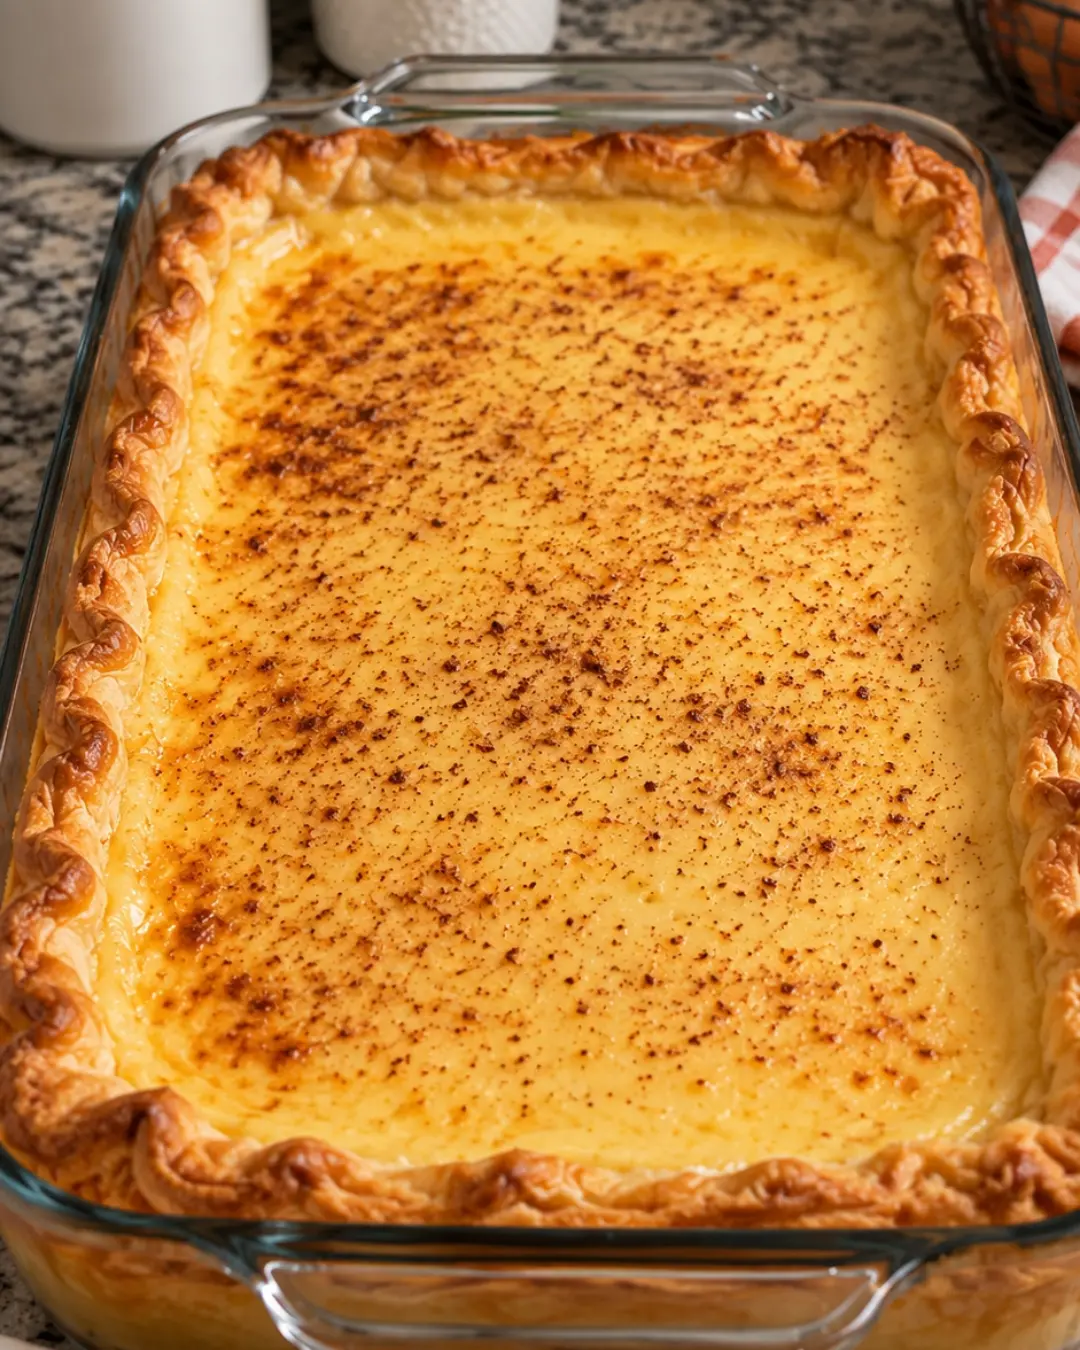
Vintage custard pie is the kind of dessert that feels at home on a family table. The filling is made from simple pantry staples: eggs, whole milk, sugar, vanilla, salt, nutmeg, and melted butter. Baked in refrigerated pie crusts, it sets into a soft, silky custard with a gentle nutmeg finish.
This recipe makes two 9-inch pies, which is useful when you are baking for a gathering or want one pie for now and one for later. The key is to bake the pies gently and cool them fully before slicing. That gives the custard time to finish setting without turning rubbery.
Why You'll Love This Vintage Custard Pie
- The ingredient list is short and easy to shop for.
- Two refrigerated pie crusts make this recipe practical for a busy baking day.
- A low oven helps the custard stay smooth and tender.
- Vanilla and nutmeg give the pie its familiar vintage flavor.
- The pies can be baked ahead and chilled until dessert time.
Ingredients for Vintage Custard Pie
- 2 refrigerated pie crusts
- 6 large eggs
- 3 cups whole milk
- 1 cup granulated sugar
- 2 teaspoons vanilla extract
- 1 quarter teaspoon salt
- 1 half teaspoon ground nutmeg
- 2 tablespoons unsalted butter melted
Use whole milk for the richest, most stable custard texture, and bring the eggs and milk close to room temperature before mixing. Cold ingredients can make the butter firm up into small pieces, while room-temperature ingredients combine more evenly.
How to Make Vintage Custard Pie
Step 1: Heat the Oven and Prepare the Crusts
Set a rack in the center of the oven and heat it to 375°F. Place the 2 refrigerated pie crusts in two 9-inch pie plates, following the package directions if they are rolled crusts. Press the dough gently into the plates without stretching it, then fold and crimp the edges. Set the prepared crusts on a large rimmed baking sheet so they are easier to move and any drips are contained.
Step 2: Make the Custard Mixture
In a large bowl, whisk the 6 large eggs until the yolks and whites are fully blended. Add the 1 cup granulated sugar and whisk until smooth. Gradually whisk in the 3 cups whole milk, then add the 2 teaspoons vanilla extract, 1 quarter teaspoon salt, and 1 half teaspoon ground nutmeg. Stir in the 2 tablespoons unsalted butter melted. The butter does not need to be hot; let it cool briefly if needed so it does not cook the eggs.
Step 3: Fill the Pie Crusts
Divide the custard mixture evenly between the two prepared crusts. Pour slowly to avoid splashing the custard over the edges. If the crusts are very full, transfer the baking sheet to the oven first and pour the filling into the crusts there. Leave a little space below each crimped edge so the custard will not spill while the pies are moved.
Step 4: Bake the Pies
Bake the pies at 375°F for 15 minutes. Without opening the oven for long, reduce the temperature to 350°F and continue baking for 30 to 40 minutes. The pies are done when the edges are set and the centers still have a slight, gentle wobble when the baking sheet is nudged. A food thermometer inserted into the center should read at least 160°F for an egg-based dish. If the crust edges brown too quickly, cover them loosely with strips of aluminum foil.
Step 5: Cool Completely
Remove the baking sheet from the oven and place it on a cooling rack. Let the pies cool at room temperature for about 2 hours, or until the centers are fully set. Do not cut into the pies while they are warm, because the custard will not yet have its clean slice. Once cooled, cover the pies and refrigerate them if they will not be served within 2 hours.
Step 6: Slice and Serve
For neat slices, chill the pies for at least 2 hours before serving. Use a sharp knife and wipe the blade between cuts. Serve the custard pie cold or let it stand at room temperature for 15 to 20 minutes for a softer texture. Keep leftovers covered in the refrigerator and use them within 3 to 4 days.
Tips for Success
- Whisk the eggs just until blended rather than beating in lots of air, which can create bubbles on the surface of the custard.
- Strain the custard through a fine-mesh sieve before filling the crusts if you want an especially smooth finish.
- Pouring the custard into the crusts on the oven rack reduces the chance of spilling a full pie plate during transfer.
- The center should jiggle slightly, not ripple like liquid, when the pies are ready to come out of the oven.
- Cool the pies completely before covering them so condensation does not collect on the surface.
Equipment Needed
- two 9-inch pie plates
- large mixing bowl
- whisk
- rimmed baking sheet
- cooling rack
- sharp knife
Variations
- For a stronger spice note, keep the ground nutmeg on the surface by lightly dusting each pie with a little of the measured nutmeg before baking.
- For a slightly deeper crust color, brush the exposed crust edges with a little of the melted butter before filling the pies.
- Bake one pie now and freeze the second unbaked pie only if the crust package directions allow freezing; thaw it in the refrigerator before baking and check the center for doneness.
- Serve each slice with a spoonful of lightly sweetened whipped cream if you want a richer dessert without changing the custard.
- For small gatherings, bake the filling in one deep 9-inch pie crust only if your crust and pie plate can safely hold the full amount; place any extra custard in a small oven-safe dish and bake it alongside the pie.
Serving Suggestions
Serve vintage custard pie chilled, cool, or slightly below room temperature. The simple custard is good on its own, but it also pairs well with coffee, black tea, or a spoonful of whipped cream. Since this recipe makes two pies, it works well for holidays, potlucks, and family dinners where one dessert may not be enough. Refrigerate the pies within 2 hours of baking or serving, and keep them covered until the next serving.
FAQs about Vintage Custard Pie
Can I make vintage custard pie ahead of time? Yes. Bake the pies up to one day ahead, cool them completely, cover them, and refrigerate them. Chilling also makes the custard easier to slice cleanly.
Why is my custard pie watery? Watery custard usually comes from underbaking, cutting the pie before it has cooled, or storing it while still warm. Bake until the center reaches at least 160°F and has only a slight wobble, then cool it fully.
Can I use one pie crust instead of two? The listed amount of custard is intended for two 9-inch pies. A single standard crust may not hold all of it safely. Use a deep-dish crust only if it can hold the filling, and bake any extra custard separately in an oven-safe dish.
How do I know when custard pie is done? The outer edges should look set, while the center should move slightly when the pie is gently nudged. For an additional food-safety check, the center should reach at least 160°F on an instant-read thermometer.
How long does custard pie keep? Cover and refrigerate the baked pies for 3 to 4 days. Because the filling contains eggs and milk, do not leave the pies at room temperature for more than 2 hours.
Final Thoughts
Vintage custard pie rewards a calm, gentle bake. The filling comes together in minutes, and the two crusts make enough dessert to share with a crowd. Let the pies cool fully, keep them chilled, and you will have smooth slices with a tender custard center and a familiar nutmeg finish.
Vintage Custard Pie
Ingredients
Equipment
Method
- Prepare two 9-inch refrigerated pie crusts and place them on a rimmed baking sheet.
- Whisk the eggs, sugar, milk, vanilla, salt, nutmeg, and melted butter until smooth, then divide the custard between the crusts.
- Bake at 375°F for 15 minutes, reduce the oven to 350°F, and bake 30 to 40 minutes more until the centers are just set and reach at least 160°F.
- Cool the pies completely, chill if desired, then slice and serve.
Nutrition
Notes
- Cool the pies fully before slicing so the custard can set.
- Refrigerate covered leftovers within 2 hours and use within 3 to 4 days.
- The recipe makes two 9-inch pies.