

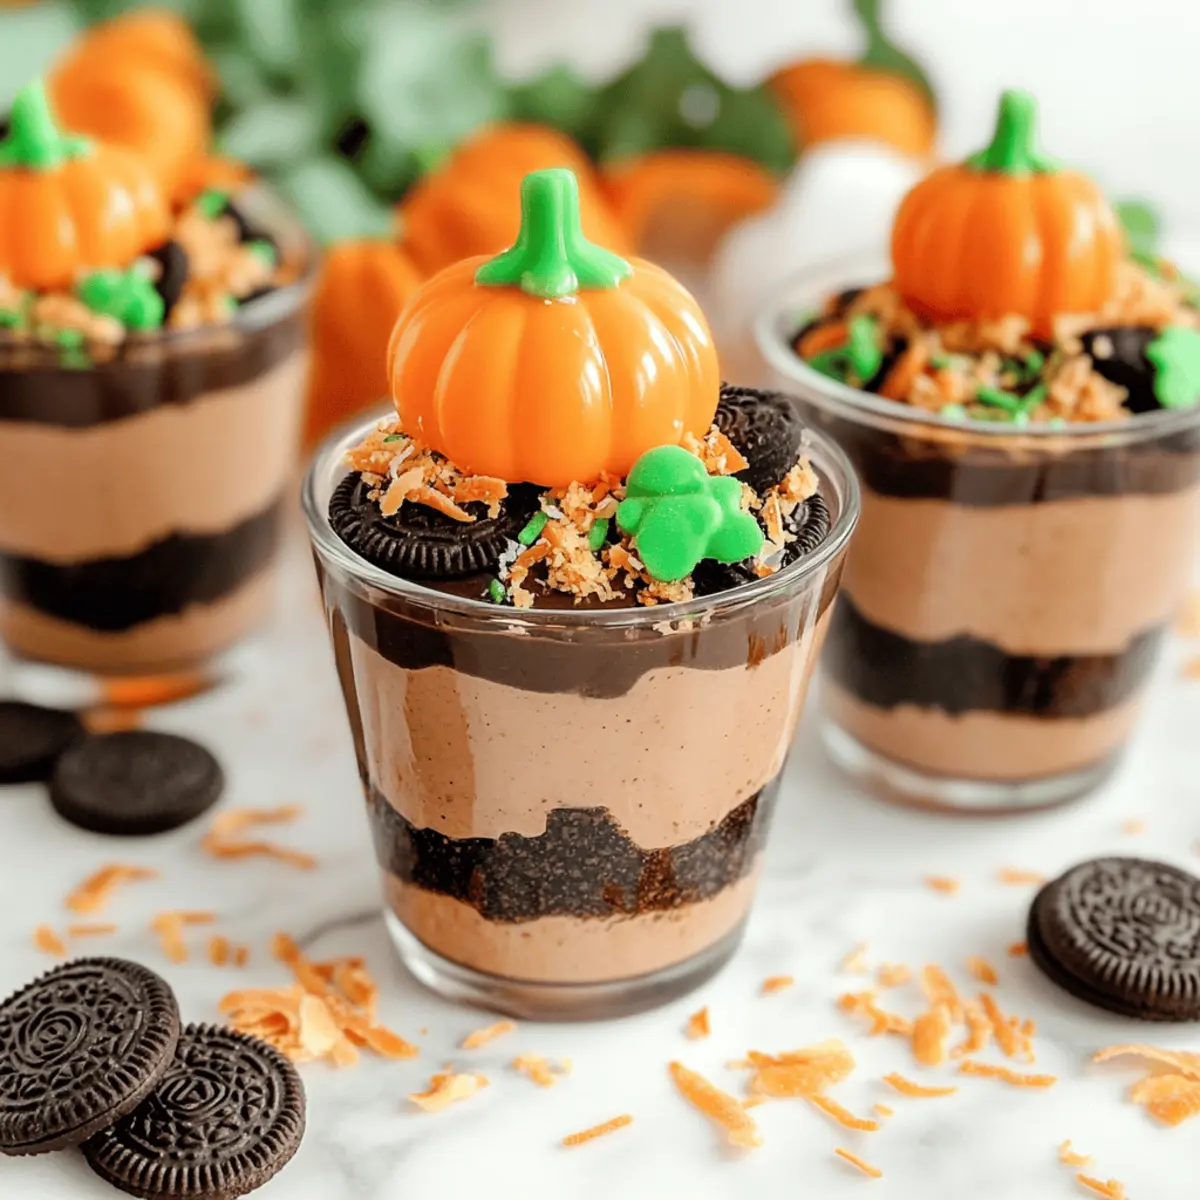
As I stood in my kitchen, the crisp autumn air whispering through the window, I couldn’t shake the excitement for my favorite fall traditions. One of them? Whipping up these delightful Pumpkin Dirt Cups! This charming dessert is as simple to make as it is stunning to behold, combining layers of velvety chocolate pudding with crunchy Oreo crumbs. Not only are they a playful nod to Halloween festivities, but they also serve as a fantastic way to engage kids in the kitchen. With practically no baking involved, you can have these scrumptious cups ready in a flash, making them perfect for unexpected guests or cozy family nights. Are you ready to dive into this deliciously fun fall treat?

Why are Pumpkin Dirt Cups a must-try?
Delightful Creativity: These Pumpkin Dirt Cups combine fun and festive flavors, making them a seasonal favorite for all ages.
Easy to Make: With no baking required, you can whip these desserts up in no time, perfect for busy evenings or surprise guests.
Kid-Friendly Fun: Engage children in the kitchen by letting them help assemble the layers for a memorable experience.
Visual Appeal: The vibrant layers and whimsical toppings create a dish that’s both a feast for the eyes and the palate.
Versatile Options: Feel free to personalize them by swapping out pudding flavors or toppings, as mentioned in our helpful variation ideas.
Perfect for Any Occasion: Whether it’s a Halloween gathering or a cozy night in, these cups are sure to delight family and friends alike!
Pumpkin Dirt Cups Ingredients
For the Pudding
• Chocolate Instant Pudding – Provides rich chocolate flavor and smooth texture; substitute with vanilla pudding for a different twist.
• Milk (2 cups) – Necessary to prepare the pudding mix; any milk variety works, including almond or oat milk.
For the Whipped Layer
• Cool Whip (8 oz) – Creates a light, airy texture in the dessert; can be swapped with whipped cream if desired.
For the Crunchy Base
• Oreo Cookies (1 package) – Adds crunch and chocolate flavor; opt for Golden Oreos for a unique look.
For the Festive Topping
• Candy Pumpkins – Decorative and festive; they add a seasonal charm; can be substituted with candy corn or gummy worms.
• Shredded Coconut – Creates a whimsical “grass” effect when dyed with green food coloring; this addition is optional for presentation.
Step‑by‑Step Instructions for Pumpkin Dirt Cups
Step 1: Crush the Oreos
Begin by crushing the Oreo cookies to create a crunchy base for your Pumpkin Dirt Cups. Use a food processor for a fine crumb texture or place the Oreos in a zipped plastic bag and crush them with a rolling pin. Aim for crumbs resembling sand, ensuring some larger pieces remain for added texture. Set the crushed Oreos aside in a bowl.
Step 2: Prepare the Pudding
In a medium mixing bowl, combine 2 cups of milk and the chocolate instant pudding mix. Whisk these ingredients together vigorously for about 2 minutes until the mixture thickens significantly. Once it reaches a pudding-like consistency, allow it to sit for 5 minutes to fully set. This will give the Pumpkin Dirt Cups a rich, creamy layer.
Step 3: Fold in Cool Whip
Gently fold 8 ounces of Cool Whip into the prepared pudding mixture using a spatula. Carefully combine the two components until the Cool Whip is fully incorporated, creating a light and airy pudding layer. This step is crucial for achieving that fluffy texture in your Pumpkin Dirt Cups, making them enjoyable for everyone.
Step 4: Assemble the Cups
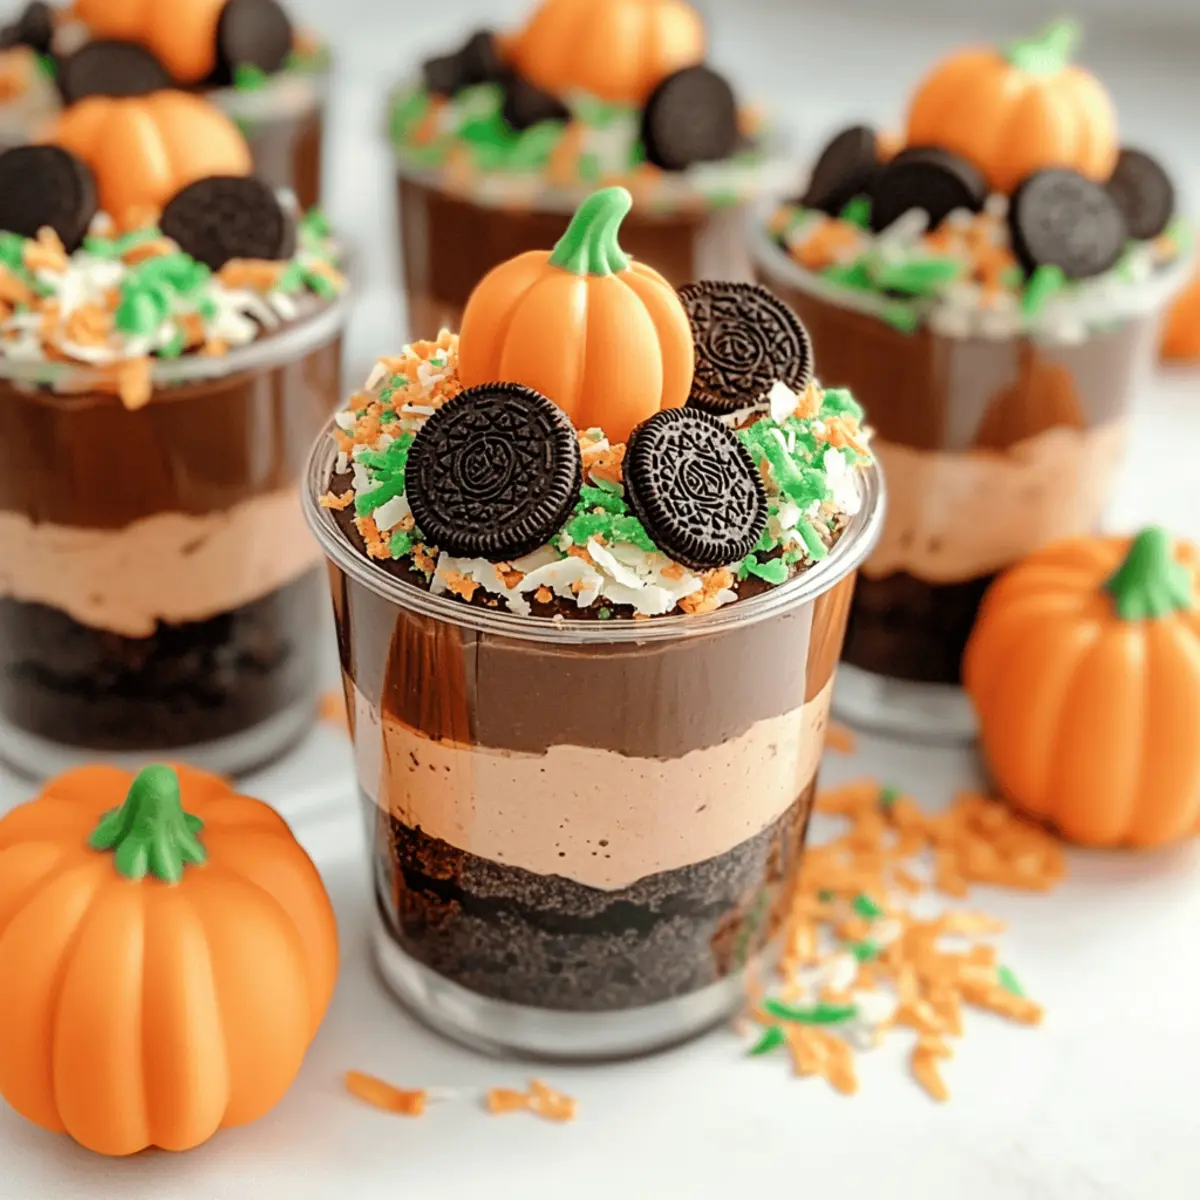
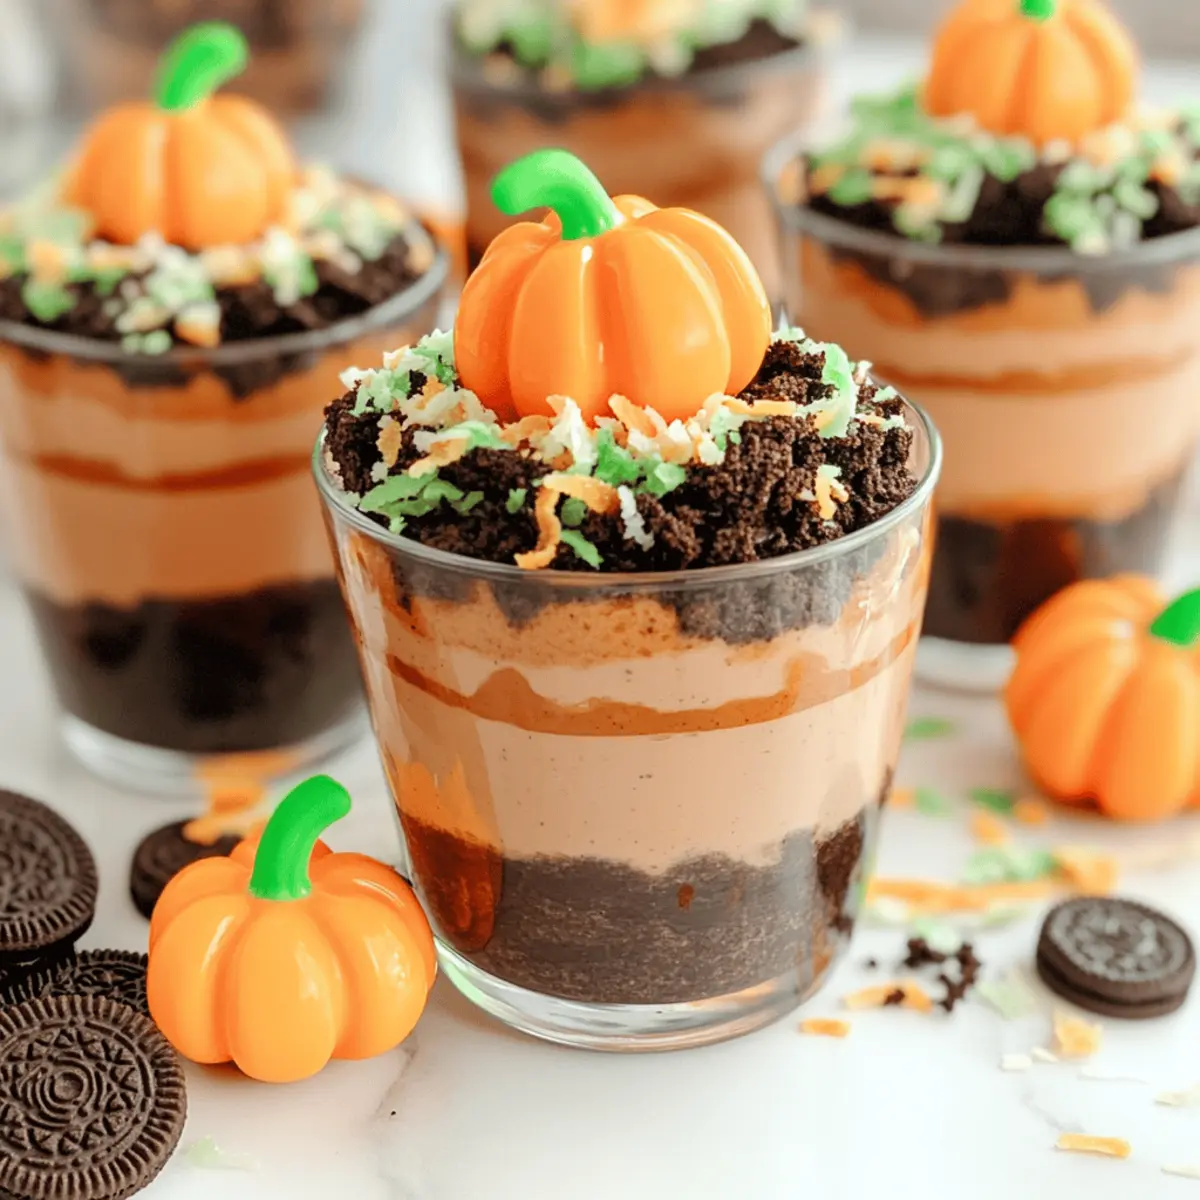
Start layering your Pumpkin Dirt Cups in clear individual serving cups. Spoon a layer of crushed Oreos into the bottom, followed by a layer of the light pudding mixture. Repeat this process, alternating layers of Oreos and pudding. Aim to fill each cup to the top, creating visually appealing layers that showcase the delightful texture of this fun dessert.
Step 5: Refrigerate
Once your cups are assembled, place them in the refrigerator to chill for a minimum of 1 hour. This will allow the pudding to set properly and enhance the overall flavor of the Pumpkin Dirt Cups. Chilling is essential for both the taste and presentation, ensuring the layers are stable and easy to enjoy.
Step 6: Add the Finishing Touches
Before serving your Pumpkin Dirt Cups, prepare the decorative elements. In a small bowl, mix shredded coconut with a few drops of green food coloring to create a “grass” effect. Sprinkle this on top of each cup. Finally, finish with a couple of candy pumpkins as a whimsical garnish, adding a festive touch ready for your fall celebration.
What to Serve with Pumpkin Dirt Cups?
Indulging in these whimsical treats sets the stage for a delightful fall feast, making it essential to balance flavors and textures.
- Autumn Apple Salad: A crisp mix of tart apples, nuts, and a honey dressing complements the sweetness of the dessert perfectly. The freshness offers a wonderful contrast to the creamy cups.
- Spiced Caramel Brownies: Rich brownies drizzled with spiced caramel enhance the chocolate flavors of the cups while adding a decadent touch that all ages will love.
- Pumpkin Spice Muffins: Soft, warmly spiced muffins echo the season’s flavors, making them a comforting companion alongside the Pumpkin Dirt Cups.
- Vanilla Ice Cream: Serve a scoop on the side to create a delightful warm-cold contrast that enhances the overall dessert experience.
- Hot Apple Cider: This warm drink warms up your gatherings, wrapping everyone in the essence of fall with its aromatic spices, harmonizing beautifully with the cups.
- Chocolate Milkshakes: A blended treat that’s perfect for any gathering, their creamy texture pairs harmoniously with the layered cups, creating a nostalgic twist.
- Chewy Ginger Cookies: Spicy and soft, these cookies enhance the festive spirit, providing a unique crunch and flavor alongside your fun dessert.
- Milk or Nut Milk: These simple drinks are classic and refreshing, making them a versatile option that pairs beautifully with the sweet richness of the Pumpkin Dirt Cups.
- Carrot Cake Trifle: Lighter than traditional cake, it brings layers of flavors and textures that echo the clever presentation of your main dessert.
- Pecan Pie Bites: These mini desserts offer a delightful nutty crunch, finishing off your autumn spread with a sweet and savory appeal.
Expert Tips for Pumpkin Dirt Cups
-
Chill Time Matters: Ensure the pudding mixture is adequately chilled for at least 1 hour. This step helps the layers set properly, making them easier to serve.
-
Layering Technique: When layering, use clear cups to showcase the beautiful contrast of creamy pudding and crunchy Oreos. It makes the dessert visually appealing and exciting.
-
Oreo Texture: Crush the Oreo cookies to a mix of fine crumbs and larger pieces. This mix adds delightful crunch and varied texture in your Pumpkin Dirt Cups.
-
Creative Toppings: Don’t hesitate to experiment with toppings! You can use candy corn or spooky gummy worms for a Halloween touch, tailoring the recipe to your event.
-
Custom Flavors: Feel free to swap the chocolate pudding for vanilla or butterscotch pudding to explore different flavor profiles while keeping the delightful layering intact.
How to Store and Freeze Pumpkin Dirt Cups
Fridge: Store any leftover Pumpkin Dirt Cups in an airtight container in the refrigerator for up to 2 days. This ensures they stay fresh and retain their creamy texture.
Layer Protection: If you need to store them in individual cups, cover each one with plastic wrap to prevent drying out and to keep all the layers intact.
Freezer: For longer storage, freeze the assembled cups covered with plastic wrap and then foil for up to 1 month. Note that the texture may change slightly upon thawing.
Reheating: To enjoy frozen Pumpkin Dirt Cups, transfer them to the fridge for a few hours or overnight to thaw before serving. Avoid microwave reheating, as it may compromise the textures.
Make Ahead Options
These Pumpkin Dirt Cups are fantastic for meal prep, making your life easier during busy fall weeks! You can prepare the chocolate pudding mixture and crushed Oreo layers up to 24 hours in advance. Simply whisk together the pudding and milk, fold in the Cool Whip, and store it in an airtight container in the refrigerator. Additionally, crush the Oreos and keep them in a separate container to maintain their crunch. When you’re ready to serve, layer the pudding and Oreos in individual cups, refrigerate for at least 1 hour, and finish with shredded coconut and candy pumpkins. This way, you can enjoy a delightful dessert without the last-minute rush!
Pumpkin Dirt Cups Variations & Substitutions
Feel free to get creative with your Pumpkin Dirt Cups and make them uniquely yours with these fun twists.
-
Dairy-Free: Substitute the milk with almond or oat milk and use a dairy-free whipped cream for a tasty vegan option.
This swap ensures everyone can enjoy a creamy dessert without sacrificing flavor! -
Flavor Twist: Instead of chocolate pudding, try butterscotch or vanilla pudding for a different take on these delightful cups.
Each flavor brings its own charm and complements the crunchy Oreo base beautifully. -
Crunchy Alternatives: Swap out Oreos for crushed graham crackers or vanilla wafers for a new texture experience.
The graham crackers add a lovely sweetness that pairs unexpectedly well with the pudding! -
Fruit Surprise: Add layers of fresh berries or sliced bananas for a fruity freshness within the cups.
Not only does this add nutrition, but it also enhances the flavor profile for a tasty twist. -
Gourmet Toppings: Experiment with chopped nuts or chocolate shavings for an elegant touch on top of your cups.
These added textures can elevate a simple dessert into a gourmet experience worthy of any celebration. -
Spicy Kick: For a hint of warmth, mix in a touch of cinnamon or pumpkin spice into the pudding.
This adds a seasonal depth reminiscent of holiday treats while keeping it cozy and familiar. -
Halloween Fun: Use colorful gummy worms or candy corn as toppings for a spooky aesthetic perfect for Halloween.
These playful additions can turn your cups into a fun centerpiece for any festive gathering. -
Trifle Style: Layer all components in a large glass bowl instead of individual cups for a stunning trifle that serves a crowd.
A trifle not only offers a beautiful presentation but also makes serving simple and enjoyable for everyone.
Remember, these swaps and twists can turn your Pumpkin Dirt Cups into a personalized dessert everybody will love! For inspiration, check out our expert tips and make every layer count!
Pumpkin Dirt Cups Recipe FAQs
How do I select the right ripeness for the ingredients?
Absolutely! For the best flavor and texture, ensure your milk is fresh and the Cool Whip is still within its expiration date. When it comes to the crushed Oreos, they should be intact and not stale or crumbling; check the package date if you’re unsure!
How should I store leftover Pumpkin Dirt Cups?
Store any leftover Pumpkin Dirt Cups in an airtight container in the refrigerator for up to 2 days. If you have them in individual cups, cover each one with plastic wrap to prevent drying out and keep the layers looking fabulous.
Can I freeze Pumpkin Dirt Cups?
Yes, you can! To freeze, cover the assembled cups tightly with plastic wrap and then with foil to prevent freezer burn. They will keep well in the freezer for up to 1 month. Just remember, the texture may change slightly when thawed. To enjoy, move them from the freezer to the fridge to thaw overnight before serving.
What if the pudding doesn’t set properly?
If your pudding isn’t setting as it should, it could be due to under-whisking or not allowing it to sit long enough. Ensure you whisk for the full 2 minutes and give it at least 5 minutes to set before incorporating the Cool Whip. If it’s still too runny, try adding an additional couple of minutes of chilling time – sometimes patience is the key to that perfect creamy layer!
Are there any dietary considerations for this recipe?
For convenience, this recipe can be easily tweaked for dietary needs! If anyone has lactose intolerance, consider using lactose-free milk along with dairy-free Cool Whip. Be cautious with the toppings for kids with allergies; you can opt for chocolate chips or non-candy alternatives to accommodate unique needs.
Can my pets enjoy any of these ingredients?
While Pumpkin Dirt Cups are delicious for humans, they may not be safe for pets. Oreos, especially, contain chocolate, which is toxic to dogs. Always keep these fun desserts away from your furry friends and spoil them with pet-safe treats instead!
Pumpkin Dirt Cups: A Fun Fall Treat for All Ages
Ingredients
Equipment
Method
- Crush the Oreo cookies to create a crunchy base. Use a food processor or a rolling pin.
- In a medium mixing bowl, combine 2 cups of milk and the chocolate instant pudding mix. Whisk together for about 2 minutes.
- Gently fold 8 ounces of Cool Whip into the pudding mixture using a spatula until fully combined.
- Layer the Pumpkin Dirt Cups in serving cups, alternating layers of crushed Oreos and pudding.
- Refrigerate the assembled cups for at least 1 hour to allow the pudding to set.
- Prepare decorative elements and top each cup with shredded coconut and candy pumpkins before serving.


