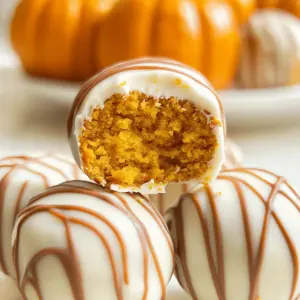
As the leaves turn and the air becomes crisp, there’s a delicious buzz in the kitchen! I find myself swept up in fall flavors, eagerly searching for cozy treats that warm the heart. Enter my Moist Pumpkin Cake Pops with Cream Cheese Frosting—the perfect embodiment of autumn’s bounty. These bite-sized delights are not only quick and simple to prepare, but they also make for delightful gifts or festive treats for holiday gatherings. With their creamy frosting concealed within a spiced pumpkin cake, every bite delivers nostalgia while satisfying the sweet tooth. Whether you’re planning a Halloween bash or just looking for a comforting fall dessert, these cake pops offer an irresistible way to celebrate the season. Curious about how to create this scrumptious treat? Let’s dive in!
Why are Pumpkin Cake Pops a must-try?
Flavorful Twist: These Pumpkin Cake Pops are a delightful fusion of comforting fall flavors with a sweet surprise inside!
Easy to Make: With just a few simple steps, you can create these enchanting treats in under an hour—perfect for busy bakers.
Perfect for Fall: Each mouthful evokes the essence of autumn, making them an ideal dessert for seasonal gatherings or Halloween parties.
Customizable: Try different toppings or frostings to make these cake pops unique to your taste, whether it’s dark chocolate or nuts!
Crowd-Pleasing: They are not only delicious but also visually appealing, ensuring they’ll be the star at your next dessert table.
So, grab your ingredients and get ready to impress friends and family with these delightful homemade Pumpkin Cake Pops that are sure to charm every guest!
Pumpkin Cake Pops Ingredients
• Get ready to indulge in these delightful Pumpkin Cake Pops!
For the Cake
- Pumpkin Cake – Essential base for your pops; choose homemade or a cake mix for convenience!
For the Frosting
- Cream Cheese – Adds delicious creaminess that pairs beautifully with pumpkin; always use at room temperature for easy blending.
- Butter – Ensures a light and fluffy frosting texture; be sure it’s at room temperature.
- Confectioners’ Sugar – Sweetens the frosting wonderfully; substitute with powdered sugar alternatives if desired.
For the Coating
- White or Milk Chocolate – Creates a smooth, rich coating; you can opt for dark chocolate if you’re craving a richer flavor.
These ingredients come together to create dreamy Pumpkin Cake Pops that capture the warmth of the season!
Step‑by‑Step Instructions for Moist Pumpkin Cake Pops with Cream Cheese Frosting
Step 1: Prepare Cake
Begin by preheating your oven to 350°F (175°C). If you’re making pumpkin cake from scratch, combine your dry ingredients and wet ingredients in a mixing bowl. If you prefer convenience, follow the instructions on your cake mix. Pour the batter into a greased baking pan and bake for 25-30 minutes, or until a toothpick inserted in the center comes out clean. Let the cake cool completely on a wire rack.
Step 2: Make Frosting
While the pumpkin cake cools, it’s time to whip up the cream cheese frosting. In a large mixing bowl, beat together 8 oz of room temperature cream cheese and 4 oz of softened butter with an electric mixer. Gradually add 2 cups of confectioners’ sugar, mixing until the frosting is fluffy and smooth. This should take about 4-5 minutes on medium speed, yielding a creamy texture without lumps.
Step 3: Crumble Cake
Once your pumpkin cake has completely cooled, cut it into large bars. Place these bars into a large mixing bowl and crumble them thoroughly with your hands or a fork. You’re aiming for a fine texture that’s easy to combine with the frosting. This step is crucial for your Pumpkin Cake Pops to have the right consistency and flavor.
Step 4: Combine Mixtures
Now, add the fluffy cream cheese frosting to the crumbled pumpkin cake in the bowl. Use your hands or a spatula to mix thoroughly until everything is combined and forms a dough-like consistency. This should take about 2-3 minutes. The mixture should easily hold together without being too sticky; perfect for shaping into pops!
Step 5: Form Balls
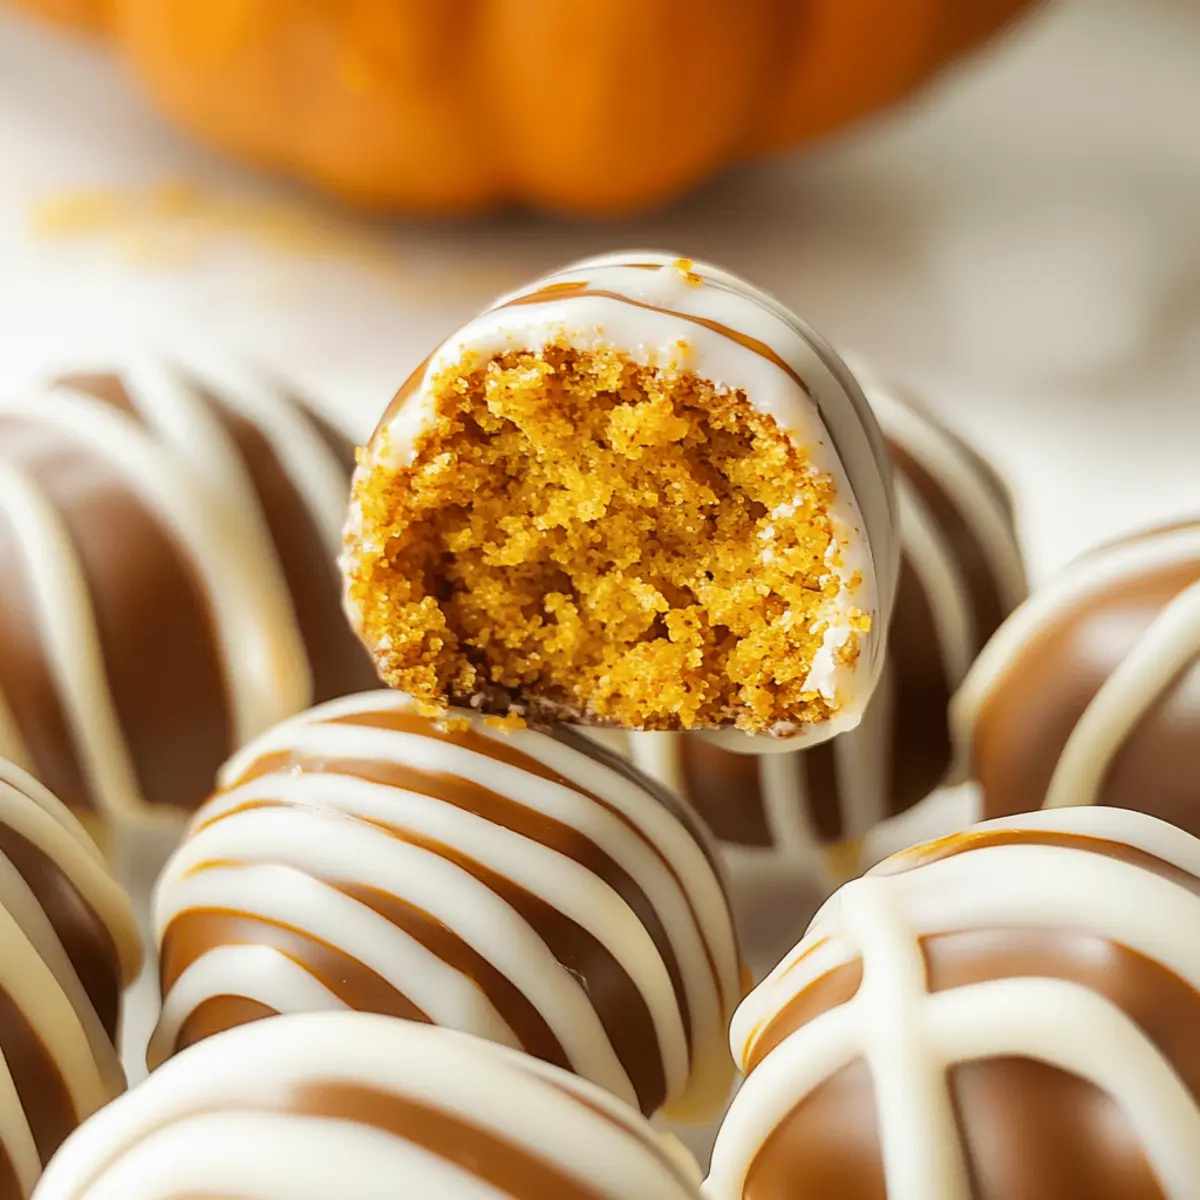
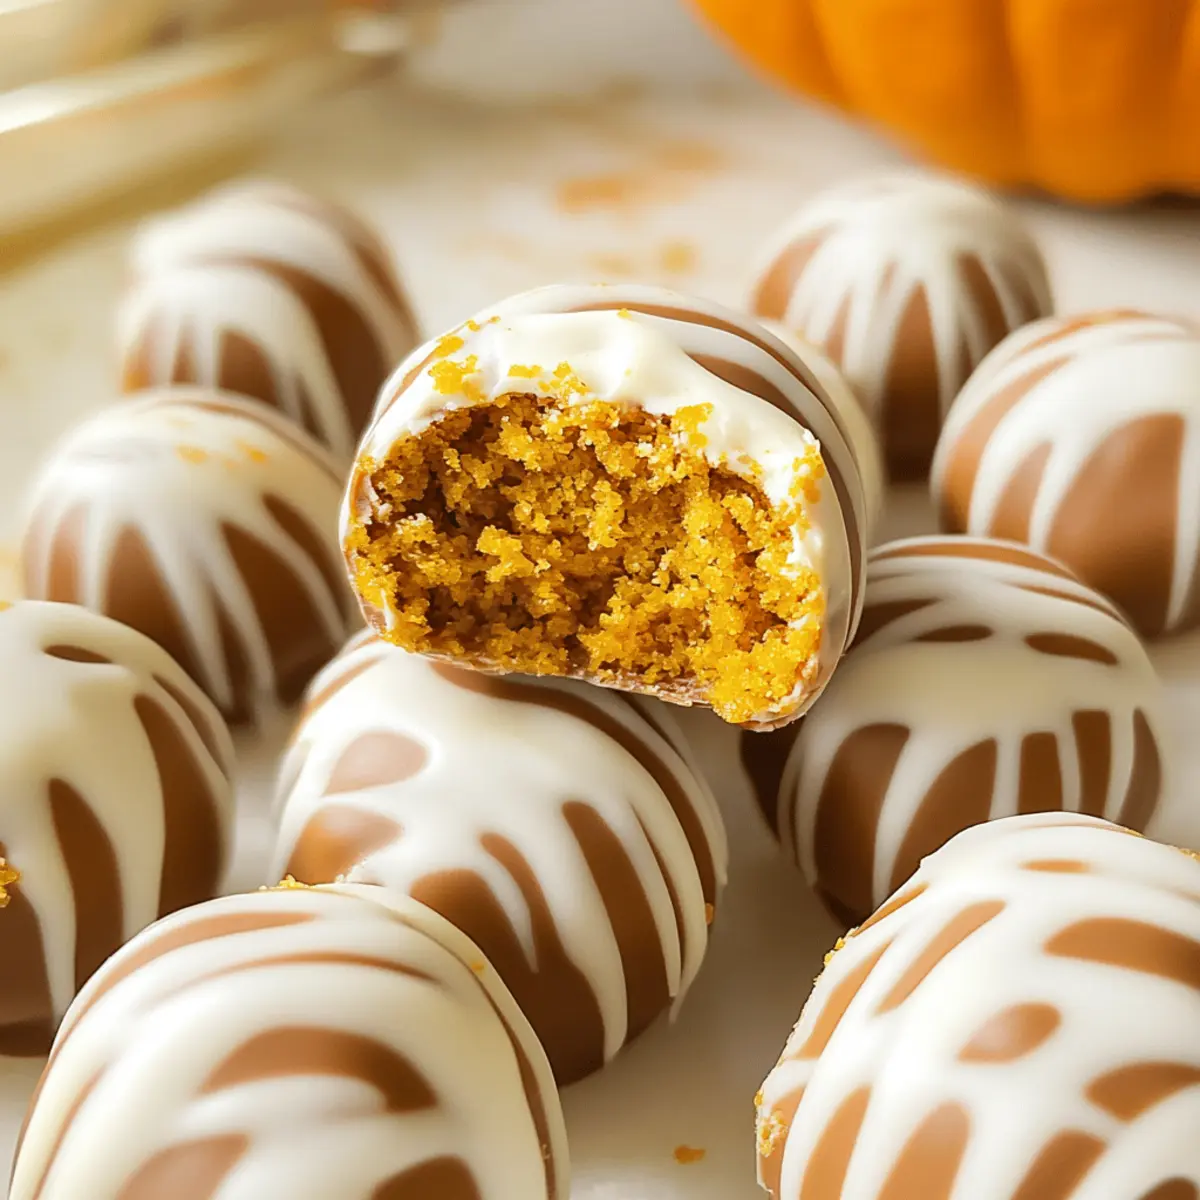
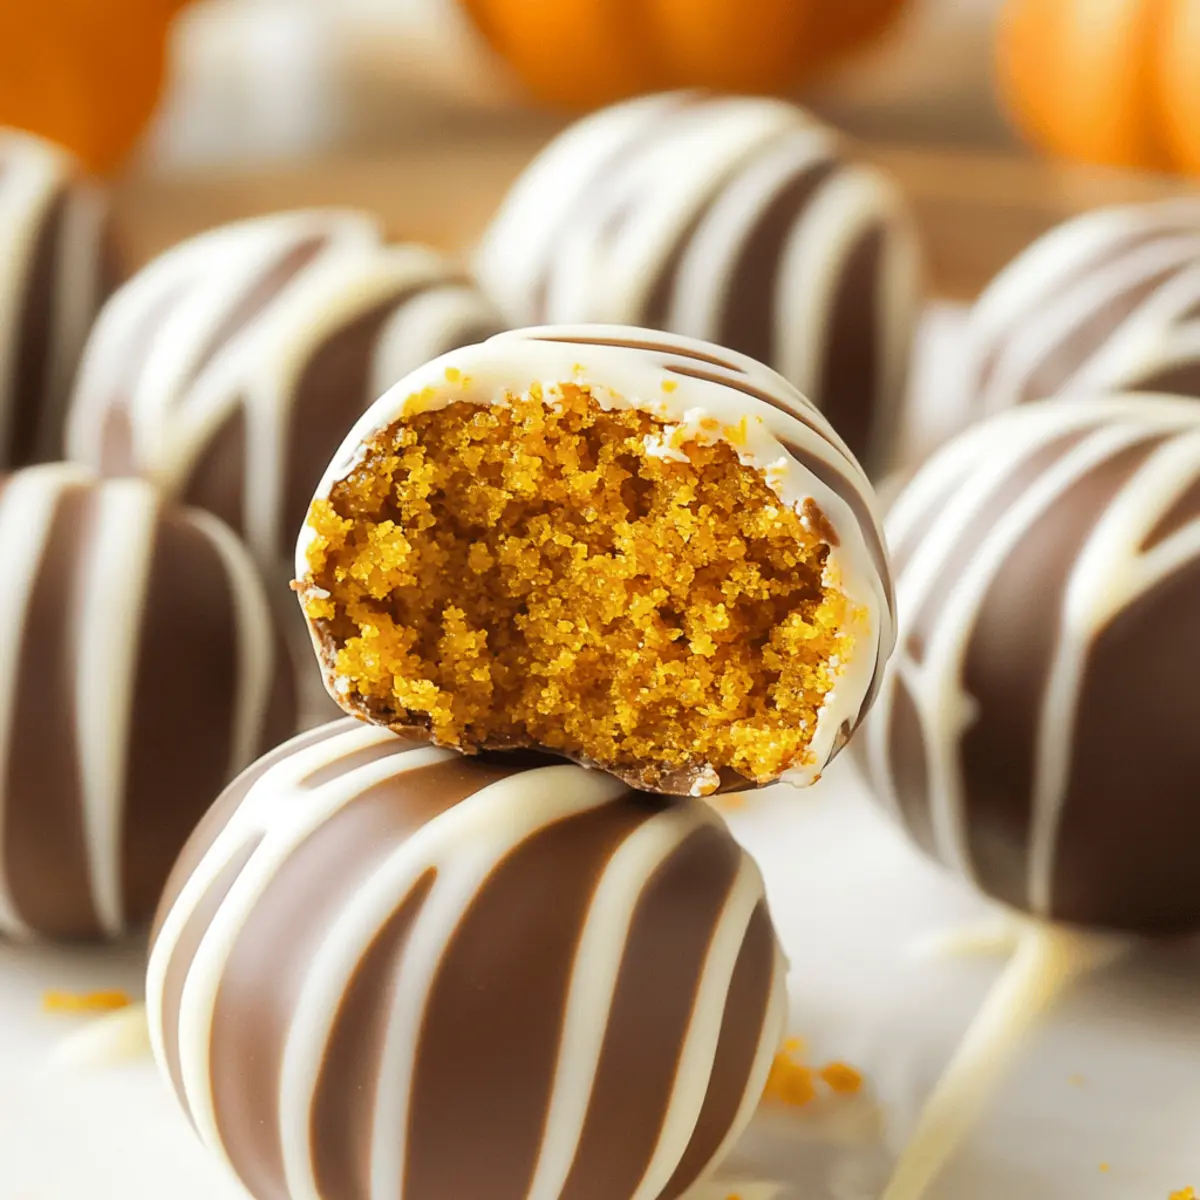
Roll the pumpkin cake mixture into 1½-inch balls, ensuring each one is uniform in size. Place these balls on a piece of wax paper or a baking sheet lined with parchment paper. Once all balls are formed, transfer them to the freezer and chill for about 10-15 minutes. This helps them firm up, making them easier to coat with chocolate.
Step 6: Melt Chocolate
While the cake balls are chilling, it’s time to melt the chocolate. In a microwave-safe bowl, heat your choice of white or milk chocolate in 30-second intervals, stirring between each, until fully melted and smooth. Alternatively, you can use a double boiler on the stovetop for a gentle melting process. Aim for a glossy, dip-ready consistency without any lumps.
Step 7: Coat Cake Balls
Once your cake balls are chilled and your chocolate is melted, dip each pumpkin cake ball into the melted chocolate, ensuring it’s completely coated. Use a fork to lift it out, allowing excess chocolate to drip off. Place the coated cake pops back onto the wax paper to set. Repeat this process until all cake balls are coated, making sure to work quickly before the chocolate hardens.
What to Serve with Moist Pumpkin Cake Pops?
As the air turns crisp with the beauty of fall, pairing these delightful treats opens up a world of cozy flavors and vibrant gatherings.
- Spiced Apple Cider: A warm glass of spiced apple cider enhances the flavors of pumpkin with its perfectly balanced sweetness and spices.
- Creamy Hot Chocolate: Rich, creamy hot chocolate adds a comforting warmth, perfect for an afternoon treat while savoring the cake pops.
- Caramel Drizzle: Drizzling homemade caramel over the cake pops further elevates their sweetness, adding an indulgent touch reminiscent of autumn fairs.
- Mixed Nuts: A bowl of crunchy mixed nuts provides a delightful contrast in texture, offering a satisfying bite alongside the soft cake pops.
- Cheesecake Bites: Pairing with small cheesecake bites offers a creamy and tangy flavor balance, creating a delightful dessert platter for guests.
- Pumpkin Spice Muffins: Complement the cake pops with soft pumpkin spice muffins; the familiar flavors will create a stunning fall dessert table!
- Roasted Pumpkin Seeds: Serve roasted pumpkin seeds as a savory snack to enhance your fall theme; their crunch beautifully contrasts the softness of the cake pops.
- Chocolate Milk: Cool and sweet chocolate milk is a fun pairing that children (and adults!) love, making these cake pops even more enjoyable.
- Whipped Cream Topping: A dollop of spiced whipped cream alongside the cake pops adds a delightful creaminess, inviting you to indulge even more.
With these pairing ideas, your dessert experience will be unforgettable, celebrating all the cozy flavors of the season!
Pumpkin Cake Pops: Variations & Substitutions
Feel free to let your creativity shine and customize these cake pops however you like!
-
Vegan Delight: Substitute the cream cheese with a plant-based cream cheese and use coconut oil in place of butter for a dairy-free option.
Transforming the flavors while keeping it vegan can be both fun and fulfilling. -
Gluten-Free: Opt for a gluten-free cake mix or use almond flour instead of regular flour for a gluten-free twist on the cake base.
This means everyone can enjoy these delicious treats at gatherings, ensuring no one is left out! -
Nutty Flavor: Add chopped walnuts or pecans to the cake mixture for a delightful crunch and richer flavor.
The nutty bits add a lovely texture contrast with every bite, enhancing the overall experience. -
Spice it Up: Incorporate cinnamon, nutmeg, or even ginger into the cake batter for an extra kick of flavor.
This subtle change can evoke even more of that cozy fall feel, reminiscent of spiced desserts enjoyed during the holidays. -
Dairy-Free Frosting: Chefs can use a dairy-free frosting option, such as a whipped coconut cream frosting instead of traditional cream cheese frosting.
Enjoy a delightful twist without sacrificing creamy goodness while making it accessible for those with dairy sensitivities! -
Pop-fect Decoration: Instead of coating with chocolate, consider rolling the pops in crushed graham crackers or assorted colored sprinkles for a festive touch.
Play with presentation to elevate your pumpkin cake pops from delicious to absolutely stunning! -
Sweet Heat: For those who love a kick, add a touch of cayenne pepper to the cake batter for a spicy flavor profile, balancing sweetness with heat.
This daring twist could surprise your guests in the best way possible, truly leaving a lasting impression! -
Chocolate Lovers: Dip the cake balls in dark chocolate for a deeper flavor, or drizzle melted chocolate over the tops for an elegant finish.
A simple swap like this will cater to chocolate lovers, making every pop a delightful indulgence!
Explore these variations to make your pumpkin cake pops truly your own and delightful for every occasion—happy baking!
Expert Tips for Perfect Pumpkin Cake Pops
-
Room Temperature Ingredients: Always use room temperature cream cheese and butter for frosting that blends smoothly without lumps.
-
Consistent Size: For uniform pops, use a cookie scoop to measure your mixture; this keeps them looking neat and ensures even baking.
-
Less Mess: Keep your hands clean and dry while rolling the cake balls to prevent them from sticking to your fingers—wash frequently!
-
Chocolate Dipping: Work quickly when coating the cake pops to prevent the chocolate from setting too fast; dip them in batches.
-
Experiment: Don’t hesitate to try a variety of toppings like sprinkles or nuts—pumpkin cake pops can be uniquely personalized!
Make Ahead Options
These Moist Pumpkin Cake Pops are perfect for meal prep! You can bake the pumpkin cake and make the cream cheese frosting up to 24 hours in advance. Simply store the cooled cake in an airtight container at room temperature, and refrigerate the frosting in a separate container until you’re ready to assemble. When it’s time to whip up your cake pops, crumble the cake, mix in the frosting, and form your balls. For added convenience, you can also freeze the formed cake balls for up to 3 months before coating. Just remember to let them thaw before dipping in chocolate to ensure a smooth finish. This prep-ahead strategy makes creating delicious Pumpkin Cake Pops a breeze, saving you precious time when you need it!
How to Store and Freeze Pumpkin Cake Pops
Room Temperature: Store the pumpkin cake pops in an airtight container at room temperature for up to 3 days. This keeps them soft and delicious, perfect for immediate enjoyment!
Fridge: For longer freshness, keep the cake pops in the refrigerator for up to a week. Make sure they are in a sealed container to prevent them from absorbing any fridge odors.
Freezer: If you want to make these pumpkin cake pops ahead of time, freeze the uncoated cake balls for up to 3 months. Just let them thaw before coating with chocolate.
Reheating: There’s no need to reheat these treats, but if you prefer your cake pops warm, briefly microwave them for about 10-15 seconds. Enjoy your delicious Pumpkin Cake Pops!
Pumpkin Cake Pops Recipe FAQs
What type of pumpkin should I use for the cake?
Absolutely! You can use fresh pumpkin or canned pumpkin puree for making your Pumpkin Cake Pops. If you choose fresh pumpkin, select small to medium-sized sugar pumpkins. They have a sweeter flavor and a smoother texture. Cut them into manageable pieces, remove the seeds, and roast until tender. Puree it in a blender or food processor for a smooth consistency.
How should I store my Pumpkin Cake Pops?
You can store your pumpkin cake pops in an airtight container at room temperature for up to 3 days. If you want to keep them for longer, refrigerate them in a sealed container for up to a week. This will help retain their moistness and flavor. Don’t forget to keep them away from strong-smelling foods, as they can absorb odors!
Can I freeze Pumpkin Cake Pops?
Very! To freeze your pumpkin cake pops, first freeze the uncoated cake balls for up to 3 months. Arrange them in a single layer on a baking sheet and freeze them until solid. Then transfer them to a freezer-safe container or bag. When you’re ready to enjoy them, simply let them thaw in the refrigerator, then coat them with melted chocolate as directed.
What can I do if my cake pops are falling apart?
If you find your cake pops crumbling or falling apart, it usually means the mixture isn’t holding together enough. Try adding a bit more frosting to the crumbled cake to create a thicker consistency that sticks well together. If that doesn’t work, you can also chill the mixture further to help it set before forming the balls, as this can create a more stable dough.
Are there any dietary considerations for Pumpkin Cake Pops?
Absolutely! If you have any allergies, you can make substitutions easily. For those with dairy allergies, consider using vegan cream cheese and butter alternatives. If you want to avoid gluten, you can use a gluten-free cake mix for the base. Always check your chocolate coating options too, as some brands may contain dairy or other allergens.
Can I use other types of frosting instead of cream cheese?
Certainly! If cream cheese isn’t your favorite, you can switch it out for a vanilla frosting or a chocolate ganache for a different flavor profile. Each option brings a unique touch to your pumpkin cake pops. Just remember to adjust the sweetness by tasting as you go, ensuring your delightful treats remain perfectly balanced!

Irresistibly Moist Pumpkin Cake Pops with Cream Cheese Frosting
Ingredients
Equipment
Method
- Preheat oven to 350°F (175°C). Prepare the cake according to the instructions on the mix or your recipe. Bake for 25-30 minutes.
- While the cake cools, beat together cream cheese and butter, then gradually mix in confectioners' sugar until fluffy.
- Crumble the cooled cake into a bowl until fine.
- Combine the crumbled cake with the frosting until it forms a dough-like consistency.
- Roll into 1½-inch balls and chill in the freezer for 10-15 minutes.
- Melt the chocolate in a microwave-safe bowl, stirring until smooth.
- Dip each cake ball in melted chocolate, then let them set back on wax paper.