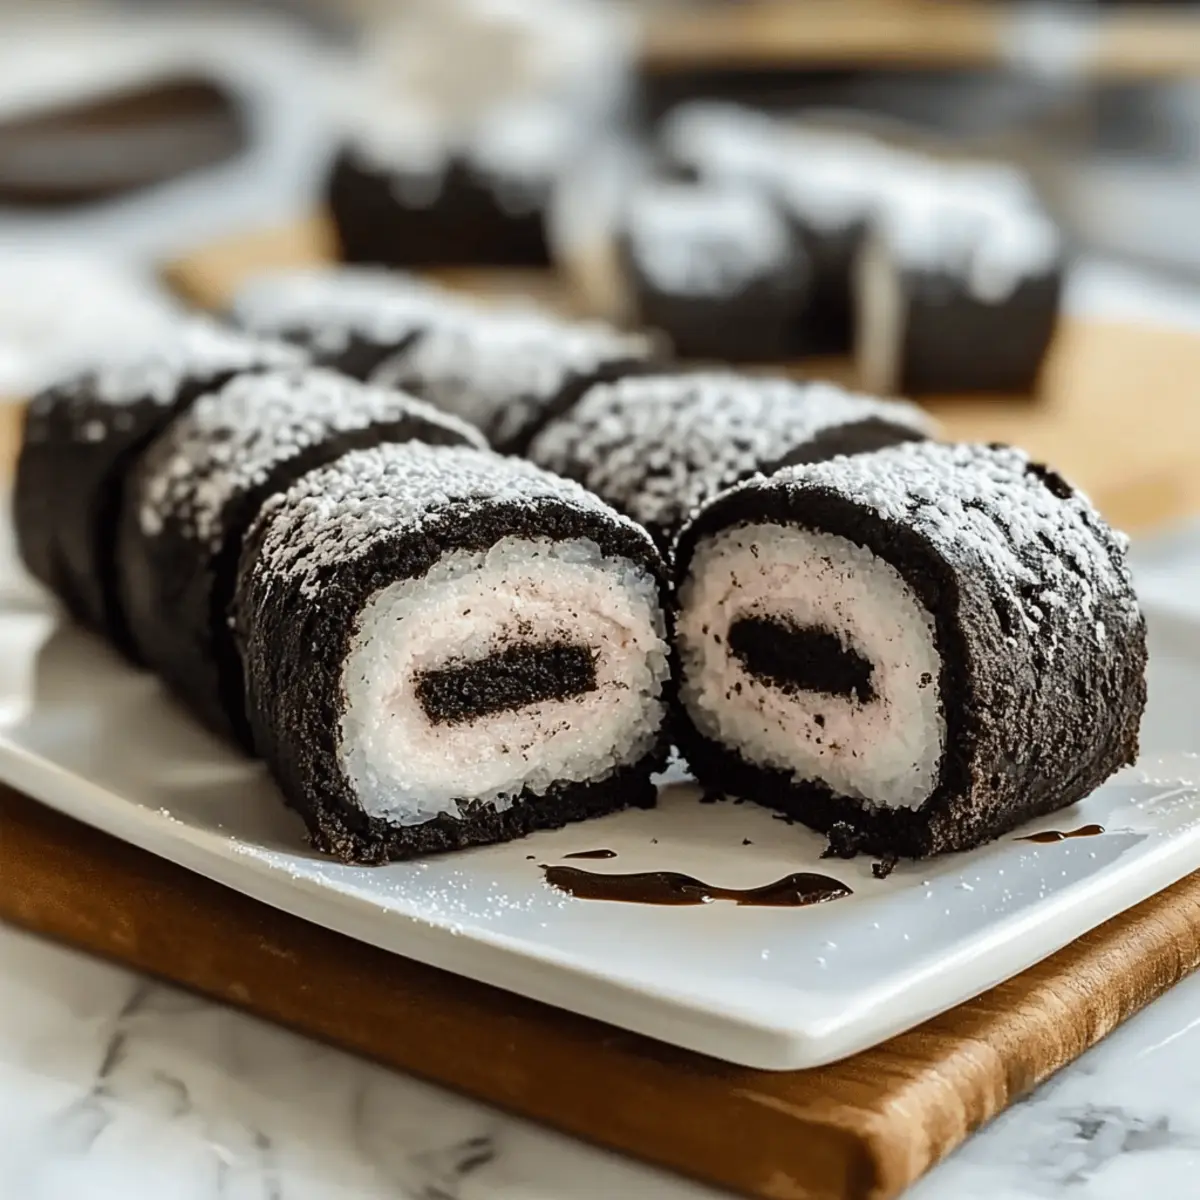
As I stood in my kitchen, I couldn’t resist the playful idea of reinventing one of my all-time favorite treats: Oreos. Now, everyone loves a good cookie, but have you ever tried making Oreo Sushi? This quick dessert brings a fun, no-bake twist that transforms classic Oreos into delightful sushi-like rolls. With just two ingredients—Oreos and milk—this easy-to-make recipe is a guaranteed hit for both kids and adults alike. It not only serves as a great way to unleash your creativity in the kitchen, but it’s also perfect for satisfying those sweet cravings without the fuss. So, are you ready to roll? Let’s dive into the world of Oreo Sushi and explore the endless variations that will take your dessert game to a whole new level!
Why Try Oreo Sushi Today?
Simplicity at its best: Just two ingredients make this no-bake dessert a breeze to whip up. Kid-friendly and fun: This playful approach to Oreos gets the little ones involved in the kitchen. Versatile options allow you to switch up flavors based on your favorite Oreo varieties or favorite toppings. Crowd-pleaser guaranteed: Serve these delightful rolls at parties, and watch everyone gather around for more! Not sure where to get started? Check out these Spicy Shrimp Sushi ideas for another creative twist in the realm of sushi-inspired treats!
Oreo Sushi Ingredients
For the Sushi Rolls
- Oreos – The star of this recipe; feel free to explore various Oreo flavors for a fun twist!
- Milk – This binds the crushed Oreos together; any milk (dairy or non-dairy) will work beautifully.
Optional Toppings
- Fresh fruit slices – Adding strawberries, bananas, or even raspberries will elevate your Oreo Sushi with bursts of flavor.
- Melted chocolate – Drizzle on top for an extra indulgent touch; perfect for chocolate lovers!
- Crushed nuts or coconut flakes – These can add a delightful crunch and texture to your rolls.
Step‑by‑Step Instructions for Oreo Sushi
Step 1: Separate the Oreos
Twist each Oreo to separate the cookie halves from the cream filling. Place the cream filling in a bowl and transfer the cookie halves into a sturdy zip-top bag. This process should take about 5 minutes, and you’ll want to keep everything organized for the next steps.
Step 2: Prepare the Cookie Base
Seal the zip-top bag and use a rolling pin to crush the cookie halves into fine crumbs. Aim for a texture similar to sand—this should take about 2-3 minutes. In a separate bowl, gradually mix the crushed cookie crumbs with milk until a thick, dough-like paste forms, which takes another 2-3 minutes.
Step 3: Assemble the Roll
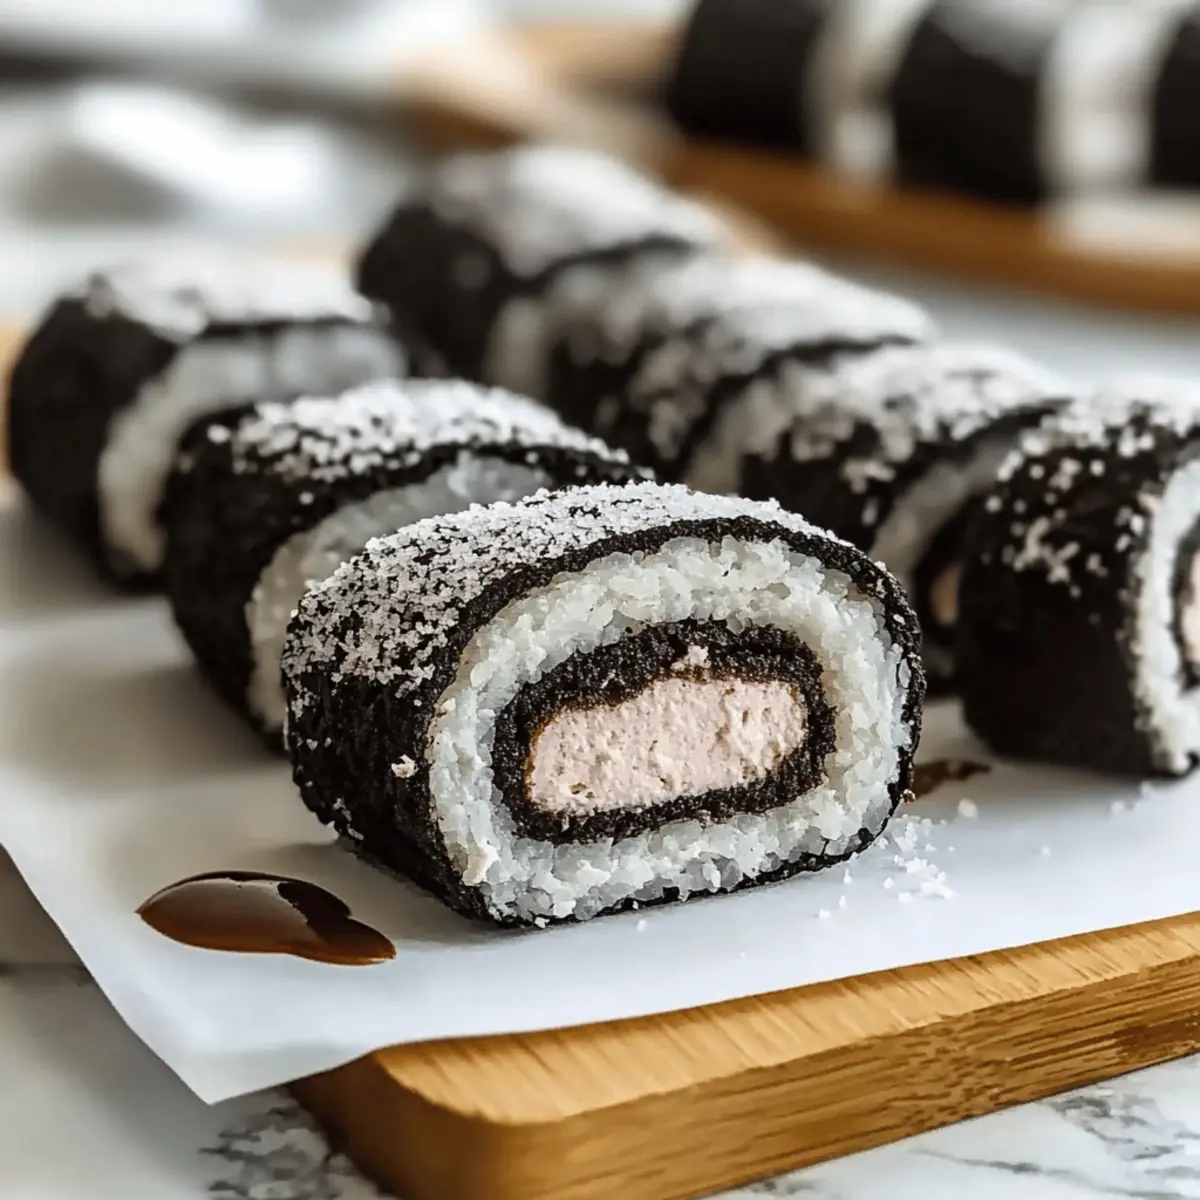
Lay down a sheet of plastic wrap on a flat surface, creating a convenient workspace. Spread the cookie paste evenly over the wrap, leaving a small border around the edges. After that, layer the cream filling on top of the cookie paste, ensuring an even distribution. This should only take about 5 minutes.
Step 4: Roll and Slice
Using the plastic wrap, carefully lift one edge and start rolling the mixture tightly into a log shape. Securely wrap it in the plastic wrap, ensuring there are no gaps. Refrigerate the roll for about 15-20 minutes to firm up before slicing. This step allows the Oreo Sushi to hold its shape.
Step 5: Serve
Once chilled, remove the log from the plastic wrap and place it on a cutting board. Using a sharp knife, slice the roll into bite-sized pieces, resembling sushi. Arrange the delightful Oreo sushi pieces on a serving plate and enjoy them plain or with optional dipping sauces like chocolate sauce or whipped cream for an extra touch.

Storage Tips for Oreo Sushi
- Fridge: Store leftover Oreo Sushi in an airtight container in the refrigerator to maintain freshness for up to 3 days. Keeping it sealed helps prevent it from drying out.
- Freezer: For longer storage, you can freeze the slices for up to 1 month. Place them in a single layer on a baking sheet until frozen solid, then transfer to an airtight container.
- Reheating: If you prefer to enjoy your Oreo Sushi slightly warmed, microwave for about 10-15 seconds. This brings back some of the creamy texture without compromising the overall flavor.
- Serving After Storage: After refrigeration or freezing, let the Oreo Sushi sit at room temperature for a few minutes before serving. This enhances the taste and texture, making it just as delicious as when freshly made.
Oreo Sushi Variations & Substitutions
Feel free to let your creativity shine as you explore delicious twists on this fun dessert!
-
Add Fruits: Enhance your rolls with fresh slices of strawberries or bananas for a burst of flavor and freshness.
-
Different Oreo Flavors: Try seasonal flavors like pumpkin spice or birthday cake for a unique twist on the classic Oreo experience.
-
Incorporate Toppings: After slicing, dip in melted chocolate or drizzle with caramel. You can also sprinkle crushed nuts or coconut flakes for added texture.
-
Frozen Version: Chill the rolls in the freezer for a refreshing summer treat. This gives your Oreo Sushi an exciting crunchy bite!
-
Nut Butter Swirl: Spread a layer of creamy peanut or almond butter over the cookie base before rolling for a nutty flavor that complements the sweetness of the Oreos.
-
Spice It Up: Add a sprinkle of cinnamon or a dash of chili powder to the cookie mixture for a surprising heat that pairs perfectly with the sweetness.
-
Cheesecake Style: Mix in some whipped cream cheese with the Oreo filling for a dreamy cheesecake-inspired dessert. It adds richness that’s absolutely irresistible!
-
Dipping Sauce Variations: Elevate your experience by serving with a variety of sauces like raspberry coulis or matcha cream alongside your favorite Spicy Shrimp Sushi for a fun fusion feast; the contrast will delight your guests!
Expert Tips for Making Oreo Sushi
-
Perfect Consistency: Ensure your cookie mixture is thick enough to hold its shape while rolling. Too thin, and it will crumble apart.
-
Fine Crumbs: Always crush the Oreos into fine crumbs. Coarse crumbs will lead to an uneven texture and may cause the roll to fall apart.
-
Keep It Cool: Refrigerate your roll for the recommended time. This helps the Oreo Sushi firm up, making slicing easier and keeping everything intact.
-
Flavor Combinations: Don’t hesitate to mix in different flavored Oreos or toppings. This is an easy way to customize your Oreo Sushi to suit your taste!
-
Dipping Sauces: Enhance your dessert experience with complementary sauces—chocolate or caramel can elevate the sweet flavors of your Oreo Sushi.
Make Ahead Options
These Oreo Sushi rolls are perfect for meal prep enthusiasts looking to save time during busy weeknights! You can prepare the cookie base and assemble the rolls up to 24 hours in advance by following the initial steps. Simply crush the Oreos, mix them with milk, and spread the mixture on plastic wrap, adding the cream filling, then roll it up tightly. Once wrapped, refrigerate the log to retain its freshness. When you’re ready to enjoy your tasty creation, just slice the roll into bite-sized pieces and arrange them beautifully on a platter. This way, you’ll have a delightful dessert ready to impress with minimal effort!
What to Serve with Oreo Sushi?
Create a dessert experience that delights all your senses with delicious pairings!
- Whipped Cream: A dollop of light and airy whipped cream adds a touch of sweetness that perfectly complements the crunchy Oreo rolls.
- Chocolate Sauce: Drizzling rich chocolate sauce over Oreo Sushi not only enhances the flavor but brings a delightful visual impact to your dessert presentation.
- Fresh Fruit Salad: Bright and juicy fruit cuts, like strawberries and bananas, add freshness which balances the sweetness and adds a burst of color.
- Matcha Green Tea: This earthy, slightly bitter tea offsets the sweetness of Oreo Sushi, providing a refreshing cleanse for the palate.
- Peanut Butter Dip: Creamy peanut butter dip adds a savory twist that pairs unexpectedly well with sweet Oreo rolls, creating a mouthwatering contrast.
- Coconut Flakes: Sprinkling toasted coconut flakes on top gives each bite a tropical flair and delightful texture.
- Vanilla Ice Cream: A scoop of creamy vanilla ice cream alongside Oreo Sushi adds an indulgent, cool element for the ultimate treat experience.
- Caramel Sauce: For those who like a sweeter finish, a drizzle of caramel sauce offers a luxurious touch to each bite, elevating the dessert.
- Milkshakes: A classic milkshake is the perfect drink to wash down the sweet and creamy flavors, reinforcing the fun, nostalgic vibe of knowing no-bake treats.

Oreo Sushi Recipe FAQs
How do I choose the right Oreos for my Oreo Sushi?
Absolutely! The beauty of Oreo Sushi lies in its versatility. You can use any flavor of Oreos that strikes your fancy—classic, double stuff, or seasonal flavors like pumpkin spice or peppermint. Just remember, the cream filling adds sweetness, so consider the flavor combination you want.
How should I store leftover Oreo Sushi?
For best freshness, store leftover Oreo Sushi in an airtight container in the refrigerator, where it can last up to 3 days. This helps retain the creaminess and prevents the cookie base from drying out. Just make sure to keep it sealed tightly!
Can I freeze Oreo Sushi?
Yes! You can freeze Oreo Sushi for up to 1 month. To do this, slice the sushi and place the pieces in a single layer on a baking sheet. Freeze until solid, then transfer to an airtight container, separating layers with parchment paper. When ready to enjoy, let them thaw in the refrigerator for a few hours.
What should I do if my Oreo Sushi falls apart when slicing?
Very common! If your sushi roll crumbles while slicing, it could be due to two reasons: you may not have crushed the Oreos fine enough, or the mixture wasn’t thick enough. Make sure to crush Oreos until they resemble sand and adjust the milk gradually so that the dough holds together well. Try refrigerating the roll a bit longer to firm it up before slicing.
Are there any dietary considerations for making Oreo Sushi?
Of course! If you’re concerned about allergies, make sure to check the packaging of Oreos as they may contain gluten, dairy, or nut traces depending on the flavor. For a dairy-free option, you can use non-dairy milk, and if you’re considering pet-friendly treats, remember that chocolate is toxic to dogs, so keep your Oreo sushi out of their reach!
Can I add other ingredients to my Oreo Sushi?
The more the merrier! You can absolutely get creative with your Oreo Sushi by adding fresh fruit slices, different flavored Oreos, or even crushed nuts for extra texture. For a fun twist, drizzle melted chocolate or caramel on top after slicing for a decadent finish!
Oreo Sushi: Fun No-Bake Treats for Sweet Lovers Everywhere
Ingredients
Equipment
Method
- Twist each Oreo to separate the cookie halves from the cream filling. Place the cream filling in a bowl and the cookie halves in a zip-top bag.
- Seal the zip-top bag and crush the cookie halves into fine crumbs using a rolling pin. Mix with milk in a bowl until a thick paste forms.
- Lay a sheet of plastic wrap and spread the cookie paste evenly, leaving a border. Layer the cream filling on top evenly.
- Using the plastic wrap, roll the mixture tightly into a log shape and wrap securely. Refrigerate for about 15-20 minutes to firm up.
- Slice the roll into bite-sized pieces resembling sushi and serve on a plate. Enjoy plain or with optional dipping sauces.