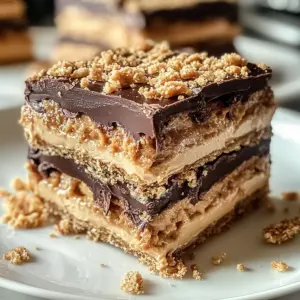
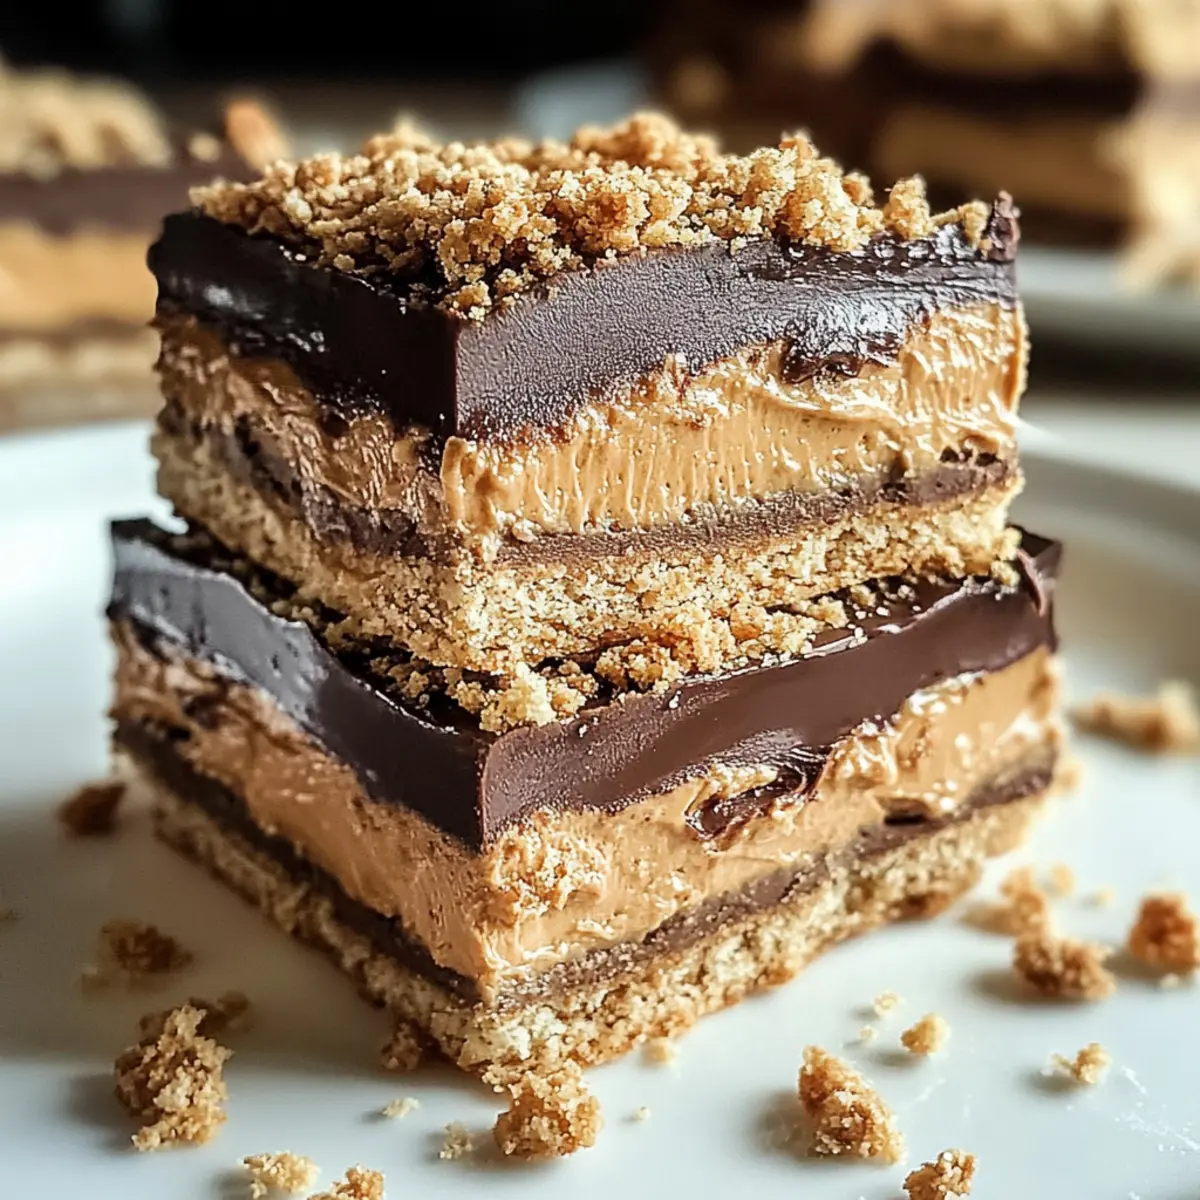
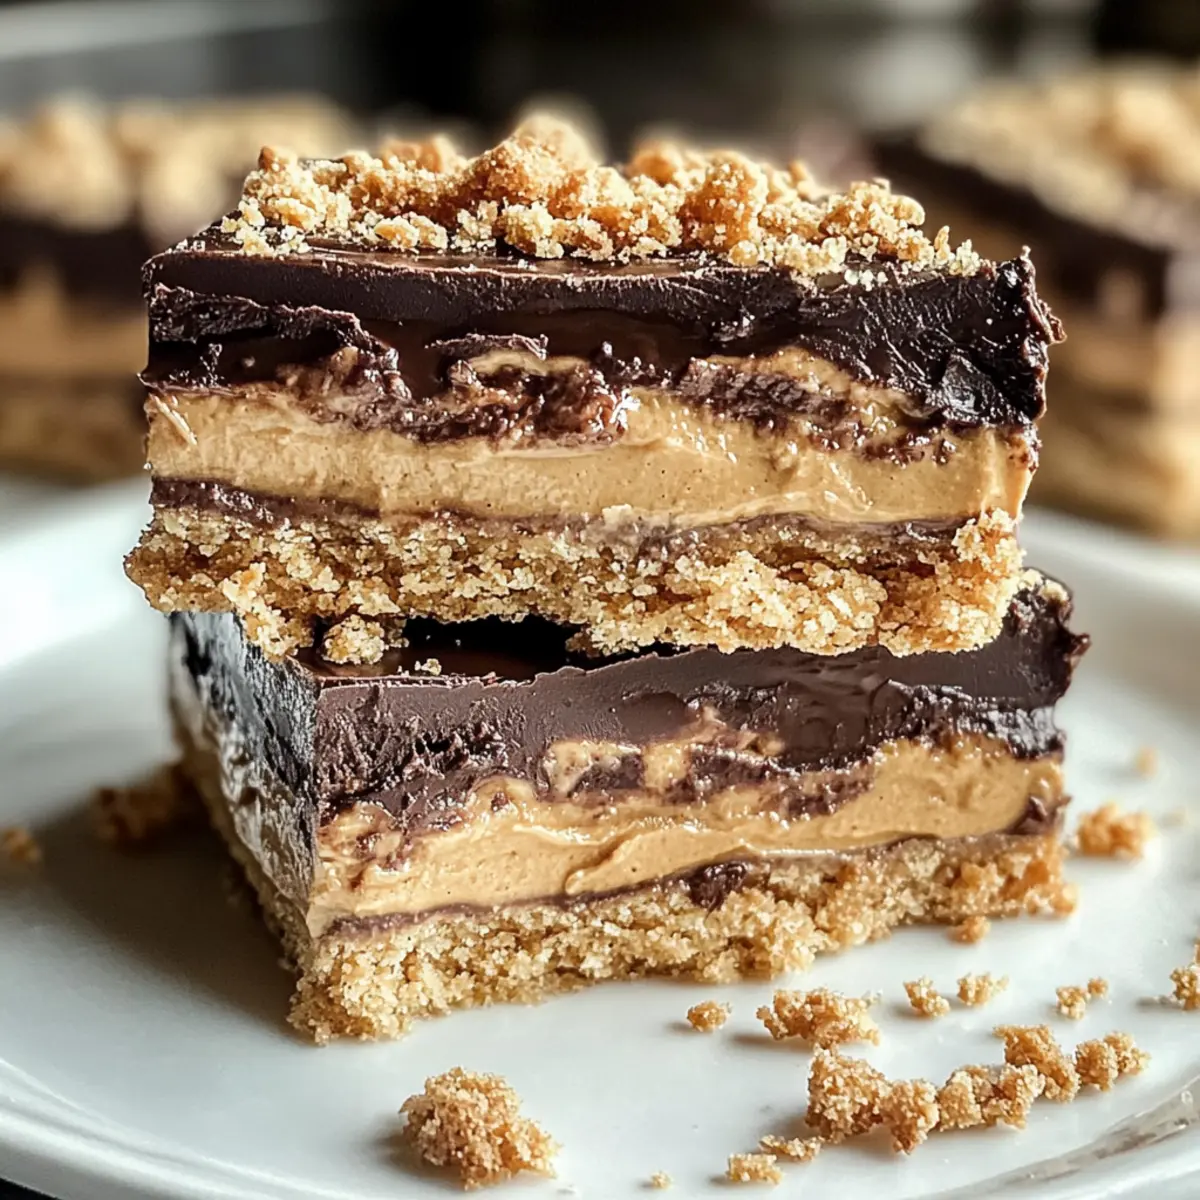
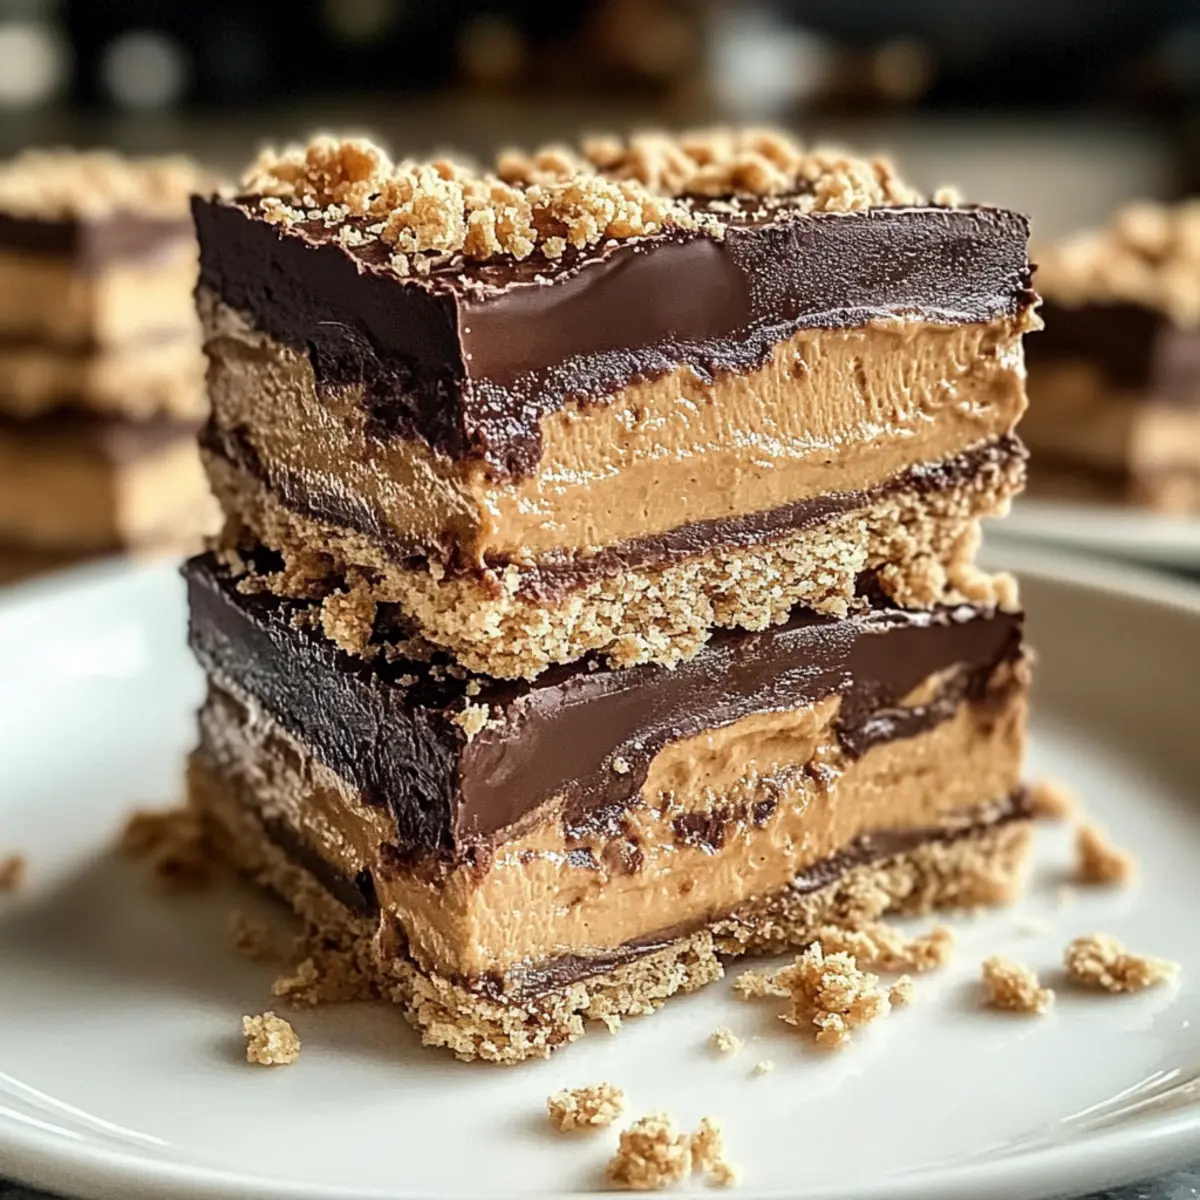
Walking through the gates of Disneyland often feels like stepping into a world of magic, where every corner invites a taste of nostalgia. One of my fondest memories is indulging in those delightful treats, and today, I’m excited to share my version of No-Bake Disneyland Peanut Butter Sandwich Bars. These sweet gems feature a luscious peanut butter filling sandwiched between crispy graham crackers and melted chocolate, making them an irresistible dessert for any occasion. With just a quick prep time of 10 minutes and no oven required, they’re perfect for impressing guests at parties or simply treating yourself after a long day. Plus, you can easily customize them with various toppings to really make them your own. Ready to transport your taste buds to the happiest place on earth? Let’s get started!
Why are these bars a must-try?
Quick and Easy: With a preparation time of just 10 minutes, you can whip up these delicious bars without any fuss.
No-Bake Delight: No need for baking skills! This recipe is perfect for those who crave something sweet without the oven hassle.
Rich, Creamy Filling: The luscious peanut butter filling combined with layers of chocolate creates a melt-in-your-mouth experience that everyone will love.
Customizable Treat: Feel free to mix things up! Add nuts, drizzle caramel, or swap ingredients to personalize these bars to your taste.
Crowd-Pleaser: Perfect for parties or family gatherings, these bars are sure to impress and satisfy your guests’ sweet cravings!
If you’re interested in more quick desserts, check out some of my other delightful no-bake recipes.
No-Bake Disneyland Peanut Butter Sandwich Bars Ingredients
For the Bars
• Graham Crackers – Provide structure and a crunchy texture; substitute with crushed digestive biscuits or vanilla wafers if needed.
• Creamy Peanut Butter – Adds rich flavor and creaminess; feel free to use crunchy peanut butter for added texture.
• Softened Butter – Binds the filling together and adds moisture; ensure it’s fully softened for easy mixing.
• Vanilla Extract – Enhances the overall flavor of the bars; use pure vanilla for the best taste.
• Salt – Balances sweetness and enhances flavors; Himalayan pink salt can be a good substitute.
• Powdered Sugar – Sweetens the filling and helps achieve a smooth consistency; adjust to taste.
For the Chocolate Coating
• Shortening – Helps chocolate melt smoothly and remain glossy; can be replaced with coconut oil if desired.
• Semi-Sweet Chocolate Chips – Used for layering and topping to provide a rich chocolate flavor; dark chocolate chips work well for a deeper taste.
With these wonderful ingredients in hand, you’re just a few steps away from creating your own No-Bake Disneyland Peanut Butter Sandwich Bars!
Step‑by‑Step Instructions for No-Bake Disneyland Peanut Butter Sandwich Bars
Step 1: Prepare Your Dish
Start by spraying an 8½ x 11 inch glass baking dish with non-stick spray to ensure easy removal of your deliciousNo-Bake Disneyland Peanut Butter Sandwich Bars once set. Make sure to cover the entire surface evenly, and set the dish aside while you prepare the filling.
Step 2: Crush Crackers
Take two sheets of graham crackers and place them into a zip-top bag. Using a rolling pin, crush the crackers into small, even crumbs—this should take about 1-2 minutes. Aim for a fine texture, as this will provide a great base for your bars, and set the crushed crackers aside.
Step 3: Mix Filling
In a mixing bowl, combine 1 cup of creamy peanut butter, ½ cup of softened butter, 1 teaspoon of vanilla extract, and a pinch of salt. Use a hand mixer to blend these ingredients for about 2-3 minutes until smooth and creamy. Gradually add in 2 cups of powdered sugar, mixing until just combined and the mixture is smooth and fluffy.
Step 4: Melt Chocolate
In a microwave-safe bowl, combine 1 cup of semi-sweet chocolate chips with 2 tablespoons of shortening. Heat the mixture in the microwave for 30 seconds, then stir. Repeat this process until the chocolate is fully melted and smooth—this should take around 1-2 minutes, being careful not to overheat and burn the chocolate.
Step 5: Layer Ingredients
Lay down six whole graham crackers in the bottom of your prepared baking dish. Drizzle one-third of the melted chocolate over the crackers, ensuring even coverage. Next, spread one-third of the peanut butter mixture over the chocolate layer, smoothing it out gently with a spatula to create an even layer.
Step 6: Repeat Layers
Add yet another third of the melted chocolate over the peanut butter layer. Place another six graham crackers on top, pressing down gently. Finish with the remaining peanut butter mixture, then top with the rest of the melted chocolate. Be sure to spread it evenly to coat the top layer.
Step 7: Add Texture
To enhance the appearance and crunch of your No-Bake Disneyland Peanut Butter Sandwich Bars, sprinkle some crushed graham cracker crumbs over the top layer of melted chocolate. This not only adds some extra texture but also makes your dessert visually appealing.
Step 8: Chill and Serve
Refrigerate the dish for at least one hour to allow the bars to firm up and set properly. Once chilled, carefully cut them into squares using a sharp knife. The bars should be firm yet slightly soft in the center, perfect for indulging your sweet tooth.
Expert Tips for No-Bake Disneyland Peanut Butter Sandwich Bars
-
Softened Butter is Key: Ensure your butter is fully softened to achieve a creamy peanut butter filling that mixes easily without clumping.
-
Chocolate Melting Caution: Avoid overheating chocolate chips. Stir every 30 seconds while melting to prevent burning and maintain a smooth consistency.
-
Layering Perfection: Pay close attention to the layering process. Even layers of peanut butter and chocolate will result in bars that slice perfectly and taste balanced.
-
Chill Time Matters: Let the bars chill for at least one hour. This helps them set properly, ensuring a delightful chewy texture that holds together when sliced.
-
Customize with Care: Feel free to add your favorite toppings or swap in different ingredients, but keep balance in mind—too many add-ins can disrupt the texture of your no-bake bars.
Make Ahead Options
These No-Bake Disneyland Peanut Butter Sandwich Bars are perfect for meal prep enthusiasts! You can prepare the filling and layer the graham crackers up to 24 hours in advance, keeping them covered in the refrigerator to maintain their freshness. To do this, simply follow the instructions to create the filling and layer two sets of graham crackers, but hold off on the final chocolate layer until you’re ready to serve. When it’s time to enjoy your bars, just melt the remaining chocolate, drizzle it over the top, and sprinkle with crushed graham crackers before chilling. This way, you’ll have a delightful, crowd-pleasing dessert ready with minimal effort on busy weeknights!
No-Bake Disneyland Peanut Butter Sandwich Bars Variations
Customize your No-Bake Disneyland Peanut Butter Sandwich Bars for a uniquely delightful experience that suits your taste buds!
-
Nutty Crunch: Add chopped peanuts or almonds to the peanut butter filling for a delicious crunch and nutty flavor boost.
Imagine the satisfying sound of a crispy bite, making each piece even more fun to enjoy! -
Caramel Swirl: Drizzle caramel sauce over the top before chilling for an added layer of sweetness and chewiness.
This twist creates a beautiful contrast with the chocolate, enhancing your dessert’s overall richness! -
Flavored Chocolate: Swap out semi-sweet chocolate chips for milk or dark chocolate to cater to your sweet preferences.
Each chocolate variation brings a different flavor profile; try dark chocolate for a more intense taste. -
Plant-Based Option: Substitute creamy peanut butter with almond butter or sunflower seed butter for a nut-free version.
The creamy texture will remain, and it’s perfect for those with nut allergies looking to indulge! -
S’Mores Style: Layer in mini marshmallows and crumbled graham crackers between the chocolate and peanut butter layers for a fun s’mores-inspired twist.
The marshmallows add a fluffy sweetness that complements the rich flavors beautifully. -
Spicy Kick: Add a pinch of cayenne pepper to your chocolate layer for a surprising heat that balances the sweetness.
It’s an unexpected flavor adventure that’ll leave everyone guessing and enjoying! -
Fruit Flavor: Incorporate a layer of raspberry or strawberry jam between the chocolate and peanut butter for a fruity surprise.
This adds a vibrant pop of flavor that takes your taste buds on a delightful journey! -
Mini Treats: Cut the bars into bite-sized squares for portion-controlled delights; perfect for parties or a midday snack.
These little gems are perfect for sharing and allow everyone to indulge without guilt!
If you’re inspired to explore even more delicious options, make sure to check out my other delightful no-bake recipes that will whisk you away into a world of flavor.
Storage Tips for No-Bake Disneyland Peanut Butter Sandwich Bars
- Room Temperature: These bars can be kept at room temperature for up to 2 hours if serving at a gathering, but for longer freshness, refrigerate them.
- Fridge: Store in an airtight container in the refrigerator for up to 1 week to maintain their creamy texture and flavor.
- Freezer: For longer storage, wrap individual bars in plastic wrap and place them in a freezer-safe bag. These can be frozen for up to 3 months without compromising their deliciousness.
- Reheating: To enjoy, simply thaw in the refrigerator overnight or at room temperature for about 30 minutes before serving. The No-Bake Disneyland Peanut Butter Sandwich Bars remain delightful even when slightly chilled!
What to Serve with No-Bake Disneyland Peanut Butter Sandwich Bars
Indulging in velvety peanut butter bars is a treat, but pairing them with the right accompaniments elevates your dessert experience to a whole new level.
- Fresh Fruit Salad: A mix of vibrant fruits adds a refreshing contrast to the rich bars, balancing sweetness with a burst of natural flavor.
- Vanilla Ice Cream: Creamy and cold, this classic pairing enhances the luscious peanut butter filling, providing a delightful temperature and texture contrast.
- Chocolate Milkshake: This indulgent drink complements the chocolate layers of the bars perfectly, making for a satisfying and nostalgic dessert experience.
- Coffee: The robust flavor of coffee cuts through the sweetness, making it an excellent companion for enjoying a slice of these rich bars.
- Caramel Sauce Drizzle: Elevate your bars with a sweet drizzle of warm caramel, adding a gooey element that takes every bite to new heights.
- Whipped Cream Topping: A light and fluffy addition that adds a delicate touch, creating a delightful contrast against the creamy filling and crunchy texture.
- Nutty Granola: Sprinkling some crunchy granola on top introduces a delightful crunch and a hint of nuttiness that pairs well with the bars’ flavors.
- Milk: A classic choice, this paired beverage refreshes the palate and complements the dessert, dragging nostalgic memories of childhood treats.
- Dairy-Free Yogurt: Consider a scoop on the side for those looking for a lighter option without compromising flavor—its tangy notes offer a compelling contrast!
No-Bake Disneyland Peanut Butter Sandwich Bars Recipe FAQs
How do I select the best graham crackers for this recipe?
Absolutely! When choosing graham crackers, look for ones that are fresh and free from dark spots or breaks, as they should be sturdy enough to hold the layers. Opt for honey-flavored varieties for a touch of added sweetness. Alternatively, crushed digestive biscuits or vanilla wafers make excellent substitutes if you’re looking for variation.
How should I store these Peanut Butter Sandwich Bars?
For optimal freshness, store the No-Bake Disneyland Peanut Butter Sandwich Bars in an airtight container in the refrigerator, where they’ll stay delicious for up to one week. If you want to keep them longer, wrap each bar in plastic wrap or foil and store them in a freezer-safe bag. They can be frozen for up to three months, ensuring you have a sweet treat at the ready!
Can I freeze the Peanut Butter Sandwich Bars? How?
Absolutely! To freeze, slice the bars once they’ve chilled and set. Wrap each piece individually in plastic wrap and place them in a freezer-safe container or bag, making sure to label them with the date. When you’re ready to enjoy, simply thaw them in the refrigerator overnight or let them sit at room temperature for about 30 minutes before serving.
My bars came out too soft. What went wrong?
Very! If your bars are too soft, it could be due to insufficient chilling time; they should be refrigerated for at least one hour to set properly. Make sure you let them cool completely before cutting them. If they still seem too soft after chilling, you can try adding a bit more powdered sugar to the filling for better structure or serve them directly from the fridge to maintain firmness.
Are there any allergy concerns with this recipe?
Yes, indeed! Since the bars contain peanut butter, they are not suitable for anyone with nut allergies. To accommodate dietary restrictions, you can substitute peanut butter with sunflower seed butter or almond butter, though the taste will change slightly. Always check ingredient labels for allergens, especially for the chocolate chips, as they may contain traces of dairy or nuts.
What are some variations I can try for these bars?
The more the merrier! You can enhance the flavor and texture by adding ingredients like chopped nuts, shredded coconut, or a drizzle of caramel. If you want to change the chocolate flavor, try using milk chocolate or white chocolate chips instead of semi-sweet. Customize the recipe based on your preferences; it’s all about making these No-Bake Disneyland Peanut Butter Sandwich Bars truly your own!

No-Bake Disneyland Peanut Butter Sandwich Bars Delight
Ingredients
Equipment
Method
- Start by spraying an 8½ x 11 inch glass baking dish with non-stick spray to ensure easy removal of your No-Bake Disneyland Peanut Butter Sandwich Bars once set.
- Take two sheets of graham crackers and place them into a zip-top bag. Using a rolling pin, crush the crackers into small, even crumbs.
- In a mixing bowl, combine 1 cup of creamy peanut butter, ½ cup of softened butter, 1 teaspoon of vanilla extract, and a pinch of salt. Use a hand mixer to blend until smooth and creamy.
- In a microwave-safe bowl, combine 1 cup of semi-sweet chocolate chips with 2 tablespoons of shortening. Heat the mixture in the microwave for 30 seconds, then stir, repeating until fully melted.
- Lay down six whole graham crackers in the bottom of your prepared baking dish. Drizzle one-third of the melted chocolate over the crackers.
- Spread one-third of the peanut butter mixture over the chocolate layer.
- Add another third of the melted chocolate over the peanut butter layer. Place another six graham crackers on top, pressing down gently.
- Finish with the remaining peanut butter mixture and top with the rest of the melted chocolate.
- Sprinkle some crushed graham cracker crumbs over the top layer of melted chocolate.
- Refrigerate the dish for at least one hour, then cut into squares with a sharp knife.