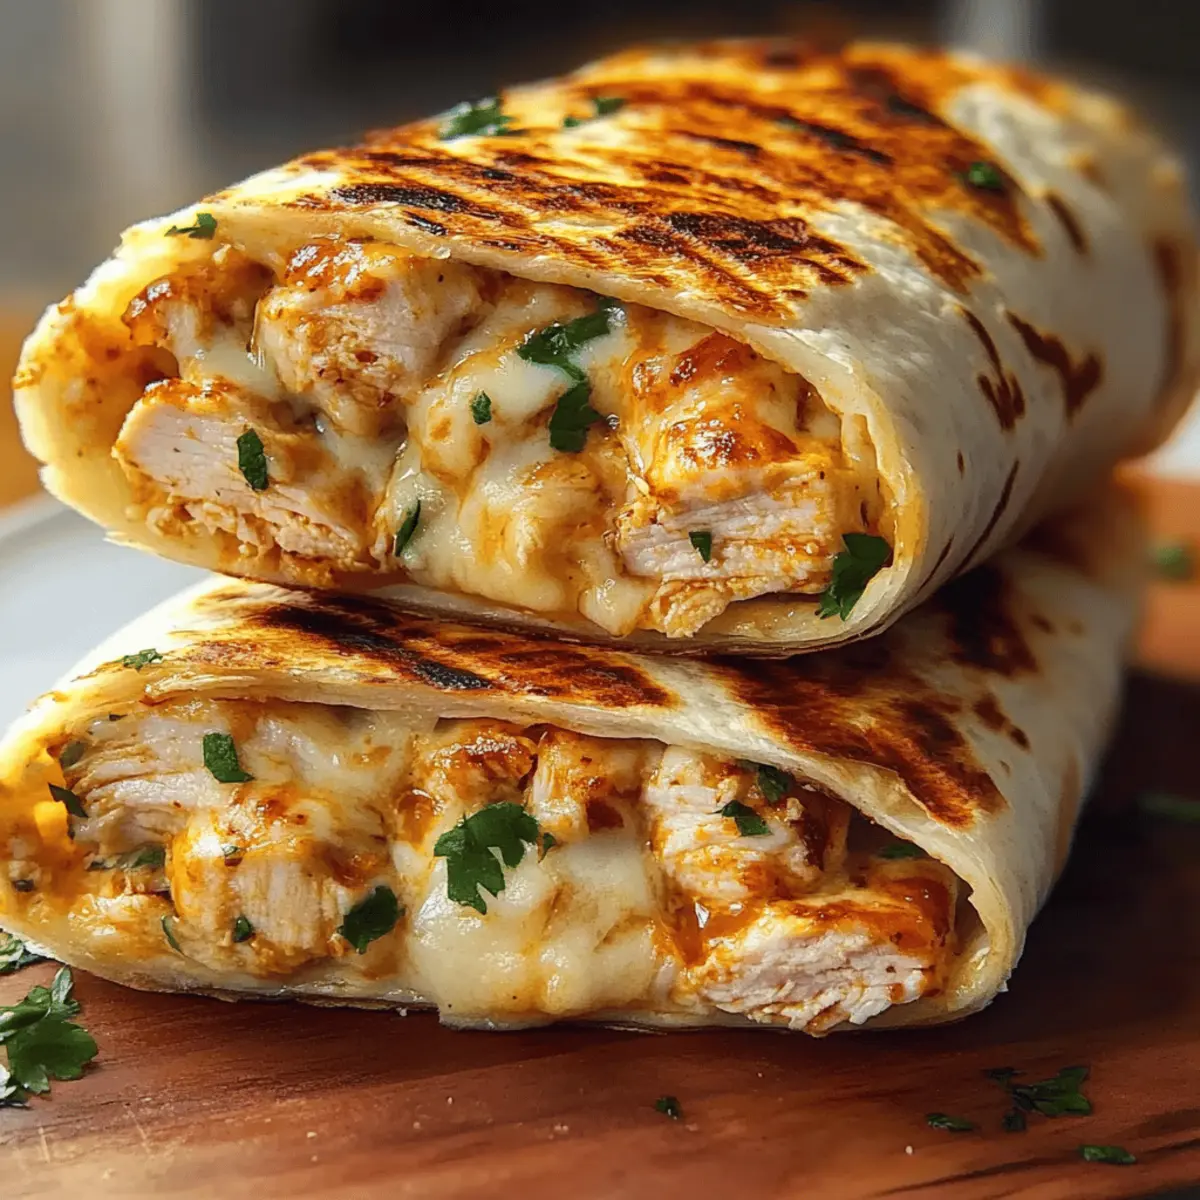
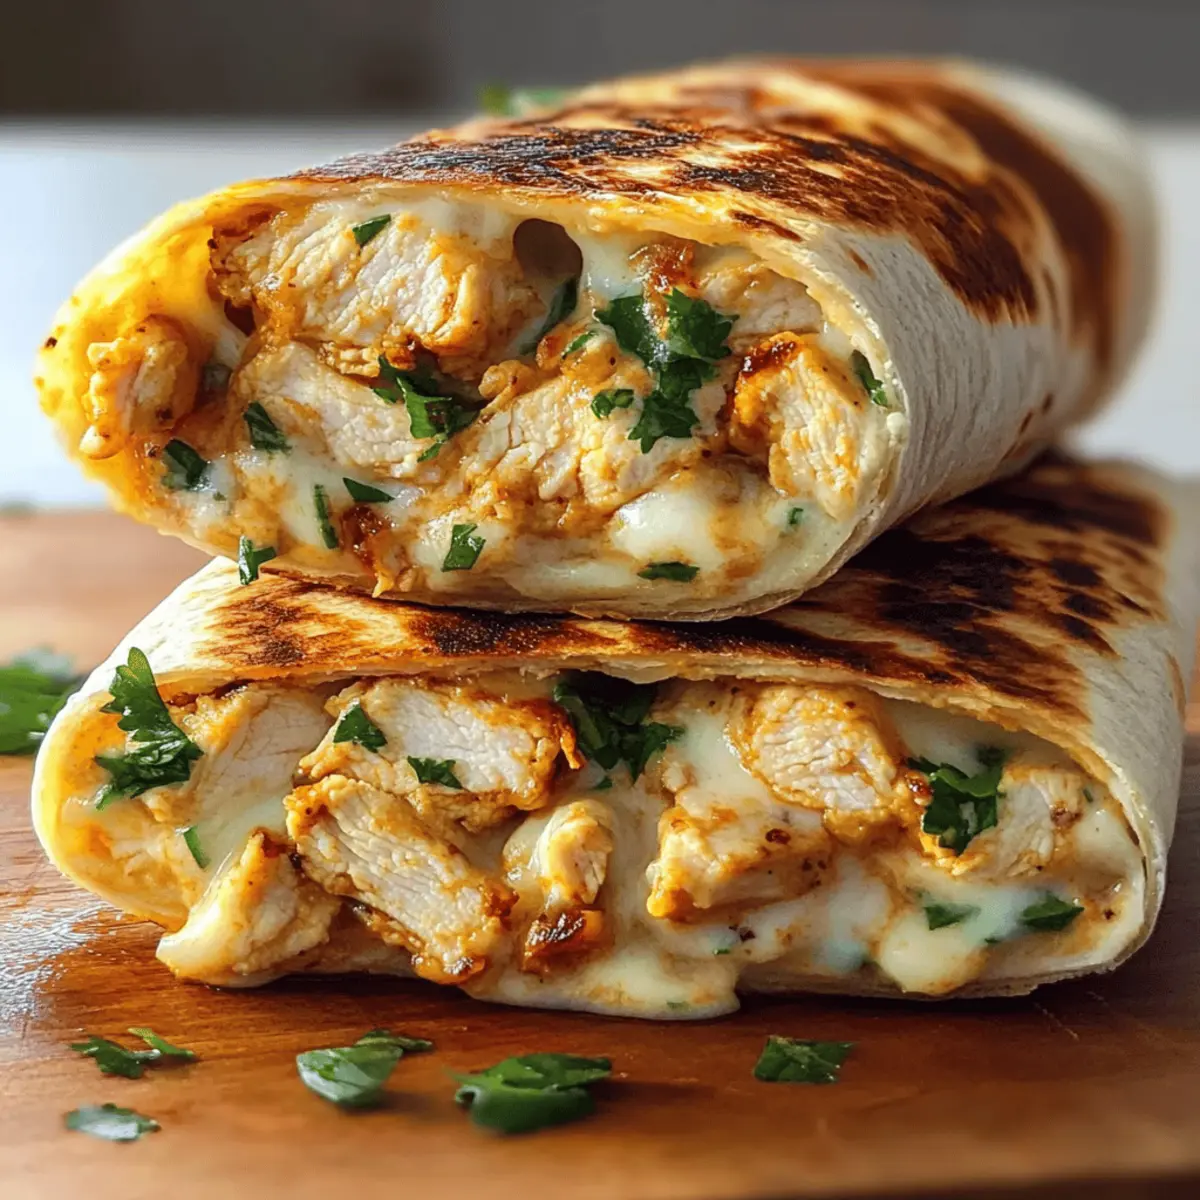
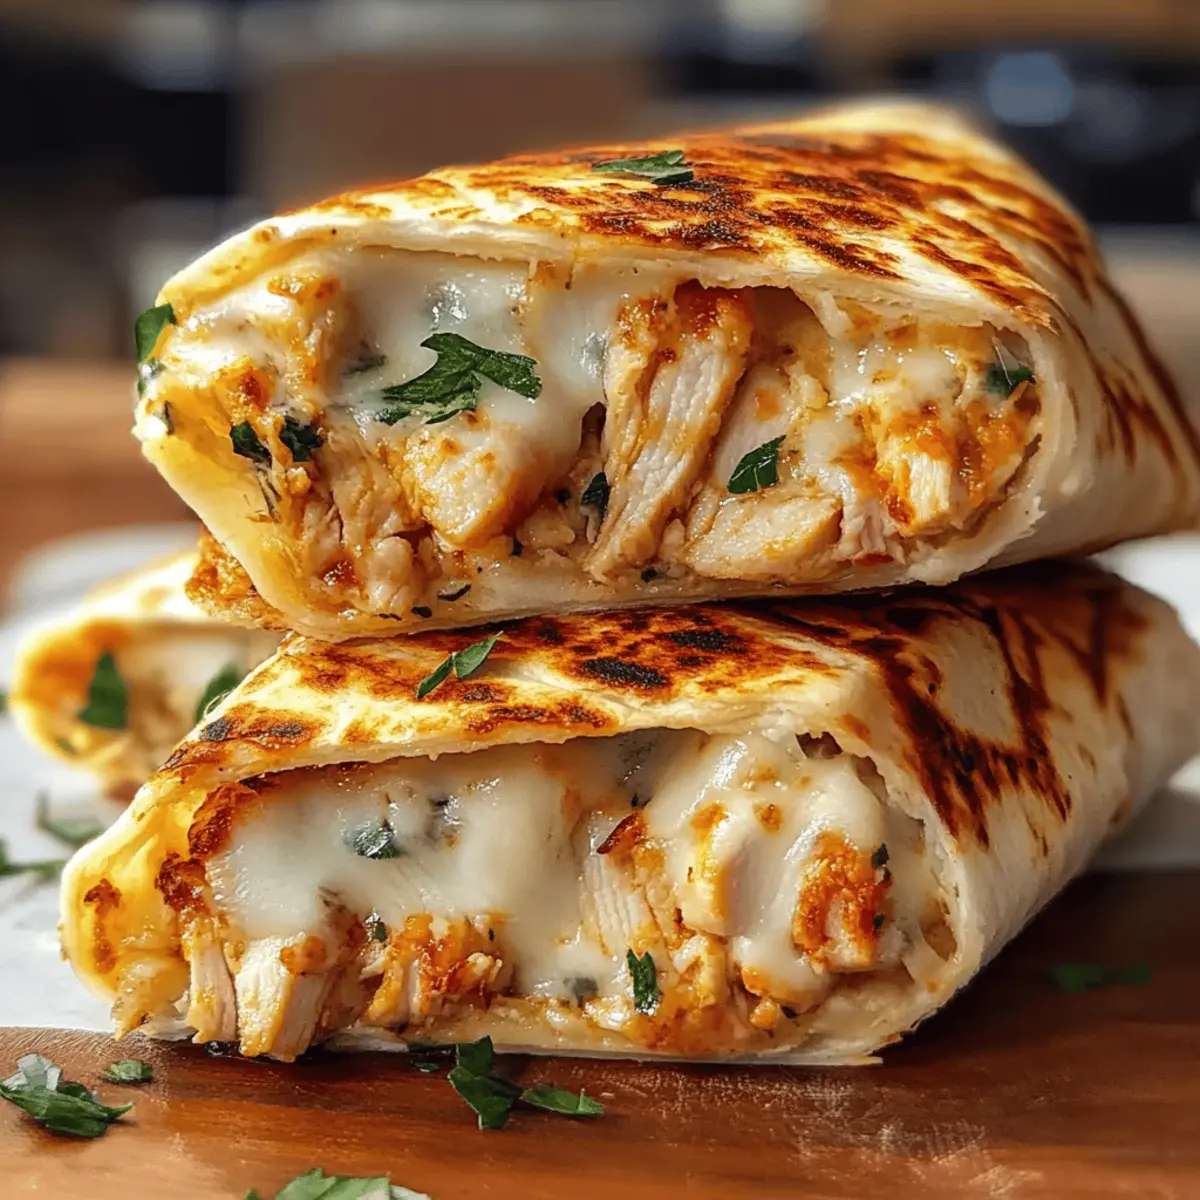
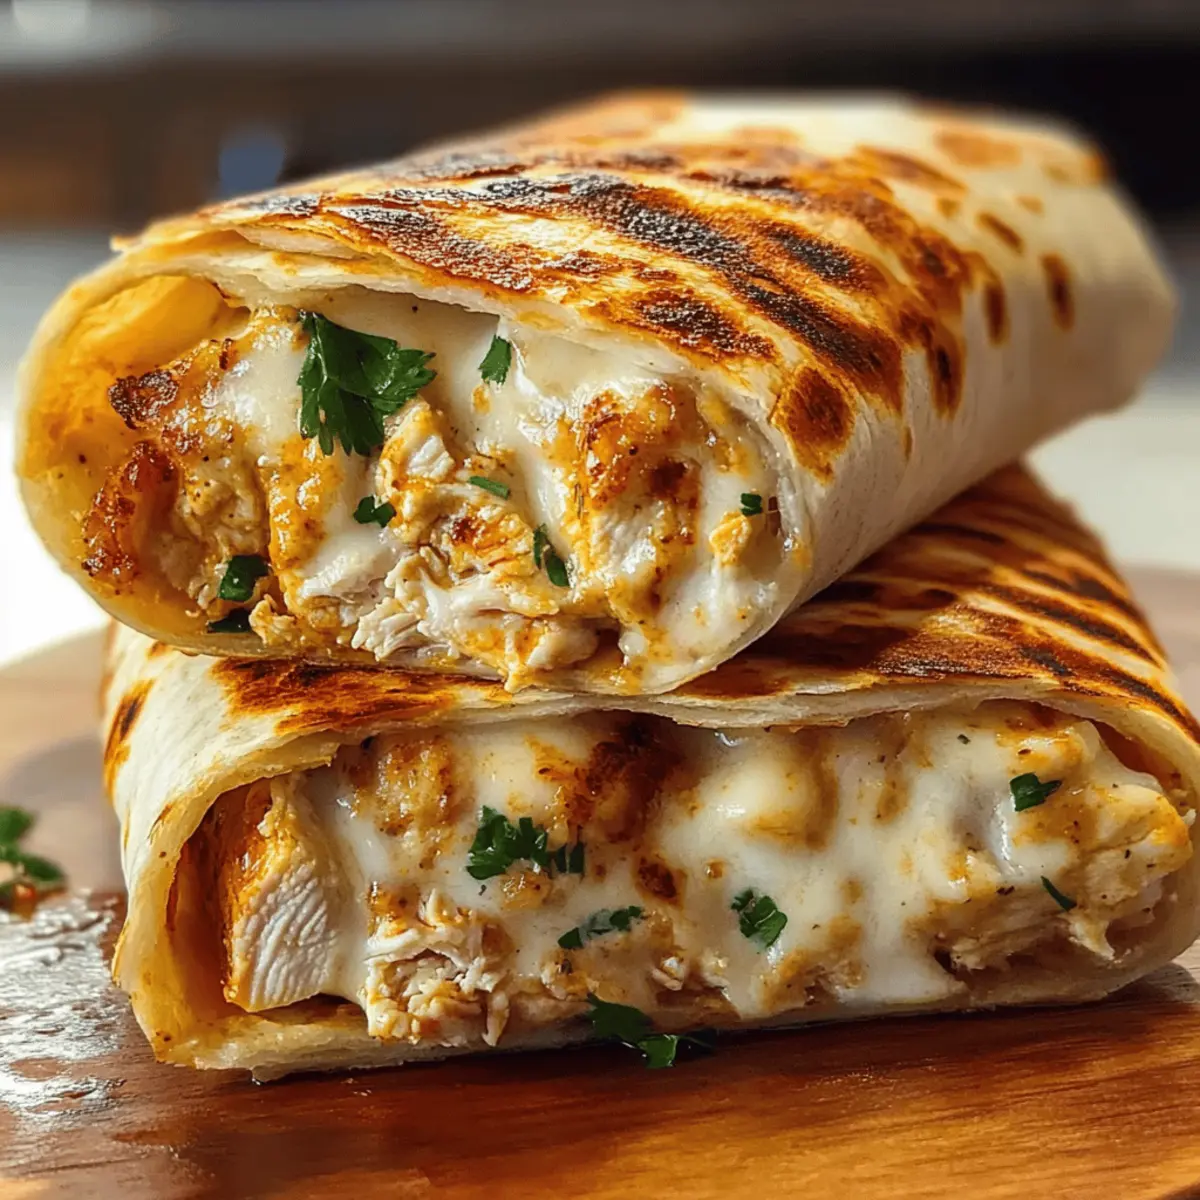
As I rummaged through my pantry one busy weeknight, I stumbled upon a trove of ingredients just waiting to be transformed into something magical. Enter the Cheesy Garlic Chicken Wraps, a delightful fusion of tender chicken, robust garlic, and gooey cheese, all wrapped snugly in a warm tortilla. What I love most about this recipe is its adaptability—it caters to whatever cravings you might have while ensuring a quick, comforting meal on your table in no time. Plus, it’s perfect for feeding both picky eaters and adventurous palates alike. Imagine serving these wraps at a family gathering or a cozy dinner with friends, where they’ll undoubtedly become the star of the night. Are you ready to get wrapped up in this tasty adventure?
Why Are These Wraps So Irresistible?
Comfort, your taste buds will dance with joy at the rich blend of flavors—the garlic and cheese meld beautifully with the juicy chicken. Customization makes it so versatile; swap out proteins, try various cheeses, or sneak in delicious veggies! Quick preparation ensures you’ll spend less time in the kitchen and more enjoying your meal, making it ideal for busy weeknights. Crowd-pleaser? Absolutely! These wraps are sure to impress family and friends at any gathering. If you’re in the mood for another delicious chicken dish, try our Garlic Parmesan Chicken for a new twist!
Cheesy Garlic Chicken Wraps Ingredients
For the Chicken Filling
• Cooked Chicken – Diced cooked chicken is the heart of this wrap; use rotisserie for convenience.
• Garlic – Fresh minced garlic gives a wonderful aroma; granulated works in a pinch.
• Cheese – A blend like mozzarella and cheddar adds creaminess; try pepper jack for a kick!
For the Wraps
• Tortilla – Choose regular or gluten-free tortillas to suit dietary needs; whole wheat adds fiber.
• Olive Oil – Great for sautéing garlic; can easily be swapped for butter for richness.
• Butter (optional) – Use for browning the wraps; omit for a lighter version.
For Garnishing
• Parsley (optional) – Adds a pop of color and freshness; consider other fresh herbs for variety.
Wrap up your culinary adventure with these Cheesy Garlic Chicken Wraps, perfect for transforming a weeknight dinner into a comforting feast!
Step‑by‑Step Instructions for Cheesy Garlic Chicken Wraps
Step 1: Prepare Chicken
Begin by seasoning your cooked chicken to enhance its flavor. You can bake, sauté, or grill the chicken until it reaches an internal temperature of 165°F (about 10-15 minutes). Once it’s fully cooked, let it cool slightly before dicing it into small, bite-sized pieces. This chicken will be the heart of your Cheesy Garlic Chicken Wraps.
Step 2: Sauté Garlic
In a medium skillet, heat 2 tablespoons of olive oil over medium heat. Once hot, add 3 cloves of minced garlic, stirring for about 30 seconds until it becomes golden and fragrant. Be careful not to let it burn, as burnt garlic can create a bitter taste. This sizzling garlic will form the delicious base for your chicken filling.
Step 3: Combine
Carefully add the diced chicken to the skillet with the sautéed garlic. Toss everything together so that the chicken is coated in the garlic oil. Remove the skillet from the heat and quickly stir in your choice of shredded cheese, like mozzarella and cheddar, allowing the heat to melt the cheese slightly. This creates a gooey, flavorful filling for your wraps.
Step 4: Assemble Wraps
Take a tortilla and place a generous scoop of the cheesy chicken mixture in the center. Fold the sides in and roll the wrap tightly from the bottom up to encase the filling completely, similar to how you would roll a burrito. Ensure your wraps are well-rolled to prevent any delicious spilling when cooking.
Step 5: Toast Wraps
In the same skillet, melt 1 tablespoon of butter over medium heat. Once melted, place the wraps seam-side down onto the skillet. Toast each wrap for 2-3 minutes or until golden brown and crispy. Flip and toast the other side for another 2-3 minutes, achieving a delightful crunch that adds texture to your Cheesy Garlic Chicken Wraps.
Step 6: Serve
Once toasted to perfection, remove the wraps from the skillet and let them rest for a minute to cool slightly. Slice each wrap on a diagonal for a beautiful presentation and garnish with chopped parsley for a pop of color. Serve warm and enjoy the cheesy, savory goodness of your homemade Cheesy Garlic Chicken Wraps!
Cheesy Garlic Chicken Wraps Variations
Feel free to explore exciting twists on these wraps that cater to your taste buds and dietary needs!
-
Different Protein: Substitute chicken with shredded rotisserie turkey or grilled shrimp for a fresh take. Both options add a lovely flavor while keeping it light and satisfying.
-
Go Gluten-Free: Use gluten-free tortillas to make a delicious version perfect for those avoiding gluten. This swap ensures everyone can enjoy these wraps without missing out on comfort.
-
Additional Veggies: Toss in sautéed spinach, diced bell peppers, or mushrooms for an extra nutrient boost. This not only adds color but also enhances the flavor and texture of each bite.
-
Spicy Kick: Add sliced jalapeños or crushed red pepper flakes to the chicken mixture for a zesty kick. This elevates the flavor profile and makes it extra enjoyable for those who love heat.
-
Cheese Variation: Swap mozzarella for pepper jack or Gouda for an exciting flavor twist. Each cheese brings its character, providing a unique cheese experience in every wrap.
-
Vegetarian Delight: Replace chicken with black beans or lentils for a protein-rich plant-based option. This option remains hearty and flavorful, perfect for vegetarians or those seeking lighter fare.
-
Creamy Sauce: Drizzle a creamy garlic sauce or ranch dressing inside the wrap before assembling for an additional layer of flavor. This small addition can transform the entire experience!
-
Make it Low-Carb: Opt for lettuce wraps instead of tortillas. This lightens the dish and is simply refreshing, all while still delivering on taste.
No matter how you choose to play with these Cheesy Garlic Chicken Wraps, each bite is sure to bring smiles around the dinner table! And if you’re craving another chicken-related dish, don’t forget to check out our scrumptious Garlic Butter Chicken Bites for a quick yet delightful recipe!
Make Ahead Options
These Cheesy Garlic Chicken Wraps are a dream for meal prep aficionados! You can prepare the chicken filling (cooked and mixed with garlic and cheese) up to 3 days in advance and store it in an airtight container in the refrigerator. For the best flavor, assemble the wraps just before serving to prevent the tortillas from becoming soggy. However, if you need to make the wraps ahead of time, wrap them tightly in foil and refrigerate for up to 24 hours. When you’re ready to enjoy, simply toast them in a skillet over medium heat for about 3-5 minutes per side, ensuring they are just as delicious as if freshly made.
How to Store and Freeze Cheesy Garlic Chicken Wraps
Fridge: Store cooked wraps in an airtight container for up to 2 days. Ensure they cool completely before sealing to maintain freshness.
Freezer: For longer storage, wrap each Cheesy Garlic Chicken Wrap tightly in plastic wrap and then in foil. They can be frozen for up to 3 months.
Reheating: Thaw in the refrigerator overnight, then reheat in a skillet over medium heat for 3-5 minutes on each side until crispy. Avoid microwaving to retain the texture.
Make-Ahead: Pre-assemble wraps without toasting, wrap individually, and refrigerate for up to 1 day before grilling them fresh when ready to serve.
What to Serve with Cheesy Garlic Chicken Wraps
Imagine the delightful aromas wafting through your kitchen as you prepare a lovely meal that won’t just fill the stomach but also warm the heart.
- Fresh Green Salad: A crisp salad with mixed greens and a zesty vinaigrette balances the richness of the wraps and adds freshness.
- Seasoned Potato Wedges: These crunchy, oven-baked potatoes provide a satisfying contrast to the cheesy wraps, perfect for dipping in your favorite sauce.
- Tomato Soup: A warm bowl of creamy tomato soup pairs beautifully, inviting you to dip your wraps and enjoy every bite. It adds comfort and nostalgia to the meal.
- Roasted Vegetables: Try some seasonal roasted veggies for a colorful plate; they offer a caramelized sweetness that enhances the savory fillings.
- Guacamole or Salsa: Keep it fun with dollops of guacamole or fresh salsa. Their vibrant flavors are perfect for dipping and elevate the whole dining experience.
- Sparkling Lemonade: Sip on a refreshing glass of sparkling lemonade or iced tea to cleanse the palate between bites; the citrus notes bring brightness to rich flavors.
- Fruit Platter: For a sweet finish, serve a selection of seasonal fruits. Their natural sweetness will leave everyone feeling satisfied without being too heavy.
- Chili Lime Corn on the Cob: This unique side brings a burst of flavor; the sweetness of corn enhances the savory wrap, and the chili-lime kick adds a fun twist.
- Chocolate Chip Cookies: End on a sweet note with warm chocolate chip cookies for a comforting dessert that appeals to both children and adults alike.
Expert Tips for Cheesy Garlic Chicken Wraps
Tight Rolling: Ensure wraps are tightly rolled to avoid spillage while cooking. A well-formed wrap supports the filling perfectly.
Garlic Butter Boost: For an extra punch of flavor, brush tortillas with garlic butter before grilling. It enhances the overall taste!
Crisp Reheating: Reheat wraps in a skillet or toaster oven to maintain their crispy exterior. Avoid using the microwave, as it can make them soggy.
Flavor Experimentation: Don’t hesitate to play with different cheeses and add-ons. The versatility of these Cheesy Garlic Chicken Wraps allows you to customize based on your preferences.
Vegetable Addition: Sneak in some veggies like spinach or bell peppers for added nutrition. They not only enhance the flavor but also add beautiful color.
Cheesy Garlic Chicken Wraps Recipe FAQs
What type of chicken is best for Cheesy Garlic Chicken Wraps?
Absolutely! Diced cooked chicken is the ideal choice, but you can also use rotisserie chicken for added convenience. If you’re in a pinch, ground chicken or turkey can work beautifully too—just make sure it’s well-cooked and seasoned.
How long can I store leftover Cheesy Garlic Chicken Wraps?
For the best taste, store your wraps in an airtight container in the refrigerator for up to 2 days. Make sure they cool down completely before sealing, as this prevents moisture buildup and keeps them fresh longer.
Can I freeze Cheesy Garlic Chicken Wraps?
Very much so! To freeze, wrap each of your Cheesy Garlic Chicken Wraps tightly in plastic wrap, followed by a layer of aluminum foil to protect them from freezer burn. They can be stored in the freezer for up to 3 months. When you’re ready to enjoy, just thaw them in the fridge overnight, then reheat in a skillet for about 3-5 minutes on each side until crispy.
What should I do if the wraps are falling apart when I cook them?
Oh no! If you find that your wraps are bursting open while cooking, it’s likely they’re not rolled tightly enough. Make sure to fold in the sides snugly and then roll from the bottom up. Additionally, using a little additional cheese as a glue can help keep everything together!
Are there any dietary considerations for making Cheesy Garlic Chicken Wraps?
Absolutely! These wraps are highly customizable. For gluten-free options, use certified gluten-free tortillas. Also, if you have cheese allergies, try a dairy-free cheese alternative or load them up with more veggies! Just be sure to double-check ingredient labels for any allergens.
Cheesy Garlic Chicken Wraps: A Weeknight Comfort Meal
Ingredients
Equipment
Method
- Season your cooked chicken and bake, sauté, or grill until it reaches 165°F (about 10-15 minutes). Let cool slightly and dice into small pieces.
- Heat 2 tablespoons of olive oil in a skillet over medium heat. Add 3 cloves of minced garlic and stir for about 30 seconds until golden and fragrant.
- Add the diced chicken to the skillet with garlic, toss to coat. Remove from heat and stir in the shredded cheese.
- Place a scoop of the cheesy chicken mixture on a tortilla, roll tightly from the bottom up, ensuring the sides are folded in.
- Melt 1 tablespoon of butter in the skillet, toast each wrap seam-side down for 2-3 minutes, until golden and crispy. Flip and toast the other side.
- Let the wraps rest for a minute, then slice diagonally and garnish with chopped parsley before serving.