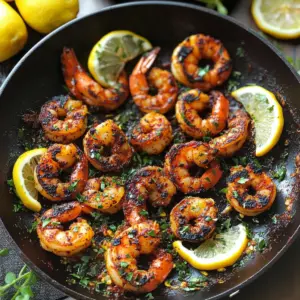
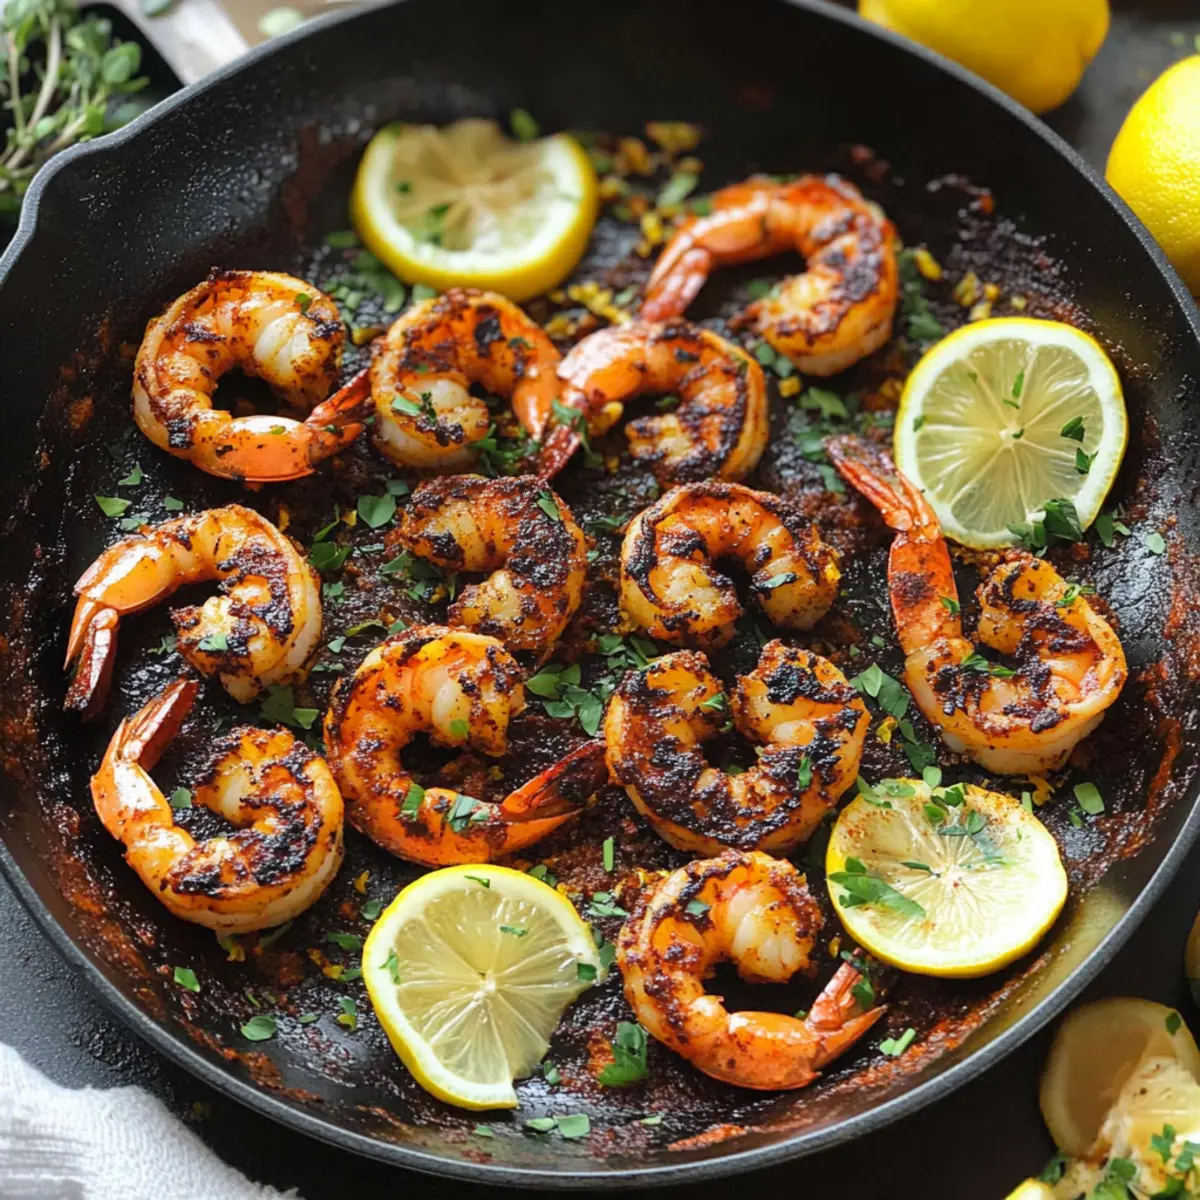
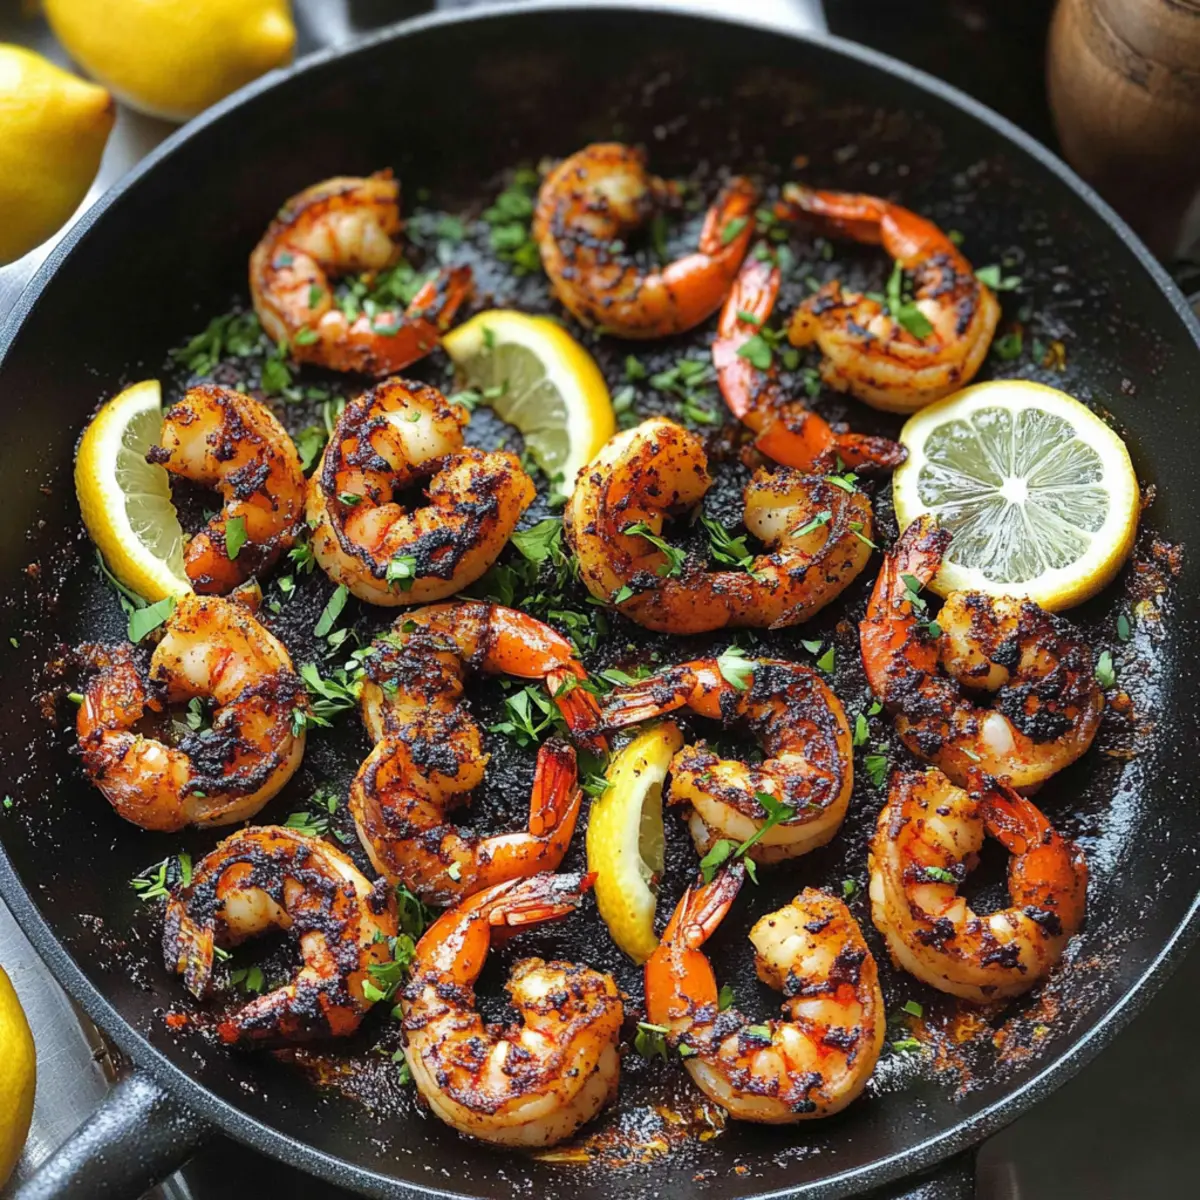
As the clock ticks down to dinner time, I often find myself racing against the clock—hunting for a simple yet satisfying dish. Enter my 20-Minute Blackened Shrimp, a recipe that’s become my go-to hero for busy weeknights. With a spicy homemade seasoning that transforms tender shrimp into mouthwatering morsels, this dish doesn’t just promise quick prep; it’s also totally versatile, allowing me to serve it over anything from crispy salads to fluffy rice. Plus, it checks off all the boxes for those looking to keep their meals low-carb and gluten-free. Trust me, you’ll love how easy it is to whip this up! Ready to learn how this delightful seafood dish can elevate your weeknight dinner? Let’s dive in!
Why is this shrimp dish a must-try?
Quick Prep: In just 20 minutes, you can have a flavorful meal ready, making it ideal for busy schedules.
Versatile: Perfectly pairs with pasta, salads, or grains, catering to every craving.
Health-Conscious: Low-carb, dairy-free, and gluten-free, it aligns with various dietary preferences.
Flavor Explosion: The homemade seasoning creates a robust, smoky flavor that tantalizes your taste buds.
Crowd-Pleaser: This dish is sure to impress family and friends, making it a hit at any gathering. Need more inspiration? Check out these delicious dairy-free recipes for more exciting meal options!
Blackened Shrimp Ingredients
For the Seasoning
• Smoked Paprika – Adds a rich, smoky flavor to the shrimp; substitute with regular paprika if you can’t find it.
• Chili Powder – Brings heat and complexity; use cayenne pepper for extra spice if desired.
• Italian Seasoning – Offers a lovely herb blend; any mix of dried herbs will work, so get creative!
• Garlic Powder – Boosts umami flavor; fresh minced garlic can be used as a delicious substitute.
• Red Pepper Flakes – Provides the right kick of spice; adjust to your personal heat preference.
• Salt – Elevates all flavors; opt for kosher salt for better seasoning control.
For the Shrimp
• Raw Shrimp (1.5 lbs, peeled and deveined) – The star of the dish; for a quicker option, substitute with pre-cooked shrimp and adjust cooking time.
• Olive Oil (2 tablespoons) – Essential for cooking; feel free to use vegetable oil or butter as an alternative.
For Garnish
• Lemon Slices – Adds brightness and freshness to the dish.
• Chopped Fresh Basil or Parsley – Enhances color and freshness, making the dish visually appealing.
Now that you have the ingredients ready, let’s whip up this Blackened Shrimp that’s not only delicious but also quick and perfect for a low-carb meal!
Step‑by‑Step Instructions for 20-Minute Blackened Shrimp
Step 1: Prepare the Seasoning
In a large bowl, whisk together 1 tablespoon of smoked paprika, chili powder, Italian seasoning, garlic powder, red pepper flakes, and salt until well combined. This homemade seasoning mix will be the star of your Blackened Shrimp, so take a moment to ensure it’s evenly blended. The aromas will start to arise, hinting at the bold flavors to come.
Step 2: Coat the Shrimp
Add the peeled and deveined raw shrimp to the seasoning mixture. Drizzle 1 tablespoon of olive oil over the shrimp, and toss gently to coat each piece thoroughly with the spices. The oil helps the spices adhere and adds moisture. Set the seasoned shrimp aside while you heat the skillet, allowing those flavors to meld beautifully.
Step 3: Heat the Skillet
Preheat a 12-inch cast iron skillet over medium heat for about 3-4 minutes. Once heated, increase the temperature to medium-high and add the remaining tablespoon of olive oil, swirling to coat the bottom of the skillet. The oil should shimmer—this means the pan is ready for the shrimp. Be patient; a well-heated skillet is key for that coveted blackened crust.
Step 4: Cook the Shrimp
Carefully add the seasoned shrimp to the skillet in a single layer, avoiding overcrowding. Cook for approximately 2 minutes without moving them, allowing a beautiful blackened crust to form. Flip each shrimp and cook for an additional 2 minutes or until they are opaque and lightly charred. The enticing aroma will fill your kitchen, making it hard to resist.
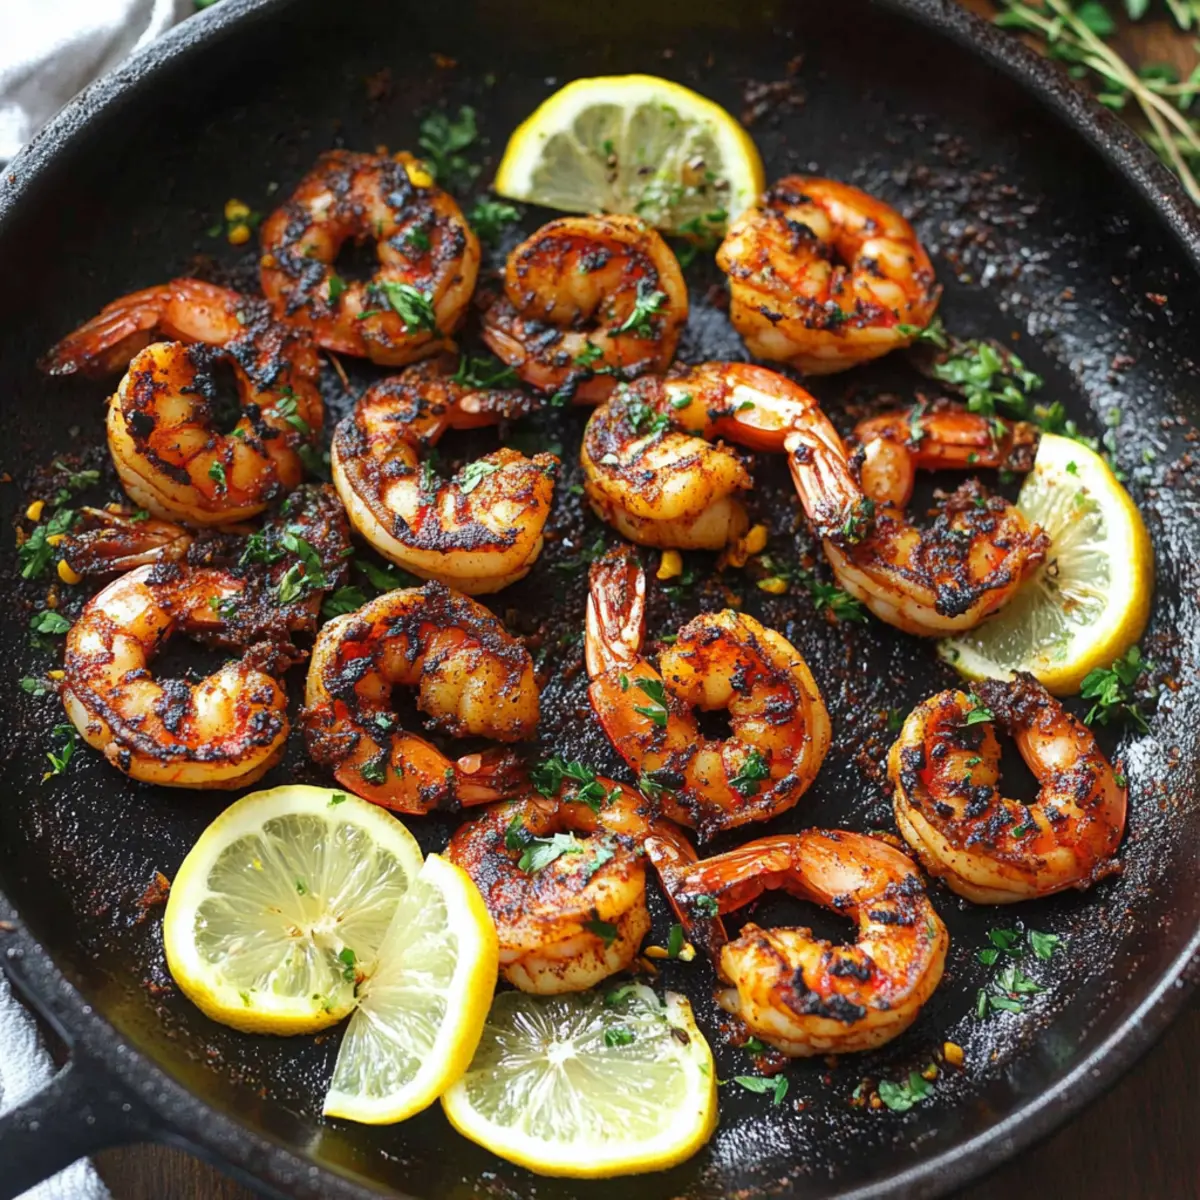
Step 5: Serve with Garnish
Once the Blackened Shrimp are perfectly cooked, remove the skillet from heat. Plate the shrimp and garnish with fresh lemon slices and chopped basil or parsley for a pop of color and brightness. The vibrant presentation enhances the dish’s appeal, inviting everyone to dig in and enjoy your delightful low-carb creation.
How to Store and Freeze Blackened Shrimp
Fridge: Store cooked Blackened Shrimp in an airtight container for up to 2 days. Gently reheat in a skillet over low heat to maintain tenderness.
Freezer: If you want to freeze leftovers, place the shrimp in a single layer on a baking sheet, freeze until solid, then transfer them to a freezer bag for up to 2 months.
Reheating: To reheat, thaw in the fridge overnight and warm in a skillet on low heat for 3-5 minutes until heated through, avoiding overcooking.
Freshness Tip: For the best flavor and texture, it’s recommended to consume cooked shrimp soon after preparation, but these storage tips will help you enjoy your Blackened Shrimp later!
Blackened Shrimp Variations & Substitutions
Feel free to personalize this amazing Blackened Shrimp recipe to suit your taste buds and dietary needs!
-
Dairy-Free: Use coconut oil instead of olive oil for a hint of tropical flavor. It not only enhances the richness but also keeps the dish plant-based.
-
Heat Level: Add more chili powder or diced jalapeños to crank up the spice. If you’re feeling adventurous, try a splash of hot sauce for an extra kick!
-
Gluten-Free: Great news—this recipe is already gluten-free! However, ensure any additional sauces or sides, like gluten-free pasta, are also compliant to keep your meal on point.
-
Pasta Lovers: Serve over zoodles (zucchini noodles) for a low-carb alternative that adds delightful texture. The shrimp pairs perfectly with the freshness of zoodles!
-
Vegetarian Option: Swap shrimp for firm tofu, marinated in the same seasoning for a hearty plant-based dish that still delivers on flavor.
-
For a Nutty Twist: Drizzle toasted sesame oil over the finished dish to introduce a nutty depth that makes it utterly irresistible.
-
Flavorful Bases: Serve over a bed of quinoa or farro for a hearty meal. These grains soak up the savory juices beautifully.
-
Citrus Kick: Squeeze fresh lime juice over the shrimp before serving for an added zing that brightens the whole dish. You could even try a side of citrus-infused salad for a fabulous pairing!
Each of these variations opens up new avenues of flavor and texture, helping you to keep your meals exciting while enjoying the deliciousness of Blackened Shrimp. Dig in and savor every bite!
Expert Tips for Blackened Shrimp
-
Preheat the Skillet: Ensure your skillet is hot enough to create the perfect blackened crust. A well-preheated cast iron skillet helps avoid burning the spices while cooking.
-
Use Raw Shrimp: For the best flavor and texture, stick to raw shrimp. If you’re in a pinch and using pre-cooked shrimp, limit cooking time to 1 minute on each side to prevent rubberiness.
-
Avoid Overcrowding: Cook shrimp in batches if necessary. Overcrowding the skillet causes the temperature to drop, preventing that delicious blackened crust from forming.
-
Adjust Spice Levels: Tailor the red pepper flakes and chili powder to your liking. If you’re sensitive to heat, start with less and gradually increase to your preferred flavor profile.
-
Experiment with Variations: Don’t hesitate to swap shrimp with other proteins like scallops or tofu. This Blackened Shrimp recipe is versatile and suits a variety of tastes!
Make Ahead Options
These Blackened Shrimp are perfect for meal prep enthusiasts! You can season the shrimp and store them in the refrigerator for up to 24 hours in advance, ensuring they marinate beautifully in the spices. For best results, keep the shrimp in an airtight container to maintain freshness and prevent any browning. Additionally, you can prepare the seasoning mixture ahead of time and keep it sealed for up to 3 days. When you’re ready to cook, simply heat your skillet and then add the shrimp, cooking them for about 4 minutes until they form that signature blackened crust. This way, you’ll enjoy restaurant-quality flavor on busy weeknights with minimal effort!
What to Serve with 20-Minute Blackened Shrimp
Transform your dining experience by pairing this zesty shrimp dish with delightful sides that complement its bold flavors.
- Creamy Avocado Salad: This fresh salad made with creamy avocado, cherry tomatoes, and lime juice adds a rich, cool contrast to the spiciness of the shrimp. Add some toasted nuts for extra texture.
- Cilantro-Lime Rice: Fluffy rice with a hint of lime and fresh cilantro provides a refreshing base for the shrimp—perfect to soak up those flavorful juices. It’s like a party on your plate!
- Garlic Sautéed Spinach: Tender, garlicky spinach adds a vibrant green element and lightens the dish, balancing the richness, while still being hearty.
- Zucchini Noodles: For a low-carb twist, spiralized zucchini noodles take the place of traditional pasta and pair beautifully with the blackened shrimp. Toss with olive oil and garlic for added flavor.
- Mango Salsa: Sweet and tangy mango salsa provides a refreshing burst that cuts through the spice of the shrimp, making each bite a tropical delight. Serve it on the side or atop the shrimp for a show-stopping presentation!
- Iced White Wine: A chilled glass of Sauvignon Blanc perfectly complements the shrimp, enhancing its flavors while keeping the experience fresh and lively. Enjoy a sip as you savor your meal!
Blackened Shrimp Recipe FAQs
How do I select the best shrimp for this recipe?
Absolutely! For the best flavor and texture, choose raw shrimp that are firm, moist, and have a mild ocean scent. Look for shrimp that are translucent and shiny, avoiding those with black spots or a strong fishy smell, which can indicate they’re not fresh.
What’s the best way to store leftover Blackened Shrimp?
Cooked Blackened Shrimp can be stored in an airtight container in the refrigerator for up to 2 days. Reheat them gently in a skillet over low heat to keep them tender, ensuring that they don’t get rubbery.
Can I freeze Blackened Shrimp? If so, how?
Yes, you can freeze Blackened Shrimp! Start by placing the leftovers in a single layer on a baking sheet and freezing them until solid, about 1-2 hours. After they’re frozen, transfer them to a freezer bag and seal it, removing as much air as possible. Frozen shrimp can be kept for up to 2 months.
What should I do if my shrimp are overcooked?
If your shrimp end up overcooked, don’t fret! For the next time, ensure your skillet is preheated properly and cook the shrimp no more than 2 minutes per side. If you’re using pre-cooked shrimp, limit heat time to 1 minute per side on low heat to avoid rubberiness. If they are already overcooked, consider chopping them into smaller pieces and tossing them into a salad for a different texture.
Is this Blackened Shrimp recipe suitable for my dietary restrictions?
Very much so! This recipe is low-carb, keto-friendly, gluten-free, and dairy-free, making it suitable for a variety of dietary preferences. Always double-check ingredient labels, especially for spices, to ensure they meet your dietary needs.
Can I use pre-cooked shrimp instead of raw?
Certainly! If you’re short on time, pre-cooked shrimp can be used, but be cautious to only heat them for about 1 minute on each side to prevent them from becoming tough. While raw shrimp produce the best flavor and texture for Blackened Shrimp, this alternative can still yield a delicious meal when you’re in a pinch.

Savor 20-Minute Blackened Shrimp - Flavorful and Quick!
Ingredients
Equipment
Method
- In a large bowl, whisk together the seasoning ingredients until well combined.
- Add the shrimp and drizzle with olive oil, gently toss to coat, and set aside.
- Preheat the skillet over medium heat, add remaining olive oil once hot.
- Carefully add shrimp to the skillet and cook for approximately 2 minutes without moving them.
- Flip shrimp and cook for an additional 2 minutes until opaque and lightly charred.
- Plate the shrimp and garnish with lemon slices and chopped basil or parsley.