As I stood in my kitchen, the delightful aroma of sweet, warm rice flour filled the air, transporting me to a cozy Japanese market. Today, I’m excited to share with you my favorite gluten-free mochi recipe, a treat that wraps tradition in chewy bliss. Not only is this delightful dessert vegan-friendly, but it allows for endless flavor experimentation—think matcha or ube—that will have your taste buds dancing. With just a handful of simple ingredients and minimal prep time, you’ll create these bite-sized morsels that are perfect for sharing (or keeping all to yourself!). Whether you’re a seasoned home chef or just dipping your toes into the world of homemade treats, this mochi recipe is sure to inspire creativity and joy in your kitchen. Want to explore how to make these delightful treats uniquely yours? Let’s dive in!
Why is this mochi recipe a must-try?
Chewy Bliss: This recipe creates delightfully chewy mochi that melts in your mouth, offering a textural experience unlike any store-bought treat.
Endless Flavor Options: With the flexibility to add flavors like matcha or ube, you’ll never run out of delicious variations to keep things exciting.
Vegan and Gluten-Free: Everyone can indulge—this recipe caters to gluten-free and vegan lifestyles, making it a hit at gatherings and for those with dietary restrictions.
Quick and Simple: In just about an hour, you’re on your way to enjoying homemade mochi that looks and tastes incredible, perfect for those with busy schedules.
Fun Activity: Making mochi can be a fun family activity; let the kids help shape and color their creations, making memories in the kitchen!
So, whether you’re considering a weekend project or needing a sweet treat for a special occasion, this mochi recipe is sure to impress!
Gluten-Free Mochi Ingredients
For the Mochi Base
- Mochiko Flour – Essential for structure and chew; be sure to use glutinous rice flour for that authentic texture.
- Granulated Sugar – Sweetens the dough nicely; feel free to adjust sweetness or use substitutes as desired.
- Baking Powder – Ensures a softer, more delicate mochi; skip substitutions here for the best results.
- Water – Hydrates the flour mixture; since moisture is key, use flavored liquids for a twist if you’d like!
- Coconut Milk – Adds creaminess and richness; swap in other plant-based milks for unique flavors.
- Vanilla Extract – Boosts the overall flavor profile; optional, but other extracts can bring new dimensions.
- Food Coloring – Gives visual appeal to your mochi; go natural with powders if coloring is desired.
For Dusting
- Potato Starch – Prevents the mochi from sticking; cornstarch makes a great substitute if needed.
With these straightforward ingredients, you’ll embark on the journey of creating delightful gluten-free mochi that’s sure to impress!
Step‑by‑Step Instructions for The Best Gluten-Free Mochi Recipe
Step 1: Preheat the Oven
Start by preheating your oven to 350°F (175°C). This temperature is crucial for baking the mochi evenly and achieving that deliciously chewy texture. While the oven warms up, gather your baking equipment, including a greased 9×13 inch baking pan and mixing bowls.
Step 2: Combine Dry Ingredients
In a medium bowl, whisk together the mochiko flour, granulated sugar, and baking powder until well combined. Ensure there are no lumps for a smooth batter, which is essential for that soft texture you desire in your gluten-free mochi. Set this mixture aside as you prepare the wet ingredients.
Step 3: Mix Wet Ingredients
In a large bowl, pour in the water, coconut milk, vanilla extract, and food coloring if you’re using it. Stir this mixture until everything is thoroughly blended. The coconut milk adds a creamy richness, making your gluten-free mochi irresistible.
Step 4: Combine Mixtures
Gradually add the dry ingredients to the wet mixture, stirring continuously until you achieve a smooth and lump-free batter. This step is crucial, as a well-mixed batter is what creates the delightful chewiness that mochi is famous for.
Step 5: Prepare for Baking
Pour the batter into your greased baking pan, smoothing the top with a spatula. To prevent moisture loss, cover the pan tightly with aluminum foil. This not only helps the mochi cook evenly but also retains its delightful chewiness while baking.
Step 6: Bake the Mochi
Place the covered baking pan in the preheated oven and bake for 60 minutes. You’ll know the gluten-free mochi is ready when the edges start to slightly pull away from the pan and the top looks set (it may have a few small cracks).
Step 7: Cool the Mochi
Once baked, carefully remove the pan from the oven and set it on a wire rack to cool completely. This cooling process allows the mochi to firm up slightly, making it easier to handle when you cut it into pieces.
Step 8: Cut and Dust
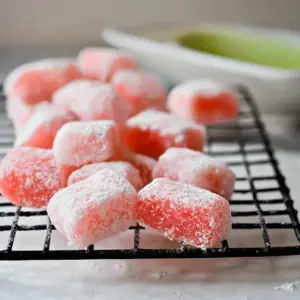
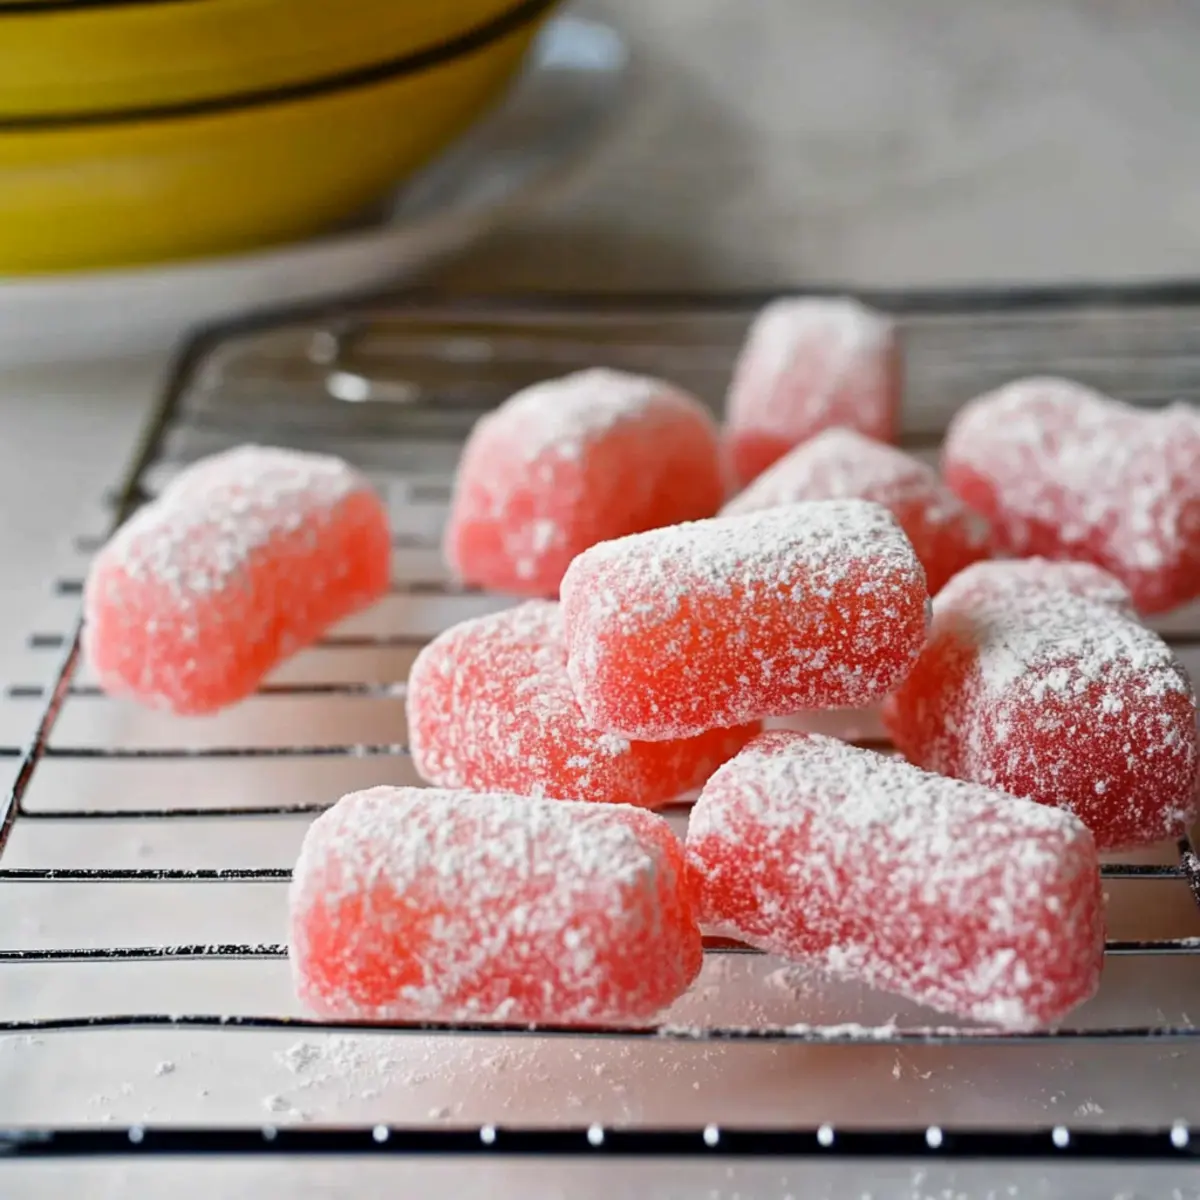
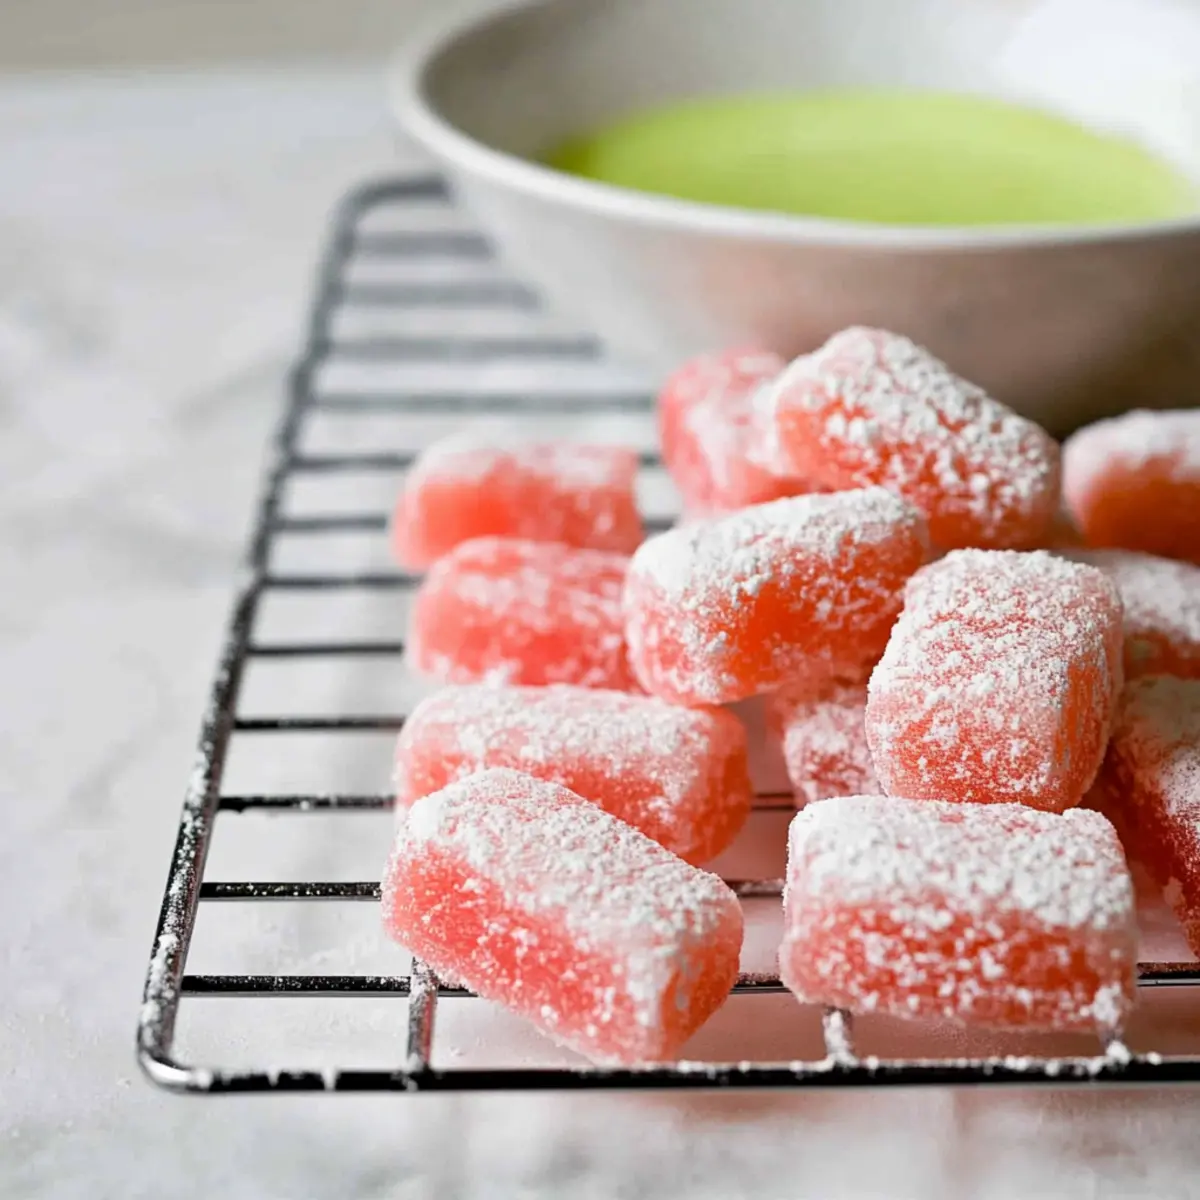
After the mochi has cooled, dust your work surface generously with potato starch. Invert the baking pan onto the starch so the mochi releases easily. Cut it into bite-sized pieces with a sharp knife, and then coat each piece lightly in potato starch to prevent sticking.
By following these steps, you’ll create The Best Gluten-Free Mochi that’s soft, chewy, and absolutely delightful!

Expert Tips for the Best Mochi
-
Greasing is Key: Ensure your baking pan is well-greased to prevent the mochi from sticking. A light coat of oil works wonders!
-
Even Baking: Use a light-colored metal baking pan for the best results. Dark pans can cause uneven cooking, so keep that in mind.
-
Avoid Refrigeration: Don’t pop your mochi in the fridge! It can harden and lose that delightful chewiness you’re aiming for; store it at room temperature instead.
-
Baking Time Adjustments: If you’re using a deeper pan or a different type, test for doneness a bit earlier to avoid overbaking, which can toughen the texture.
-
Flavor Experimentation: Feel free to add matcha, ube, or other extracts to customize your gluten-free mochi; just be sure to adjust other ingredients accordingly.
Make Ahead Options
These delightful mochi treats are perfect for meal prep enthusiasts! You can prepare the mochi batter up to 24 hours in advance by mixing the dry and wet ingredients separately. Simply store the wet mixture covered in the fridge and the dry ingredients in an airtight container. When you’re ready to bake, combine them to form a smooth batter, pour it into the pan, and proceed with the baking instructions. To maintain quality, avoid refrigerating the finished mochi, as it can harden; instead, keep it in an airtight container at room temperature for up to 3 days. This way, you’ll always have delicious, chewy mochi waiting for you with minimal effort on busy weeknights!
How to Store and Freeze Mochi
Room Temperature: Store mochi in an airtight container at room temperature for up to 3 days. This keeps them soft and chewy, ready to enjoy anytime.
Fridge: Avoid refrigerating mochi as it can harden and lose its delightful texture. Consuming them fresh is always best for maintaining their quality.
Freezer: For longer storage, freeze individual pieces in a single layer, then transfer to a freezer-safe bag. They can last up to 2 months. Reheat in the microwave for about 10-15 seconds to soften.
Reheating: When reheating, add a splash of water and cover the mochi with a damp paper towel to prevent drying out, ensuring they remain irresistibly chewy.
Variations & Substitutions for Mochi
Feel free to let your creativity shine by customizing your mochi with these delightful twists and swaps that your taste buds will love!
-
Matcha Madness: Add 2 tablespoons of matcha powder to the dry ingredients for a beautiful green tea flavor that’s both earthy and sweet. This brings a lovely color and rich taste to each piece!
-
Ube Upgrade: Incorporate ube powder instead of sugar for a vibrant purple hue and a sweet, nutty flavor. Not only will it impress visually, but it also provides a unique taste that’s sure to delight.
-
Dairy-Free Delight: Swap coconut milk for almond or cashew milk for a lighter version. These alternatives lend a subtle nuttiness, perfectly complementing the sweet chewy texture.
-
Berry Bliss: Use flavored extracts like strawberry or blueberry in place of vanilla. Just a teaspoon will add fruity notes that make each bite feel like a burst of summer!
-
Colorful Creations: Experiment with food coloring—try beet powder for red, spirulina for green, or turmeric for a sunny yellow tint. Making visually appealing desserts can be part of the fun of mochi-making!
-
Spiced Up: Add a pinch of cinnamon or nutmeg for a warm, cozy twist. These spices will not only enhance the flavor but create an inviting aroma that fills your kitchen.
-
Sweet Heat: For a kick, mix in a dash of chili powder or cayenne pepper. You’ll create a surprising and delicious contrast that’s especially fun for adventurous palates.
As you explore these variations, remember to check out the possibilities of gluten-free dessert ideas that can bring even more cheer to your kitchen table. You can craft mochi that not only reflects your personal taste but also offers exciting new experiences for you and your loved ones!
What to Serve with The Best Gluten-Free Mochi?
Imagine gathering around the table, surrounded by delightful treats that excite your taste buds and warm your heart. Let’s explore what pairs beautifully with your freshly made mochi!
-
Fresh Strawberries: Their tartness beautifully balances the sweetness of the mochi, making each bite a delightful contrast. Consider dipping the strawberries in chocolate for an elegant twist!
-
Matcha Green Tea: This earthy beverage complements the chewy texture while adding a refreshing touch. Sipping matcha while enjoying mochi creates a lovely Japanese-inspired experience.
-
Coconut Sorbet: The creamy and slightly tropical flavor of coconut sorbet elevates the mochi’s taste, offering a cool, refreshing treat on a warm day. A scoop brings a fun twist to your dessert spread!
-
Fruit Salad: A medley of seasonal fruits refreshes the palate and adds a burst of color to your plate. The natural sweetness and juiciness of fresh fruits pair exceptionally well with mochi.
-
Mango Sticky Rice: This classic dessert echoes the mochi’s chewy texture, while the coconut milk delicately ties everything together. It creates a satisfying and intriguing duo.
-
Sesame Balls: These crispy, nutty treats offer a delightful crunchy contrast to the soft, chewy mochi. Together, they showcase an array of textures and flavors to savor.
-
Chai Tea: The warming spices of chai provide a cozy counterbalance to the sweetness of mochi. Serving it warm enhances the comfort food vibe.
-
Flavored Almond Milk: Choose chocolate or vanilla for a creamy, smooth accompaniment that adds a luscious layer to the fluffy mochi.
-
Chocolate Dipping Sauce: For a decadent experience, drizzle or dip your mochi in a rich chocolate sauce. The richness complements the chewy texture beautifully.
-
Sweetened Condensed Milk: Drizzling a bit over your mochi will take the sweetness up a notch, creating an indulgent treat that’s hard to resist!
The Best Gluten-Free Mochi Recipe FAQs
How do I select ripe ingredients for my mochi?
Absolutely! While mochi primarily relies on pantry staples, you want to ensure the quality of your coconut milk. Opt for a brand that has a rich and creamy texture; this will enhance the overall flavor of your mochi. If using fresh fruits or flavors, like ripe strawberries for fillings, select those that are vibrant and without any dark spots for the best taste!
What’s the best way to store leftover mochi?
Very! To keep your mochi soft and chewy, store them in an airtight container at room temperature for about 2 to 3 days. Avoid refrigeration, as this can cause them to harden. If you have any uneaten pieces beyond this timeframe, consider freezing them instead for longer storage.
Can I freeze mochi, and how?
Of course! Freezing mochi is a fantastic way to enjoy them longer. Here’s how: First, slice the cooled mochi into bite-sized pieces. Place them in a single layer on a parchment-lined baking tray and freeze for about 1-2 hours. Once they’re firm, transfer the pieces to a freezer-safe container or bag. They’ll stay fresh for up to 3 months! When you want to eat them, simply reheat in the microwave with a splash of water covered by a damp paper towel for about 10-15 seconds.
What should I do if my mochi is too sticky?
Oh no! If your mochi is excessively sticky, it might be due to the humidity in your environment or the ratio of liquid to flour being slightly off. You can dust the surface generously with potato starch while working with it, making handling easier. If you’re looking for a firmer texture, consider slightly increasing the amount of mochiko flour during your next batch or allowing the mochi to cool longer before slicing.
Is this mochi recipe safe for those with specific dietary restrictions?
Absolutely! This gluten-free mochi recipe is not only suitable for those avoiding gluten, but it’s also vegan-friendly. The ingredients used—like mochiko flour, coconut milk, and granulated sugar—are free from animal products and gluten. However, always check food labels to ensure compliance with any additional dietary restrictions or allergies. Enjoy without worry!

Mouthwatering Gluten-Free Mochi: Chewy Delights Made Easy
Ingredients
Equipment
Method
- Start by preheating your oven to 350°F (175°C).
- In a medium bowl, whisk together the mochiko flour, granulated sugar, and baking powder until well combined.
- In a large bowl, pour in the water, coconut milk, vanilla extract, and food coloring. Stir until thoroughly blended.
- Gradually add the dry ingredients to the wet mixture, stirring continuously until you achieve a smooth and lump-free batter.
- Pour the batter into your greased baking pan and cover tightly with aluminum foil.
- Place the covered baking pan in the preheated oven and bake for 60 minutes.
- Remove the pan from the oven and set on a wire rack to cool completely.
- Dust your work surface with potato starch, invert the baking pan, and cut into bite-sized pieces.
- Coat each piece lightly in potato starch to prevent sticking.