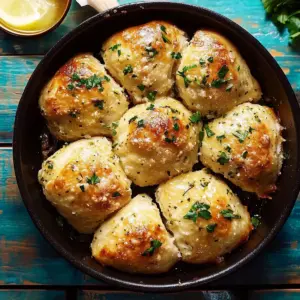
The moment the warm scent of garlic and buttery goodness fills my kitchen, I instantly feel at home. This Air Fryer Garlic Bread with Pizza Dough isn’t just a recipe; it’s a reminder of cozy family dinners and unforgettable gatherings with friends. Crafted with just six simple ingredients, it’s an incredibly easy dish to prepare that transforms everyday meals into something special. With its crispy exterior and soft, airy inside, this homemade garlic bread is the ultimate crowd-pleaser—perfect alongside your favorite pasta dishes or as a game-day snack. Plus, the air fryer gets it ready in just over half an hour, ensuring you won’t have to wait long to dive in. Are you ready to elevate your culinary game with this delightful treat?
Why is this garlic bread a must-try?
Irresistible Aroma: The moment it begins to cook, your kitchen will be enveloped in the mouthwatering scent of garlic and herbs.
Quick & Easy: Whipping up this recipe takes just over half an hour, making it perfect for busy weeknights or unexpected guests.
Crispy & Fluffy: Enjoy a delightful contrast between the golden-brown crust and the soft, airy inside, reminiscent of your favorite pizzeria.
Versatile Side: This garlic bread pairs beautifully with pastas, soups, and salads, or even stands alone as a tasty snack or appetizer.
Customizable: Feel free to experiment with herbs, spices, or cheeses to create your unique flavor profile.
Crowd-Pleasing: It’s a guaranteed hit at any gathering, turning simple meals into special occasions.
Air Fryer Garlic Bread Ingredients
Want to create this mouthwatering Air Fryer Garlic Bread? Here’s everything you’ll need!
For the Dough
• Pizza Dough – Provides the base structure for the garlic bread; you can use homemade, store-bought, or even sourdough pizza dough.
For the Garlic Butter Mixture
• Unsalted Butter (½ cup) – Adds rich flavor and promotes browning; for a dairy-free option, substitute with olive oil or dairy-free butter.
• Garlic (4 large cloves, minced) – Infuses the bread with aromatic flavor; adjust the quantity based on your garlic preference.
• Parsley (¼ cup, finely chopped) – Brings freshness and vibrant color; can be substituted with basil or oregano for different flavor profiles.
• Lemon Zest (1 teaspoon) – Brightens the garlic flavor; consider replacing it with lime zest for a refreshing twist.
• Grated Parmesan (2 tablespoons) – Enhances the dish’s flavor and provides a delightful textural contrast; feel free to swap with hard cheeses like Pecorino Romano.
Step‑by‑Step Instructions for Air Fryer Garlic Bread with Pizza Dough
Step 1: Preheat Air Fryer
Start by preheating your air fryer to 400°F (204°C). This should take about 5-10 minutes, ensuring a perfectly crispy exterior for your Air Fryer Garlic Bread. While waiting, you can gather your ingredients and prepare for the next steps, making the most of this time.
Step 2: Prepare Garlic Butter
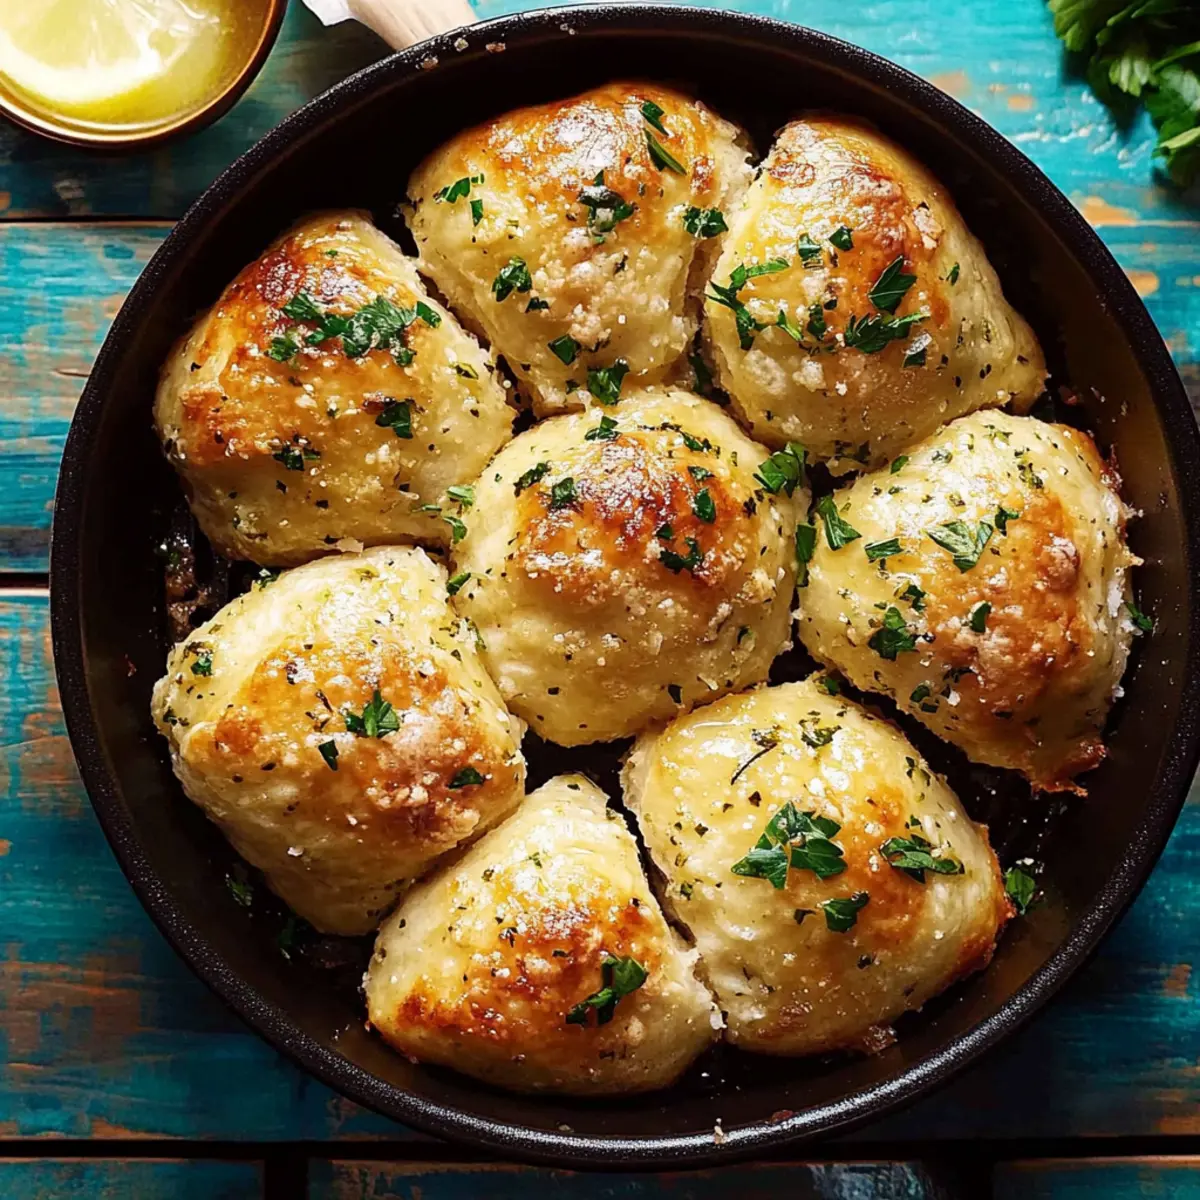
In a heat-proof bowl, melt the ½ cup of unsalted butter in the microwave until just halfway melted. Stir the butter until it is fully melted and smooth, then mix in 4 minced garlic cloves, ¼ cup of finely chopped parsley, 1 teaspoon of lemon zest, and 2 tablespoons of grated Parmesan. This aromatic garlic butter will be the flavorful base for your bread.
Step 3: Shape Dough
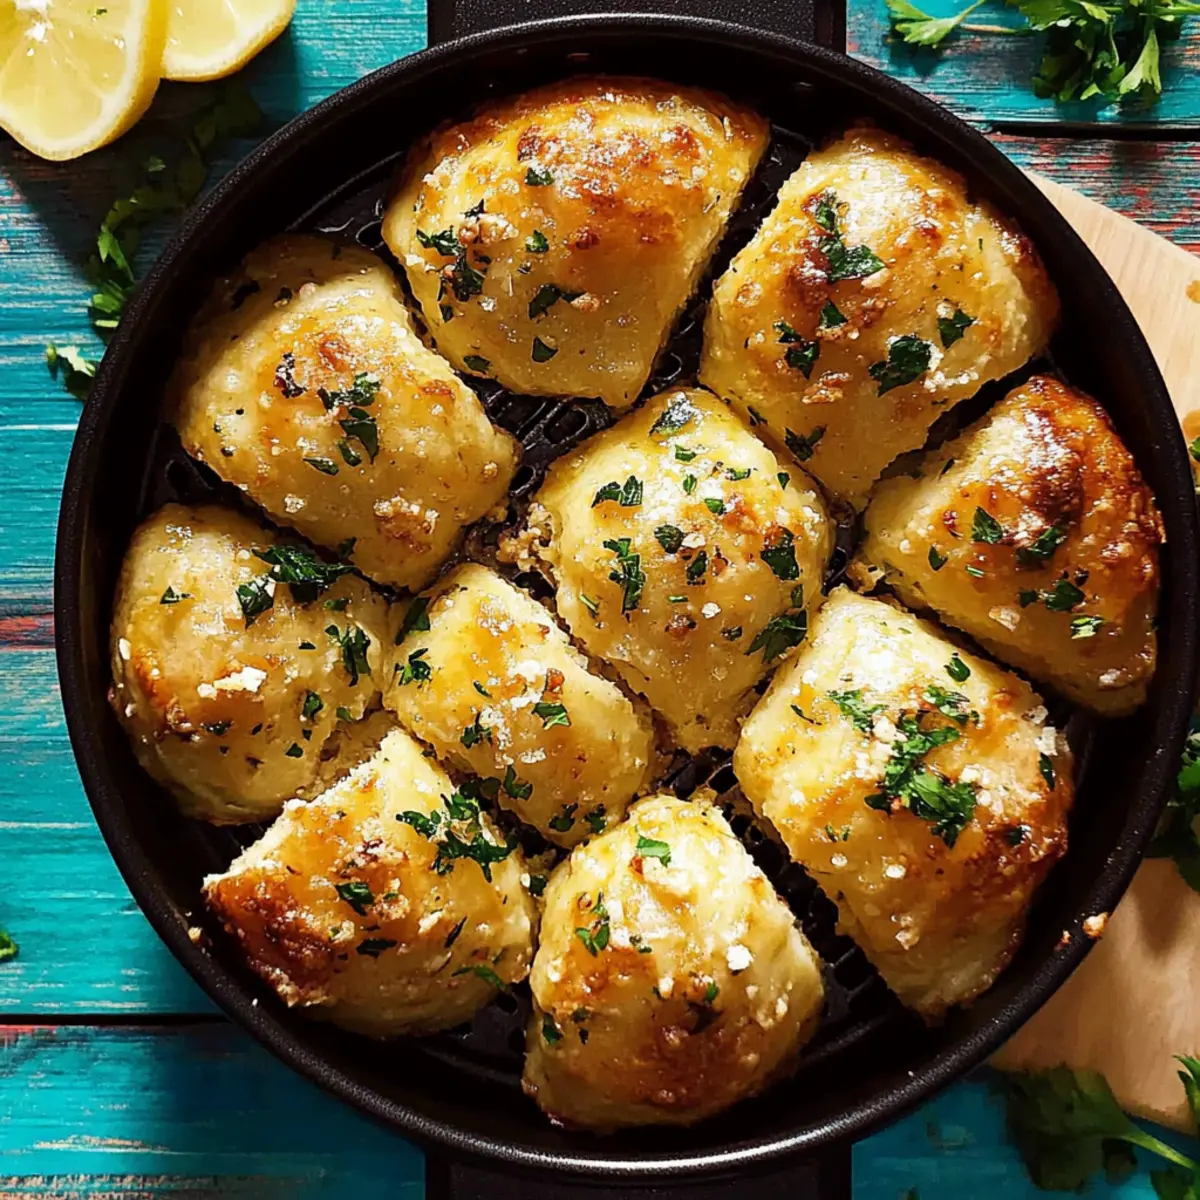
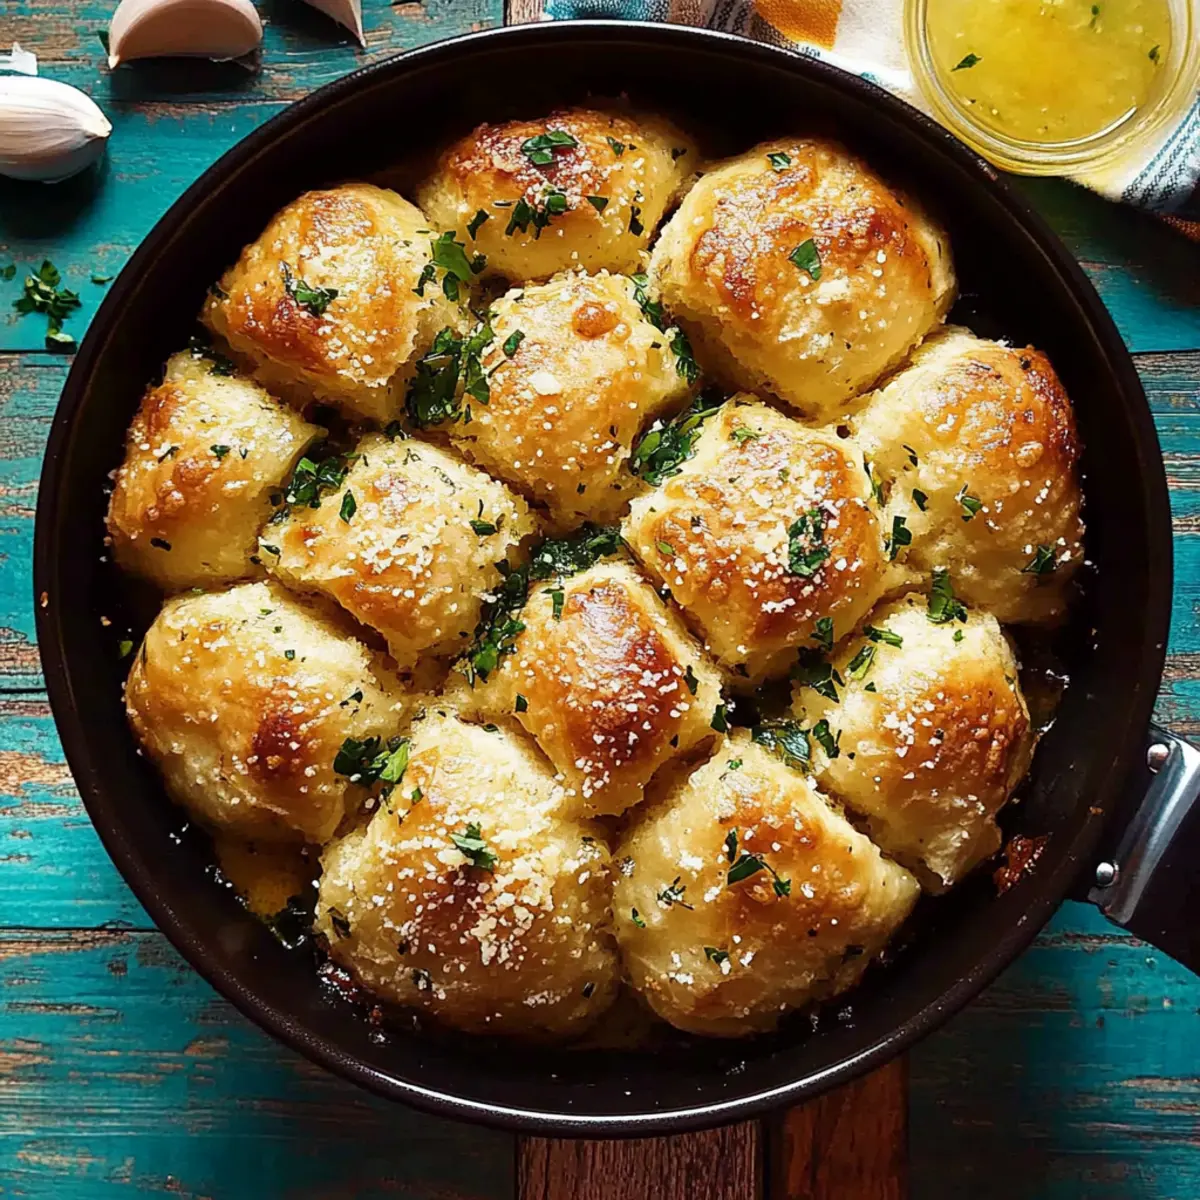
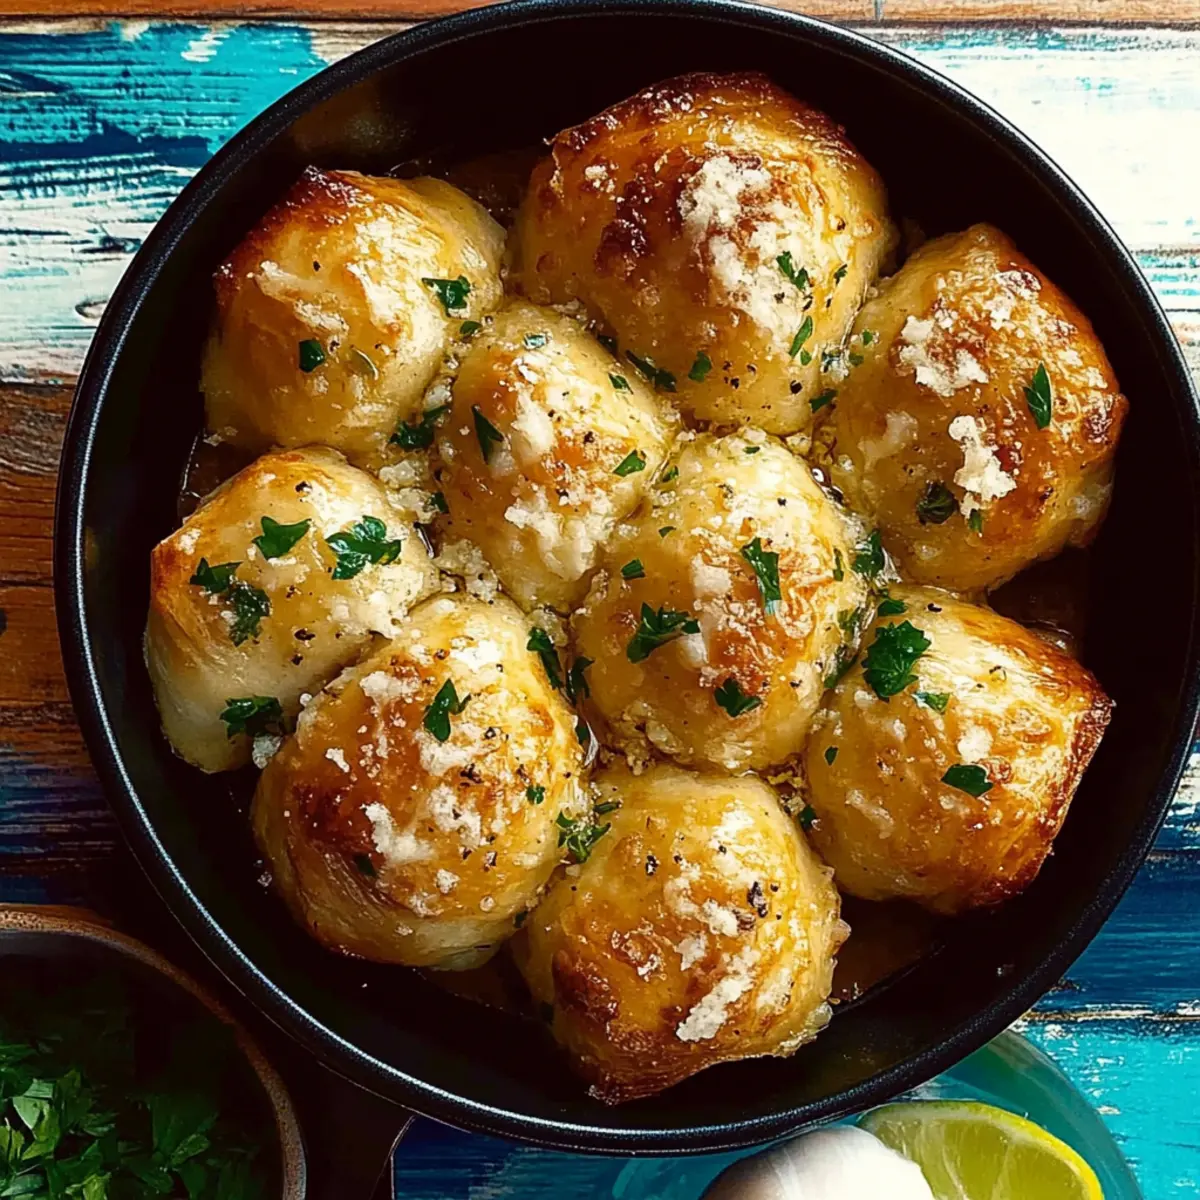
Cut your pizza dough into 12 equal pieces, rolling each piece into a ball with your hands. This shaping creates the perfect portion sizes for your Air Fryer Garlic Bread. As your dough balls take form, consider how soft and fluffy they will become once baked—an irresistible treat for any gathering.
Step 4: Grease Pan
Brush the bottom and sides of a 7 or 8-inch round pan with half of the garlic butter mixture. Carefully place the dough balls in the pan, ensuring to brush all sides with the buttery goodness for maximum flavor. Keep some of the garlic butter mixture aside to brush on after the first bake for added richness.
Step 5: Bake
Cook the dough in the preheated air fryer at 400°F for 5 minutes. After this initial baking, reduce the temperature to 325°F (163°C) without opening the air fryer, and continue to bake for another 5 minutes. This method ensures even cooking and a perfectly golden-brown crust.
Step 6: Brush and Finish Baking
After the second baking phase, take the pan out of the air fryer and brush the remaining garlic butter on top of the garlic bread. Return the pan to the air fryer for an additional 5 minutes. This final touch will enhance the flavor and ensure a beautifully crispy finish to your Air Fryer Garlic Bread.
Step 7: Cool and Serve
Once baked, let the garlic bread cool for 5-10 minutes. This cooling period helps the flavors settle, and the bread will be easier to handle. Serve your warm Air Fryer Garlic Bread alongside your favorite marinara sauce or as a delightful snack on its own, relishing every bite of this homemade delight.
Air Fryer Garlic Bread Variations
Feel free to get creative and tailor this delectable garlic bread to your tastes—just imagine the flavors dancing on your palate!
- Cheesy Bliss: Add more grated cheese or mix in some mozzarella for extra gooeyness that oozes in every bite. You can never go wrong with a cheesy twist!
- Spicy Kick: Incorporate red pepper flakes into the garlic butter for a spicy infusion. This variation will appeal to heat lovers and elevate the flavor profile.
- Herb Variations: Swap out parsley for fresh basil or cilantro to create a unique flavor that adds brightness and freshness. Each herb brings its charm to the table!
- Zesty Citrus: Replace the lemon zest with lime zest for a refreshing twist that brightens up the flavors and invigorates your taste buds.
- Sweet & Savory: Try adding a touch of honey to your garlic butter for a delightful sweet-savory combination that will surprise and please your guests.
- Olive Oil Swap: For a lighter version, use extra virgin olive oil instead of butter. This keeps the recipe delicious while offering a lovely, distinct flavor.
- Minced Veggies: Sneak in some finely chopped veggies like bell peppers or sun-dried tomatoes for a pop of color and subtle crunch that enhances the overall experience.
Experiment with these suggestions, and you’ll find your endless options for fabulous garlic bread that’s sure to impress! And if you’re in the mood for another delightful dish, consider pairing it with a rich marinara sauce or check out our easy to make air fryer recipes.
Make Ahead Options
These Air Fryer Garlic Bread bites are perfect for meal prep enthusiasts! You can prepare the garlic butter mixture (butter, garlic, parsley, lemon zest, and parmesan) up to 24 hours in advance; just keep it tightly sealed in the refrigerator to maintain its fresh flavor. Additionally, you can shape the pizza dough balls a day ahead as well. Simply cover them with plastic wrap and refrigerate them overnight. When you’re ready to serve, allow the dough to come to room temperature for about 30 minutes before following the baking instructions. Finish by air frying as directed, and you’ll serve up crispy, restaurant-quality garlic bread with minimal effort!
How to Store and Freeze Air Fryer Garlic Bread
Fridge: Store your Air Fryer Garlic Bread in an airtight container for up to 2 days. To maintain its crispy texture, reheat briefly in the air fryer for a few minutes before serving.
Freezer: For longer storage, wrap the garlic bread tightly in aluminum foil or freezer-safe plastic wrap and freeze for up to 3 months. When ready to enjoy, thaw and reheat in the air fryer to restore crispiness.
Reheating: To reheat refrigerated or frozen garlic bread, cook it in the air fryer at 350°F (175°C) for about 3-5 minutes, ensuring it remains delightful and crispy.
Serving Suggestions: Enjoy your garlic bread alongside pasta or soups any day of the week, and feel free to customize the flavors each time you make it!
What to Serve with Air Fryer Garlic Bread
Looking to complement your delicious garlic bread experience? Here are some mouthwatering ideas that add a burst of flavor to your meals.
-
Marinara Sauce: Perfect for dipping, this classic sauce provides a rich, tangy contrast to the buttery garlic bread, enhancing every bite.
-
Creamy Tomato Bisque: This velvety soup warms the soul, offering a delightful balance of creaminess and acidity that pairs beautifully with crunchy bread.
-
Caesar Salad: The crisp romaine and zesty dressing create a refreshing contrast, making each bite of garlic bread feel indulgent yet balanced.
-
Grilled Veggies: Charred vegetables like bell peppers and zucchini add vibrant flavors and textures, providing a colorful, healthy side option alongside your bread.
-
Spaghetti Aglio e Olio: Tossed in garlic and chili flakes, this simple pasta dish harmonizes with your garlic bread, creating a comforting Italian feast.
-
Olive Martini: Sip on this sophisticated cocktail with a briny twist to cut through the richness of the bread, making for a delightful pairing at your next gathering.
-
Stuffed Peppers: Filled with grains and cheese, these hearty peppers offer a delicious contrast to the light, fluffy nature of the garlic bread.
-
Chocolate Mousse: End your meal on a sweet note! The rich, velvety mousse serves as a luscious contrast to the savory garlic flavors, delighting your senses.
Expert Tips for Air Fryer Garlic Bread
• Butter Wisely: Avoid over-brushing the tops of the dough balls with garlic butter to prevent burning the herbs during cooking.
• Preheat Matters: Always preheat your air fryer well for optimal cooking. This step helps achieve that sought-after crispy exterior.
• Experiment: Don’t hesitate to customize your garlic bread by using different herbs, spices, or types of cheese to craft your ideal air fryer garlic bread.
• Watch Your Time: Keep an eye on the cooking time; every air fryer differs slightly. Adjust as needed for perfect golden-brown results.
• Cooling Time: Let the garlic bread cool for a few minutes before serving. This helps the flavors meld and makes it easier to enjoy without burning your mouth!
Air Fryer Garlic Bread Recipe FAQs
How do I know if my garlic is fresh?
Absolutely! Fresh garlic should feel firm and dry without any dark spots or sprouting green shoots. If the cloves are soft, have dark spots all over, or exhibit a strong odor, it’s best to avoid using them as they may impart a bitter taste.
How should I store leftovers?
Very! Store your Air Fryer Garlic Bread in an airtight container at room temperature for up to 2 days. If you want to retain its crispiness, I recommend reheating it in the air fryer for a few minutes before serving to bring back that delectable crunch.
Can I freeze garlic bread?
Absolutely! To freeze your garlic bread, wrap it tightly in aluminum foil or place it in a freezer-safe bag. It can be kept in the freezer for up to 3 months. When you’re ready to enjoy it, simply thaw in the fridge, then reheat in the air fryer at 350°F (175°C) for about 5-7 minutes until warm and crispy.
What if my garlic bread isn’t browning properly?
Very! If your garlic bread isn’t browning as expected, ensure your air fryer is adequately preheated before placing the dough inside. Additionally, you may need to adjust the cooking time slightly, as different air fryer models can vary in heat output. Don’t forget to finish with brushing the garlic butter on top before the final bake for that golden touch!
Are there any dietary considerations I should keep in mind?
Absolutely! For a dairy-free version, you can substitute unsalted butter with olive oil or a dairy-free butter alternative. Additionally, if you’re cooking for pets, be cautious with the garlic as it can be toxic to dogs and cats. Always take ingredient substitutions into account for any food allergies!
Crispy Air Fryer Garlic Bread Made Easy with Pizza Dough
Ingredients
Equipment
Method
- Preheat your air fryer to 400°F (204°C) for 5-10 minutes.
- Melt ½ cup of unsalted butter, mix in minced garlic, parsley, lemon zest, and Parmesan.
- Cut pizza dough into 12 equal pieces and roll into balls.
- Brush a round pan with half of the garlic butter mixture and place the dough balls in it.
- Cook the dough at 400°F for 5 minutes, then reduce to 325°F for another 5 minutes.
- Brush remaining garlic butter on top and cook for an additional 5 minutes.
- Let the garlic bread cool for 5-10 minutes before serving.