Introduction to Vanilla Cake Pops
There’s something magical about the first bite of a Vanilla Cake Pop. It takes me back to childhood birthday parties, where the sweet aroma of baked goods filled the air. These delightful treats are not just for kids; they’re perfect for any occasion, whether it’s a casual get-together or a fancy celebration.
With their bite-sized charm, Vanilla Cake Pops are a quick solution for busy days or a fun project to impress your loved ones. Plus, they’re easy to make, so you can whip them up without breaking a sweat. Let’s dive into this delicious adventure!
Why You’ll Love This Vanilla Cake Pops
These Vanilla Cake Pops are a game-changer in the dessert world. They’re incredibly easy to make, even for those who claim they can’t bake. The speed of preparation means you can whip them up in no time, making them perfect for last-minute gatherings. Plus, the taste? A delightful blend of moist cake and creamy chocolate that will have everyone coming back for seconds. Trust me, these treats are a crowd-pleaser!
Ingredients for Vanilla Cake Pops
Gathering the right ingredients is the first step to creating these delightful Vanilla Cake Pops. Here’s what you’ll need:
- All-purpose flour: The backbone of your cake, providing structure and texture.
- Baking powder: This leavening agent helps the cake rise, giving it that fluffy texture.
- Baking soda: Another leavening agent that works with the acidity of buttermilk for a perfect rise.
- Salt: Just a pinch enhances the sweetness and balances flavors.
- Unsalted butter: Adds richness and moisture; make sure it’s softened for easy mixing.
- Granulated sugar: Sweetens the cake and contributes to its tender crumb.
- Large eggs: They bind the ingredients together and add moisture.
- Vanilla extract: The star of the show, infusing the cake with a warm, sweet flavor.
- Buttermilk: This adds moisture and a slight tang, making the cake incredibly tender.
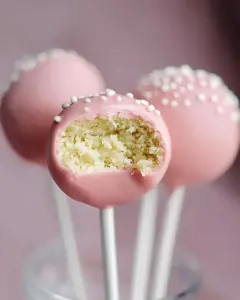
- White chocolate: Used for coating the cake pops, it adds a creamy sweetness.
- Sprinkles: Optional, but they add a fun, festive touch to your cake pops!
For those looking to mix things up, consider substituting half of the all-purpose flour with cocoa powder for a chocolate variation. You can also add a teaspoon of almond extract along with the vanilla for an extra layer of flavor.
Exact quantities for these ingredients can be found at the bottom of the article, ready for printing!
How to Make Vanilla Cake Pops
Step 1: Preheat and Prepare
Start by preheating your oven to 350°F (175°C). While it warms up, grab a 9×13 inch baking pan and grease it with butter or cooking spray. Then, dust it with flour to ensure your cake pops come out easily. This step is crucial for a smooth baking experience, so don’t skip it!
Step 2: Mix Dry Ingredients
In a medium bowl, whisk together the all-purpose flour, baking powder, baking soda, and salt. This blend is the foundation of your Vanilla Cake Pops. Make sure there are no lumps, as this will help your cake rise evenly. Set this mixture aside for later.
Step 3: Cream Butter and Sugar
In a large bowl, cream the softened unsalted butter and granulated sugar together until the mixture is light and fluffy. This usually takes about 3-5 minutes. Next, add the eggs one at a time, mixing well after each addition. Finally, stir in the vanilla extract, letting that sweet aroma fill your kitchen.
Step 4: Combine Ingredients
Now it’s time to bring everything together! Gradually add the dry ingredients to the butter mixture, alternating with the buttermilk. Start and end with the dry ingredients. Mix until just combined; overmixing can lead to dense cake pops. You want a smooth batter that’s ready to bake!
Step 5: Bake the Cake
Pour the batter into your prepared baking pan, spreading it evenly. Bake in the preheated oven for 25-30 minutes. To check for doneness, insert a toothpick into the center; it should come out clean. Once baked, let it cool in the pan for a few minutes before transferring it to a wire rack.
Step 6: Crumble the Cake
Once the cake is completely cool, crumble it into a large bowl. Use your hands or a fork to break it into fine crumbs. This step is essential for creating the perfect texture for your cake pops, so take your time to ensure it’s well crumbled.
Step 7: Mix with Chocolate
In a microwave-safe bowl, melt the white chocolate in 30-second intervals, stirring in between until smooth. Pour about half of the melted chocolate into the crumbled cake and mix until well combined. The mixture should hold together when rolled into balls. If it’s too crumbly, add more melted chocolate until you reach the right consistency.
Step 8: Shape the Cake Pops
Roll the cake mixture into 1-inch balls and place them on a baking sheet lined with parchment paper. Once shaped, insert a lollipop stick into each ball, making sure it goes in about halfway. This will help keep the sticks secure when you dip them later.
Step 9: Freeze the Cake Pops
Place the cake pops in the freezer for about 30 minutes. This step is crucial for setting the shape and ensuring they don’t fall apart when you dip them in chocolate. It’s a great time to clean up your kitchen or prepare your decorations!
Step 10: Decorate the Cake Pops
Once the cake pops are set, dip each one into the remaining melted white chocolate, allowing any excess to drip off. Immediately sprinkle with your favorite decorations, like colorful sprinkles or crushed nuts. Place the decorated cake pops upright in a foam block or a cup to set completely. Enjoy the delightful transformation!

Tips for Success
- Make sure your butter is softened for easy creaming; it should be at room temperature.
- Don’t overmix the batter; mix until just combined for light and fluffy cake pops.
- Use a cookie scoop for uniform cake pop sizes, ensuring even baking and easy handling.
- Let the cake cool completely before crumbling to avoid a soggy mixture.
- Experiment with different sprinkles or toppings for a fun twist!
Equipment Needed
- Baking pan: A 9×13 inch pan works best, but any similar size will do.
- Mixing bowls: Use a large bowl for the batter and a medium one for dry ingredients.
- Whisk: A hand whisk or electric mixer makes mixing easier.
- Lollipop sticks: If you don’t have these, use sturdy skewers as an alternative.
- Parchment paper: Essential for easy cleanup; aluminum foil can be a substitute.
Variations
- Chocolate Cake Pops: Substitute half of the all-purpose flour with cocoa powder for a rich chocolate flavor.
- Almond Vanilla Cake Pops: Add a teaspoon of almond extract along with the vanilla for a delightful twist.
- Gluten-Free Option: Use a gluten-free all-purpose flour blend to make these cake pops suitable for gluten-sensitive friends.
- Vegan Cake Pops: Replace eggs with flax eggs and use a dairy-free butter substitute along with non-dairy milk.
- Fruit-Infused Cake Pops: Mix in some finely chopped strawberries or raspberries into the cake mixture for a fruity surprise.
Serving Suggestions
- Pair your Vanilla Cake Pops with a rich cup of coffee or a refreshing glass of milk for a delightful treat.
- Serve them on a decorative platter for a stunning presentation at parties.
- Consider adding a side of fresh fruit to balance the sweetness.
- For a fun twist, create a cake pop display using a foam block covered in colorful paper.

FAQs about Vanilla Cake Pops
Can I make Vanilla Cake Pops ahead of time?
Absolutely! You can prepare the cake pops a day in advance. Just store them in an airtight container in the fridge after decorating. They’ll stay fresh and delicious!
What can I use instead of white chocolate for coating?
If you’re not a fan of white chocolate, you can use milk chocolate or dark chocolate instead. Just melt it the same way, and you’ll have a different yet equally tasty flavor!
How do I store leftover cake pops?
Store any leftover Vanilla Cake Pops in the fridge in an airtight container. They’ll last for about a week, but I doubt they’ll last that long!
Can I freeze the cake pops?
Yes, you can freeze them! Just make sure they’re in a single layer on a baking sheet until frozen, then transfer them to a freezer-safe container. They can last up to three months!
What’s the best way to decorate my cake pops?
Get creative! Use colorful sprinkles, edible glitter, or even drizzle with contrasting chocolate. You can also dip them in crushed nuts or coconut for added texture and flavor!
Final Thoughts
Creating these Vanilla Cake Pops is more than just baking; it’s about crafting sweet memories. Each bite brings a smile, whether it’s a birthday celebration or a simple family gathering. The joy of sharing these delightful treats with loved ones is unmatched. Plus, the satisfaction of making something from scratch is a rewarding experience.
So, roll up your sleeves and dive into this fun project. You’ll not only impress your friends and family but also create a delicious treat that’s sure to become a favorite. Happy baking, and enjoy every pop of sweetness!
Vanilla Cake Pops: Easy Recipe for Delightful Treats!
Ingredients
Method
- Preheat your oven to 350°F (175°C). Grease and flour a 9×13 inch baking pan.
- In a medium bowl, whisk together the flour, baking powder, baking soda, and salt. Set aside.
- In a large bowl, cream the softened butter and sugar together until light and fluffy. Add the eggs one at a time, mixing well after each addition. Stir in the vanilla extract.
- Gradually add the dry ingredients to the butter mixture, alternating with the buttermilk. Start and end with the dry ingredients, mixing until just combined.
- Pour the batter into the prepared baking pan and spread evenly. Bake for 25-30 minutes, or until a toothpick inserted in the center comes out clean.
- Allow the cake to cool completely in the pan on a wire rack. Once cooled, crumble the cake into a large bowl.
- Melt the white chocolate in a microwave-safe bowl in 30-second intervals, stirring in between until smooth.
- Pour about half of the melted chocolate into the crumbled cake and mix until well combined. You want the mixture to hold together when rolled into balls. If it’s too crumbly, add more melted chocolate.
- Roll the cake mixture into 1-inch balls and place them on a baking sheet lined with parchment paper. Insert a lollipop stick into each ball.
- Freeze the cake pops for about 30 minutes to set.
- Dip each cake pop into the remaining melted white chocolate, allowing excess to drip off. Immediately sprinkle with decorations.
- Place the decorated cake pops upright in a foam block or a cup to set completely.
Nutrition
Notes
- For a chocolate variation, substitute half of the all-purpose flour with cocoa powder.
- For added flavor, mix in a teaspoon of almond extract along with the vanilla.