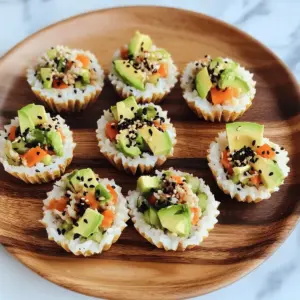
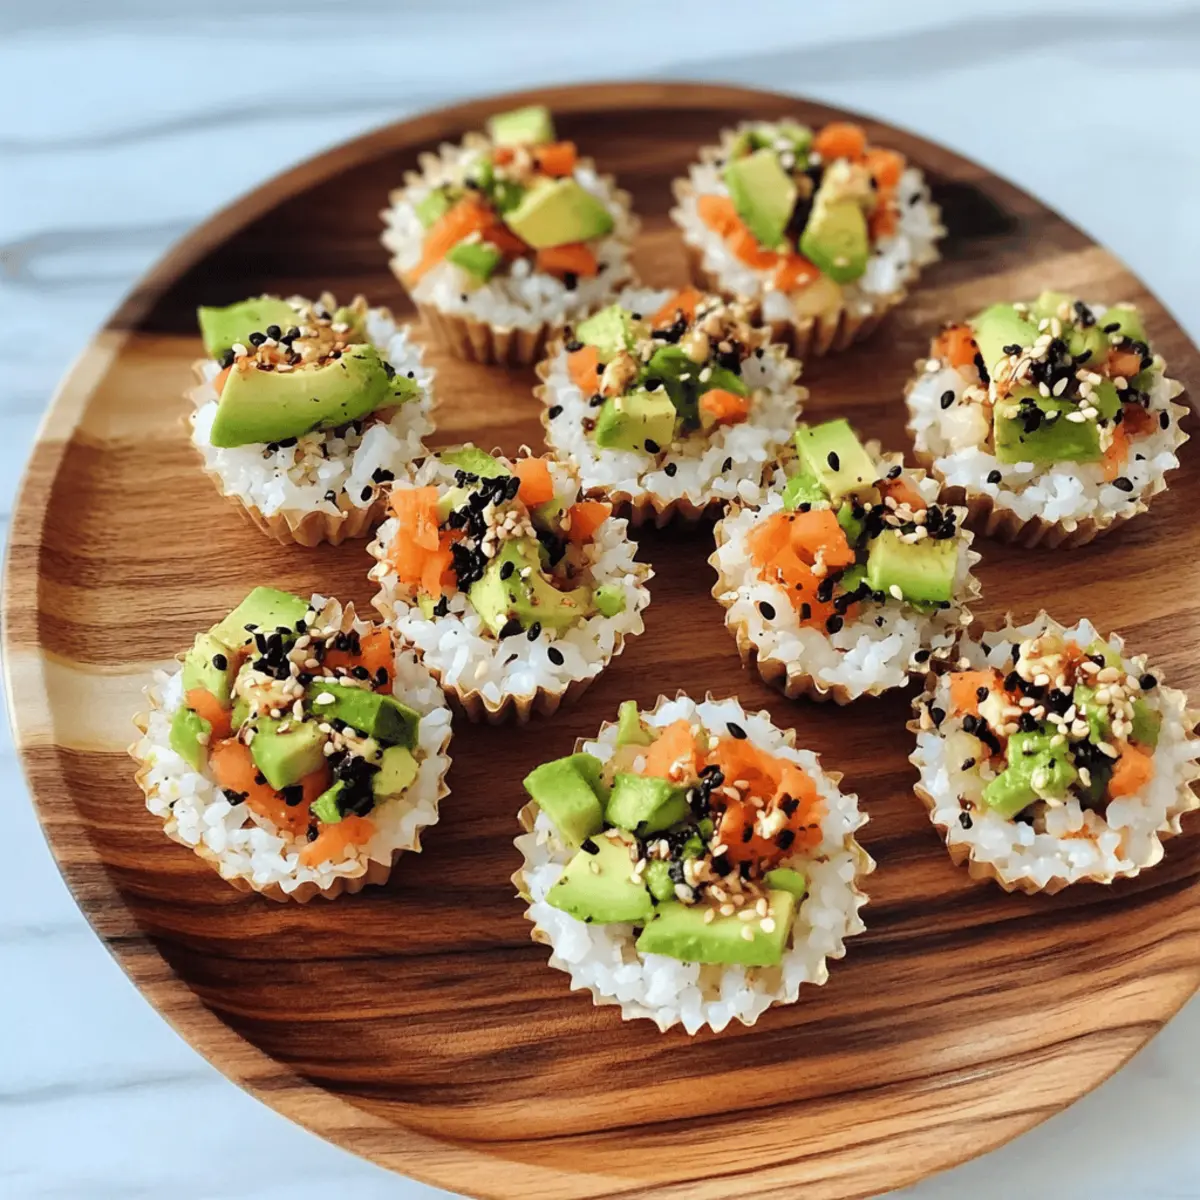
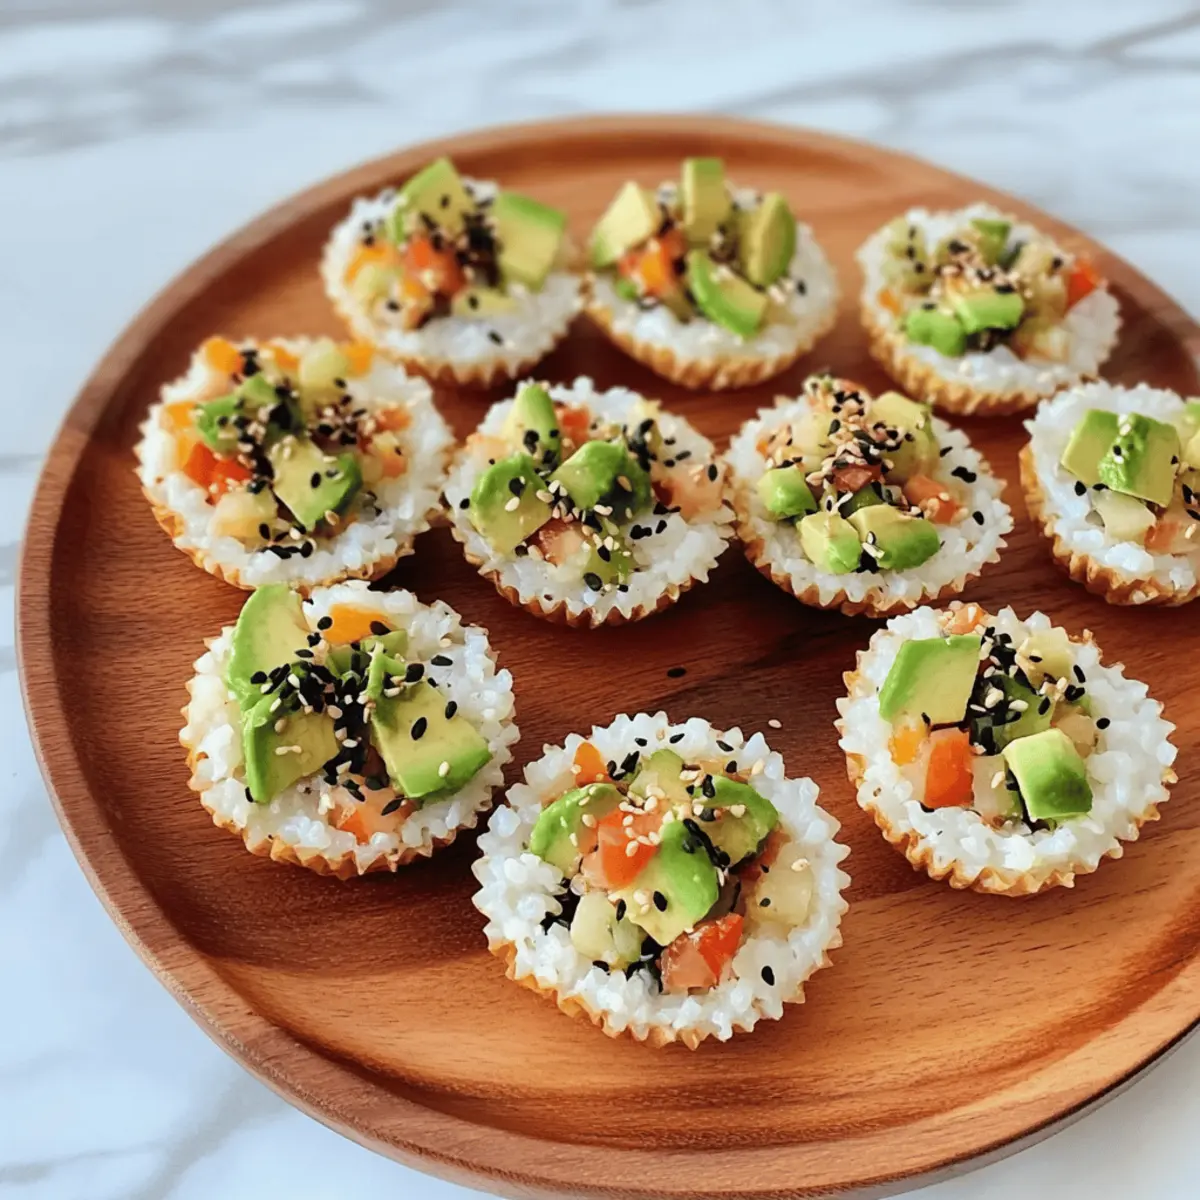
Stepping into the vibrant world of sushi can sometimes feel daunting, especially when it comes to perfecting that elusive roll. That’s where my go-to recipe for Sushi Cups comes in! These delightful no-bake bites transform traditional sushi into a customizable and approachable appetizer that’s perfect for any occasion. With just a few ingredients, you can whip up a quick snack or impress your friends at your next gathering. The best part? They’re vegetarian-friendly and bursting with colorful veggies, topped off with a creamy, spicy mayo that you can tailor to your taste. Curious about how to bring this sushi-inspired twist to your table? Let’s get started!
Why Are Sushi Cups a Must-Try?
Versatile and Customizable: With endless filling options, create your ideal combination using seasonal veggies or proteins, just like you would when making a colorful poke bowl!
Quick to Prepare: No cooking required, making these sushi cups a perfect last-minute appetizer or healthy bite when time is tight.
Light and Healthy: Each cup is packed with fresh ingredients while keeping calories in check, with approximately 110 calories per cup. Perfect for a guilt-free snack!
Crowd-Pleasing Appeal: Whether for a party, picnic, or family lunch, everyone will love these fun, bite-sized cups. Looking for another seafood twist? Check out my Spicy Shrimp Sushi for a different kind of delight!
Minimal Cleanup: With no rolling or intricate techniques involved, cleanup is a breeze, allowing you to enjoy your company more. These measurements make it easy to whip up a batch, satisfying both cravings and time constraints!
Sushi Cups Ingredients
For the Rice Base
• Sushi Rice – Provides the base structure for the cups; rinse well to remove excess starch for better texture.
• Water – Cooking medium for the rice to achieve the right consistency.
For the Filling
• Finely Chopped Veggies (Carrots, Cucumber, Bell Peppers, Sprouts) – Adds freshness and crunch; use any raw veggies you prefer.
• Steamed Mukimame (Shelled Edamame) – Adds protein and a slightly nutty flavor; can substitute with regular edamame pods if necessary.
• Diced Avocado – Provides richness and creaminess; use about half of a small avocado for this recipe.
• Sauce of Choice (Soy Sauce, Tamari, Coconut Aminos) – Adds saltiness and depth of flavor to the filling.
For the Spicy Mayo
• Mayonnaise – Base for spicy mayo, enhances creaminess.
• Sriracha Sauce – Adds spiciness to the mayo; adjust to taste.
• Honey – Balances the heat and adds slight sweetness in mayo.
• Sesame Oil – Contributes a nutty flavor to the mayo.
For Garnish
• Black Sesame Seeds – For garnish; adds visual appeal and crunch.
Now that you have all the components you need, let’s dive into crafting these delicious sushi cups!
Step‑by‑Step Instructions for Sushi Cups
Step 1: Cook Rice
In a medium pot, combine 1 cup of rinsed sushi rice with 1 ¼ cups of water. Bring to a boil over medium-high heat, then reduce the heat to low. Cover and let it simmer for 20 minutes until the water has completely absorbed and the rice is tender. Remove from heat and let it sit, still covered, for an additional 10 minutes to steam and become fluffy.
Step 2: Prepare Rice Cups
Once the sushi rice is cooked, use a fork to fluff it gently and allow it to cool slightly. Next, press the rice firmly into the cups of a greased muffin tin or silicone liners, packing it down well to ensure it holds its shape. Place the muffin tin in the refrigerator for about 20 minutes to chill and set the rice cups firmly.
Step 3: Mix Filling
While the rice cups are chilling, prepare the filling. In a large mixing bowl, combine finely chopped veggies like carrots and cucumbers, steamed mukimame, and diced avocado. Add a splash of soy sauce or your sauce of choice, then gently toss everything together until well incorporated, ensuring those vibrant flavors meld beautifully for your sushi cups.
Step 4: Make Spicy Mayo
In a small bowl, whisk together 3 tablespoons of mayonnaise, 1 tablespoon of Sriracha, 1 teaspoon of honey, and 1 teaspoon of sesame oil until you achieve a smooth and creamy consistency. Taste your spicy mayo and adjust the heat with more Sriracha if desired. This will add a delicious kick and richness to your assembled sushi cups.
Step 5: Assemble Cups
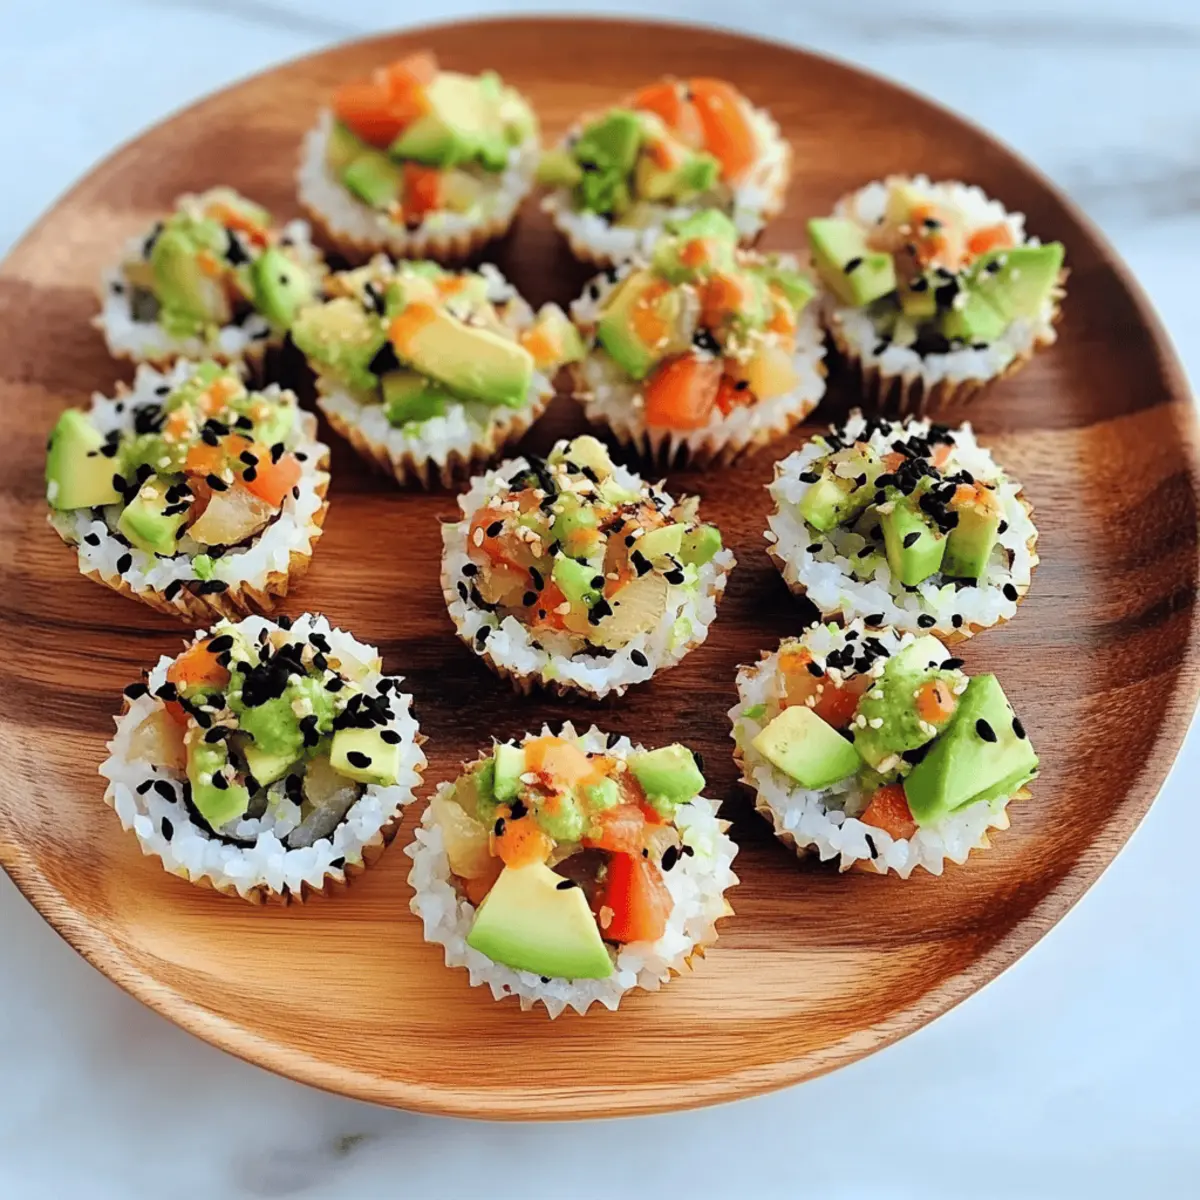
Remove the chilled rice cups from the refrigerator. Spoon the veggie filling generously over each rice cup, mounding it slightly for a delightful presentation. Drizzle the prepared spicy mayo over the tops of the filled sushi cups and sprinkle with black sesame seeds for an eye-catching finish.
Step 6: Serve and Enjoy
Your Sushi Cups are now ready to delight! Serve them immediately as colorful appetizers or a quick snack. These bite-sized wonders pack a flavorful punch and are best enjoyed fresh, but you can store any leftovers in an airtight container in the fridge for up to two days.
What to Serve with Sushi Cups
Enhance your sushi cups experience with side dishes and drinks that perfectly complement these delightful, colorful appetizers.
-
Light Cucumber Salad: A refreshing mix of cucumber, rice vinegar, and sesame seeds adds crispness that balances the richness of the sushi cups.
-
Miso Soup: The warm umami flavors of miso soup offer a cozy contrast to the individual sushi cups, making it a comforting addition to your meal.
-
Edamame Beans: Steamed edamame sprinkled with sea salt brings a satisfying bite and protein boost, pairing beautifully with the sushi’s fresh flavors.
-
Pickled Ginger: This tangy, zesty accompaniment cleanses the palate and adds a delightful kick between bites of sushi cups.
-
Sweet Potato Fries: These crispy, naturally sweet fries add a wonderful texture and slight sweetness to balance the savory flavors of the sushi cups.
-
Iced Green Tea: Refreshing and slightly grassy, this drink complements the dish’s freshness while providing a calming effect during your meal.
-
Mini Fruit Skewers: Skewers of fresh fruit like mango and pineapple add a fun, sweet contrast to the savory sushi, capturing the essence of summer in every bite.
Elevate your dining experience by combining these pairings with your sushi cups, ensuring a deliciously harmonious meal!
How to Store and Freeze Sushi Cups
Fridge: Store assembled sushi cups in an airtight container for up to 2 days. This keeps them fresh and preserves the crunchy texture of the veggies.
Freezer: Sushi cups are best enjoyed fresh, but if you need to freeze them, assemble without toppings, wrap tightly, and store in the freezer for up to 1 month. Thaw in the fridge before adding spicy mayo.
Reheating: If you’ve frozen sushi cups and want to enjoy them warm, gently reheat in the microwave for about 15-20 seconds, but add the spicy mayo after reheating to maintain its creaminess.
Preparation Tip: It’s ideal to prepare the filling and rice cups ahead of time to streamline your serving process, ensuring a delicious, fresh snack anytime!
Expert Tips for Sushi Cups
-
Rinse Rice Well: Always rinse sushi rice thoroughly to remove excess starch. This prevents sticky rice cups, ensuring a beautifully textured base.
-
Pack Firmly: When pressing rice into muffin cups, pack it down firmly to maintain their shape once removed. This step is crucial for perfect sushi cups!
-
Prep While Chilling: Use the cooling time of the rice to chop your vegetables and prepare the spicy mayo. This efficient workflow saves you time and keeps the fun rolling!
-
Maximize Freshness: Enjoy the sushi cups within 2 days for the best taste and texture. Store them in an airtight container in the fridge to keep them fresh and delectable.
-
Customize to Taste: Don’t hesitate to adjust the filling and spicy mayo to match your preferences. Adding different vegetables or proteins can elevate your sushi cups even more!
Sushi Cups: Delightful Twists Await
Feel free to jazz up these sushi cups and personalize them according to your cravings or dietary preferences!
-
Protein Boost: Add crab meat or tofu for an extra delicious layer of flavor and protein. This twist adds richness and satiety, making your sushi cups even more satisfying.
-
Vegetable Variety: Swap in radishes or avocado slices for a refreshing take. These add a pop of color and a crisp texture, keeping every bite exciting.
-
Dressing Options: Replace spicy mayo with a tangy tahini dressing for a nutty flavor profile. This twist is not just unique but also a delicious alternative for those avoiding mayonnaise.
-
Flavor Fusion: Enhance with a sprinkle of wasabi or teriyaki sauce for an unexpected kick. It brings a new layer of heat or sweetness that friends and family will surely love!
-
Herbal Garnish: Try adding cilantro or green onions for a fresh aromatic touch. These herbs will elevate the flavors, creating a fragrant bite that sings with freshness.
-
Crispy Texture: Top with crispy tempura bits for added crunch! This not only enhances the texture but also adds a fun twist that makes your sushi cups feel festive and alive.
-
Heat Level: Incorporate chili flakes or slices of jalapeños if you’re craving some extra heat! This boosts the flavor quotient and keeps your taste buds dancing.
For those who love seafood, you might enjoy pairing these sushi cups with a side of Spicy Shrimp Sushi. The possibilities are endless, so let your creativity shine!
Make Ahead Options
These Sushi Cups are a fantastic choice for busy weeknights and meal prep! You can prepare the rice cups and filling up to 24 hours in advance. To save time, press the cooked sushi rice into muffin tins and refrigerate them after they have set. You can also chop your veggies, steam the mukimame, and mix the filling a day ahead; just store each component in separate airtight containers in the fridge to maintain freshness. When you’re ready to serve, simply spoon the filling into the chilled rice cups, drizzle with spicy mayo, and enjoy these delicious bites just like they were freshly made!
Sushi Cups Recipe FAQs
How do I select the perfect sushi rice?
Absolutely! When choosing sushi rice, go for a short-grain variety, as it has the right sticky texture for molding into cups. Ensure the grains are clean and uniformly white, with no dark spots or broken grains to maintain the integrity of your sushi cups.
What’s the best way to store leftover sushi cups?
To keep your sushi cups fresh, store them in an airtight container in the fridge for up to 2 days. You’ll want to avoid prolonged exposure to air to maintain the crunchiness of the veggies and the integrity of the rice.
Can I freeze sushi cups?
Very! While sushi cups are best enjoyed fresh, you can freeze them without the spicy mayo. Wrap each cup tightly in plastic wrap and place them in a freezer-safe bag for up to 1 month. When ready to eat, simply thaw in the refrigerator overnight, then add the spicy mayo just before serving. This will help preserve the creamy texture.
What if my sushi rice is too sticky?
If your rice turns out sticky, it’s usually due to not rinsing the grains thoroughly. Rinsing removes excess starch, which can help prevent stickiness. If you find yourself in this situation, you can add a bit of water with a dash of rice vinegar while fluffing the rice to help separate the grains.
Are these sushi cups suitable for a gluten-free diet?
Absolutely! By using gluten-free soy sauce, tamari, or coconut aminos in the filling and spicy mayo, these sushi cups can be made gluten-free. Make sure to double-check all ingredient labels to ensure they meet your dietary needs.
Can I use different veggies in my sushi cups?
The more the merrier! Feel free to experiment with veggies like radishes, asparagus, or avocado slices. Just make sure they’re fresh and cut into small pieces to fit nicely in your cups—this way, you can create your ideal flavor profile and texture!

Delicious Sushi Cups: Quick, No-Bake Marvels for Everyone
Ingredients
Equipment
Method
- In a medium pot, combine 1 cup of rinsed sushi rice with 1 ¼ cups of water. Bring to a boil over medium-high heat, then reduce heat to low, cover, and simmer for 20 minutes until water is absorbed and rice is tender. Let sit covered for 10 minutes.
- Fluff cooked sushi rice with a fork and allow to cool slightly. Press rice firmly into cups of a greased muffin tin or silicone liners. Refrigerate for 20 minutes to chill and set.
- In a large mixing bowl, combine finely chopped veggies, steamed mukimame, and diced avocado. Add a splash of your sauce of choice and gently toss everything together until well incorporated.
- In a small bowl, whisk together 3 tablespoons of mayonnaise, 1 tablespoon of Sriracha, 1 teaspoon of honey, and 1 teaspoon of sesame oil until mixed well. Adjust heat to taste.
- Remove chilled rice cups from the refrigerator. Spoon veggie filling generously over each rice cup. Drizzle spicy mayo and sprinkle with black sesame seeds.
- Serve immediately as appetizers or snacks. Store leftovers in an airtight container in the fridge for up to two days.