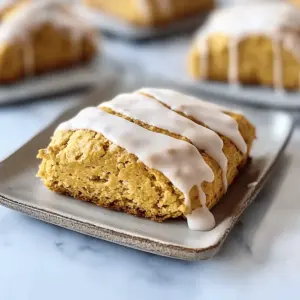
The air was filled with the sweet scent of cinnamon and nutmeg as I rummaged through my pantry, yearning for that cozy autumn vibe. That’s when the idea struck me—I could create my very own version of the beloved Starbucks Pumpkin Scones! This easy recipe is not just a delightful nod to my favorite café treat but also a wonderful way to embrace fall with its warm spices and soft, cake-like texture. Perfect for those busy mornings or lazy afternoons, these Starbucks Pumpkin Scones are quick to whip up, allowing you to savor a homemade treat without the fuss. Plus, you can make a batch ahead of time and enjoy them fresh from the oven whenever the craving hits! Curious to see how to bring that café magic home? Let’s dive into this warm, comforting recipe!

Why are homemade pumpkin scones special?
Homemade pumpkin scones offer a delightful twist to your usual fall treats. Quick & Easy to whip up, they require minimal ingredients yet pack a punch of flavor. Make-Ahead versatility means you can enjoy them fresh or freeze for later. Family-Friendly and loved by all, they’re perfect for cozy mornings with coffee. Seasonal spices like cinnamon and nutmeg create that inviting aroma, making your kitchen smell like an autumn wonderland! Embrace the comfort of homemade treats and transform your mornings into something magical.
Starbucks Pumpkin Scones Ingredients
For the Scones
• All-Purpose Flour – Provides structure; substitute with gluten-free flour for a gluten-free version.
• Brown Sugar – Adds moisture and a subtle caramel flavor; can substitute with coconut sugar for a healthier option.
• White Sugar – Sweetens the scones; you can reduce the sugar for less sweetness.
• Ground Cinnamon – Offers warmth and spice; can use pumpkin pie spice as a substitute.
• Ground Cloves – Contributes a deep, aromatic flavor; omit if unavailable.
• Ground Ginger – Enhances the fall flavor profile; fresh ginger can be used in a pinch but adjust the amount.
• Ground Nutmeg – Adds a nutty, sweet note; allspice can be substituted if needed.
• Baking Soda/Powder – Provides leavening for a light scone texture; essential, do not substitute.
• Salt – Balances sweetness; no substitutes recommended.
• Unsalted Butter (cold and diced) – Helps to create flaky layers; for dairy-free, use coconut oil or a vegan butter substitute.
• Chilled Pumpkin Puree – Gives scones moisture and flavor; avoid pumpkin pie filling as it’s seasoned and sweetened.
• Cold Milk – Adds moisture; can substitute with almond or oat milk for a dairy-free version.
• Cold Egg – Binds the ingredients together; can use a flaxseed egg as a vegan alternative.
• Vanilla Extract – Enhances the overall flavor; optional but recommended.
For the Glaze
• Powdered Sugar – Base for the glaze; can use sugar alternatives for lower sugar content.
• Heavy Cream – Used in the glaze for richness; substituted with dairy-free cream if needed.
• Pumpkin Pie Spice – For spiced glaze; can use a mixture of cinnamon, nutmeg, and cloves instead.
Get ready to savor the delightful flavors of these Starbucks Pumpkin Scones in your own kitchen!
Step‑by‑Step Instructions for Starbucks Pumpkin Scones
Step 1: Prep Oven & Baking Sheet
Begin by preheating your oven to 400°F (200°C). While it warms up, line a baking sheet with parchment paper for easy scone transfer. This step is crucial as it ensures your Starbucks Pumpkin Scones bake evenly and do not stick to the pan.
Step 2: Mix Wet Ingredients
In a medium bowl, whisk together the chilled pumpkin puree, cold milk, egg, and vanilla extract until smooth and well combined. This mixture should be creamy and free of lumps. Once combined, chill this wet mixture in the refrigerator for about 10 minutes to keep the scones light and fluffy.
Step 3: Combine Dry Ingredients
In a large mixing bowl, sift together the all-purpose flour, brown sugar, white sugar, baking powder, baking soda, salt, and your spices—cinnamon, cloves, ginger, and nutmeg. Incorporating these dry ingredients fully is essential for distributing the flavors evenly throughout your Starbucks Pumpkin Scones.
Step 4: Incorporate Butter
Add the cold, diced butter to the dry ingredients. Using a pastry cutter or your fingertips, cut the butter into the flour mixture until it resembles coarse crumbs with small pea-sized butter pieces. This will create those flaky, tender layers that are characteristic of perfect scones.
Step 5: Form Dough
Create a well in the center of the dry mixture and pour the chilled wet ingredients into it. Gently mix until a soft dough forms—be careful not to overwork the dough, as this can lead to dense scones. On a floured surface, fold the dough gently 2-3 times to bring it together without kneading it too much.
Step 6: Shape & Cut
Shape the dough into a rectangle that measures about 8×5 inches. With a sharp knife, cut the dough into 6 equal squares or triangles, providing each piece with enough space to rise on your prepared baking sheet. This proper spacing aids in achieving that desirable golden-brown crust.
Step 7: Bake
Place the shaped scones on your parchment-lined baking sheet and bake them in the preheated oven for 17-18 minutes, or until they are risen and lightly golden on top. Keep an eye on them towards the end, as you want them golden but not overly dark.
Step 8: Cool on Sheet
Once baked, remove the scones from the oven and let them cool on the baking sheet for about 10 minutes. This step helps them firm up a bit before transferring them to a wire rack, where they will cool completely while maintaining their deliciously soft center.
Step 9: Make Glaze
While the scones cool, prepare the glaze by whisking together powdered sugar and heavy cream in a small bowl until smooth. The glaze should have a pourable consistency; adjust with more cream if needed. This sweet topping is what makes your Starbucks Pumpkin Scones truly delightful!
Step 10: Glaze Scones
Once the scones are completely cooled, drizzle the vanilla glaze over each one. For a festive touch, you can follow this by applying a spiced glaze—just mix a little pumpkin pie spice into the glaze. Allow the glaze to set for about 20 minutes before enjoying your beautifully decorated scones.
How to Store and Freeze Starbucks Pumpkin Scones
Room Temperature: Store your Starbucks Pumpkin Scones in an airtight container at room temperature for up to 3 days to maintain their freshness and prevent dryness.
Fridge: If you prefer a longer shelf life, refrigerate the scones in an airtight container for up to 5 days, but be aware they may lose some of their original texture.
Freezer: For longer storage, wrap each scone tightly in plastic wrap and place them in a freezer bag. They can be frozen for up to 3 months without compromising flavor.
Reheating: When ready to enjoy, reheat the scones in a preheated oven at 300°F for 5-8 minutes or microwave for 15-20 seconds for a freshly baked taste.
Make Ahead Options
These Simple Starbucks Pumpkin Scones are perfect for meal prep, saving you time on busy mornings! You can prepare the dough up to 24 hours in advance by mixing the wet and dry ingredients separately and refrigerating them until you’re ready to bake. To maintain quality, keep the dough tightly wrapped in plastic wrap or sealed in an airtight container to prevent drying out. When you’re ready to enjoy your pumpkin scones, simply shape, cut, and bake them according to the instructions. Alternatively, you can freeze baked scones for up to 3 months; just reheat them in the oven at 300°F for about 5-8 minutes for a freshly baked taste!
What to Serve with Simple Starbucks Pumpkin Scones
The warm, cozy flavors of autumn are best enjoyed with delightful companions that elevate your scone experience.
- Cinnamon Coffee: A smooth cup of coffee with a dash of cinnamon perfectly balances the scones’ sweetness and spices.
- Maple Pecan Butter: This rich, nutty spread complements the scones’ flavors beautifully and adds a creamy texture that’s irresistible.
- Fresh Fruit Salad: A vibrant medley of seasonal fruits provides a refreshing contrast, cutting through the scones’ richness and adding brightness to your plate.
- Spiced Chai Latte: This aromatic drink enhances the fall vibe and creates a lovely harmony between the scones and warm spices.
- Autumn Salad: A mix of arugula, roasted squash, and cranberries adds a fresh crunch that contrasts the soft scones, rounding out your meal perfectly.
- Pumpkin Spice Whipped Cream: Top your scones with this creamy treat for an added layer of flavor that celebrates the essence of fall!
- Warm Apple Cider: A cozy drink that pairs wonderfully with pumpkin scones, bringing a comforting taste of the season to each bite.
- Chocolate Chip Cookies: For those with a sweet tooth, the pairing of these two beloved treats makes an indulgent snack that everyone will love.
Starbucks Pumpkin Scones Variations & Substitutions
Feel free to make these scones your own with these delicious variations and substitutions that awaken your creativity in the kitchen!
- Gluten-Free: Substitute all-purpose flour with a 1:1 gluten-free flour mix for a delightful gluten-free version without sacrificing flavor.
- Lower Sugar: Use coconut sugar or a sugar alternative like monk fruit sweetener to cut down on sweetness while keeping the flavor intact.
- Spice It Up: Add a pinch of cardamom or nutmeg to elevate the autumn spice profile, giving your scones a unique twist that’s sure to impress.
- Fruity Fun: Mix in dried cranberries or chopped apples for a fruity surprise that pairs wonderfully with the pumpkin flavor.
- Nutty Bit: Incorporate chopped walnuts or pecans into the dough for added crunch and nutty flavor, creating a satisfying texture contrast in each bite.
- Vegan Delight: Replace the egg with a flaxseed egg (1 tablespoon ground flaxseed + 2.5 tablespoons water) and use dairy-free butter or coconut oil for a completely plant-based treat.
- Extra Creamy Glaze: A drizzle of maple syrup instead of heavy cream in the glaze can add a sweet, rich flavor that complements the pumpkin beautifully.
- Heat Kick: For a spicy touch, add a pinch of cayenne pepper to the scone mixture for those who enjoy a little heat with their sweet fall flavors.
Each variation breathes new life into these Starbucks-style scones. So go ahead and explore these ideas that will leave your kitchen smelling heavenly, making it impossible for anyone to resist a taste! If you’re looking to transform your mornings even more, check out how to bring some homemade charm to your breakfast or pair your scones with a steaming cup of cozy chai tea for the ultimate autumn experience.
Expert Tips for Starbucks Pumpkin Scones
-
Chill the Dough: Always chill your wet ingredients before mixing them into the dry to help the scones maintain their shape and texture while baking.
-
Don’t Overmix: Mix the dough just until combined. Overworking will lead to tough scones, so be gentle when folding the dough to create those light, fluffy Starbucks Pumpkin Scones.
-
Butter is Key: Use cold, unsalted butter, cutting it into the flour until it resembles coarse crumbs. This creates those airy, flaky layers that make the scones delicious!
-
Adjust the Glaze: The consistency of your glaze matters! Add heavy cream slowly to achieve your desired thickness—it should coat the back of a spoon without being too runny.
-
Serve Fresh: For the best flavor and texture, serve your scones warm from the oven. Store leftovers in an airtight container for up to three days, but they’re best enjoyed fresh!
Starbucks Pumpkin Scones Recipe FAQs
How do I choose the right pumpkin puree?
Absolutely! When selecting pumpkin puree, opt for 100% pure pumpkin for the best flavor and texture. Avoid pumpkin pie filling since it contains added sugars and spices that can alter the taste of your scones. If possible, look for brands that use organic pumpkins for a fresher flavor.
How should I store my Starbucks Pumpkin Scones?
For optimal freshness, store your Starbucks Pumpkin Scones in an airtight container at room temperature for up to 3 days. If you prefer them a bit cooler, they can be kept in the fridge for up to 5 days, but keep in mind they may lose some of their delightful fluffiness.
Can I freeze my scones, and how do I do it?
Certainly! To freeze your Starbucks Pumpkin Scones, take each cooled scone and wrap it tightly in plastic wrap. Then, place them in a freezer bag or airtight container. They can be stored in the freezer for up to 3 months. When you’re ready to enjoy them, simply reheat in a 300°F (150°C) oven for 5-8 minutes or microwave for 15-20 seconds.
What if my dough is too sticky?
Very! If you find your dough is too sticky, try adding a bit more flour, a tablespoon at a time, while mixing gently until it reaches a workable consistency. Be cautious not to overmix as it can toughen the scones. A light, fluffy texture is what we aim for!
Are these scones suitable for allergies?
Absolutely! If you’re making these for someone with dietary restrictions, you can customize the recipe. For a dairy-free option, substitute the unsalted butter with coconut oil or a vegan butter alternative. Additionally, use a flaxseed egg instead of a regular egg, and almond or oat milk can take the place of regular milk. Always double-check ingredient labels for possible allergens to ensure safety for those with specific sensitivities.

Starbucks Pumpkin Scones Made Easy for Cozy Fall Mornings
Ingredients
Equipment
Method
- Preheat your oven to 400°F (200°C) and line a baking sheet with parchment paper.
- In a medium bowl, whisk together the chilled pumpkin puree, cold milk, egg, and vanilla extract until smooth.
- In a large mixing bowl, sift together the all-purpose flour, brown sugar, white sugar, baking powder, baking soda, salt, and spices.
- Cut cold, diced butter into the dry ingredients until it resembles coarse crumbs.
- Create a well in the center and pour the chilled wet ingredients into it, mixing gently until a soft dough forms.
- Shape the dough into a rectangle, cut into 6 squares or triangles, and place on the prepared baking sheet.
- Bake for 17-18 minutes until risen and lightly golden on top.
- Let the scones cool on the baking sheet for about 10 minutes before transferring to a wire rack.
- Whisk together powdered sugar and heavy cream to prepare the glaze.
- Drizzle the glaze over cooled scones and allow to set for about 20 minutes before serving.