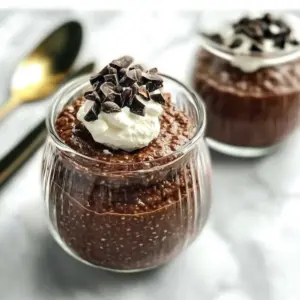
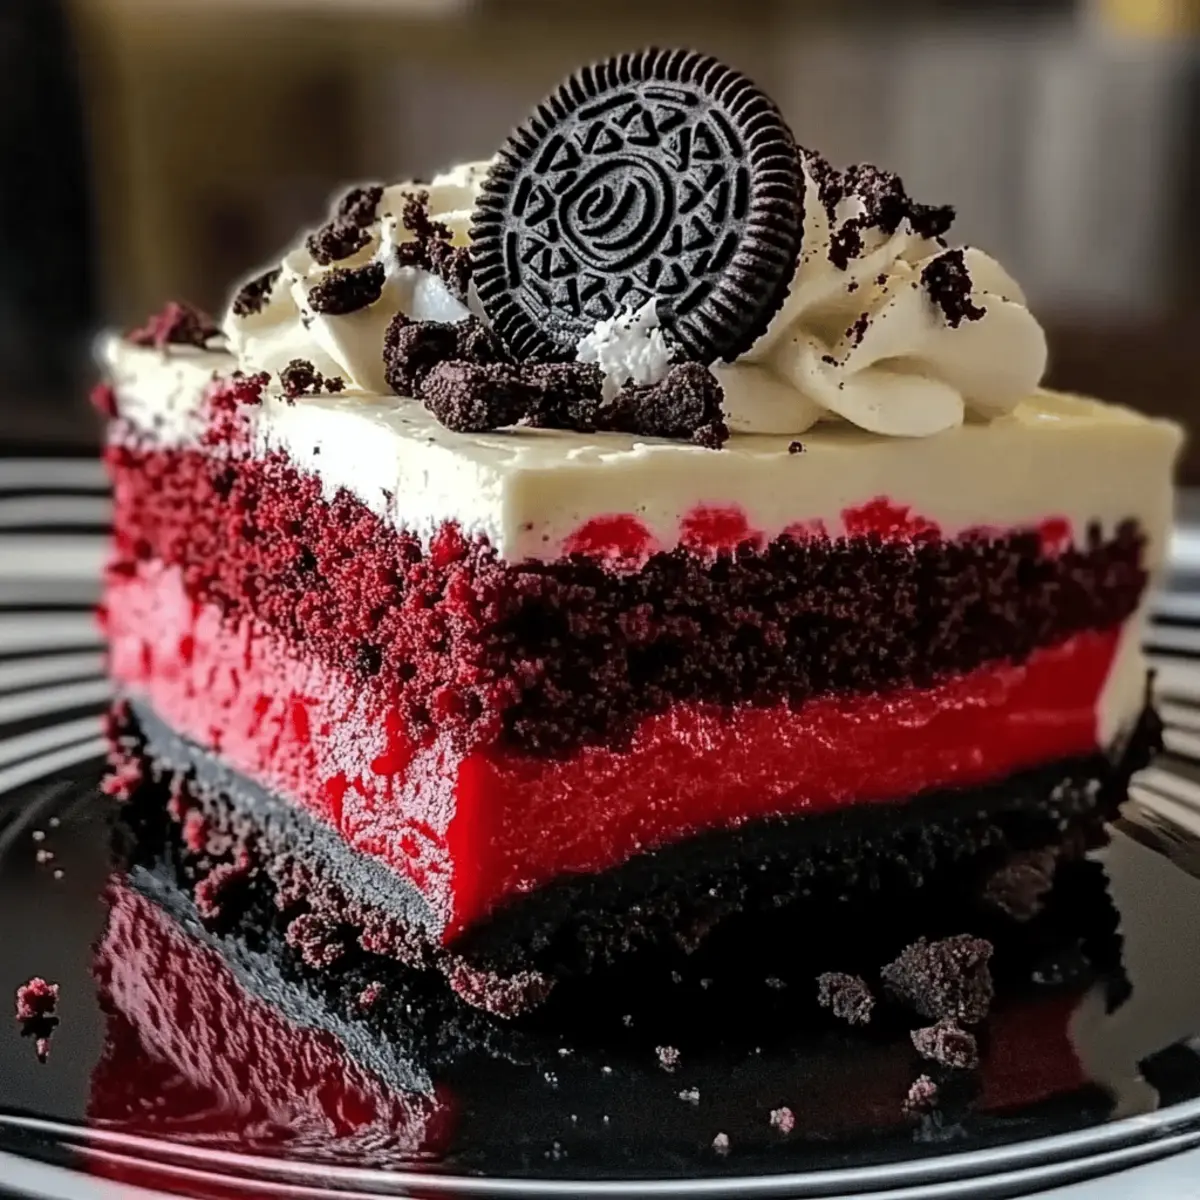
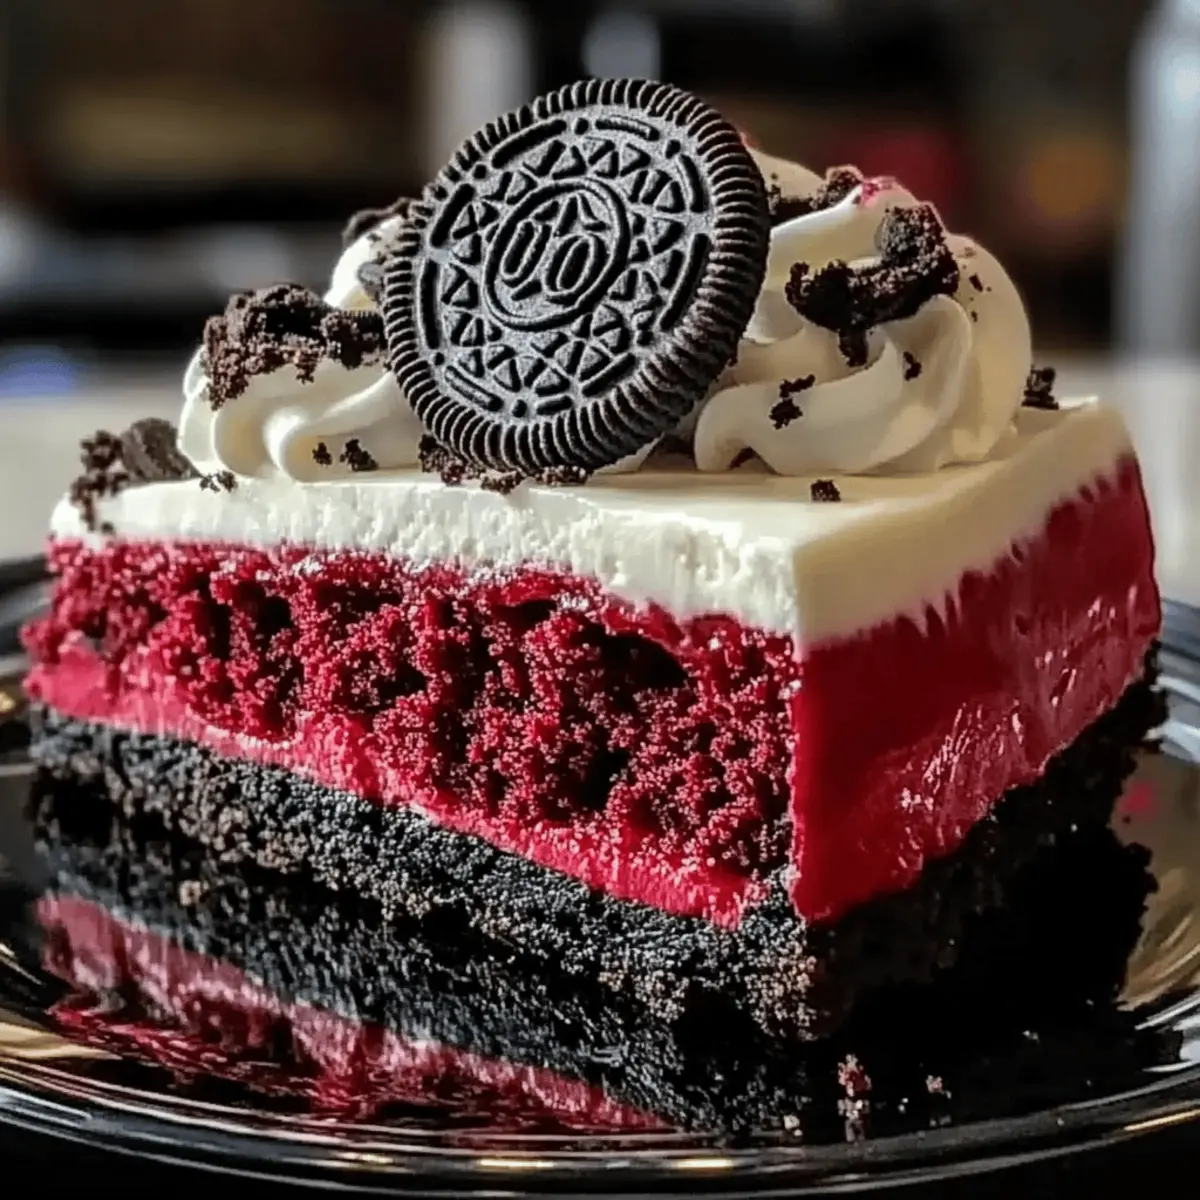
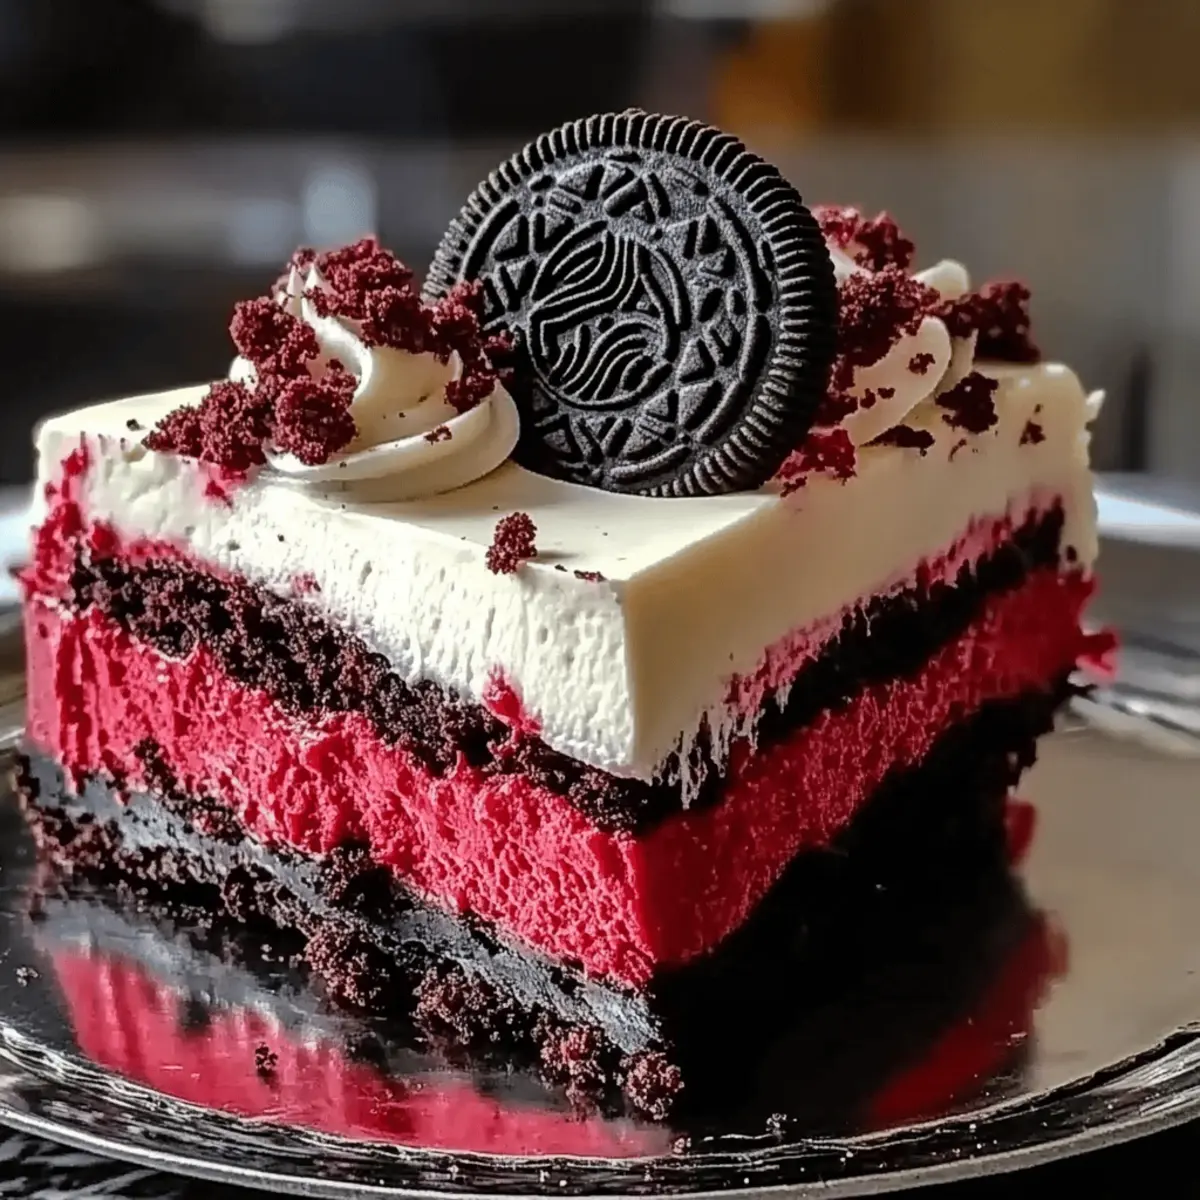
Every time I slice into this vibrant Red Velvet Oreo Cheesecake, I’m instantly transported from my kitchen to a charming bakery, where every indulgent bite feels like a special occasion. This dessert combines the sumptuous, velvety richness of classic red velvet cake with the creamy decadence of a cheesecake, all resting atop a crunchy Oreo cookie crust. Not only is it visually stunning, making it a showstopper for gatherings, but it’s also incredibly easy to customize for those on gluten-free diets. You’ll love the balance of flavors and textures here, making it a delightful treat for any day of the week. Ready to impress your friends or treat yourself to something heavenly? Let’s dive into this delectable recipe!
Why is This Cheesecake Extra Special?
Indulgent flavors: This Red Velvet Oreo Cheesecake delivers a perfect blend of rich, velvety creaminess and chocolatey crunch, making it an unforgettable dessert for every occasion.
Simple customization: Whether you’re hosting a gathering or just craving a sweet treat, you can easily adapt this recipe with gluten-free options or alternative crusts, like chocolate chip cookies!
Crowd favorite: The eye-catching red color and creamy texture make this cheesecake a no-fail showstopper that impresses family and friends alike.
Effortless preparation: You’ll find that creating this decadent dessert is simpler than you might think. With straightforward instructions, even novice bakers can create a masterpiece!
Perfect for any occasion: This cheesecake elevates any meal – serve it at birthdays, holidays, or simply savor it with a comforting cup of tea or coffee. Don’t forget to check out other delightful recipes like Mexican Shredded Chicken or Chicken Buttered Noodles for your next gathering!
Red Velvet Oreo Cheesecake Ingredients
For the Cake Layer
• 1 ½ cups all-purpose flour – Structure for the red velvet layer; for a gluten-free version, use gluten-free all-purpose flour.
• 1 cup granulated sugar – Adds sweetness to both layers.
• 1 tablespoon cocoa powder – Enhances the chocolate flavor in the red velvet layer.
• ½ teaspoon baking soda – A crucial leavening agent for the cake layer.
• ¼ teaspoon salt – Balances the overall sweetness.
• 1 teaspoon vanilla extract – A must-have flavor enhancer.
• 1 large egg – Binds ingredients and adds moisture.
• ½ cup vegetable oil – Provides fat for moisture.
• ¼ cup buttermilk – Adds a lovely tanginess and extra moisture.
• 1 ounce red food coloring – Gives the cake its signature vibrant red color.
For the Cheesecake Filling
• 1 cup cream cheese – The star ingredient for the creamy cheesecake layer.
• 4 tablespoons powdered sugar – Sweetens the cheesecake filling perfectly.
• 1 teaspoon vanilla extract – Additional flavoring for a rich taste.
• 1 tablespoon corn starch – Helps to stabilize the cheesecake filling.
For the Crust and Topping
• 20 Oreo cookies – The foundation of the cheesecake crust; use gluten-free Oreos for an alternative.
• 12 tablespoons unsalted butter – Binds the crust together for a delectable crunch.
• ½ cup crushed Oreo cookies – Adds a delightful topping and extra texture.
• 3 whole Oreos – For a stunning garnish.
• ¼ cup heavy cream – To whip into a fluffy topping that enhances this indulgent dessert.
This Red Velvet Oreo Cheesecake combines vibrant colors and flavors, making it a treat you won’t forget!
Step‑by‑Step Instructions for Red Velvet Oreo Cheesecake
Step 1: Prep the Crust
Begin by crushing 20 Oreo cookies into fine crumbs using a food processor or a plastic bag and rolling pin. Combine these crumbs with 12 tablespoons of melted unsalted butter in a mixing bowl, stirring until well combined. Press this mixture evenly into the bottom of a 9-inch springform pan to form a crust, then refrigerate it for about 30 minutes to set while you prepare the cake layer.
Step 2: Make the Cake Batter
In a large mixing bowl, sift together 1 ½ cups of all-purpose flour, 1 cup of granulated sugar, 1 tablespoon of cocoa powder, ½ teaspoon of baking soda, and ¼ teaspoon of salt. In another bowl, whisk together 1 large egg, ½ cup of vegetable oil, ¼ cup of buttermilk, 1 teaspoon of vanilla extract, and 1 ounce of red food coloring until blended. Gradually combine the wet and dry ingredients, mixing until just combined and smooth.
Step 3: Bake the Cake Layer
Preheat your oven to 350°F (175°C). Carefully pour the red velvet batter over the chilled Oreo crust in the springform pan, spreading it evenly. Bake in the preheated oven for 30 minutes or until a toothpick inserted into the center comes out clean. Allow the cake layer to cool completely in the pan on a wire rack to prevent cracking.
Step 4: Prepare the Cheesecake Filling
In a large mixing bowl, beat 1 cup of room-temperature cream cheese with an electric mixer until it’s smooth and creamy. Gradually add in 4 tablespoons of powdered sugar, 1 teaspoon of vanilla extract, and 1 tablespoon of corn starch. Mix until fully incorporated and the filling is silky, ensuring no lumps remain. This rich mixture will provide the creamy top layer for your Red Velvet Oreo Cheesecake.
Step 5: Layer the Cheesecake Mixture
Once the red velvet layer has cooled completely, gently spread the cheesecake filling over the cake layer using a spatula. Ensure it’s evenly distributed across the top. For a smooth finish, you can tap the pan lightly on the counter. This layer will create a beautiful contrast of colors and flavors, making your dessert visually stunning.
Step 6: Chill the Cheesecake
Cover the springform pan with plastic wrap or aluminum foil and refrigerate the cheesecake for at least 4-6 hours, or preferably overnight. This chilling time allows the flavors to meld beautifully and the cheesecake to set properly, ensuring a perfect slice when you’re ready to serve your Red Velvet Oreo Cheesecake.
Step 7: Serve with Style
Before serving, whip ¼ cup of heavy cream until soft peaks form. Top the chilled cheesecake with the whipped cream and sprinkle with ½ cup of crushed Oreo cookies for a delightful crunch. Finally, garnish with 3 whole Oreos placed decoratively on top. Slice into the cake, serve, and enjoy the delicious layers of your homemade Red Velvet Oreo Cheesecake.
Make Ahead Options
These Red Velvet Oreo Cheesecakes are perfect for busy home cooks looking to streamline their meal planning! You can prepare the crust and cake layer up to 24 hours in advance by refrigerating them separately. Simply crush 20 Oreo cookies, mix with melted butter, and press into the pan, then bake the red velvet layer and allow to cool. Cover both layers tightly to maintain their quality. When you’re ready to serve, whip up the cheesecake filling, spread it over the cooled cake, and chill for at least 4-6 hours or overnight. You’ll be left with a stunning dessert that tastes just as indulgent with minimal last-minute effort!
How to Store and Freeze Red Velvet Oreo Cheesecake
Fridge: Keep the cheesecake stored in an airtight container in the refrigerator for up to 5 days. This will maintain its creamy texture and flavor.
Freezer: For longer storage, wrap the cheesecake tightly in plastic wrap and aluminum foil, then freeze for up to 2 months. Thaw in the refrigerator overnight before serving.
Reheating: There’s no need to reheat this cheesecake; it’s best enjoyed chilled. Just top with whipped cream and crushed Oreos before serving for that fresh touch.
Serving Suggestions: You can enhance the flavor by serving with fresh berries or pomegranate seeds, but remember to store them separately!
Expert Tips for Red Velvet Oreo Cheesecake
-
Use Room Temperature Ingredients: Ensure your cream cheese and eggs are at room temperature for a smoother texture in your cheesecake filling, helping to avoid lumps.
-
Don’t Overmix: When combining the wet and dry ingredients for the cake layer, mix just until combined. Overmixing can lead to a tough cake, so be gentle!
-
Chill for Best Texture: Allow your Red Velvet Oreo Cheesecake to chill for at least 6 hours or overnight. This leads to a firmer texture and more vibrant flavor as it sets properly.
-
Prevent Cracking: To avoid cracks in the cheesecake, bake it slowly and leave the oven door slightly ajar once it’s done. This gradual cooling helps maintain a moist environment.
-
Customization Options: Want to switch it up? Substitute Oreos with a different cookie for the crust, or even add crushed Oreos into the cheesecake filling for added texture and flavor.
Red Velvet Oreo Cheesecake Variations
Feel free to take this classic dessert and make it your own by customizing it to suit your taste!
-
Gluten-Free: Use gluten-free all-purpose flour and gluten-free Oreos to make this cheesecake suitable for those with gluten sensitivities. It’s just as delicious!
-
Different Crust: Swap out the Oreo crust for a graham cracker or chocolate chip cookie crust, introducing new flavors and textures to your cheesecake experience.
-
Extra Crunch: Fold in crushed Oreos into the cheesecake filling for delightful bursts of chocolatey goodness in every slice. This variation will keep everyone guessing!
-
Chocolate Drizzle: Drizzle melted chocolate over the top before serving for an added layer of indulgence that’s sure to impress your guests.
-
Add a Twist: Incorporate nuts like pecans or walnuts into the crust for a nutty, satisfying crunch that contrasts beautifully with the creamy filling.
-
Cheesecake Swirl: For a vibrant presentation, create a red velvet cheesecake swirl by spooning dollops of cheesecake filling on top of the red velvet layer and swirling them together before chilling.
-
Fruit Topping: Serve with fresh fruit such as strawberries or raspberries to introduce a refreshing and tart element that complements the richness.
-
No-Bake Option: For a lighter version, consider a no-bake cheesecake mix with whipped cream and cream cheese, nestled into the same Oreo crust for effortless charm.
Feel inspired to let your creativity shine! Whether you’re opting for a classic twist or adding exciting new elements, it’s all about making your Red Velvet Oreo Cheesecake memorable. For more ideas that will delight your taste buds, check out my other recipes like Mexican Shredded Chicken and Chicken Buttered Noodles. Enjoy baking!
What to Serve with Red Velvet Oreo Cheesecake?
For the perfect finishing touches to your indulgent dessert experience, pair your cheesecake with complementary flavors and textures that heighten every bite.
-
Fresh Berries: Bright strawberries or raspberries add a refreshing burst of flavor, cutting through the richness of the cheesecake beautifully. Their natural sweetness and tartness create a delightful contrast on your palate.
-
Coffee or Espresso: A warm cup of coffee or a shot of espresso boosts the flavors of the cheesecake. The bitter notes of the coffee balance the sweetness, making each bite even more indulgent.
-
Whipped Cream: A dollop of freshly whipped cream enhances the luscious texture of your cheesecake. It creates a creamy, airy layer that complements the dense, rich cake wonderfully.
-
Chocolate Ganache: Drizzling the cheesecake with silky chocolate ganache adds a decadent touch. The smooth richness of chocolate harmonizes perfectly with the Oreo crust and creamy layers.
-
Vanilla Ice Cream: Serve a scoop of vanilla ice cream on the side for a classic pairing. The cold creaminess contrasts with the cake’s warmth, creating a delightful experience for your taste buds.
-
Caramel Sauce: Drizzling caramel sauce over each slice creates an extra layer of sweetness and depth. The sticky, buttery flavor pairs beautifully with the cheesecake.
-
Pomegranate Seeds: For a touch of elegance, scatter pomegranate seeds over your cheesecake. Their juicy burst adds a refreshing touch while enhancing the dessert’s visual appeal.
These pairing suggestions will elevate your Red Velvet Oreo Cheesecake, transforming it into a complete and unforgettable dessert experience!
Red Velvet Oreo Cheesecake Recipe FAQs
How can I choose ripe ingredients for the Red Velvet Oreo Cheesecake?
Absolutely! Ensure your buttermilk is fresh and creamy for the best moisture and flavor. For the whipped cream, use heavy cream that’s not nearing expiration. As for the eggs, pick ones that feel heavy in their shells, as they typically yield better results in baking. For the red food coloring, look for a bright, vibrant bottle that hasn’t dried out.
How should I store my Red Velvet Oreo Cheesecake?
To keep your cheesecake fresh, store it in an airtight container in the refrigerator for up to 5 days. This method preserves the creamy texture and delicious flavors! If you have leftover slices, make sure they’re tightly wrapped to maintain their quality.
Can I freeze my Red Velvet Oreo Cheesecake and for how long?
Yes, you can freeze your cheesecake! To do this, wrap it tightly in plastic wrap and then in aluminum foil to prevent freezer burn. It will keep its best quality for up to 2 months. When you’re ready to enjoy, simply thaw it in the refrigerator overnight before serving. This keeps the texture smooth and creamy.
What if my cheesecake cracks during baking?
Very! Cracking can happen due to a couple of reasons. To prevent this, make sure to bake your cheesecake slowly at a low temperature and avoid overmixing the filling. If it does crack, don’t worry too much — you can cover it with whipped cream and crushed Oreos, turning a little imperfection into a charming feature!
Are there any dietary considerations I should keep in mind for this recipe?
Of course! If you’re catering to gluten-free guests, simply substitute the all-purpose flour and Oreos with gluten-free alternatives. When cooking for those with allergies, ensure your cheesecake is free from allergens like dairy and nuts. There are excellent non-dairy cream cheeses available today that can be used for a creamy texture without the dairy!
How do I create variations of the Red Velvet Oreo Cheesecake?
To customize this cheesecake, simply swap out the Oreos for chocolate chip cookies or graham crackers for the crust. For an added crunch, mix in crushed Oreos directly into the cheesecake filling. If you want a chocolate lovers’ dream, you can drizzle melted chocolate over the top before garnishing! Enjoy playing with flavors to make it uniquely yours.

Irresistible Red Velvet Oreo Cheesecake You'll Love
Ingredients
Equipment
Method
- Begin by crushing 20 Oreo cookies into fine crumbs using a food processor or a plastic bag and rolling pin. Combine these crumbs with 12 tablespoons of melted unsalted butter in a mixing bowl, stirring until well combined. Press this mixture evenly into the bottom of a 9-inch springform pan to form a crust, then refrigerate it for about 30 minutes to set while you prepare the cake layer.
- In a large mixing bowl, sift together 1 ½ cups of all-purpose flour, 1 cup of granulated sugar, 1 tablespoon of cocoa powder, ½ teaspoon of baking soda, and ¼ teaspoon of salt. In another bowl, whisk together 1 large egg, ½ cup of vegetable oil, ¼ cup of buttermilk, 1 teaspoon of vanilla extract, and 1 ounce of red food coloring until blended. Gradually combine the wet and dry ingredients, mixing until just combined and smooth.
- Preheat your oven to 350°F (175°C). Carefully pour the red velvet batter over the chilled Oreo crust in the springform pan, spreading it evenly. Bake in the preheated oven for 30 minutes or until a toothpick inserted into the center comes out clean. Allow the cake layer to cool completely in the pan on a wire rack to prevent cracking.
- In a large mixing bowl, beat 1 cup of room-temperature cream cheese with an electric mixer until it’s smooth and creamy. Gradually add in 4 tablespoons of powdered sugar, 1 teaspoon of vanilla extract, and 1 tablespoon of corn starch. Mix until fully incorporated and the filling is silky, ensuring no lumps remain.
- Once the red velvet layer has cooled completely, gently spread the cheesecake filling over the cake layer using a spatula. Ensure it’s evenly distributed across the top.
- Cover the springform pan with plastic wrap or aluminum foil and refrigerate the cheesecake for at least 4-6 hours, or preferably overnight.
- Before serving, whip ¼ cup of heavy cream until soft peaks form. Top the chilled cheesecake with the whipped cream and sprinkle with ½ cup of crushed Oreo cookies for a delightful crunch. Finally, garnish with 3 whole Oreos placed decoratively on top.