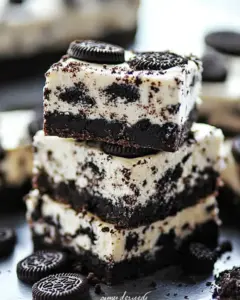
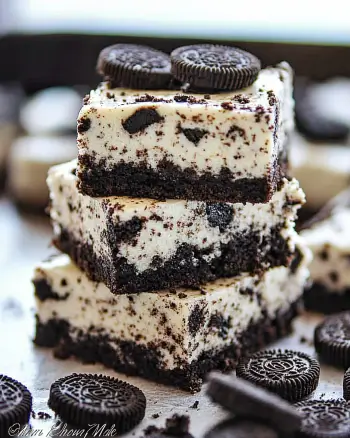
Introduction to Oreo Cheesecake Bars Recipe
What Makes Oreo Cheesecake Bars Special?
Oreo cheesecake bars are a delightful treat that combines the rich, creamy texture of cheesecake with the beloved crunch of Oreo cookies. This dessert is not just a feast for the eyes; it’s a burst of flavor in every bite. The smooth cream cheese filling pairs perfectly with the chocolatey cookie crust, creating a harmonious blend that is hard to resist. Plus, the addition of chopped Oreos in the filling adds an extra layer of texture and taste, making these bars truly special.
What sets Oreo cheesecake bars apart is their versatility. They can be enjoyed at any time of the year, whether it’s a summer picnic or a cozy winter gathering. The combination of flavors and textures makes them a crowd-pleaser, appealing to both kids and adults alike. With just a few simple ingredients, you can whip up a batch that will leave everyone asking for seconds!
The Perfect Dessert for Any Occasion
Whether you’re celebrating a birthday, hosting a holiday party, or simply craving something sweet, Oreo cheesecake bars are the perfect dessert. They are easy to make and can be prepared in advance, allowing you to enjoy your time with family and friends without the stress of last-minute baking. Just imagine serving these delicious bars at your next gathering; they are sure to impress!
Additionally, their easy-to-cut nature makes them ideal for serving. You can slice them into small squares, making it easy for guests to grab and enjoy. With their rich flavor and creamy texture, Oreo cheesecake bars are not just a dessert; they are an experience. So, gather your ingredients and get ready to create a treat that will delight everyone!
Ingredients for Oreo Cheesecake Bars Recipe
To create the delicious Oreo cheesecake bars, you’ll need a few simple ingredients. Each component plays a vital role in achieving that perfect balance of flavors and textures. Here’s what you’ll need:
- 1 ½ cups Oreo cookie crumbs
- ½ cup unsalted butter, melted
- 2 (8-ounce) packages cream cheese, softened
- ¾ cup granulated sugar
- 1 teaspoon vanilla extract
- 2 large eggs
- 1 cup chopped Oreo cookies (about 10 cookies)
- ½ cup sour cream
- ¼ cup powdered sugar
- Extra Oreo cookies for topping (optional)
These ingredients come together to create a rich and creamy dessert that everyone will love. The Oreo cookie crumbs form a delicious crust, while the cream cheese filling is smooth and decadent. The chopped Oreos mixed into the filling add delightful bits of chocolatey goodness. Don’t forget the optional toppings for that extra flair!
Gather these ingredients, and you’ll be well on your way to making a batch of irresistible Oreo cheesecake bars. Let’s move on to the preparation steps to bring this tasty treat to life!
Step-by-Step Preparation of Oreo Cheesecake Bars Recipe
Step 1: Preparing the Crust
1 ½ cups of Oreo cookie crumbs and place them in a medium bowl. Next, pour in the ½ cup of melted unsalted butter. Mix these two ingredients together until the crumbs are fully coated with butter. This step is crucial as it helps bind the crust together.
9×9-inch baking pan. Make sure to spread it evenly across the base. This will create a solid foundation for your cheesecake filling. Use the back of a measuring cup or your fingers to pack it down tightly. This ensures a nice, firm crust that holds up when you cut the bars later.
Step 2: Making the Cheesecake Filling
2 packages of softened cream cheese. Using an electric mixer, beat the cream cheese until it’s smooth and creamy. This should take about 2-3 minutes. Gradually add in the ¾ cup of granulated sugar while continuing to mix. This will help sweeten the filling and create a lovely texture.
1 teaspoon of vanilla extract for flavor. Then, add the 2 large eggs, one at a time. Make sure to beat well after each addition. This helps incorporate air into the mixture, making it light and fluffy. Finally, gently fold in the 1 cup of chopped Oreo cookies and ½ cup of sour cream until just combined. Be careful not to overmix, as you want to keep those delicious Oreo chunks intact!
Step 3: Assembling the Oreo Cheesecake Bars
With your crust and filling ready, it’s time to assemble the Oreo cheesecake bars. Pour the creamy cheesecake mixture over the prepared crust in the baking pan. Use a spatula to spread it evenly across the crust. This ensures every bite has that rich cheesecake flavor paired with the crunchy crust.
If you like, you can sprinkle a few extra chopped Oreo cookies on top of the filling for added texture and decoration. This little touch makes your bars look even more appealing and delicious!
Step 4: Baking the Bars
325°F (163°C). Bake for about 30-35 minutes. You’ll know they’re done when the center is set but still slightly jiggles when shaken. This is important, as overbaking can lead to a dry texture.
Once baked, carefully remove the pan from the oven and let it cool at room temperature. This cooling step is essential for the bars to set properly before chilling.
Step 5: Cooling and Serving
4 hours, or overnight if you can wait! Chilling allows the flavors to meld together and makes cutting the bars easier.
¼ cup of powdered sugar for a sweet finish. If you like, add some extra Oreo cookies on top for decoration. Cut the bars into squares and enjoy this delightful treat with family and friends!
Variations of Oreo Cheesecake Bars Recipe
Different Flavor Combinations
¼ cup of cocoa powder to the cream cheese mixture. This will enhance the chocolate flavor and create a rich, decadent dessert.
½ cup of creamy peanut butter into the cheesecake filling. This will give your bars a delightful nutty flavor that pairs wonderfully with the Oreos. You can also top the bars with a drizzle of melted chocolate or peanut butter for an extra treat!
1 cup of fresh raspberries or strawberries into the filling. This will add a refreshing burst of flavor and a pop of color. Just be sure to gently fold the fruit in to keep the texture smooth.
chocolate chip cookies or Graham crackers for a unique twist. Each variation brings its own special flavor, making your Oreo cheesecake bars even more exciting!
Gluten-Free Options
If you or your guests are following a gluten-free diet, you can still enjoy these delicious Oreo cheesecake bars! Start by using gluten-free Oreo cookies for the crust and filling. Many brands offer gluten-free versions that taste just as good as the original.
almond flour or coconut flour in place of traditional flour if you decide to experiment with the crust. Just make sure to check the labels to ensure all ingredients are gluten-free.
These gluten-free variations will allow everyone to indulge in the creamy goodness of Oreo cheesecake bars without worry. So, whether you’re hosting a gathering or just treating yourself, these options ensure that everyone can enjoy this delightful dessert!
Cooking Note for Oreo Cheesecake Bars Recipe

When making Oreo cheesecake bars, a few cooking notes can help ensure your dessert turns out perfectly every time. First, always use softened cream cheese. This is crucial for achieving a smooth and creamy filling. If your cream cheese is too cold, it can lead to lumps in your mixture, which you want to avoid.
Next, be mindful of your baking time. Every oven is different, so keep an eye on your bars as they bake. The edges should be set, while the center may still have a slight jiggle. This indicates that the bars will firm up as they cool. Overbaking can lead to a dry texture, which is not what you want for a creamy cheesecake.
Cooling is another important step. Allow the bars to cool at room temperature before refrigerating. This helps them set properly and enhances the flavors. If you rush this step, you might end up with a gooey center that doesn’t hold its shape when cut.
Lastly, when cutting your cheesecake bars, use a sharp knife. For clean cuts, dip the knife in hot water and wipe it dry before slicing. This technique helps prevent the filling from sticking to the knife, giving you neat, beautiful squares.
By following these cooking notes, you’ll be well on your way to creating delicious Oreo cheesecake bars that are sure to impress your family and friends!
Serving Suggestions for Oreo Cheesecake Bars Recipe
Pairing with Beverages
When it comes to serving Oreo cheesecake bars, pairing them with the right beverages can elevate the experience. A classic choice is a glass of cold milk. The creamy texture of the cheesecake complements the rich flavor of the Oreo cookies, making it a match made in dessert heaven.
If you prefer something a bit more indulgent, consider serving your bars with a scoop of vanilla ice cream. The warm, melty ice cream contrasts beautifully with the chilled cheesecake bars, creating a delightful treat. For a fun twist, try pairing them with a chocolate milkshake. The combination of flavors will surely satisfy any sweet tooth!
For those who enjoy coffee, a cup of freshly brewed coffee or espresso can be a perfect accompaniment. The bitterness of the coffee balances the sweetness of the cheesecake, enhancing the overall flavor profile. You can also try a flavored coffee, like hazelnut or mocha, for an extra kick.
Presentation Ideas
Presentation plays a key role in making your Oreo cheesecake bars even more appealing. Start by cutting the bars into neat squares and placing them on a decorative platter. You can use a cake stand for an elegant touch, or a simple white plate to let the bars shine.
To add a pop of color, consider garnishing the bars with fresh berries, such as raspberries or strawberries. This not only enhances the visual appeal but also adds a refreshing flavor contrast. Drizzling some chocolate or caramel sauce over the top can also create a beautiful presentation while adding extra sweetness.
For a fun and festive touch, you can sprinkle crushed Oreo cookies on top of the bars before serving. This adds texture and makes the dessert look even more delicious. If you’re serving these bars at a party, consider placing them in individual cupcake liners for easy serving and a cute presentation.
With these serving suggestions, your Oreo cheesecake bars will not only taste amazing but also look stunning on any table. Enjoy sharing this delightful dessert with family and friends!
Tips for Perfecting Your Oreo Cheesecake Bars Recipe
Common Mistakes to Avoid
Making Oreo cheesecake bars can be a fun and rewarding experience, but there are a few common mistakes to watch out for. First, ensure your cream cheese is softened properly. If it’s too cold, it won’t blend smoothly, leading to lumps in your filling. Always let it sit at room temperature for about 30 minutes before mixing.
Another mistake is overmixing the batter. While you want everything well combined, overmixing can introduce too much air, causing the cheesecake to crack during baking. Mix just until combined, especially after adding the eggs.
Pay attention to your baking time as well. Every oven is different, so check your bars a few minutes before the suggested time. They should be set around the edges but still slightly jiggly in the center. This ensures a creamy texture once cooled.
Lastly, don’t skip the chilling step! Allowing your bars to chill for at least four hours helps them set properly. If you cut them too soon, they may fall apart. Patience is key for the best results!
Storage Tips
Storing your Oreo cheesecake bars correctly will keep them fresh and delicious for longer. After they have cooled and set, cover the pan tightly with plastic wrap or aluminum foil. This prevents them from drying out and keeps them tasting great.
For longer storage, you can freeze the bars. Cut them into squares and place them in an airtight container, separating layers with parchment paper. They can be frozen for up to three months. When you’re ready to enjoy them, simply thaw them in the refrigerator overnight.
When storing leftovers in the fridge, they can last for about 5-7 days. Just make sure they are well covered to maintain their flavor and texture. Enjoy your delicious Oreo cheesecake bars whenever the craving strikes!
Breakdown of Time for Oreo Cheesecake Bars Recipe
Prep Time
20-25 minutes. This includes gathering your ingredients, making the crust, and mixing the cheesecake filling. It’s a quick and easy task that sets the stage for a delicious dessert!
Cooking Time
30-35 minutes. During this time, the cheesecake filling bakes to perfection. Keep an eye on the oven to ensure the edges are set while the center remains slightly jiggly. This balance is key to achieving that creamy texture we all love!
Total Time
50-60 minutes. However, don’t forget the chilling time! For the best results, refrigerate your bars for at least 4 hours or overnight. This allows the flavors to meld and the bars to set properly, making them easier to cut and serve.
So, while the active time is relatively short, the waiting period is essential for a delightful dessert experience. Patience pays off when it comes to these scrumptious Oreo cheesecake bars!
Nutritional Information for Oreo Cheesecake Bars Recipe
Calories
210 calories. This makes them a satisfying dessert option without being overly heavy. Enjoying one or two bars can fit nicely into a balanced diet, especially when shared with friends and family!
Protein
4 grams of protein. This protein comes mainly from the cream cheese and eggs used in the recipe. While they are not a primary source of protein, every little bit helps when it comes to satisfying your hunger and keeping you feeling full.
Sodium
150 milligrams of sodium. This amount is relatively moderate, especially when compared to many other desserts. However, if you are on a strict low-sodium diet, you may want to enjoy these bars in moderation or adjust the recipe to lower the sodium content.
Overall, Oreo cheesecake bars are a delightful treat that can be enjoyed as part of a balanced diet. With their rich flavors and creamy texture, they are sure to be a hit at any gathering!
FAQs about Oreo Cheesecake Bars Recipe
Can I use different types of cookies for the crust?
Absolutely! While Oreo cookies are the classic choice for the crust, you can get creative with different types of cookies. For instance, chocolate chip cookies or even Graham crackers can work well. Just make sure to crush them into fine crumbs, similar to how you would with Oreos. This will help create a solid base for your cheesecake bars. Experimenting with different flavors can lead to exciting new variations!
How do I know when the cheesecake bars are done baking?
Knowing when your cheesecake bars are done baking is key to achieving the perfect texture. Look for the edges to be set while the center remains slightly jiggly. This slight jiggle indicates that the filling will firm up as it cools. If the center is completely firm, it may be overbaked, leading to a dry texture. Keep an eye on them during the last few minutes of baking to ensure they come out just right!
Can I freeze Oreo cheesecake bars?
Yes, you can freeze Oreo cheesecake bars! To do this, cut them into squares and place them in an airtight container. Make sure to separate layers with parchment paper to prevent sticking. They can be frozen for up to three months. When you’re ready to enjoy them, simply thaw them in the refrigerator overnight. This way, you can have a delicious treat ready whenever the craving strikes!
What is the best way to cut cheesecake bars?
Cutting cheesecake bars can be tricky, but with the right technique, you can achieve clean, beautiful squares. Start by using a sharp knife. For the best results, dip the knife in hot water and wipe it dry before slicing. This helps prevent the filling from sticking to the knife. Make sure to cut straight down and avoid sawing back and forth. This method will give you neat, professional-looking bars that are perfect for serving!
Conclusion on Oreo Cheesecake Bars Recipe
In conclusion, the Oreo cheesecake bars recipe is a delightful way to satisfy your sweet tooth while impressing your family and friends. With its creamy filling and crunchy crust, this dessert is a perfect blend of flavors and textures. Whether you’re celebrating a special occasion or simply enjoying a quiet evening at home, these bars are sure to bring joy to any gathering.
Not only are they easy to make, but the variations allow you to customize them to suit your taste. From adding different flavors to making gluten-free options, the possibilities are endless. Plus, with the tips and tricks shared throughout this article, you can avoid common mistakes and ensure your bars turn out perfectly every time.
So, gather your ingredients, follow the steps, and get ready to indulge in a treat that everyone will love. Remember, patience is key when it comes to chilling and serving these delicious bars. Once you take that first bite, you’ll understand why Oreo cheesecake bars are a favorite dessert for many!
Enjoy your baking adventure, and don’t forget to share your creations with loved ones. Happy baking!