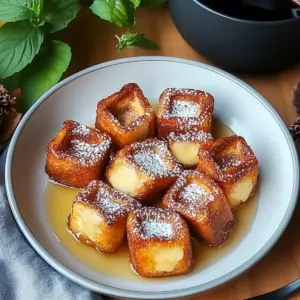
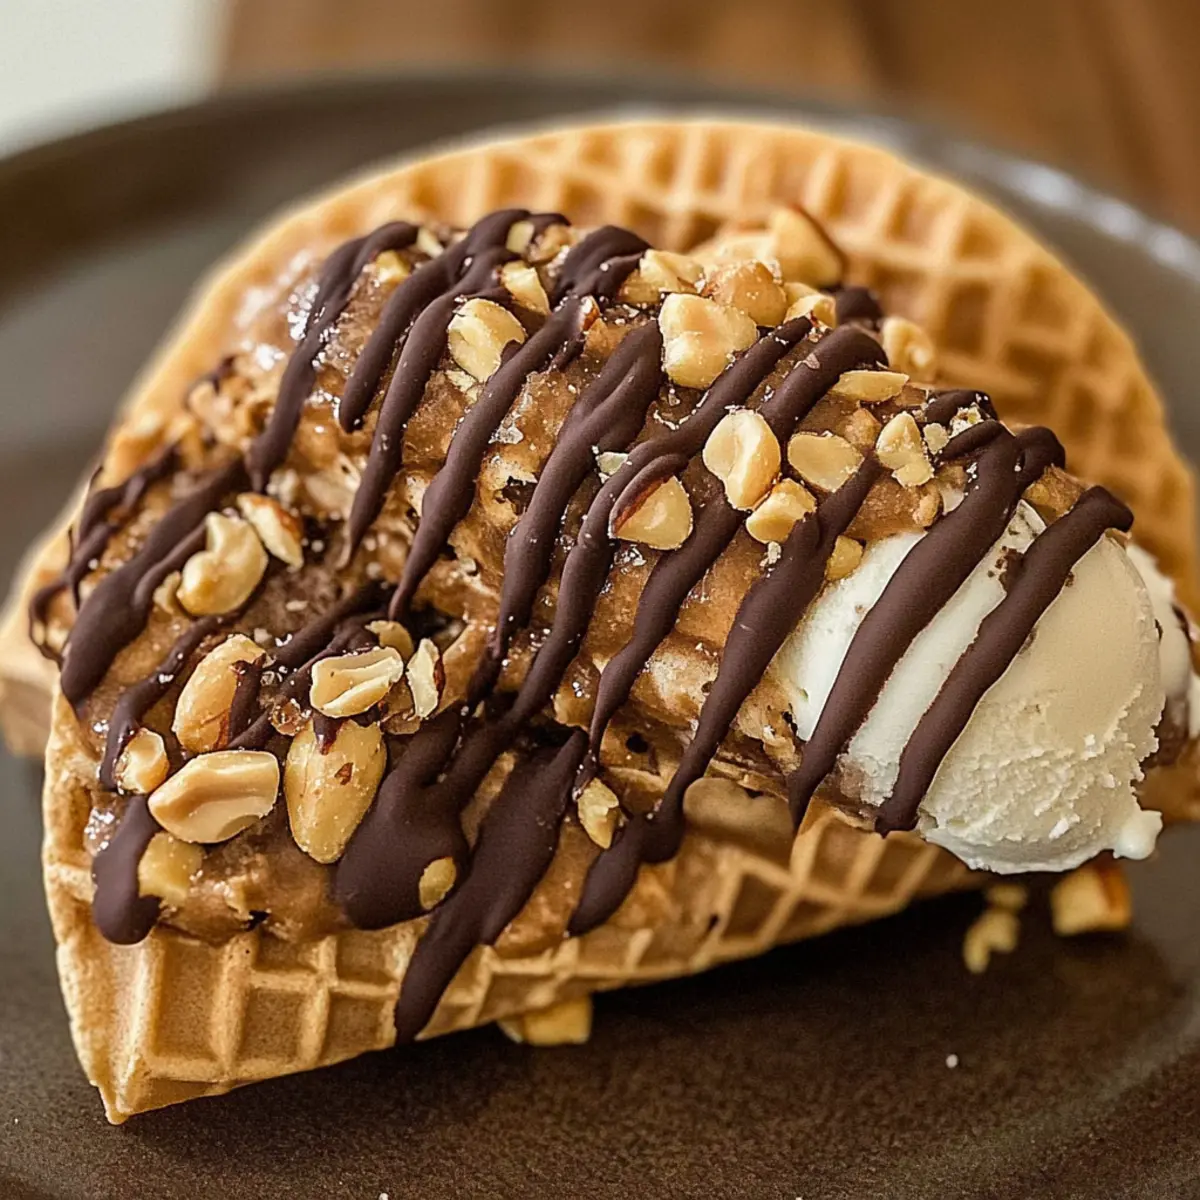
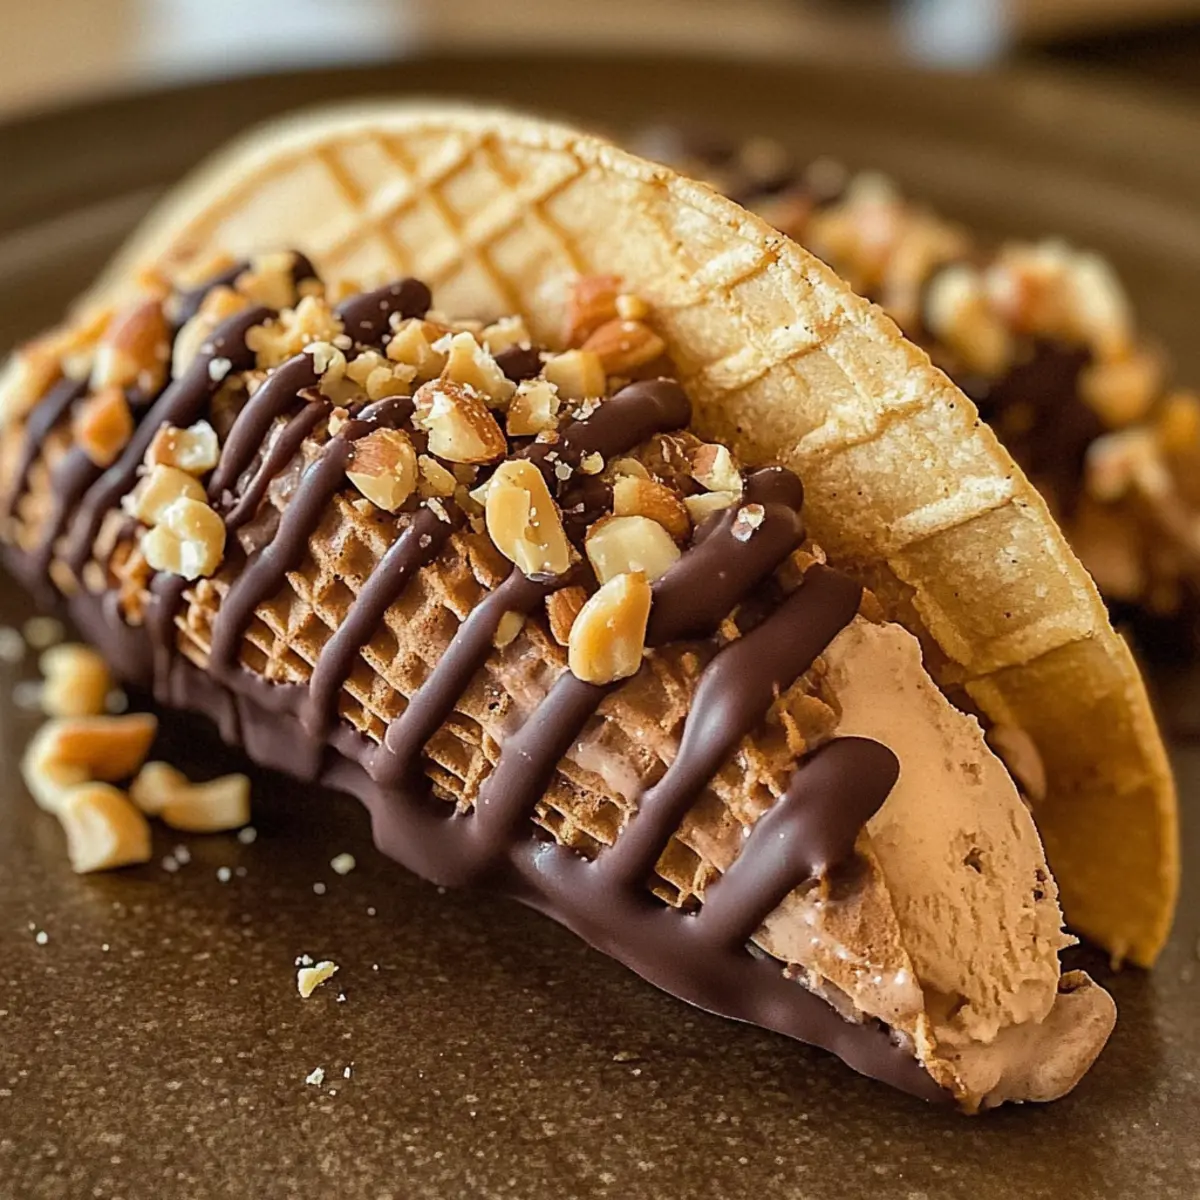
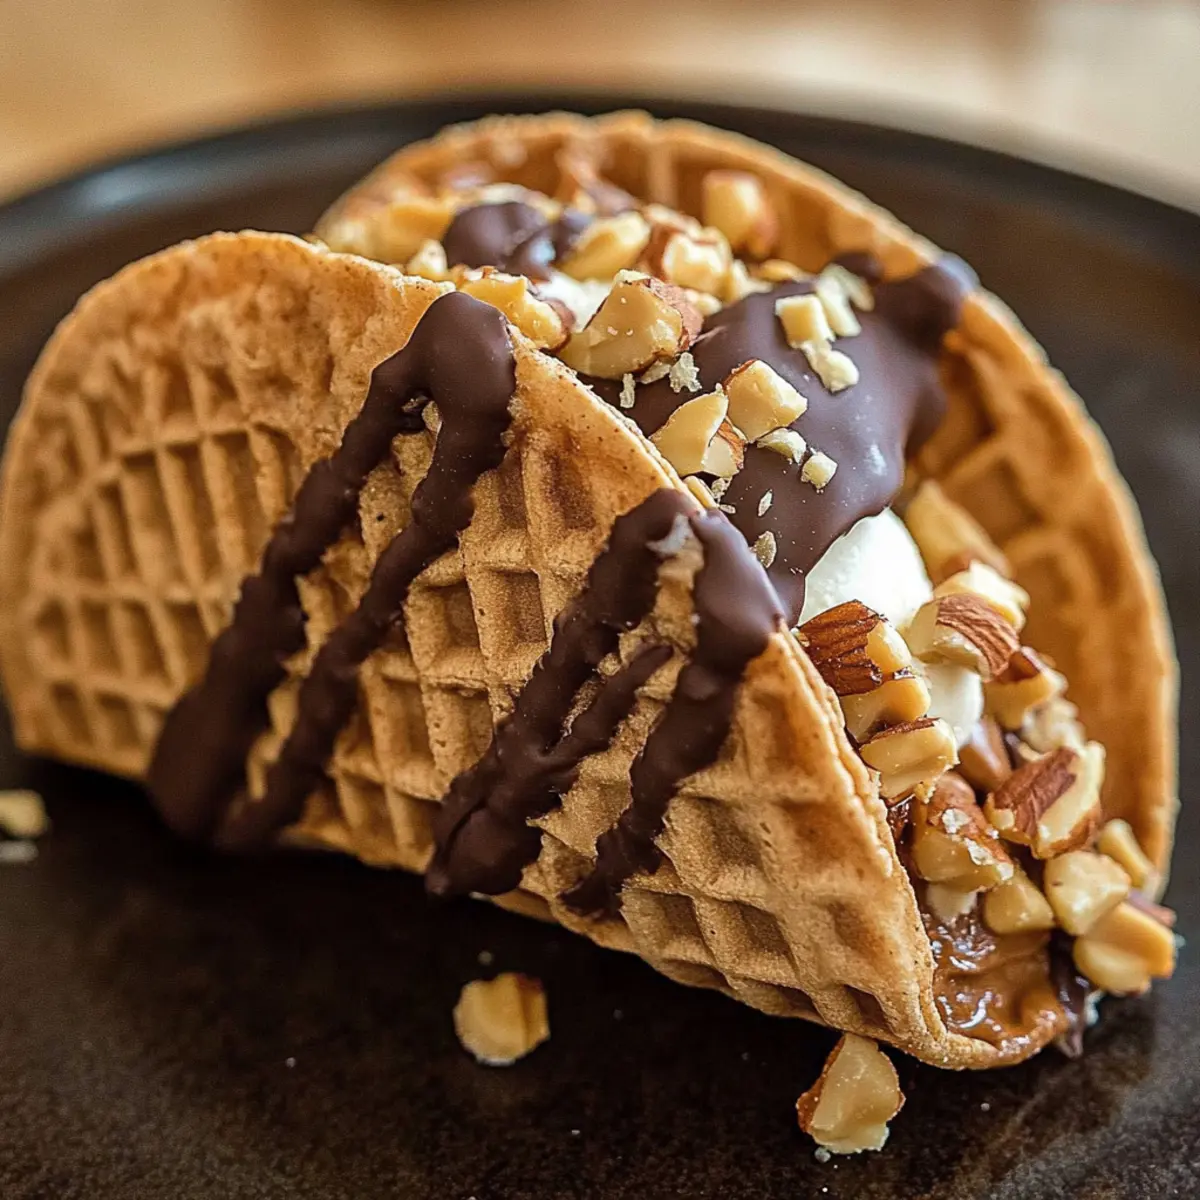
On a sun-soaked afternoon, I found myself reminiscing about carefree summers, when the sweet sound of an ice cream truck brought joy to neighborhood kids. That’s when I knew I had to create these Homemade Chocolate-Dipped Choco Tacos. Perfect for capturing the essence of those golden days, this recipe features a crispy waffle cone taco shell snugly filled with creamy vanilla ice cream and enveloped in luscious chocolate. Not only are these treats a crowd-pleaser, but they also offer a delightful twist to your typical dessert that is both fun and kid-friendly. In just a few simple steps, you can whip up these indulgent delights for your next backyard gathering or family get-together. Curious about how easy it is to impress your friends and family with this nostalgic treat? Let’s dive into the recipe!
Ready for a Summer Treat Adventure?
Simplicity at its Best: This delightful recipe is incredibly easy to make, requiring minimal ingredients that you probably already have at home.
Endless Customization: Whether you prefer classic vanilla or another favorite flavor, these Choco Tacos can be tailored to satisfy every sweet tooth in your family.
Crowd-Pleasing Fun: Perfect for parties, you can set up a DIY topping bar so everyone can personalize their own tacos with sprinkles, nuts, or coconut!
Nostalgia in Every Bite: Each crispy taco shell filled with smooth ice cream will transport you back to those sunny days of childhood ice cream truck treats.
Time-Saving: These fun desserts are a breeze to prepare in advance—make the shells ahead of time and fill them just before serving for a stress-free treat!
Perfect for Kids: Not just a dessert, this is an invitation for kids to get creative in the kitchen with you, making memories along the way.
Homemade Choco Taco Ingredients
• Craft your own nostalgic dessert with these simple ingredients!
For the Taco Shell
- Waffle Cones – The base of the Choco Tacos; ensure they are slightly damp for easier shaping.
For the Filling
- Vanilla Ice Cream – A creamy classic; feel free to opt for your favorite brand or make your own for a personal touch.
For the Chocolate Coating
- Chocolate Chips – The delicious coating for your tacos; dark or milk chocolate can be used based on preference.
For the Topping
- Chopped Peanuts – Adds a delightful crunch and nutty flavor; try sprinkles or coconut flakes for an alternative twist.
Step‑by‑Step Instructions for Homemade Chocolate-Dipped Choco Tacos
Step 1: Shape Waffle Cones
Begin by slightly dampening each waffle cone to make them more pliable. Gently press and reshape them into a taco shell form. This should take about 5 minutes, ensuring they hold their new shape without cracking. If you notice any breaks, simply reshape and adjust. Aim for a sturdy shell for the perfect Homemade Chocolate-Dipped Choco Tacos.
Step 2: Fill Taco Shells
Generously scoop vanilla ice cream into each taco shell, using about ¼ cup per cone. Pack the ice cream down firmly to prevent it from collapsing. This filling process should take around 10 minutes. If desired, you can slightly overfill the shells for an extra indulgent treat. A nice, rounded top will make your Homemade Chocolate-Dipped Choco Tacos irresistible!
Step 3: Dip in Chocolate
Melt chocolate chips in a microwave-safe bowl in 30-second intervals, stirring until smooth and glossy. This should take about 1-2 minutes. Once melted, hold the filled end of each taco and dip it into the warm chocolate. Ensure the chocolate coats well for a beautiful finish. Allow any excess chocolate to drip off before proceeding to the next step.
Step 4: Add Toppings
Before the chocolate sets, sprinkle your chopped peanuts—or any alternative toppings—over the chocolate-coated area. This should be done immediately after dipping, taking about 5 minutes. The toppings will stick better while the chocolate is still warm. Your Homemade Chocolate-Dipped Choco Tacos will soon glisten with delicious, crunchy accents!
Step 5: Freeze and Serve
Carefully place the decorated tacos on a tray lined with parchment paper and freeze them for at least 30 minutes or until the chocolate is firm. This step ensures a crispy texture and allows the ice cream to set properly. Once ready, your Homemade Chocolate-Dipped Choco Tacos are prepared for serving. Enjoy these delightful treats with your family or friends!
Expert Tips for Homemade Choco Tacos
-
Proper Shell Handling: Ensure waffle cones are slightly damp, but not dripping wet. This prevents breakage while reshaping them into taco shells, avoiding frustration.
-
Scoop Perfectly: Use a sturdy ice cream scoop to pack the vanilla ice cream tightly into the shells. A well-packed filling prevents collapsing, ensuring your Homemade Choco Tacos stay intact.
-
Chocolate Dipping: Melt chocolate slowly in intervals and stir until smooth. Adding a teaspoon of coconut oil can create a thinner dip, making it easier to coat the cones without clumping.
-
Topping Timing: Sprinkle chopped peanuts or other toppings immediately after dipping. Doing this while the chocolate is still warm helps them adhere well, enhancing the final presentation.
-
Freezing Tip: Allow sufficient time in the freezer to ensure the chocolate is firm and the ice cream is well-frozen. This guarantees a satisfying and crisp bite when served.
What to Serve with Homemade Chocolate-Dipped Choco Tacos
Nothing completes a summer-themed dessert like those decadent Choco Tacos, enticing you to create an entire feast of delightful flavors and textures.
-
Fresh Fruit Salad: A mix of seasonal fruits like strawberries, blueberries, and melons adds a refreshing balance to the rich tacos. The natural sweetness complements the chocolate nicely.
-
Whipped Cream: The light, airy texture of whipped cream provides an indulgent yet fluffy contrast to the crunchy taco shell and creamy filling. Add a hint of vanilla for an extra touch of nostalgia!
-
Chocolate Sauce Drizzle: Serve with extra chocolate sauce in a small bowl for those who crave more chocolatey goodness. It invites fun and makes for a perfect dipping option!
-
Ice Cold Milk: A classic pairing with ice cream treats, cold milk enriches the overall experience, balancing the sweetness from the tacos. Whether whole, almond, or oat milk, it all works!
-
Ice Cream Separator: Have a variety of ice cream flavors available for guests to mix, allowing them to create their own customized versions. Think mint, strawberry, or even coffee—endless opportunities for sorbet or gelato!
-
Chocolate-Covered Strawberries: These are a beautiful complement to the tacos, bringing a touch of elegance to the dessert spread. Their sweetness and slight tartness create a lovely flavor dynamic.
-
Lemonade or Iced Tea: A cool, refreshing drink is essential for summer gatherings. Lemonade adds a zing that contrasts beautifully with the creamy, sweet chocolate tacos, while unsweetened iced tea offers a comforting balance.
-
S’mores Dip: Introduce a fun sharing option! Melt chocolate and marshmallows together for guests to enjoy with graham crackers alongside those nostalgic Choco Tacos. It’s another layer of deliciousness that will surely be a hit.
Homemade Choco Tacos Variations
Get ready to make your Choco Tacos your own with delightful twists and swaps that elevate each bite!
-
Flavor Swap: Replace vanilla ice cream with chocolate, strawberry, or mint for a fun twist that personalizes your dessert. Each flavor brings its own story and nostalgia, just waiting to be savored!
-
Alternative Chocolate: Use white chocolate for a sweeter finish, or try a mix of dark and milk chocolate for a complex flavor profile that surprises the taste buds. The creamy sweetness adds a lovely contrast to the crispy shell!
-
Nut-Free Option: Skip the chopped peanuts and use rainbow sprinkles or shredded coconut for a colorful, allergy-friendly topping! This gets the kids involved too – everyone loves sprinkles!
-
Extra Crunch: Mix in crushed graham crackers or cookies with your nuts for added texture and flavor. Imagine that delightful crunch with each scoop of ice cream, reminiscent of a summer picnic!
-
Spicy Kick: Add a pinch of chili powder to your chocolate for a surprising heat. The unexpected spice will make these tacos a talking point at your next gathering, leaving everyone wanting more!
-
DIY Ice Cream: Make your own ice cream by blending bananas and yogurt for a healthier treat, or opt for a dairy-free version with coconut milk ice cream. This twist caters to a variety of dietary needs while still delivering on flavor.
-
Gourmet Toppings: Experiment with caramel or chocolate sauce drizzled on top after the chocolate has set. This little addition transforms the presentation and adds an irresistible sweetness!
-
Fruit Fusion: Incorporate fresh fruit like strawberries or raspberries between the ice cream and taco shell for a refreshing burst of flavor. The acidity pairs beautifully with the creamy filling, making every bite delightful!
Feel free to get creative and mix these variations to make the perfect batch of Choco Tacos that your friends and family will love. If you’re looking for more delicious ideas, you might want to check out our other fun summer dessert recipes like DIY Ice Cream Sundaes or Frozen Fruit Bars for more inspiration!
Make Ahead Options
These Homemade Chocolate-Dipped Choco Tacos are perfect for meal prep! You can prepare the waffle cone shells up to 24 hours in advance. Simply reshape and store them in an airtight container to keep them crisp. If you’re short on time, you can also scoop the vanilla ice cream and store it separately in the freezer for up to 3 days—just make sure it’s tightly covered to prevent icy freezer burn. When you’re ready to serve, dip the taco shells in melted chocolate, add your favorite toppings, and freeze them for about 30 minutes until set. This way, you’ll have delicious, homemade desserts on hand with minimal last-minute effort, making your gatherings even sweeter!
How to Store and Freeze Homemade Choco Tacos
Fridge: Store any leftover Homemade Choco Tacos in an airtight container in the fridge for up to 2 days, but expect the taco shell to lose some crispness.
Freezer: For optimal storage, place the tacos in an airtight container and freeze them for up to one week. This preserves their delightful crunch and creamy filling!
Reheating: If desired, allow the tacos to sit at room temperature for a few minutes before serving—this helps soften the ice cream slightly for a perfect bite.
Wrapping: To prevent freezer burn, consider wrapping each taco individually in plastic wrap before placing them in an airtight container.
Homemade Chocolate-Dipped Choco Tacos Recipe FAQs
How do I select the best waffle cones for Choco Tacos?
Absolutely! Look for waffle cones that are fresh and crisp, without any signs of damage or moisture. Cones that are slightly damp when reshaped are ideal, but avoid ones that are overly wet or have cracks, as these can break during the shaping process.
How should I store leftover Choco Tacos?
You can keep any leftover Homemade Chocolate-Dipped Choco Tacos in an airtight container in the fridge for up to 2 days. However, be mindful that the taco shell might lose some of its crispness. For longer storage, freeze them in an airtight container for up to one week, which will help maintain their delightful crunch and creamy interior!
Can I freeze Choco Tacos for later?
Yes! To freeze your Homemade Chocolate-Dipped Choco Tacos, place them in an airtight container, and they can last for up to one week. If you want to prevent freezer burn, wrap each taco individually in plastic wrap before placing them in the container. When ready to enjoy, let them sit at room temperature for a few minutes to soften the ice cream for a perfect creamy bite.
What should I do if my chocolate coating isn’t smooth?
No worries! If your chocolate isn’t coming out smooth, you can try melting it in 30-second intervals to prevent scorching. Additionally, adding a teaspoon of coconut oil while melting can help create a thinner consistency, making it easier for the chocolate to coat your tacos evenly and beautifully.
Are these Choco Tacos safe for pets or those with allergies?
It’s important to be cautious if pets are involved! Chocolate is toxic to dogs and other pets, so keep these Choco Tacos away from them. Additionally, if anyone has nut allergies, you can easily substitute the chopped peanuts with sprinkles or coconut flakes to make them safe and still delicious for everyone.
Can I make these in advance?
Very much so! You can prepare the waffle taco shells a day before and fill them with ice cream just before serving, ensuring they stay fresh and delicious. This makes it convenient for gatherings, allowing you more time to enjoy your company while serving a fun and tasty treat!

Homemade Choco Tacos: A Fun Summer Dessert Adventure
Ingredients
Equipment
Method
- Shape Waffle Cones: Slightly dampen each waffle cone and reshape into a taco shell. This takes about 5 minutes.
- Fill Taco Shells: Scoop about ¼ cup of vanilla ice cream into each shell, packing down firmly. This takes around 10 minutes.
- Dip in Chocolate: Melt chocolate chips in a microwave-safe bowl in 30-second intervals, stirring until smooth (1-2 minutes). Dip filled end of each taco into chocolate.
- Add Toppings: Sprinkle chopped peanuts or alternative toppings over the chocolate-coated area immediately for better adhesion, taking about 5 minutes.
- Freeze and Serve: Place tacos on parchment paper and freeze for at least 30 minutes until chocolate is firm.