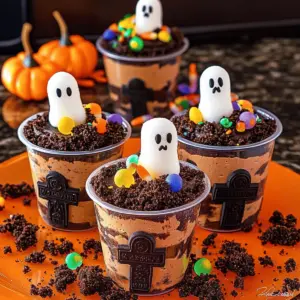
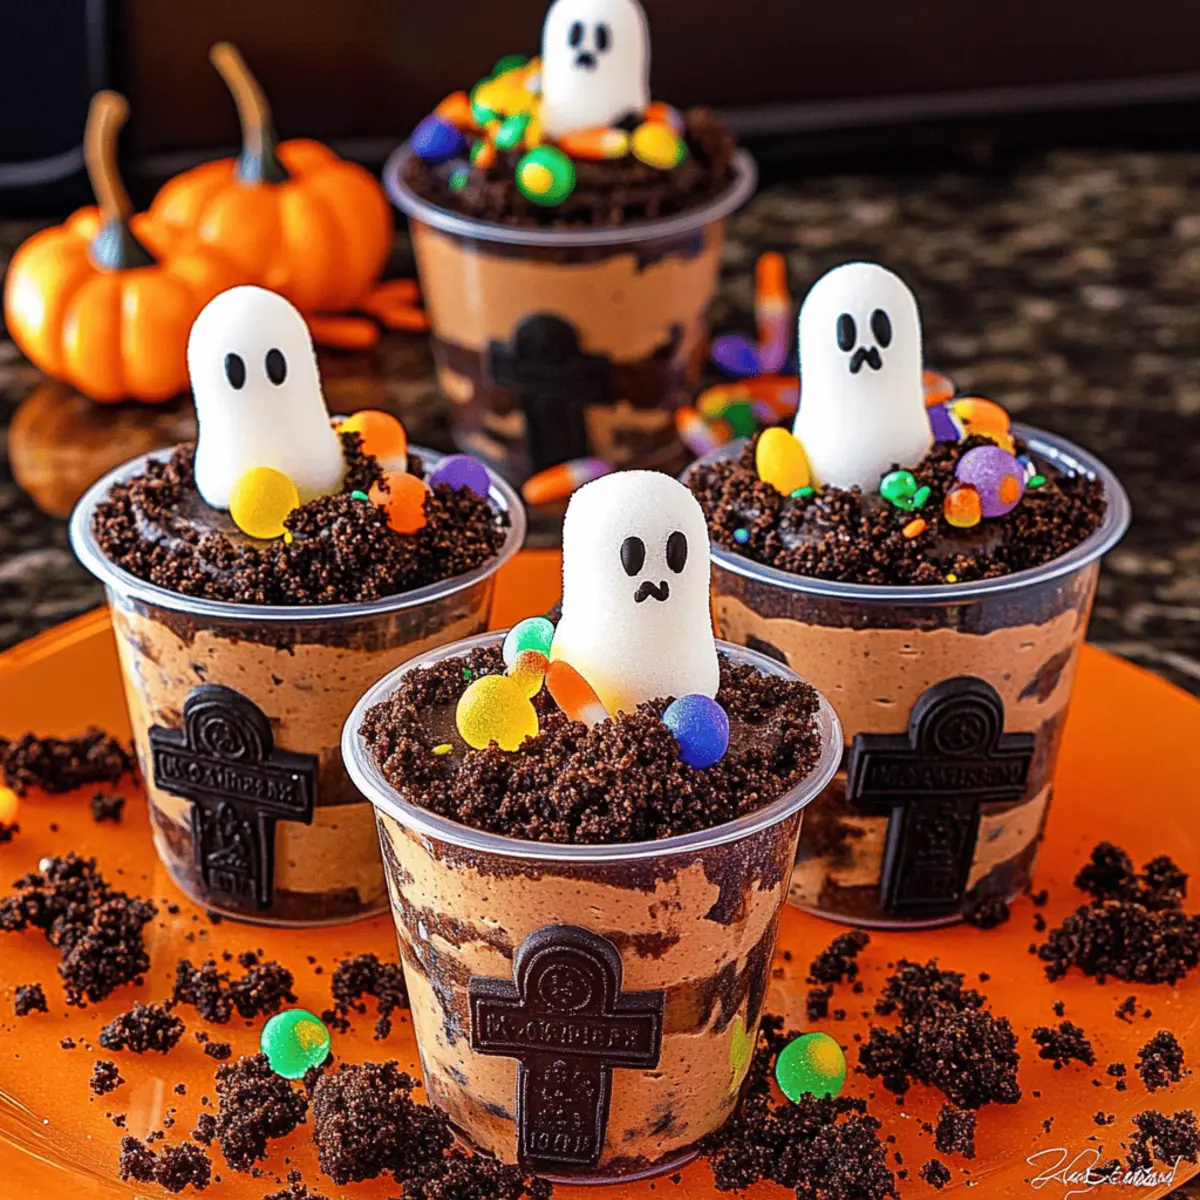
As I stood in my kitchen, surrounded by vibrant Halloween decorations and the sweet smell of chocolate wafting through the air, the idea for these Halloween Graveyard Dirt Cups struck me—a fun, no-bake treat that perfectly balances spooky and delicious. These delightful cups are not only incredibly easy to make, but they also become an instant crowd-pleaser at any Halloween gathering. With layers of creamy chocolate pudding, crunchy Oreo crumbs, and a variety of festive decorations, each cup transforms into a charming little graveyard that brings smiles to kids and adults alike. Plus, you can customize the toppings for a unique twist, making them as imaginative as you want! Curious about how to create this ghoulishly delicious dessert? Let’s dive into the recipe!

Why Are Graveyard Dirt Cups So Fun?
Adorable Presentation: Each cup transforms into a spooky graveyard, appealing to kids and adults alike.
No-Bake Simplicity: With minimal effort, you can whip these up without turning on the oven.
Customizable Creations: Swap out decorations to reflect your personal style or themes—gummy bats and chocolate skeletons keep it exciting!
Time-Saving Treat: Ideal for last-minute gatherings, you can prepare these cups quickly and chill or serve immediately.
Crowd-Pleaser Delight: Whether for school events or Halloween parties, these treats wow guests, sparking joy and nostalgia alike.
Halloween Graveyard Dirt Cup Ingredients
Create the magic with these delicious treats!
For the Base
- Oreo cookies – The essential ingredient adds structure and rich flavor; feel free to use gluten-free Oreos for a twist.
- Whole milk – Ensures a creamy, smooth pudding texture; very cold milk makes all the difference.
- Instant chocolate pudding mix – Thickens the mixture quickly without any cooking required; vanilla pudding makes a great alternative if you’re feeling adventurous.
- Whipped topping – Lightens the chocolate mousse texture; opt for dairy-free whipped topping for a vegan option.
For the Decorations
- Milano cookies – Perfect for creating tombstone decorations; you can also substitute with similar sandwich cookies.
- Black cookie icing – Adds spooky details to the tombstones; melted chocolate or ganache can do the job too!
- Ghost peeps – A fun and festive addition; marshmallows can be used if you’re looking for a different look.
- Gummy worms – Provides a creepy touch that kids love; any gummy candies can be swapped in for variety.
- Mini pumpkin candies – Adds a delightful fall-themed decoration; candy corn is another excellent choice.
- Halloween sprinkles – Brings color and fun to the mix; feel free to replace them with sprinkles from other holidays.
For the “Mud” Layer
- Chocolate syrup – Enhances flavor and gives a glossy finish to the cups; adjust the quantity based on your taste preferences.
Now you’re all set to bring the Halloween spirit into your kitchen with these delightful Halloween Graveyard Dirt Cups!
Step‑by‑Step Instructions for Halloween Graveyard Dirt Cups
Step 1: Prepare Oreo Crumbs
Start by pulsing the Oreo cookies in a food processor until they resemble fine crumbs, about 30 seconds. This will provide a deliciously crunchy base for your Halloween Graveyard Dirt Cups. If you don’t have a food processor, you can place the cookies in a zip-top bag and crush them with a rolling pin.
Step 2: Mix Pudding
In a large mixing bowl, whisk together 2 cups of very cold whole milk and the instant chocolate pudding mix for 2 minutes until the mixture thickens and forms a smooth consistency. Next, gently fold in the whipped topping until everything is well blended and creamy. Add ¼ cup of chocolate syrup, incorporating it lightly for a streaked effect, and then refrigerate the pudding mixture for about 10-15 minutes.
Step 3: Layer Dirt Cups
Once the pudding is set, take clear cups and start layering your Halloween Graveyard Dirt Cups. Begin with 2 tablespoons of crushed Oreo crumbs at the bottom of each cup, followed by 3-4 tablespoons of the chocolate pudding mixture. Repeat the layers until you reach the top of the cups, finishing with a final layer of Oreo crumbs to create a “dirt” effect.
Step 4: Create “Mud”
In a small bowl, combine any remaining Oreo crumbs with the leftover chocolate syrup. Mix until you get a shiny, clumpy texture. This “mud” will enhance the spooky feel of your Halloween Graveyard Dirt Cups, so make sure it has a nice, gritty appearance that resembles real dirt.
Step 5: Decorate
Using the black cookie icing, carefully draw details on Milano cookies to transform them into tombstones. Place these decorations into the top layer of the pudding cups. Add ghost peeps and sprinkle the “mud” mixture over the top to create a creepy landscape. Finish off the presentation by scattering gummy worms and mini pumpkin candies atop each cup for an extra festive touch.
Step 6: Chill or Serve
For the best flavor and texture, it’s ideal to refrigerate your decorated Halloween Graveyard Dirt Cups for about 30 minutes before serving. If you’re in a hurry or want an immediate treat, you can serve them right away! The layers should remain distinct, providing guests with a delightful visual and delicious experience.

Storage Tips for Halloween Graveyard Dirt Cups
Fridge: Store leftover Halloween Graveyard Dirt Cups in an airtight container for up to 5 days. Make sure the cups are sealed properly to maintain freshness.
Freezer: It’s not recommended to freeze these cups as the textures of the pudding and toppings may change once thawed, leading to a less appealing dessert.
Reheating: There’s no need to reheat these cups. Enjoy them cold for the best experience, keeping their delightful layers intact.
Assembling Ahead: If you plan to make these in advance, assemble the base but wait to add decorations until just before serving to prevent sogginess.
What to Serve with Halloween Graveyard Dirt Cups
These spook-tacular treats are perfect for creating a fun family meal or Halloween party feast that delights the senses.
-
Spooky Sugar Cookies: Featuring festive shapes like bats and pumpkins, these cookies add a sweet, crunchy complement to the creamy dessert.
-
Mummy Hot Dogs: Mini hot dogs wrapped in crescent roll dough, baked to golden perfection, offer a savory contrast to the sweet pudding cups.
-
Pumpkin Soup: A warm, spiced pumpkin soup brings a cozy, seasonal vibe that balances the cold and creamy layers of the dirt cups.
-
Hocus Pocus Punch: A vibrant punch made with fruit juices and soda gives a refreshing twist, perfect for rejuvenating guests between sweets.
-
Apple Slices with Caramel Dip: Crisp apple slices with a drizzle of warm caramel add a fresh, crunchy element that complements the chocolate richness.
-
Cheesy Bat Wings: Baked chicken wings coated with a spicy cheese sauce bring a “bite” to the table, keeping the savory theme running strong.
Delve fully into the Halloween spirit with these delightful pairings that ensure every bite is a festive celebration!
Halloween Graveyard Dirt Cups Variations
Feel free to unleash your creativity with these fun twists on the Halloween Graveyard Dirt Cups, making them even more delightful!
-
Vanilla Pudding: Swap the chocolate pudding for vanilla for a lighter flavor. This simple change brings a bright, creamy note to your delicious layers!
-
Gluten-Free Option: Use gluten-free Oreo cookies for a delightful treat everyone can enjoy. Even those with dietary restrictions will appreciate this spooky dessert!
-
Minty Fresh: Try mint Oreo cookies as the base for a refreshing take. The mint adds a surprising but delicious pop, perfect for adding a little extra fun!
-
Chocolate Ganache Topping: Instead of black icing, use chocolate ganache to decorate the tombstones for a rich and luscious finish. This adds an elegant touch while keeping the spooky vibe intact.
-
Hot and Spicy: Incorporate spicy chili chocolate candies as an alternative for a daring twist. The combination of sweet and spicy will definitely catch everyone’s attention!
-
Crunchy Add-ins: Mix crushed pretzels or nuts into the Oreo layers for an unexpected texture contrast. This addition gives a satisfying crunch that’s sure to impress.
-
Themed Toppers: Create a unique experience by using Halloween-themed candies, like gummy bats or spooky skeletons. It’s a fun way to personalize each cup for different gatherings!
-
Seasonal Sprinkles: Swap the Halloween sprinkles for themed ones and enjoy your dirt cups during other holidays like Thanksgiving or Christmas. They’ll be a year-round favorite!
Each of these variations elevates the Halloween Graveyard Dirt Cups, allowing you to craft a dessert that caters to every festive occasion or taste preference. Don’t hesitate to explore ideas and make it your own—remember, fun in the kitchen is what it’s all about! For more inspiration, check out how to use different toppings in your dessert creations with our [gummy worms](#) or [mini pumpkin candies](#)!
Expert Tips for Halloween Graveyard Dirt Cups
- Layer Carefully: Start with a sturdy base of Oreo crumbs to ensure your Halloween Graveyard Dirt Cups hold their shape. Avoid overfilling to prevent messy spills.
- Chill Before Serving: Refrigerate the assembled cups for at least 30 minutes before serving; this enhances the flavors and helps the layers set nicely.
- Customize Decorations: Use themed decorations based on your style or event; varying the candies can keep things exciting and fresh for future gatherings.
- Mixing Pudding: For a smooth consistency, whisk the pudding mix with very cold milk for at least two minutes, ensuring there are no lumps before adding whipped topping.
- Avoid Soggy Layers: Assemble the cups a few hours before serving and add the decorations just before to prevent the Oreo crumbs from becoming soggy.
Make Ahead Options
These Halloween Graveyard Dirt Cups are perfect for busy home cooks looking to save time! You can prepare the chocolate pudding mixture and Oreo crumbs up to 24 hours in advance, storing them separately in airtight containers in the refrigerator. Simply layer the cups with the Oreo crumbs and pudding just before serving for the best texture. However, to keep the decorations crisp, hold off on adding Milano tombstones, ghost peeps, and gummy worms until you’re ready to present them. This way, you’ll have spooky, delightful desserts that are just as delicious and fresh, making your Halloween gatherings a breeze!

Halloween Graveyard Dirt Cups Recipe FAQs
How do I choose ripe ingredients for my Halloween Graveyard Dirt Cups?
Absolutely! When selecting your Oreo cookies, make sure they are not stale or broken, as they should provide a crunchy texture. If using other candies like ghost peeps or gummy worms, check the packaging for freshness dates to ensure they’re soft and colorful for decorating.
How should I store leftovers of the Halloween Graveyard Dirt Cups?
Very important! You can store leftover Halloween Graveyard Dirt Cups in an airtight container in the fridge for up to 5 days. Ensure each cup is sealed properly to maintain freshness and prevent any cross-flavors with other fridge items.
Can I freeze my Halloween Graveyard Dirt Cups?
I don’t recommend freezing these delightful cups. Freezing can alter the textures of the creamy pudding and toppings, leading to an unappetizing experience when thawed. Enjoy the layers fresh and delicious right from the fridge!
What can I do if my pudding is too runny?
If you find that your pudding mixture hasn’t thickened properly and is too runny, fear not! You can whisk in an extra tablespoon or two of instant pudding mix, then let it sit for about 5-10 minutes until it thickens up. Make sure you’re using very cold milk, as this is crucial for achieving the right texture!
Are there any dietary considerations for the ingredients in Halloween Graveyard Dirt Cups?
Certainly! If you’re making these for a group with dietary restrictions, consider using gluten-free Oreos and dairy-free whipped topping to accommodate those with gluten allergies or lactose intolerance. Always double-check all candy ingredients for potential allergens, as certain candies may contain nuts or other common allergens.
How can I make these more festive without changing the recipe?
The more the merrier! You can easily customize your Halloween Graveyard Dirt Cups by swapping decorations based on themes. For example, try adding gummy bats or chocolate skeletons for a chilling twist! Just remember, you can unleash your creativity while keeping the basic recipe intact.
Halloween Graveyard Dirt Cups You Can't Resist Making
Ingredients
Equipment
Method
- Prepare Oreo crumbs by pulsing Oreo cookies in a food processor until fine crumbs are formed, about 30 seconds.
- Mix together 2 cups of cold whole milk and instant chocolate pudding mix in a large bowl for 2 minutes until thick.
- Gently fold in whipped topping and add ¼ cup chocolate syrup, mixing lightly, then refrigerate for 10-15 minutes.
- Layer cups by starting with 2 tablespoons of crushed Oreo crumbs, followed by 3-4 tablespoons of pudding mixture.
- Create 'mud' by mixing remaining Oreo crumbs with leftover chocolate syrup until a shiny texture is achieved.
- Decorate with black icing on Milano cookies, place them in the pudding cups, and finish with ghost peeps and 'mud' mixture.
- Refrigerate decorated cups for about 30 minutes before serving or serve right away.