Introduction to French Dip Sliders
There’s something undeniably comforting about a warm, hearty meal that brings back memories of family gatherings and cozy evenings. French Dip Sliders are just that—a delightful blend of tender roast beef and gooey provolone cheese, all nestled in soft slider buns. Whether you’re looking for a quick solution for a busy day or a dish to impress your loved ones, these sliders hit the spot. They’re easy to whip up and perfect for game day or a casual dinner. Trust me, once you try them, they’ll become a staple in your kitchen!
Why You’ll Love This French Dip Sliders
French Dip Sliders are the ultimate comfort food, combining simplicity with mouthwatering flavor. They come together in just 35 minutes, making them perfect for busy weeknights or last-minute gatherings. The tender roast beef paired with melted provolone creates a taste sensation that’s hard to resist. Plus, who doesn’t love a dish that doubles as a fun, interactive meal with that savory dipping broth? You’ll be the hero of your next meal!
Ingredients for French Dip Sliders
Gathering the right ingredients is the first step to creating these delicious French Dip Sliders. Here’s what you’ll need:
- Thinly sliced roast beef: The star of the show! Look for high-quality, tender cuts for the best flavor.
- Provolone cheese: This melty cheese adds a creamy texture. Feel free to swap it for Swiss or cheddar if you prefer.
- Slider buns: Soft and fluffy, these buns hold everything together. You can use regular or gluten-free options.
- Beef broth: This savory liquid is essential for dipping. Homemade is great, but store-bought works just fine.
- Worcestershire sauce: A splash of this adds depth and umami to the beef. It’s a must-have in your pantry!
- Unsalted butter: Brushing this on the buns gives them a golden, crispy finish.
- Garlic powder: A sprinkle of this enhances the flavor profile without overpowering the dish.
- Onion powder: Similar to garlic, it adds a subtle sweetness and depth.
- Salt and pepper: Essential for seasoning the beef to perfection.
- Fresh parsley: Optional, but a sprinkle of this brightens up the dish and adds a pop of color.
For those looking to spice things up, consider adding sliced jalapeños or using pepper jack cheese for a kick. You can find the exact quantities for each ingredient at the bottom of the article, ready for printing!
How to Make French Dip Sliders
Creating French Dip Sliders is a straightforward process that yields delicious results. Follow these simple steps, and you’ll have a crowd-pleaser on your hands in no time!
Step 1: Preheat the Oven
Start by preheating your oven to 350°F. This step is crucial for even cooking. A hot oven ensures that the sliders bake perfectly, with the cheese melting just right and the buns getting that golden finish.
Step 2: Prepare the Beef
In a large skillet over medium heat, combine the beef broth and Worcestershire sauce. Bring this mixture to a gentle simmer. Once it’s bubbling, add the thinly sliced roast beef. Heat it for about 3-5 minutes until it’s warmed through. Don’t forget to season with salt and pepper to taste. This step infuses the beef with flavor, making it even more irresistible!
Step 3: Assemble the Sliders
While the beef is heating, grab your slider buns and place them on a baking sheet. If you like, slice the buns in half and lay the bottom halves on the sheet. Next, layer the provolone cheese over the bottom halves. Once the beef is heated, evenly distribute it over the cheese. Finally, place the top halves of the buns on the beef. This layering creates a delightful combination of flavors and textures.
Step 4: Season the Buns
In a small bowl, mix the melted butter, garlic powder, and onion powder. Brush this flavorful mixture generously over the tops of the slider buns. This not only adds flavor but also gives the buns a beautiful, crispy finish when baked.
Step 5: Bake the Sliders
Cover the sliders with aluminum foil and pop them in the preheated oven. Bake for 15 minutes, then remove the foil and bake for an additional 5-10 minutes. This allows the cheese to melt and the tops to turn golden brown. Keep an eye on them; you want that perfect melt without burning!
Step 6: Serve and Enjoy
Once they’re out of the oven, let the sliders cool for a few minutes. This is important! It allows the cheese to set slightly, making them easier to slice. Serve them warm with a small bowl of the savory beef broth for dipping. Trust me, the first bite will have you hooked!

Tips for Success
- Use high-quality roast beef for the best flavor and tenderness.
- Don’t skip the butter mixture; it adds a delicious crunch to the buns.
- Experiment with different cheeses to find your favorite combination.
- Let the sliders cool slightly before slicing to keep everything intact.
- Serve with extra beef broth for dipping—it’s a game changer!
Equipment Needed
- Baking sheet: A standard sheet works, but a rimmed one prevents spills.
- Large skillet: Any non-stick skillet will do for heating the beef.
- Small bowl: Perfect for mixing the butter and seasonings.
- Aluminum foil: Essential for covering the sliders while baking.
Variations
- Spicy Kick: Add sliced jalapeños or use pepper jack cheese for a fiery twist.
- Cheese Swap: Experiment with different cheeses like Swiss, cheddar, or even blue cheese for unique flavors.
- Vegetarian Option: Substitute the roast beef with sautéed mushrooms or a hearty portobello for a delicious meatless version.
- Herb Infusion: Mix fresh herbs like thyme or rosemary into the butter for an aromatic touch.
- Gluten-Free: Use gluten-free slider buns to accommodate dietary needs without sacrificing flavor.
Serving Suggestions
- Classic Sides: Pair your sliders with crispy fries or sweet potato wedges for a satisfying crunch.
- Fresh Salad: A light side salad with vinaigrette balances the richness of the sliders.
- Drink Pairing: Serve with a cold beer or a refreshing iced tea to complement the flavors.
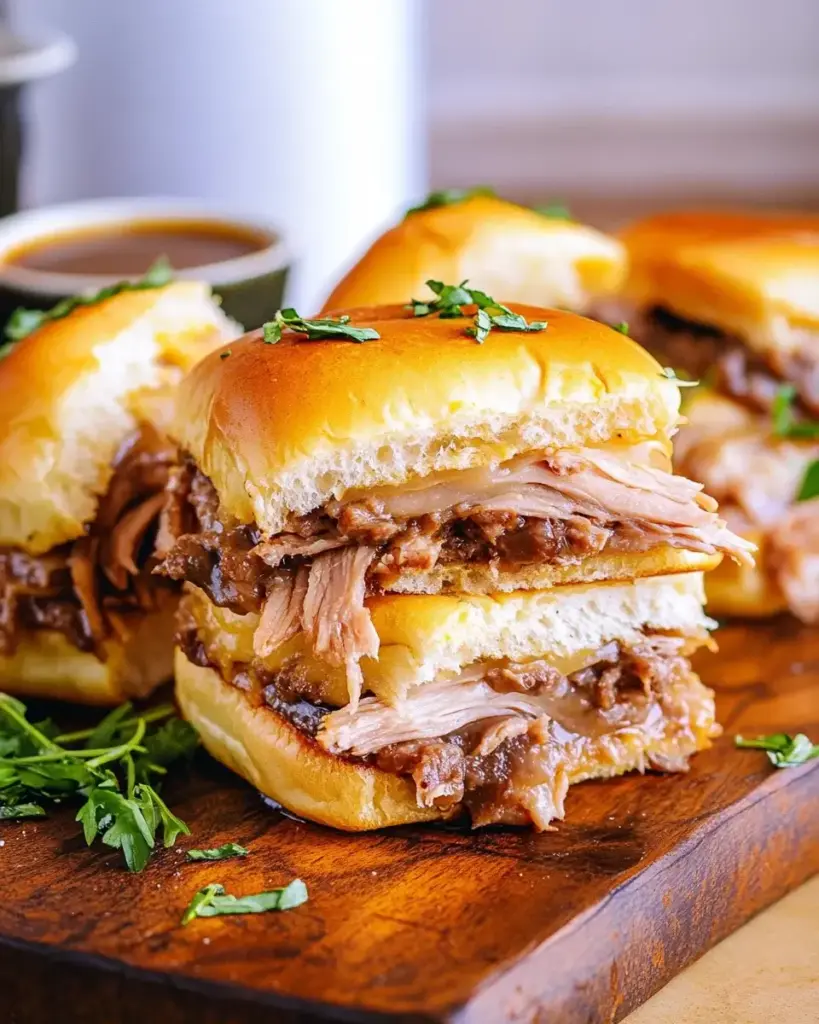
- Presentation: Arrange sliders on a wooden board for a rustic touch, garnished with fresh parsley.
FAQs about French Dip Sliders
Can I make French Dip Sliders ahead of time?
Absolutely! You can prepare the beef and assemble the sliders a few hours in advance. Just cover them tightly and refrigerate. When you’re ready to serve, pop them in the oven to warm up and melt the cheese.
What can I use instead of roast beef?
If you’re looking for alternatives, consider using shredded chicken or even pulled pork. Both options can be delicious and offer a different twist on the classic French Dip Sliders.
How do I store leftovers?
Store any leftover sliders in an airtight container in the fridge for up to three days. Reheat them in the oven for the best results, ensuring the cheese gets melty again!
Can I freeze French Dip Sliders?
Yes, you can freeze them! Assemble the sliders without baking, wrap them tightly, and freeze for up to a month. When you’re ready to enjoy, bake them straight from the freezer, adding a few extra minutes to the cooking time.
What should I serve with French Dip Sliders?
These sliders pair wonderfully with crispy fries, a fresh salad, or even a side of coleslaw. The dipping broth is a must-have, adding that extra layer of flavor to your meal!
Final Thoughts
French Dip Sliders are more than just a meal; they’re an experience that brings people together. The aroma of warm, savory beef mingling with melted cheese creates a cozy atmosphere that invites conversation and laughter. Whether you’re hosting a game night or enjoying a quiet dinner at home, these sliders are sure to impress. Plus, the simplicity of the recipe means you can focus on what really matters—spending time with loved ones. So, roll up your sleeves, gather your ingredients, and dive into this delicious comfort food adventure. You won’t regret it!
French Dip Sliders: The Ultimate Comfort Food Recipe!
Ingredients
Method
- Preheat your oven to 350°F.
- In a large skillet over medium heat, combine the beef broth and Worcestershire sauce. Bring to a simmer, then add the sliced roast beef. Cook for about 3-5 minutes until heated through. Season with salt and pepper to taste.
- While the beef is heating, place the slider buns on a baking sheet. If desired, slice the buns in half and lay the bottom halves on the sheet.
- Layer the provolone cheese over the bottom halves of the buns. Once the beef is heated, evenly distribute the beef over the cheese. Place the top halves of the buns on the beef.
- In a small bowl, mix the melted butter, garlic powder, and onion powder. Brush this mixture over the top of the slider buns.
- Cover the sliders with aluminum foil and bake in the preheated oven for 15 minutes. Remove the foil and bake for an additional 5-10 minutes, or until the cheese is melted and the tops are golden brown.
- Remove from the oven and let cool for a few minutes. Slice the sliders and serve warm with a small bowl of the beef broth for dipping. Garnish with fresh parsley if desired.
Nutrition
Notes
- For a spicy kick, add sliced jalapeños or pepper jack cheese to the sliders.
- Try using different types of cheese, such as Swiss or cheddar, for a unique flavor twist.