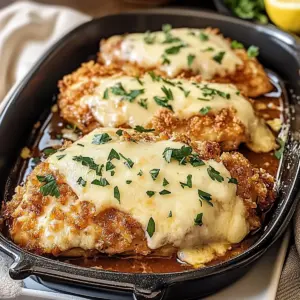
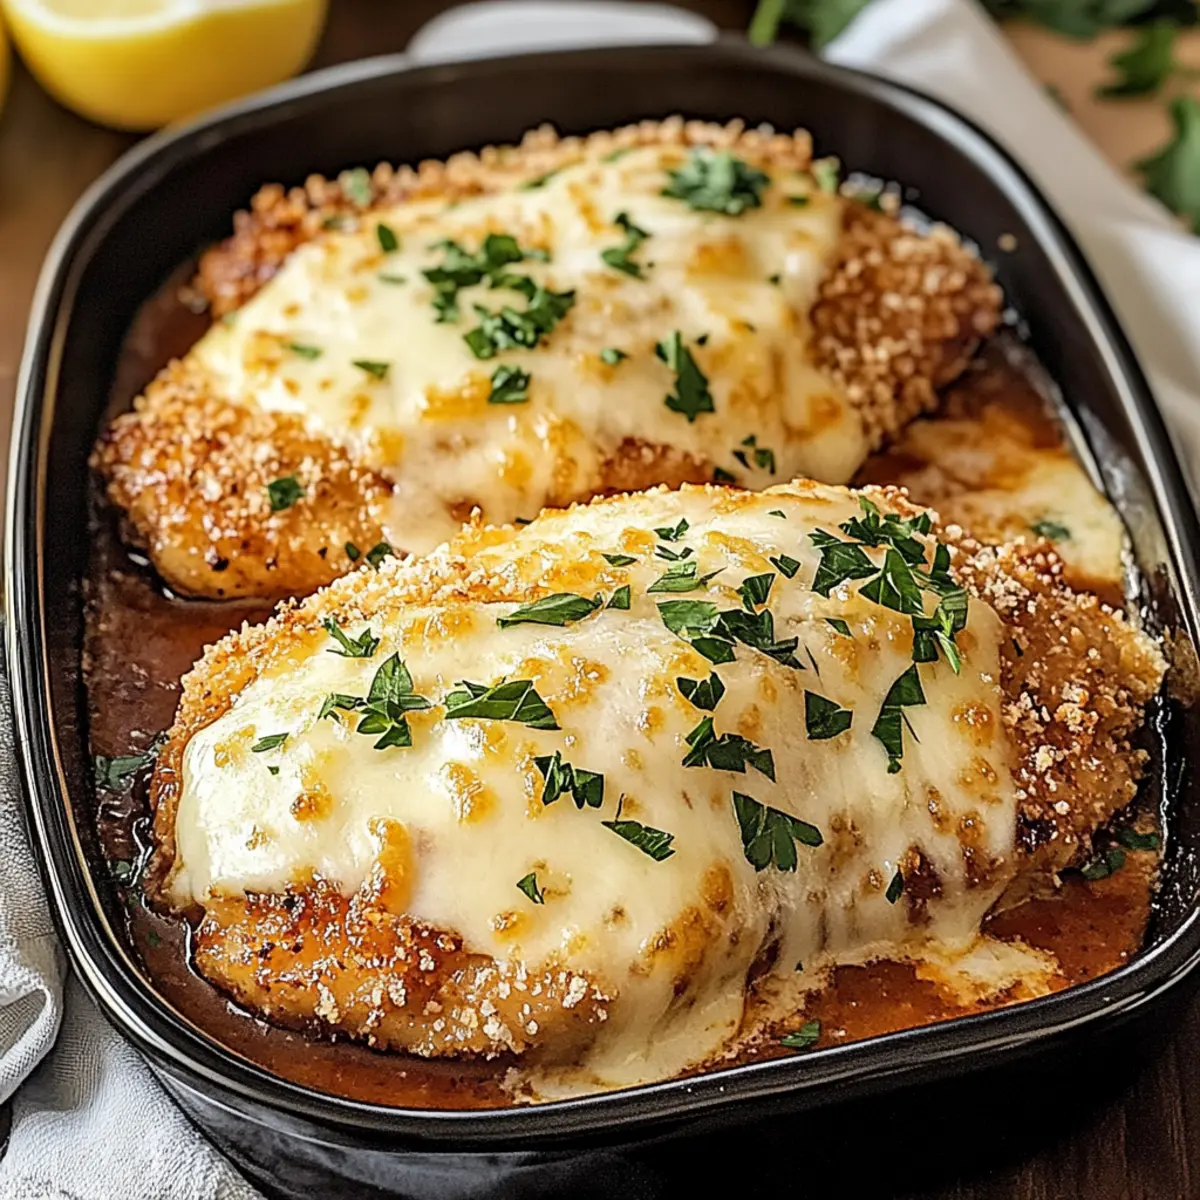
As I sifted through my kitchen for something special, the thought of Chicken Romano danced in my mind—a dish that transforms ordinary into extraordinary with its golden crust and cheesy, tender goodness. This elegant yet easy recipe is a game-changer, perfect for weeknights when you crave comfort food or for impressing guests at a dinner party. The best part? It’s meal prep-friendly and offers gluten-free and dairy-free options, making it versatile for any dietary need. Whether you’re dreaming of a summery lemony twist or a flavorful Italian night, this recipe can be your culinary canvas. What delightful side would you pair with your own crispy Chicken Romano creation?
Why is Chicken Romano a Must-Make?
Irresistible Crunch: The perfectly crispy coating clings to juicy chicken like a warm hug, elevating your meal to restaurant-quality.
Flavor Versatility: Customize with gluten-free and dairy-free alternatives, ensuring everyone can savor this dish.
Quick and Easy: This recipe is designed to fit your busy lifestyle—perfect for weeknight dinners or special occasions.
Meal Prep Friendly: Make ahead and store for delightful lunches or last-minute dinners; it’s a time-saver!
Pair it with fresh sides like roasted vegetables or a simple salad for a balanced meal, just like with my delicious Garlic Butter Chicken or vibrant Hawaiian Chicken Coconut. You’ll want to make Chicken Romano again and again!
Chicken Romano Ingredients
Discover all the essentials for crafting the perfect Chicken Romano—flavor and ease wrapped in one delightful dish!
For the Chicken
- Boneless, Skinless Chicken Breasts – The star of the dish; tender and juicy after cooking.
- Eggs – Acts as a binder to ensure the coating sticks beautifully.
For the Coating
- All-Purpose Flour – For dredging and helping the egg mixture adhere; substitute with almond flour for gluten-free options.
- Grated Romano Cheese – Adds a sharp, tangy flavor to create that irresistible cheesy crust; try Parmesan for a milder alternative.
- Italian-Style Breadcrumbs – Provides crunch and texture; you can use gluten-free breadcrumbs if needed.
- Garlic Powder & Paprika – Introduce depth and warmth to the breading, enhancing overall flavor.
- Salt & Pepper – Essential for bringing out the best in every ingredient.
For Cooking
- Olive Oil & Unsalted Butter – A perfect frying duo, creating a crispy texture while adding richness.
For Garnish
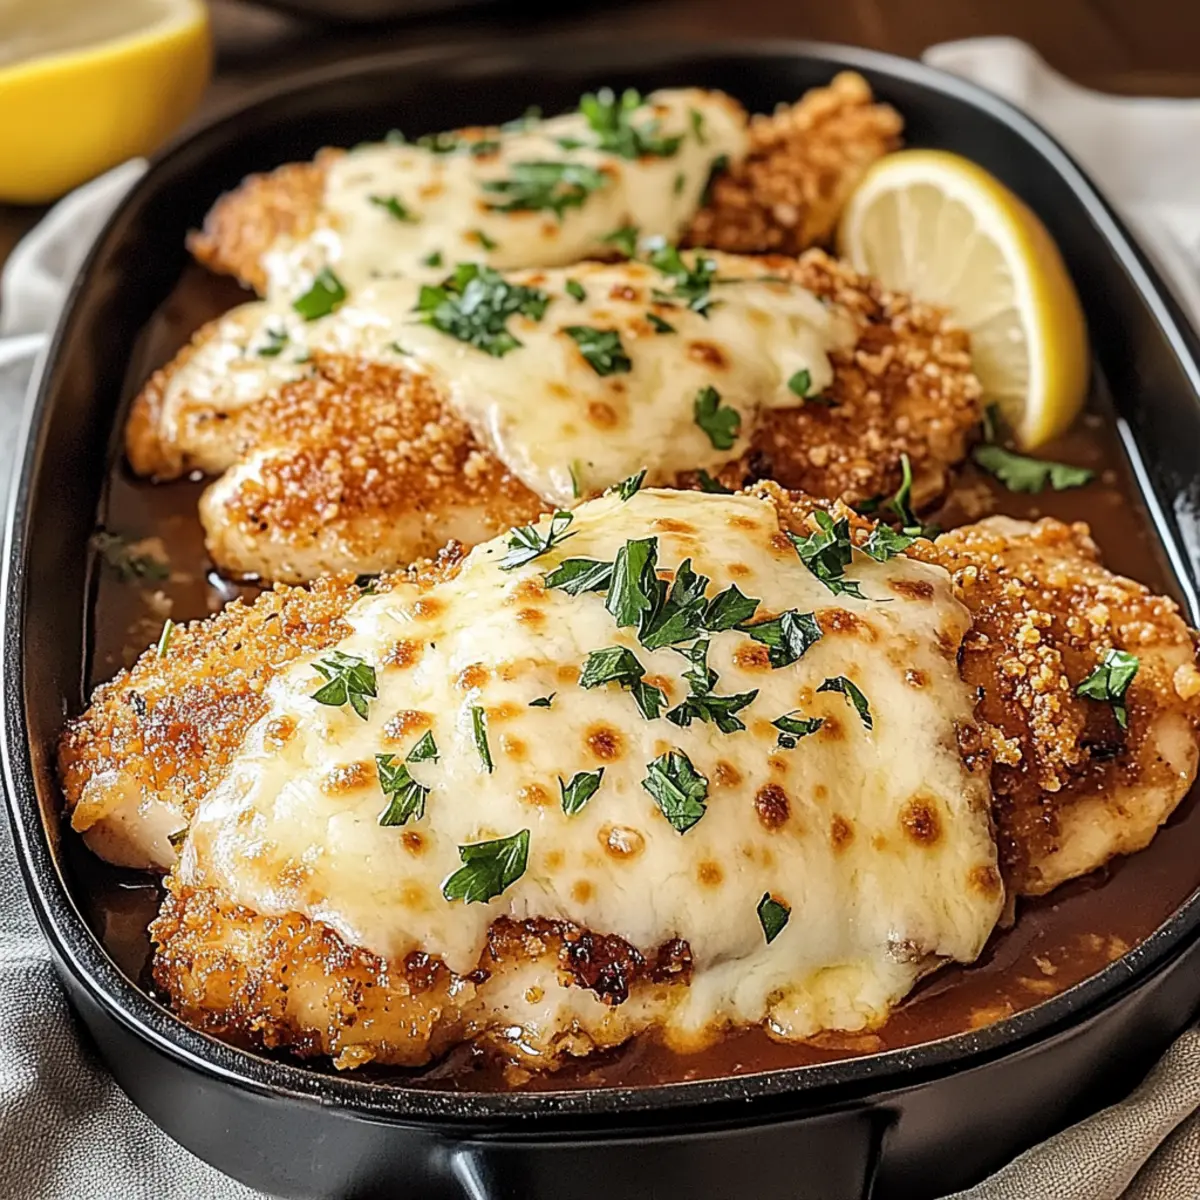
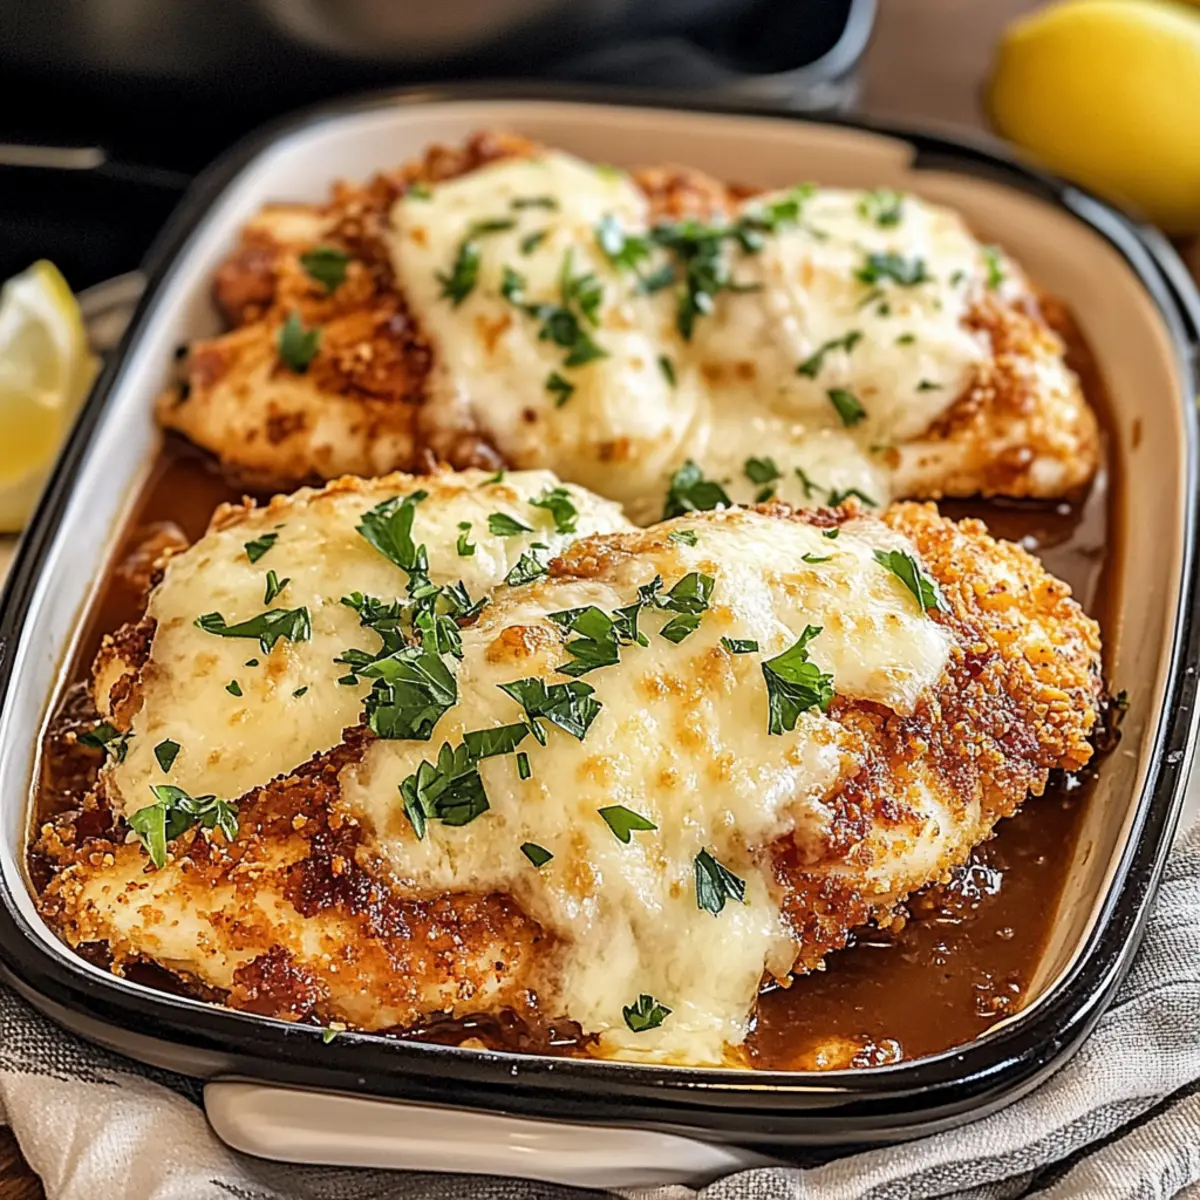
- Fresh Parsley – Adds a pop of color and a hint of freshness to your Chicken Romano.
- Lemon Wedges – Serve alongside for a bright burst of flavor that elevates the dish.
With these ingredients, you’re all set to make your very own delicious Chicken Romano—a meal that promises to impress!
Step‑by‑Step Instructions for Chicken Romano
Step 1: Prepare Chicken
Begin by slicing the boneless, skinless chicken breasts into cutlets about ½ inch thick. This ensures even cooking and enhances tenderness. After slicing, use a meat mallet to pound each piece gently until uniform in thickness. This preparation step sets the foundation for a juicy and perfectly cooked Chicken Romano.
Step 2: Dredging Setup
Set up three shallow bowls on your counter. In the first bowl, place all-purpose flour; in the second, whisk together eggs and milk until combined. Finally, in the third bowl, mix grated Romano cheese, Italian-style breadcrumbs, garlic powder, paprika, salt, and pepper. This organized setup streamlines the coating process for your Chicken Romano.
Step 3: Coating Chicken
Take each chicken cutlet and first dip it into the flour, ensuring it’s fully coated. Shake off any excess flour before transferring the cutlet to the egg mixture, allowing it to soak briefly. Finally, press the chicken firmly into the cheese-breadcrumb mixture, ensuring a generous and even coating. Repeat this process for all cutlets, readying them for frying.
Step 4: Fry Chicken
Heat a skillet over medium heat and add a mix of olive oil and unsalted butter. Once the oil shimmers (about 3-5 minutes), gently place each coated chicken cutlet into the pan. Fry for 3-4 minutes per side, or until they turn a golden brown and crispy. Keep an eye on them to avoid burning, ensuring a delightful Chicken Romano.
Step 5: Bake Chicken
Preheat your oven to 375°F (190°C) while the chicken fries. Once golden and crispy in the skillet, transfer each chicken cutlet to a baking sheet. Bake in the preheated oven for about 10 minutes, or until the chicken reaches an internal temperature of 165°F, ensuring it’s fully cooked and juicy.
Step 6: Rest & Serve
After baking, remove the Chicken Romano from the oven and let it rest for a few minutes on a cutting board. This allows the juices to redistribute for maximum flavor. Garnish with freshly chopped parsley and serve with lemon wedges for a refreshing touch, enhancing the overall dining experience.
What to Serve with Crispy Chicken Romano?
Create a delightful dining experience by pairing your meal with these fabulous sides and drinks.
- Creamy Garlic Mashed Potatoes: The smooth, buttery texture complements the crispy chicken beautifully, creating a comforting comfort food duo.
- Roasted Seasonal Vegetables: Roasting brings out their natural sweetness, providing a contrast to the savory richness of Chicken Romano.
- Simple Arugula Salad: A light, peppery salad with a tangy lemon vinaigrette refreshes the palate after each bite of rich chicken.
- Pasta Aglio e Olio: This traditional Italian pasta dish, with its garlic and olive oil, perfectly matches the flavors of Chicken Romano.
- Crusty Italian Bread: Ideal for soaking up any leftover sauce, enhancing the meal with rustic charm and satisfying crunch!
- Lemon Spritzer: A refreshing drink made with lemon juice and sparkling water to cleanse the palate with its bright, zesty notes.
- Tiramisu for Dessert: End the meal on a sweet note with this classic coffee-flavored Italian dessert, harmonizing beautifully with the main dish.
- Chardonnay Wine: A chilled glass of Chardonnay, with its fruity notes, pairs perfectly with the dish’s cheesy crust and lemony zest.
Expert Tips for Chicken Romano
-
Preheat Oil Correctly: Ensure your oil reaches 350°F before frying; this prevents greasy cutlets and helps achieve a satisfying crispness.
-
Firm Coating: Press breadcrumbs firmly onto the chicken to create a thick, secure layer that won’t fall off during cooking; this is key for perfect Chicken Romano.
-
No Overcrowding: When frying, don’t crowd the pan! Fry in batches to maintain proper oil temperature, ensuring each cutlet gets that golden-brown perfection.
-
Rest for Juiciness: Allow the fried Chicken Romano to rest after baking—this vital step lets juices redistribute, keeping the chicken tender and moist.
-
Check Internal Temp: Use a meat thermometer to ensure each piece of chicken reads 165°F internally; this guarantees safety and flavorful tenderness.
Make Ahead Options
These Crispy Chicken Romano cutlets are perfect for meal prep enthusiasts! You can bread the chicken and refrigerate it up to 24 hours in advance, which helps the coating adhere better during cooking. To prepare ahead, follow the breading steps, then cover the cutlets in a single layer with plastic wrap and refrigerate. When you’re ready to serve, simply heat olive oil and butter in a skillet, fry for 3-4 minutes on each side until golden, then bake at 375°F (190°C) for about 10 minutes to reach that juicy perfection. This method ensures that your Chicken Romano is just as delicious, saving you precious time on busy weeknights!
Storage Tips for Chicken Romano
Fridge: Store leftover Chicken Romano in an airtight container for up to 3 days to maintain freshness and flavor.
Freezer: For longer storage, cool the cooked chicken completely, then freeze it on a baking sheet before transferring to a freezer-safe container. This will keep it fresh for up to 3 months.
Reheating: To reheat, simply bake the frozen Chicken Romano at 375°F for about 20-25 minutes, until warmed through. This method helps retain the crispy texture that makes Chicken Romano so enjoyable.
Room Temperature: Allow the cooked chicken to cool before refrigeration, as placing warm food directly in the fridge can create excess moisture and affect quality.
Chicken Romano Variations & Substitutions
Unleash your culinary creativity by customizing this Chicken Romano recipe to suit your taste and dietary needs!
- Gluten-Free: Use almond flour and gluten-free breadcrumbs in place of all-purpose flour and regular breadcrumbs for a deliciously crispy coating.
- Dairy-Free: Substitute Romano cheese with nutritional yeast or a dairy-free cheese alternative for a cheesy flavor without the dairy.
- Baked Version: For a healthier option, bake instead of fry! Lightly spray the breaded chicken with olive oil before baking for a crispy finish.
- Sandwich Style: Turn your Chicken Romano into a hearty sandwich! Serve it on a ciabatta roll with fresh lettuce, tomato, and a drizzle of balsamic glaze.
- Herbal Infusion: Enhance the flavor by mixing in fresh herbs like basil or oregano into the breadcrumb mixture for an aromatic twist.
- Zesty Lemon: Add lemon zest to the breadcrumb mixture for a refreshing citrus kick that brightens up the dish.
- Spicy Kick: Sprinkle some red pepper flakes into the breading for those who love a bit of heat with their cheesy goodness.
- Veggie Additions: Mix in finely chopped spinach or sun-dried tomatoes to the breadcrumb mixture for added flavor and nutrition.
With all these delightful variations, you can create a Chicken Romano masterpiece tailored just for you. For more inspiration, check out my Hawaiian Chicken Coconut or flavorful Teriyaki Chicken Tacos to mix things up!
Crispy Chicken Romano Recipe FAQs
How do I select the best chicken for Chicken Romano?
Absolutely! Look for boneless, skinless chicken breasts that are plump and have a bright, pink hue. Avoid any that have dark spots or a slimy texture. Fresh chicken should feel firm when you press it; this indicates it’s fresh and perfect for your crispy Chicken Romano!
What’s the best way to store leftover Chicken Romano?
You can keep your leftover Chicken Romano in an airtight container in the refrigerator for up to 3 days. If you want to save it longer, let it cool completely, then freeze the chicken on a baking sheet. Once frozen, transfer it to a freezer-safe container, where it can last for up to 3 months. Just remember to thaw it in the fridge overnight before reheating!
Can I freeze Chicken Romano and what’s the best way to do it?
Yes, you can definitely freeze Chicken Romano! After cooking, let it cool to room temperature. Next, place the cutlets on a baking sheet in a single layer and freeze until solid (about 1-2 hours). Once frozen, transfer them to a freezer-safe bag or container for up to 3 months. When you’re ready to enjoy, bake directly from the freezer at 375°F for 20-25 minutes until hot and crispy.
What should I do if my coating falls off during cooking?
Very common! If your coating falls off, it might be because the breadcrumbs weren’t pressed firmly onto the chicken or the oil temperature was too low. For best results, make sure to press the breadcrumbs firmly onto the chicken when coating it. Also, ensure your oil is preheated to 350°F before frying—this will help create that beautiful, crispy crust without the coating separating.
Are there any dietary considerations for Chicken Romano, like allergies?
Absolutely! If you’re making Chicken Romano for someone with dietary restrictions, you can easily adapt it. Use almond flour for a gluten-free option and replace the Romano cheese with nutritional yeast for a dairy-free alternative. Always check the labels of your breadcrumbs and any additional ingredients to ensure they’re free from common allergens if needed.
Can pets eat the Chicken Romano leftovers?
While a little plain, cooked chicken is generally safe for pets, you should avoid giving them the seasoned coating. Ingredients like garlic and onion can be harmful to dogs and cats. If you want to share with your furry friends, simply remove any seasoned parts and give them a small, plain cutlet instead!

Crispy Chicken Romano with a Flavor-Packed Twist
Ingredients
Equipment
Method
- Begin by slicing the boneless, skinless chicken breasts into cutlets about ½ inch thick.
- Set up three shallow bowls with flour, whisked eggs, and a mixture of cheese, breadcrumbs, garlic powder, paprika, salt, and pepper.
- Coat each chicken cutlet in flour, then dip in eggs, and finally press into the cheese-breadcrumb mixture.
- Heat olive oil and unsalted butter in a skillet over medium heat and fry each coated chicken cutlet for 3-4 minutes per side.
- Transfer fried cutlets to a baking sheet and bake in a preheated oven at 375°F for about 10 minutes.
- Let the Chicken Romano rest for a few minutes before garnishing with parsley and serving with lemon wedges.