

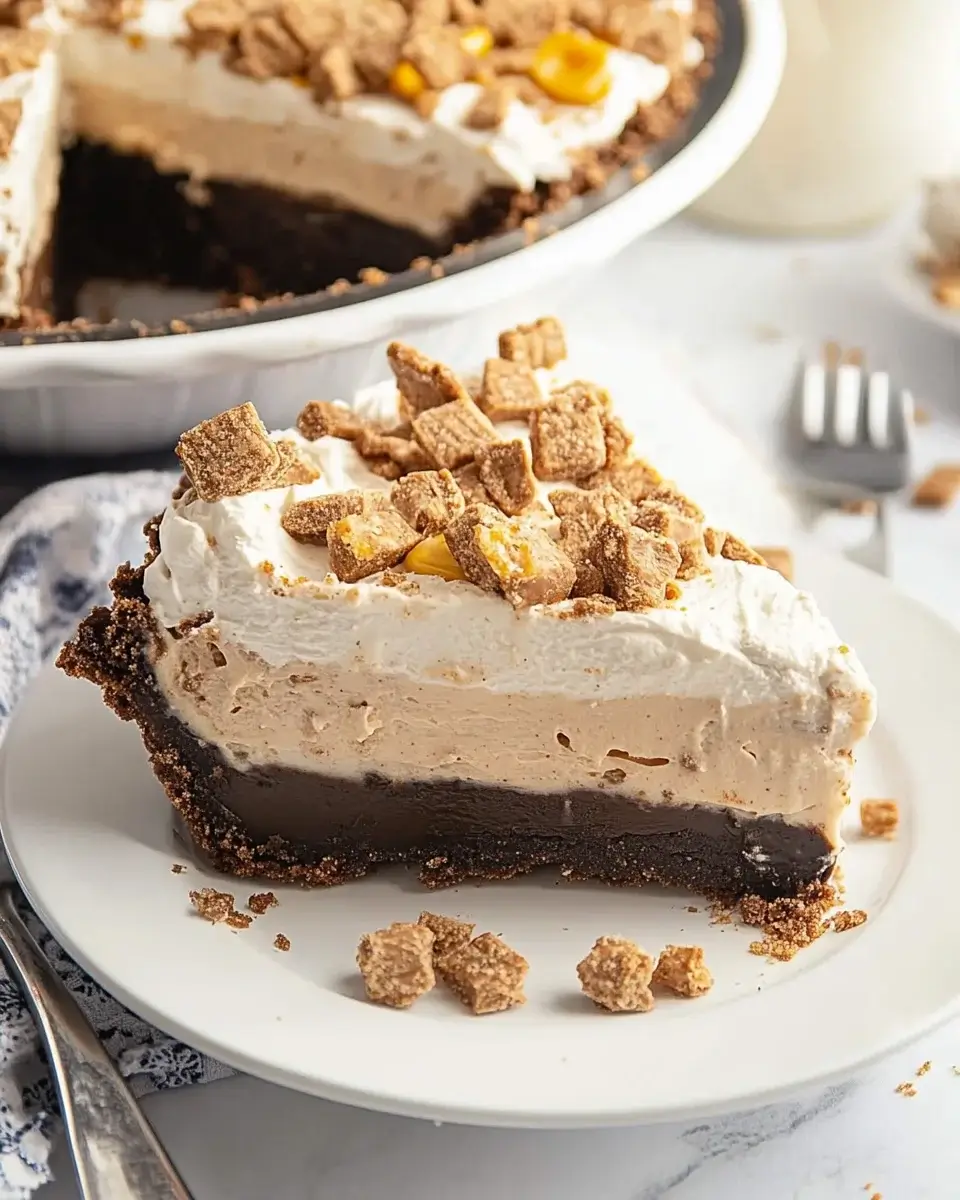
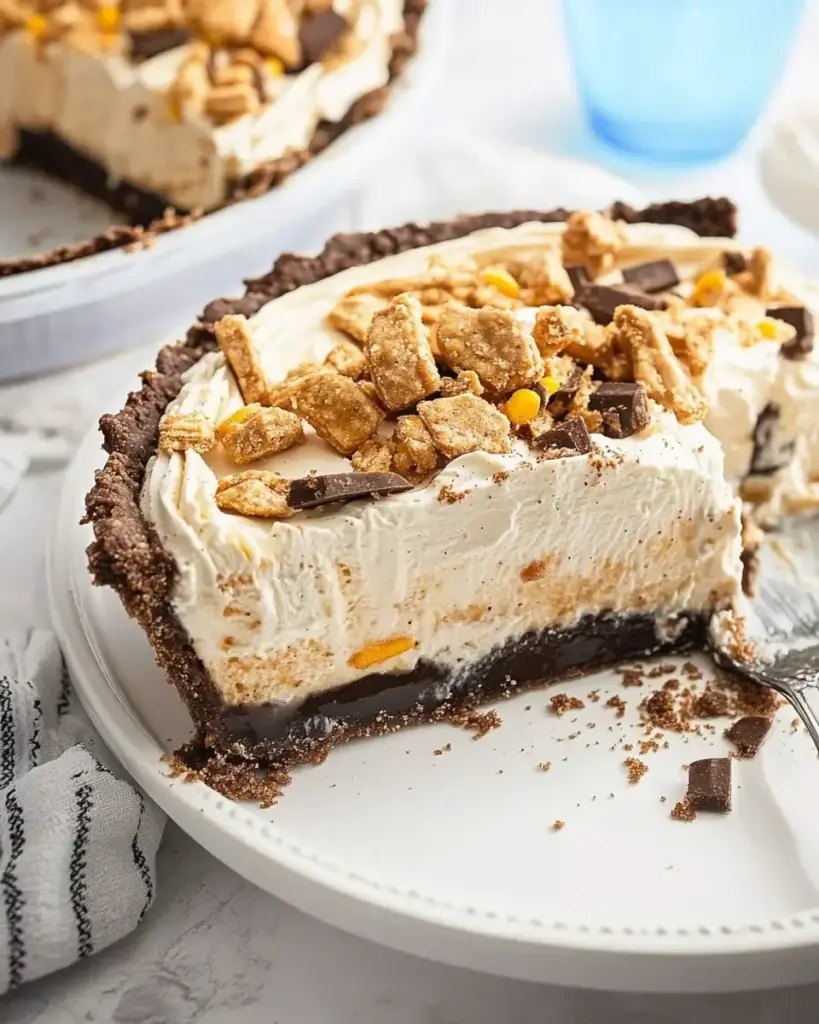
Introduction to Butterfinger Pie
There’s something magical about desserts that bring back childhood memories, and Butterfinger Pie is one of those treats that does just that. The creamy blend of peanut butter and crushed Butterfinger bars nestled in a graham cracker crust is pure bliss. Whether you’re looking for a quick solution for a busy day or a show-stopping dessert to impress your loved ones, this no-bake pie is the answer. It’s simple, delicious, and sure to satisfy any sweet tooth. Trust me, once you take a bite, you’ll be transported back to simpler times, savoring every delightful morsel.
Why You’ll Love This Butterfinger Pie
This Butterfinger Pie is a dream come true for anyone who loves a quick and easy dessert. With no baking required, you can whip it up in just 20 minutes. The combination of creamy peanut butter and crunchy Butterfinger bars creates a flavor explosion that’s hard to resist. Plus, it’s perfect for gatherings or a cozy night in. You’ll impress your friends and family without breaking a sweat!
Ingredients for Butterfinger Pie
Gathering the right ingredients is the first step to creating this delightful Butterfinger Pie. Here’s what you’ll need:
- Creamy peanut butter: This is the star of the show, providing that rich, nutty flavor.
- Powdered sugar: It adds sweetness and helps create a smooth filling.
- Cream cheese: Softened cream cheese gives the pie its creamy texture and a slight tang.
- Whipped topping: Think Cool Whip! It lightens the filling and adds a fluffy element.
- Vanilla extract: A splash of vanilla enhances the overall flavor profile.
- Graham cracker pie crust: This buttery crust is the perfect base, but feel free to swap it for an Oreo crust for a chocolatey twist.
- Butterfinger candy bars: Crushed for that signature crunch and sweet, peanut buttery goodness.
- Chocolate syrup: Optional, but a drizzle on top elevates the dessert to a whole new level.
For exact measurements, check the bottom of the article where you can find everything listed for easy printing. Happy baking!
How to Make Butterfinger Pie
Creating this Butterfinger Pie is a breeze, and I promise it’ll be worth every minute spent in the kitchen. Follow these simple steps, and you’ll have a dessert that’s sure to impress.
Step 1: Prepare the Filling
Start by grabbing a large mixing bowl. Combine the creamy peanut butter, powdered sugar, and softened cream cheese. Using an electric mixer, beat the mixture on medium speed until it’s smooth and well combined. You want a creamy consistency that’s free of lumps. Trust me, this is the foundation of your pie!
Step 2: Incorporate Whipped Topping
Next, it’s time to lighten things up! Gently fold in the whipped topping and a splash of vanilla extract. Use a spatula to carefully mix until everything is fully incorporated. This step adds that fluffy texture that makes each bite feel like a cloud of deliciousness.
Step 3: Add Butterfinger Crunch
Now comes the fun part! Stir in the crushed Butterfinger candy bars, making sure to reserve a small amount for garnish later. The crunch of the Butterfinger adds a delightful contrast to the creamy filling. It’s like a party in your mouth!
Step 4: Fill the Crust
Pour the luscious mixture into your graham cracker pie crust. Spread it evenly with a spatula, ensuring every corner is filled. This is where the magic happens, as the crust will hold all that creamy goodness together.
Step 5: Chill the Pie
Patience is key here! Cover the pie with plastic wrap and refrigerate it for at least 4 hours, or overnight if you can wait. This chilling time allows the flavors to meld beautifully and gives the pie a chance to set properly.
Step 6: Serve with a Drizzle
Finally, it’s time to serve! Drizzle some chocolate syrup over the top and sprinkle the reserved crushed Butterfinger bars for that extra touch. This final flourish not only looks stunning but adds a burst of flavor that will have everyone coming back for seconds.
Tips for Success
- Make sure your cream cheese is softened for easy mixing.
- For a richer flavor, consider adding a layer of melted chocolate in the crust.
- Chill the pie overnight for the best texture and flavor.
- Use a spatula to gently fold in the whipped topping to keep it light and airy.
- Don’t skip the chocolate drizzle; it elevates the dessert!
Equipment Needed
- Mixing bowl: A large bowl for combining ingredients. A sturdy pot can work in a pinch.
- Electric mixer: For smooth mixing. A whisk will do if you’re feeling adventurous.
- Spatula: Essential for folding and spreading. A wooden spoon can also be handy.
- Measuring cups: For accurate ingredient portions. You can use any cup for rough estimates.
- Pie dish: A 9-inch pie dish is ideal. Any similar-sized dish will suffice.
Variations
- Chocolate Lovers: Swap the graham cracker crust for an Oreo crust for a chocolatey twist that complements the peanut butter.
- Nut-Free Option: Use sunbutter or another nut-free spread in place of peanut butter for a safe alternative.
- Healthier Version: Substitute Greek yogurt for cream cheese to reduce calories while keeping the creaminess.
- Vegan Delight: Use dairy-free cream cheese and whipped topping, along with a vegan graham cracker crust.
- Extra Crunch: Add chopped peanuts or other candy bars like Snickers for a fun mix of textures and flavors.
Serving Suggestions
- Pair with a scoop of vanilla ice cream for a delightful contrast in temperature and texture.
- Serve alongside fresh berries to add a pop of color and a hint of tartness.
- For drinks, consider a rich coffee or a creamy milkshake to complement the dessert.
- Garnish with whipped cream and a sprinkle of crushed Butterfinger for an eye-catching presentation.

FAQs about Butterfinger Pie
Got questions about this delicious Butterfinger Pie? You’re not alone! Here are some common queries that might pop up as you whip up this delightful dessert.
Can I make Butterfinger Pie ahead of time?
Absolutely! In fact, making it a day in advance is a great idea. The flavors meld beautifully overnight, and it gives the pie ample time to set in the fridge.
How long does Butterfinger Pie last in the fridge?
This no-bake pie can last up to 5 days in the refrigerator, as long as it’s covered properly. Just be sure to enjoy it before it disappears!
Can I freeze Butterfinger Pie?
Yes, you can freeze it! Just make sure to wrap it tightly in plastic wrap and then foil. It can be frozen for up to 2 months. Thaw it in the fridge before serving.
What can I use instead of whipped topping?
If you prefer a homemade touch, you can whip up some heavy cream to use instead of store-bought whipped topping. Just sweeten it to taste and fold it in gently.
Is Butterfinger Pie suitable for vegetarians?
Yes, this Butterfinger Pie is vegetarian-friendly! Just check the ingredients of your whipped topping and graham cracker crust to ensure they meet your dietary preferences.
Final Thoughts
Creating Butterfinger Pie is more than just whipping up a dessert; it’s about crafting a moment of joy. Each slice is a delightful blend of creamy peanut butter and crunchy Butterfinger, evoking nostalgia and happiness. Whether you’re sharing it with family or enjoying a quiet evening alone, this pie brings smiles and sweet satisfaction. The best part? It’s so easy to make! So, roll up your sleeves, gather your ingredients, and let this no-bake wonder become a staple in your dessert repertoire. Trust me, every bite will remind you of the simple pleasures in life.
Butterfinger Pie: Discover This Irresistible Dessert!
Ingredients
Method
- In a large mixing bowl, combine the creamy peanut butter, powdered sugar, and softened cream cheese. Beat with an electric mixer on medium speed until smooth and well combined.
- Add the whipped topping and vanilla extract to the mixture. Gently fold in the whipped topping until fully incorporated.
- Stir in the crushed Butterfinger candy bars, reserving a small amount for garnish if desired.
- Pour the mixture into the graham cracker pie crust, spreading it evenly.
- Cover the pie with plastic wrap and refrigerate for at least 4 hours, or overnight for best results.
- Before serving, drizzle chocolate syrup over the top and sprinkle with the reserved crushed Butterfinger bars.
Nutrition
Notes
- For a richer flavor, try adding a layer of melted chocolate on the bottom of the pie crust before adding the filling.
- You can also substitute the graham cracker crust with an Oreo crust for a chocolatey twist.


