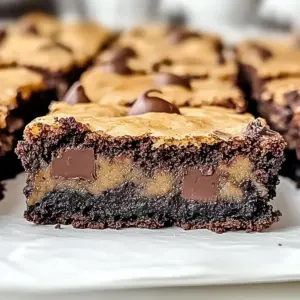
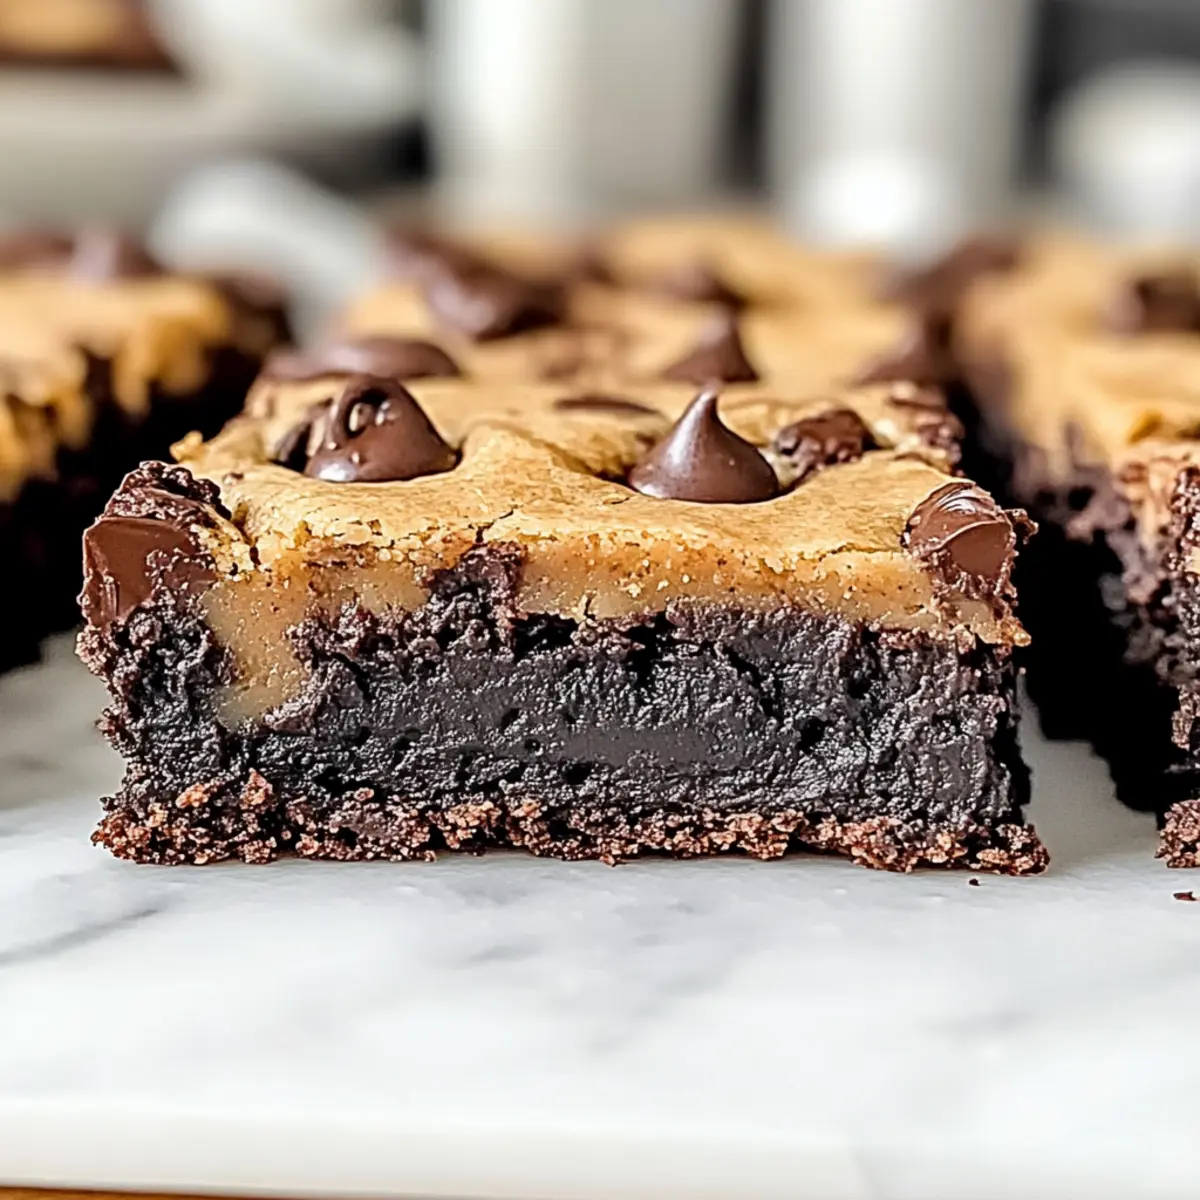
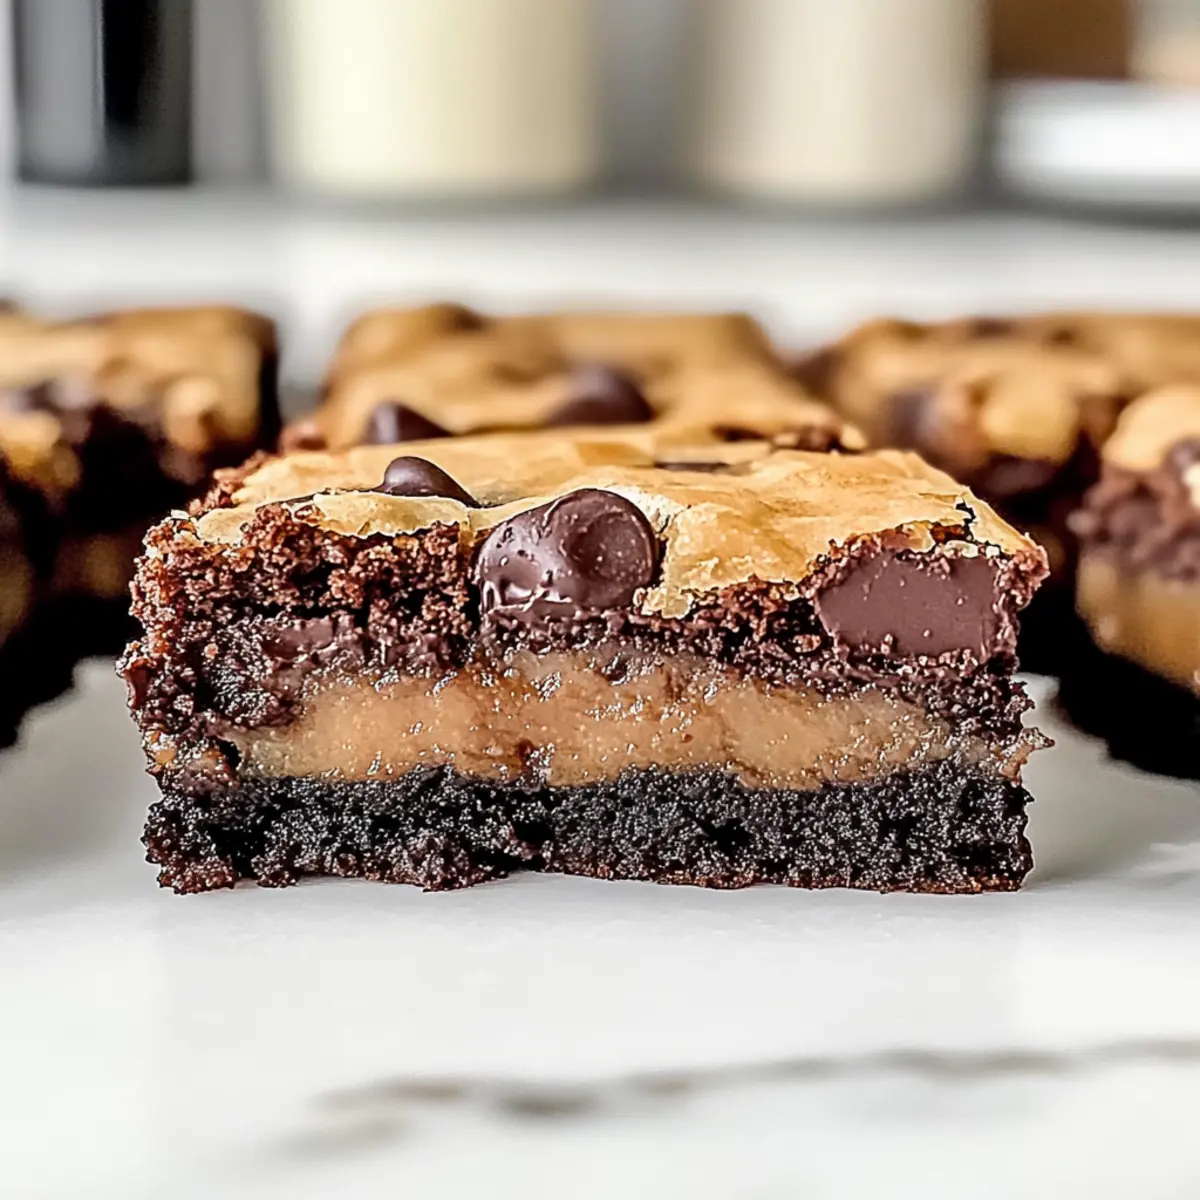
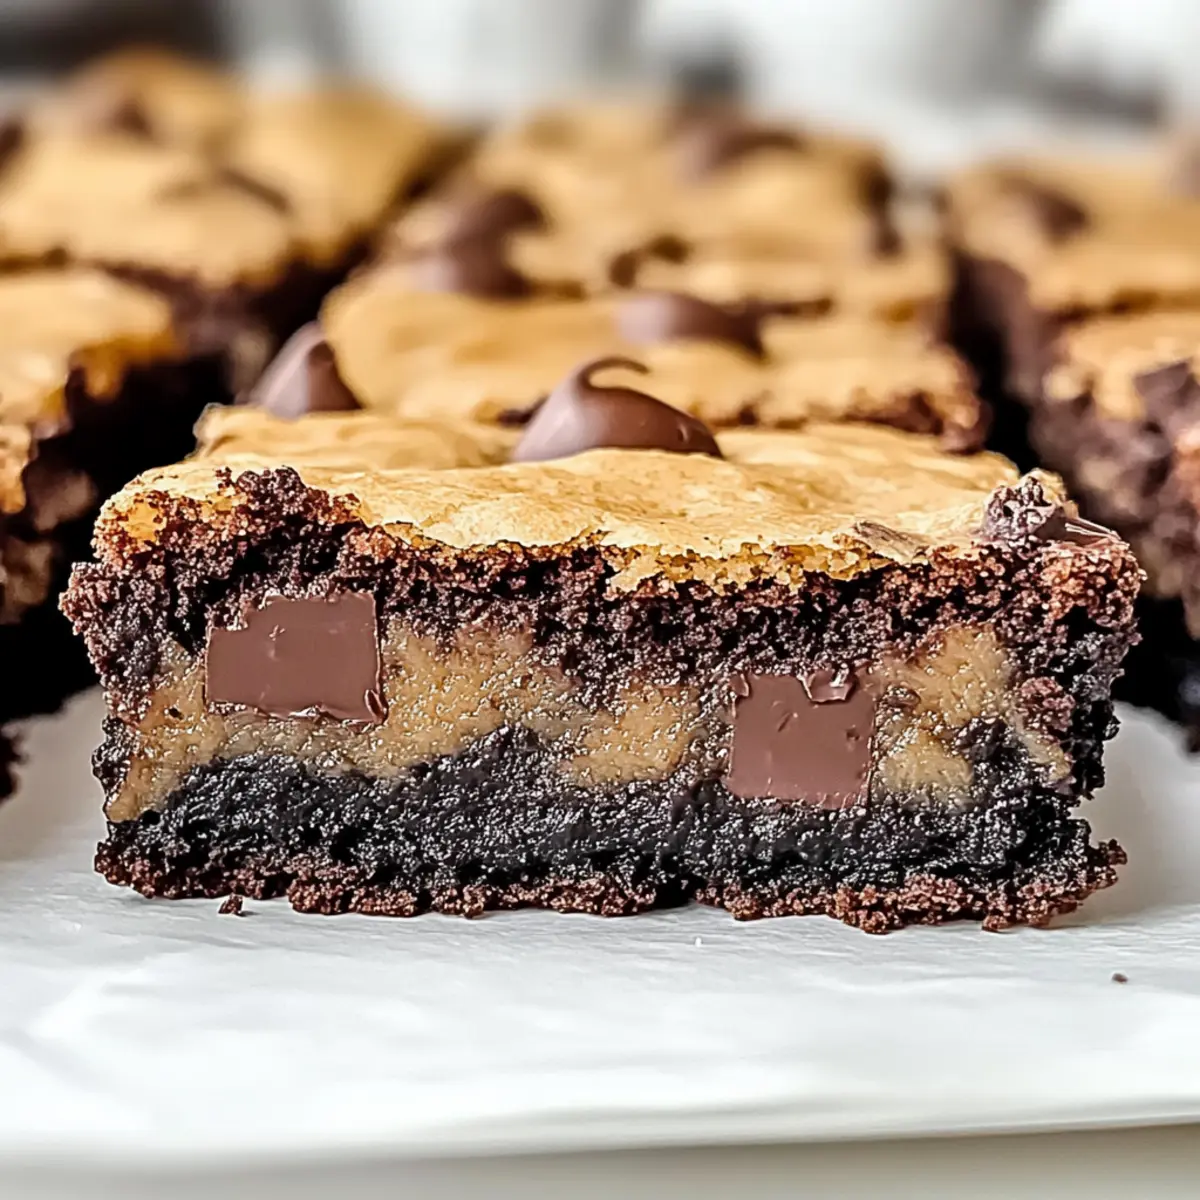
As I strolled through my kitchen, the tantalizing scent of brown butter wafted through the air, sparking a delightful memory of cozy gatherings and warm treats. These Brown Butter Brookies are my go-to dessert, merging rich chocolate chip cookies with luscious brownies for the ultimate one-pan indulgence. Not only can you whip up this crowd-pleaser in no time, but it also offers options for gluten-free and vegan adaptations, making it inclusive for all your loved ones. The chewy cookie texture complements the fudgy brownie depth, creating a heavenly blend you simply can’t resist. Ready to discover how to create this decadent delight that will keep everyone coming back for seconds? Let’s dive in!

Why are Brown Butter Brookies a Must-Try?
Irresistible Fusion: These Brown Butter Brookies uniquely combine the best of both worlds—rich chocolate chip cookies and fudgy brownies—creating an unforgettable dessert experience.
One-Pan Wonder: Enjoy the simplicity of preparing this crowd-pleaser in just one pan, making cleanup a breeze.
Endless Variations: Whether you prefer vegan or gluten-free, this recipe adapts effortlessly to suit any dietary needs, ensuring everyone can indulge.
Perfectly Textured: Experience a heavenly contrast of chewy and dense textures that melt in your mouth, leaving you wanting more.
Quick and Easy: Whip up this treat in no time, perfect for those spontaneous gatherings or cozy nights in.
Brown Butter Brookies Ingredients
• Discover the key ingredients for these delightful Brown Butter Brookies below!
For the Cookie Layer
- Unsalted Butter – Provides richness and moisture; you can substitute with salted butter, just reduce any extra salt.
- Granulated Sugar – Adds sweetness and creates a crispy edge; no known substitute.
- Light Brown Sugar – Contributes moisture and a hint of caramel flavor; swap with dark brown sugar for a deeper taste.
- Large Egg – Binds the ingredients together and enhances texture; a flax egg is a great substitute for a vegan option.
- All-Purpose Flour – Forms the structure of the cookie layer; gluten-free flour can be used for those avoiding gluten.
- Chocolate Chips – Adds delightful chocolate bursts and texture; feel free to use chunks or different types of chocolate as desired.
For the Brownie Layer
- Bittersweet Chocolate – Intensifies the chocolate flavor in the brownie layer; you can swap in semi-sweet chocolate for a sweeter profile.
- Unsalted Butter – This ingredient enhances the moisture of the brownie batter; you can use the same substitution as above.
Whether you’re baking for a crowd or simply treating yourself, these Brown Butter Brookies are sure to impress!
Step‑by‑Step Instructions for Brown Butter Brookies: The Ultimate One-Pan Chocolatey Delight
Step 1: Brown the Butter
Start by melting 1 cup of unsalted butter in a light-colored saucepan over medium heat, stirring constantly for about 5-7 minutes. Keep an eye on it as it turns golden brown and develops a nutty aroma. Once browned, remove from heat and allow it to cool slightly before transferring to the refrigerator for about 1 hour to solidify.
Step 2: Prepare Cookie Dough
In a large mixing bowl, combine the cooled browned butter with ¾ cup granulated sugar and ¾ cup light brown sugar. Beat in 1 large egg until the mixture is smooth and creamy. Gradually mix in 1 ½ cups all-purpose flour, and gently fold in 1 cup of chocolate chips, ensuring an even distribution of sweet chocolatey goodness throughout the cookie dough.
Step 3: Prepare Brownie Batter
In a saucepan, melt 4 ounces of bittersweet chocolate along with ½ cup of unsalted butter over low heat, stirring until melted and smooth. Once slightly cooled, whisk in ½ cup granulated sugar followed by 1 large egg. Slowly add in ½ cup all-purpose flour, mixing just until combined to maintain a fudgy texture for the brownie layer.
Step 4: Layer in Pan
Preheat your oven to 350°F (175°C) while you prepare your baking pan. Grease an 8″x8″ baking pan to prevent sticking. Start by spreading about ⅓ of the brownie batter evenly on the bottom of the pan. Spoon dollops of the cookie dough on top, followed by alternating layers of the remaining brownie and cookie batters, creating a beautiful marbled effect.
Step 5: Bake
Carefully place the layered pan into your preheated oven and bake for 25-30 minutes. Look for the edges to turn golden brown, while the center should still retain a slightly soft texture. If the edges brown too quickly, tent the brookies with foil to prevent burning, ensuring an even bake throughout.
Step 6: Cool
Once baked, remove the pan from the oven and set it on a wire rack to cool for about 10 minutes. After that, gently lift the brookies out of the pan to cool completely. Allowing them to chill fully will ensure cleaner slices when it’s time to cut and serve your delicious Brown Butter Brookies.
How to Store and Freeze Brown Butter Brookies
- Room Temperature: Keep your brookies in an airtight container at room temperature for up to 4 days to maintain their chewy texture and flavor.
- Fridge: If storing longer, place them in the fridge where they will stay fresh for up to 7 days; just ensure they’re in a well-sealed container to avoid drying out.
- Freezer: Wrap the brookies tightly in plastic wrap or foil, then place in a freezer bag for up to 3 months. Thaw overnight in the fridge and warm briefly before serving for that fresh-baked taste.
- Reheating: For a delightful warm treat, simply pop them in the microwave for about 15-20 seconds before enjoying.
What to Serve with Brown Butter Brookies?
Indulging in a luscious dessert like Brown Butter Brookies opens the door to all kinds of delightful pairings that elevate your experience.
- Vanilla Ice Cream: Creamy and cool, it beautifully contrasts the warm, chewy brookies, enhancing the chocolate flavor.
- Hot Fudge Sauce: Rich and decadent, drizzling this over your brookies adds an extra layer of indulgence that chocolate lovers crave.
- Fresh Berries: Tart raspberries or strawberries provide a refreshing bite, cutting through the sweetness and adding vibrant color.
- Espresso or Coffee: A robust cup of espresso perfectly balances the sweetness, making every bite even more delightful.
- Sea Salt Sprinkles: A pinch of flaky sea salt amplifies the chocolate flavors and adds an unexpected savory element that intrigues the palate.
- Nuts: Toasted pecans or walnuts sprinkled atop the brookies introduce a satisfying crunch that contrasts the soft textures.
Imagine serving these pairs at your next gathering—your friends and family will be raving about it for days!
Make Ahead Options
These Brown Butter Brookies are a fantastic choice for meal prep aficionados eager to save time during the week! You can prepare the dough components—both the cookie and brownie layers—up to 24 hours in advance. Just mix and store each layer separately in airtight containers in the refrigerator to maintain their delicious flavors and textures. When ready to bake, simply bring the mixtures to room temperature, layer them as instructed, and pop them in the oven. This ensures a seamless baking experience without sacrificing taste. Trust me; they’ll come out just as delightful, ready to impress your family or guests with minimal effort!
Tips for the Best Brown Butter Brookies
-
Don’t Rush Browning: Allow your butter to brown slowly for the best flavor. Rushing this step can result in a burnt taste instead of the desired nutty aroma.
-
Avoid Overmixing: Gently fold your ingredients together just until combined. Overmixing can lead to tough brookies, so embrace that homemade texture!
-
Chill for Neat Slices: After baking, let your brookies cool completely before slicing. This step helps achieve that perfect, clean-cut marbled effect.
-
Watch the Bake Time: Remove your brookies when the edges are golden brown, but the center remains slightly soft. They will continue to cook as they cool.
-
Experiment with Add-ins: Feel free to customize your brookies with add-ins like nuts or dried fruit to enhance flavor and texture, keeping them crowd-pleasers for everyone!
Brown Butter Brookies Variations
Feel free to sprinkle your own flair into these delicious Brown Butter Brookies—let your creativity shine in every bite!
-
Nut Butters: Swirl in favorite nut butters like Biscoff or peanut butter to add rich, creamy flavor. They create a delightful, nutty surprise in every mouthful!
-
Chocolate Types: Experiment with dark, milk, or even white chocolate chips for varied flavor profiles. Each type offers a unique sweetness and creaminess that can redefine your brookies.
-
Gluten-Free/Vegan Options: Use gluten-free flour and replace the egg with a flax egg and coconut oil for a vegan twist. Enjoy these inclusive options without sacrificing flavor!
-
Add-ins: Introduce dried fruits like cranberries or cherries or a dose of cinnamon for homey warmth. These add-ins not only pop in flavor but also bring a beautiful contrast of textures.
-
Salted Caramel Drizzle: Top your brookies with a salted caramel sauce to elevate the rich flavors. A drizzle of warm caramel adds a luxurious touch and is a definite crowd-pleaser!
-
Spice It Up: Add a pinch of cayenne pepper or espresso powder to intensify the chocolate flavor and bring unexpected warmth. This twist elevates the taste and keeps people guessing what makes them so special!
-
Layered Texture: For an extra crisp crust, sprinkle a handful of crushed cookies or graham crackers on top before baking. This crunchy layer adds a delightful textural contrast to the chewy brookie base.
-
Chocolate Swirls: Create beautiful swirls by lightly mixing melted chocolate into the brownie batter before layering. Not only does it look stunning, but it also enhances the overall chocolatey indulgence!
Dive into these variations, and make every batch of Brown Butter Brookies your own! If you’re also in the mood for quick creamy desserts, check out this easy dessert ideas to complement your baking adventures!
Brown Butter Brookies Recipe FAQs
What type of butter should I use for brown butter?
Use unsalted butter for browning, as it provides richness and allows you to control the saltiness of your recipe. If you only have salted butter, just reduce or omit any additional salt in the dough. Browning unsalted butter creates depth and a nutty flavor essential to the taste of your Brown Butter Brookies.
How should I store my Brown Butter Brookies?
Store the brookies in an airtight container at room temperature for up to 4 days to maintain their chewy texture. If you want to store them longer, you can refrigerate them for up to 7 days. Just ensure the container is well-sealed to prevent any drying out.
Can I freeze Brown Butter Brookies?
Absolutely! Wrap the brookies tightly in plastic wrap or foil and place them in a freezer-safe bag for up to 3 months. When you’re ready to enjoy them, thaw them in the fridge overnight and warm them in the microwave for about 15-20 seconds for that fresh-baked feel.
How do I ensure my brookies don’t turn out tough?
To prevent tough brookies, avoid overmixing the batter. Mix just until the ingredients are combined, and remember that a little crumbly texture is okay! Additionally, keep an eye on the baking time, removing them from the oven when the edges are golden brown and the center is slightly soft.
What if I want to make these brookies vegan?
You can easily adapt this recipe for a vegan option! Substitute the large egg with a flax egg (1 tablespoon flaxseed meal mixed with 2.5 tablespoons water, let sit for 5 minutes) and replace the butter with coconut oil or dairy-free butter. You’ll still achieve that wonderfully rich flavor and texture!
Are there any allergy considerations for this recipe?
Yes! If you’re making these brookies for guests with allergies, be mindful of common allergens like eggs, dairy, and gluten. For a gluten-free version, switch the all-purpose flour with a gluten-free blend. And for those avoiding eggs and dairy, use the aforementioned vegan substitutions for a delicious and safe treat.
Feel free to experiment and enjoy creating these Brown Butter Brookies with loved ones—everyone will be asking for seconds!
Brown Butter Brookies: Irresistible One-Pan Delight
Ingredients
Equipment
Method
- Brown the Butter: Melt 1 cup of unsalted butter in a saucepan over medium heat, stirring for 5-7 minutes until golden brown. Remove from heat and cool slightly, then refrigerate for 1 hour to solidify.
- Prepare Cookie Dough: Combine cooled browned butter with ¾ cup granulated sugar and ¾ cup light brown sugar. Beat in 1 large egg. Gradually mix in 1 ½ cups all-purpose flour and fold in 1 cup chocolate chips.
- Prepare Brownie Batter: Melt 4 oz of bittersweet chocolate with ½ cup unsalted butter over low heat. Once cooled, whisk in ½ cup granulated sugar and 1 large egg. Slowly mix in ½ cup all-purpose flour.
- Layer in Pan: Grease an 8"x8" pan. Spread ⅓ of the brownie batter, add cookie dough dollops, then layer with remaining brownie and cookie batters.
- Bake: Preheat oven to 350°F. Bake for 25-30 minutes until edges are golden and center slightly soft.
- Cool: Remove from oven and cool on a wire rack for 10 minutes before lifting out to cool completely.