As the brisk air signals the arrival of fall, my kitchen transforms into an aromatic sanctuary filled with the scent of simmering apple cider. It’s a gentle reminder of the warmth and nostalgia this season brings, and my latest obsession—a Creamy Apple Cider Cheesecake—captures that essence perfectly. This delightful dessert showcases the tangy notes of reduced apple cider, creating a refreshing departure from traditional pumpkin treats. Not only is it a quick and easy recipe to whip up, but it also offers a creamy texture that will have everyone asking for seconds. Whether you’re hosting a cozy gathering or simply indulging yourself, this cheesecake promises to wrap you in autumn’s embrace with each delicious bite. Ready to elevate your dessert game this season? Let’s dive into the layers of flavor waiting for you!

Why is this cheesecake a must-try?
Irresistible Fall Flavor: The fresh apple cider infuses this cheesecake with a delightful tang, setting it apart from traditional desserts.
Easy to Make: With straightforward instructions and simple ingredients, you’ll have a delicious dessert ready in no time.
Creamy Delight: Thanks to the sour cream, each slice is perfectly smooth and rich, making for a truly indulgent treat.
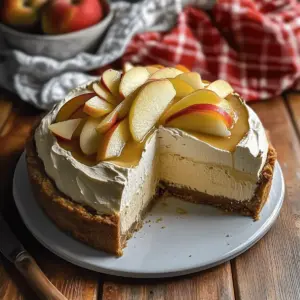
Versatile Toppings: Whether drizzled with caramel or served with fresh apples, this cheesecake adapts to your taste and mood.
Crowd-Pleasing Dessert: Perfect for gatherings, this Apple Cider Cheesecake will have both friends and family raving about your culinary skills!
Apple Cider Cheesecake Ingredients
For the Crust
• Cookie Crumbs (Digestive or Graham Crackers) – These create a sweet, crunchy base; gluten-free options can be explored for a delicious twist.
• Butter – Melted butter binds the crumbs for a firm and flavorful crust.
• Powdered Sugar – Adds a hint of sweetness to the crust; can be adjusted based on preference and sweetness of the cookies.
For the Filling
• Fresh Apple Cider – This provides the primary flavor and moisture, with Honeycrisp being the preferred choice for its tartness.
• Cream Cheese – Essential for a creamy structure; ensure it’s at room temperature for smooth mixing.
• Sour Cream – Adds lightness and enhances creaminess; always use full-fat for the best results.
• Brown Sugar – Gives a wonderful sweetness with caramel notes; both light and dark versions work interchangeably.
• Vanilla Extract – Always use pure to elevate the overall flavor profile.
• Cinnamon – Adds warmth and cozy spice; adjust per your taste preference.
• Eggs – Important for structure; be sure they’re at room temperature for better blending.
• All-Purpose Flour – Recently added to help the cheesecake set firmly; ensures a great texture.
For the Mulling Spices (Optional)
• Cloves, Allspice, and Nutmeg – These can be included to bring added warmth and complexity to your filling.
With this Apple Cider Cheesecake, you’re well on your way to creating a festive fall dessert that will impress everyone at your table!
Step‑by‑Step Instructions for Apple Cider Cheesecake
Step 1: Reduce the Cider
Begin by pouring 3 cups of fresh apple cider into a saucepan. Bring it to a gentle boil over medium heat, adding optional mulling spices if desired. Reduce the heat to low and let it simmer for about 30–45 minutes, stirring occasionally, until it thickens and reduces to roughly 1/3 cup. Once done, remove from heat and allow it to cool completely.
Step 2: Preheat the Oven
While your cider is cooling, preheat your oven to 350°F (175°C). Prepare a 9-inch springform pan by lining the bottom with parchment paper. This will ensure that your creamy Apple Cider Cheesecake comes out smoothly after baking, making it easier to serve and impress your guests.
Step 3: Make the Crust
In a mixing bowl, combine your cookie crumbs with melted butter, a pinch of salt, and powdered sugar. Using a fork or your hands, mix until it resembles wet sand. Press this mixture firmly into the bottom of the prepared springform pan to create a solid crust. Bake in the preheated oven for 10 minutes until lightly golden, then remove and let it cool while you prepare the filling.
Step 4: Prepare the Filling
In a stand mixer, add the room-temperature cream cheese. Beat on medium speed until it becomes smooth and creamy, about 2-3 minutes. Gradually incorporate the brown sugar, mixing until well combined. Next, mix in the cooled reduced apple cider, sour cream, vanilla extract, and cinnamon. Blend until the mixture is uniform and creamy.
Step 5: Incorporate Eggs and Flour
With the mixer on low speed, add the eggs one at a time, ensuring each egg is fully incorporated before adding the next. Once all the eggs are mixed in, sprinkle in the all-purpose flour and mix just until combined. This step ensures your Apple Cider Cheesecake will have the perfect texture without overbeating.
Step 6: Bake the Cheesecake
Pour the filling into the cooled crust, smoothing the top with a spatula. Place the springform pan inside a larger baking dish and fill the outer dish halfway with hot water (this is your water bath). This method helps prevent cracks. Bake in the preheated oven for about 80–90 minutes, or until the edges look set and the center is slightly jiggly.
Step 7: Cool Gradually
Once the baking time is complete, turn off the oven but leave the cheesecake inside with the door cracked open for 30 minutes. This gradual cooling method prevents the cheesecake from sinking. Afterward, let it sit at room temperature for an additional 15 minutes before transferring it to the refrigerator. Chill for at least 8 hours, or overnight, to fully set and enhance flavors.

Expert Tips for Apple Cider Cheesecake
-
Perfect Water Bath: A water bath helps prevent cracks and ensures an even bake. Wrap your pan tightly with foil to avoid water leakage.
-
Cool Slowly: Gradually cooling the cheesecake in the oven is crucial. It reduces the risk of sinking and maintains that dreamy texture.
-
Egg Incorporation: Be gentle when adding eggs; overbeating can lead to cracks in your Apple Cider Cheesecake. Mix just until combined.
-
Room Temperature Ingredients: Ensure all dairy ingredients, especially cream cheese and eggs, are at room temperature. This creates a smoother batter and better incorporation.
-
Flavor Customization: Don’t shy away from spices! Adding cloves or nutmeg can elevate the flavor, making each bite uniquely yours.
Make Ahead Options
These Creamy Apple Cider Cheesecakes are perfect for busy weeknights and meal prep lovers! You can prepare the crust up to 3 days in advance; simply store it in an airtight container at room temperature. The filling can be mixed and kept in the refrigerator for up to 24 hours before baking, helping to save time on the day of serving. Just make sure to let the filling come to room temperature before pouring it into the crust for even baking. By pre-prepping these components, you’ll enjoy a delicious dessert with minimal effort, and it’ll be just as creamy and delightful when it’s time to indulge!
Apple Cider Cheesecake Variations
Feel free to get creative and customize this cheesecake to make it your own with these delightful ideas!
-
Spice Variations:
Sprinkle in ground cloves, nutmeg, or allspice to add layers of warm, aromatic spices that echo the autumn season. -
Gluten-Free Crust:
Swap graham crackers for gluten-free cookie crumbs or almond flour for a delicious crust that everyone can enjoy. -
Simple Caramel Drizzle:
Elevate each slice with a rich caramel sauce poured over the cheesecake right before serving for a decadent treat. -
Apple Compote Topping:
Create a quick apple compote by simmering diced apples with cinnamon and a touch of sugar. Spoon it over your cheesecake for an extra fruity punch. -
Cinnamon Sugar Sprinkle:
Mix cinnamon with a little sugar and dust it over the top for a sweet, crunchy finish that adds texture and warmth. -
Flavor Boost with Apple Puree:
Swap some of the cream cheese for homemade apple puree for a deeper apple flavor and added moisture in every bite. -
Yogurt Instead of Sour Cream:
For a tangy twist, use Greek yogurt in place of sour cream, which also adds a boost of protein. -
Add a Kick:
If you enjoy a bit of heat, consider incorporating a tiny pinch of cayenne pepper to the crust for a surprising flavor contrast that plays well with the sweetness of the cheesecake.
These simple adaptations can turn your Apple Cider Cheesecake into a unique, personalized dessert for any occasion! If you’re looking for more ideas, try pairing with some freshly sliced apples or a side of apple cider caramel ice cream to complete your cozy fall experience!
What to Serve with Creamy Apple Cider Cheesecake?
Elevate your dessert experience with perfect pairings that bring warmth and autumnal joy to every bite.
-
Freshly Sliced Apples: Crisp and juicy apples add a refreshing crunch that beautifully contrasts the creamy cheesecake, enhancing its flavors.
-
Apple Cider Caramel Ice Cream: A scoop of this rich ice cream with caramel notes complements the cheesecake, intensifying the apple essence and adding creaminess.
-
Spiced Whipped Cream: Lightly spiced whipped cream provides an airy finish, enhancing the warmth of cinnamon and nutmeg in the cheesecake.
-
Maple Syrup Drizzle: A drizzle of pure maple syrup adds a lovely sweetness that marvelously intertwines with the cheesecake’s tart notes, making each bite divine.
-
Candied Pecans: These sweet, crunchy nuts offer a delightful crunch and buttery flavor, a perfect match for the silky smoothness of the cheesecake.
-
Chai Tea: A warm cup of chai tea, with its spices and creamy texture, is the ideal drink pairing, elevating the entire dessert experience.
Indulging in these delightful accompaniments will take your Creamy Apple Cider Cheesecake to new levels of deliciousness and help you savor the spirit of fall!
How to Store and Freeze Apple Cider Cheesecake
Fridge: Keep your cheesecake tightly covered with plastic wrap or foil in the refrigerator, where it can stay fresh for up to 3-4 days.
Freezer: For long-term storage, wrap individual slices in plastic wrap and then place them in an airtight container. They can be frozen for up to 2 months.
Thawing: To enjoy your frozen Apple Cider Cheesecake, simply transfer it to the fridge 6-8 hours before serving to thaw gently.
Reheating: If you prefer a warm slice, gently warm individual portions in the microwave for 15-20 seconds, just until slightly warm—not hot—to maintain its creamy texture.

Apple Cider Cheesecake Recipe FAQs
How do I select the best apple cider for this cheesecake?
Absolutely! For the best flavor, I recommend using fresh apple cider, ideally from Honeycrisp apples for their tartness. Avoid ciders that are overly sweet or heavily processed, as they can alter the cheesecake’s taste. Always look for ciders that are clear and free from sediment for a cleaner finish.
What’s the best way to store my cheesecake?
Very! Your apple cider cheesecake should be tightly covered with plastic wrap or foil in the refrigerator. It will remain fresh for up to 3-4 days. If you have leftovers, it’s a great make-ahead dessert for gatherings, so feel free to prepare it before an event!
Can I freeze leftover cheesecake?
Absolutely! To freeze your apple cider cheesecake, wrap individual slices in plastic wrap and then place them in an airtight container. They can be stored in the freezer for up to 2 months. Just remember to transfer them to the refrigerator about 6-8 hours before you plan to serve for a gentle thaw.
What if my cheesecake cracks while baking?
No worries! If your apple cider cheesecake cracks, it may have been due to overbeating the eggs or baking at too high a temperature. To prevent this, keep ingredients at room temperature and use a water bath during baking. If it does crack, don’t fret! You could top it with whipped cream or a drizzle of caramel sauce to hide imperfections—delicious and beautiful!
Are there any dietary considerations with this cheesecake?
Definitely! If you’re catering to dietary needs, you can make this cheesecake gluten-free by using gluten-free cookie crumbs for the crust. Always double-check whether any of your guests have allergies to dairy or eggs, as the cream cheese and eggs are crucial to the recipe’s integrity.
What can I substitute for fresh apple cider if I can’t find it?
If you can’t find fresh apple cider, you can use any tart cider or even unsweetened apple juice as a substitute. For the best result, consider adding a splash of lemon juice to mimic that tanginess—use about 1 tablespoon for every cup of juice. This way, you’ll still capture the essence of that delightful apple flavor!

Deliciously Creamy Apple Cider Cheesecake for Fall Bliss
Ingredients
Equipment
Method
- Step 1: Reduce the Cider. Pour 3 cups of fresh apple cider into a saucepan and bring to a gentle boil. Add optional mulling spices if desired. Reduce heat and let simmer for 30-45 minutes until thickened to about 1/3 cup. Cool completely.
- Step 2: Preheat the Oven. Preheat your oven to 350°F (175°C) and prepare a 9-inch springform pan by lining the bottom with parchment paper.
- Step 3: Make the Crust. Combine cookie crumbs, melted butter, powdered sugar, and a pinch of salt in a bowl until resembling wet sand. Press into the bottom of the prepared pan and bake for 10 minutes until lightly golden.
- Step 4: Prepare the Filling. In a stand mixer, beat room-temperature cream cheese until smooth. Gradually add brown sugar and mix well. Incorporate cooled apple cider, sour cream, vanilla extract, and cinnamon until creamy.
- Step 5: Incorporate Eggs and Flour. With the mixer on low, add eggs one at a time. Once all are incorporated, sprinkle in flour and mix until just combined.
- Step 6: Bake the Cheesecake. Pour filling into the cooled crust, smoothing the top. Bake in a water bath for about 80-90 minutes until edges are set and center is slightly jiggly.
- Step 7: Cool Gradually. Turn off the oven, let the cheesecake cool inside with the door cracked for 30 minutes, then sit at room temperature for 15 minutes before chilling in the refrigerator at least 8 hours.