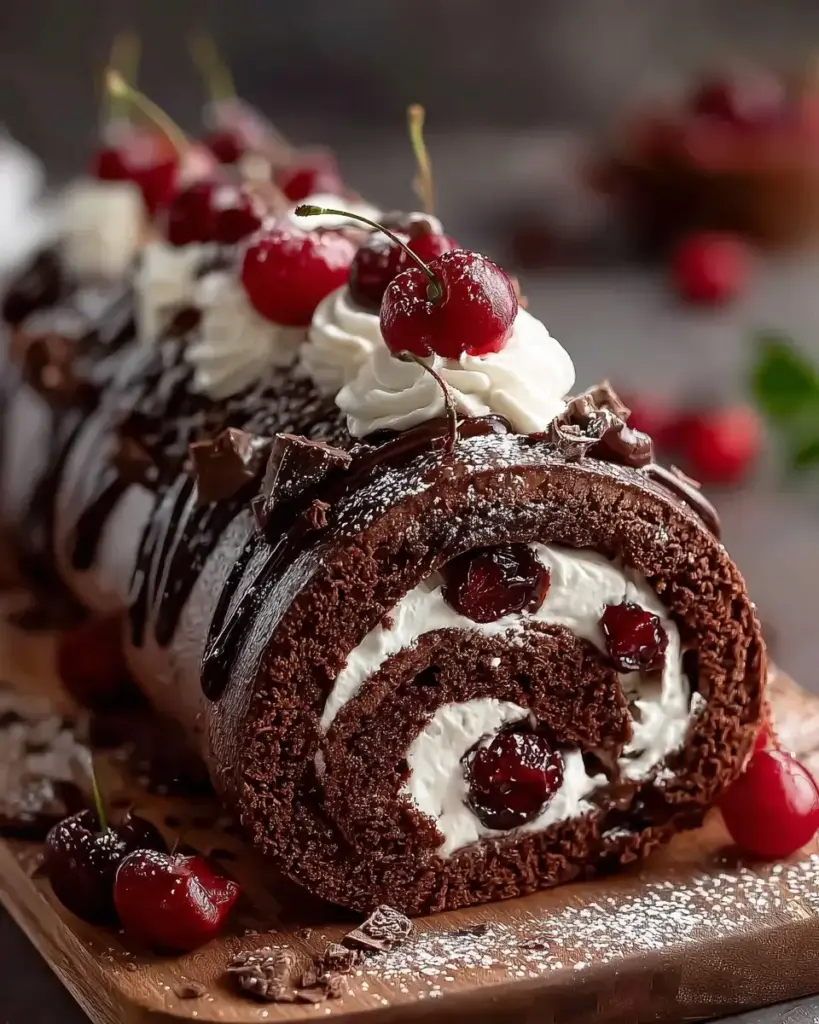
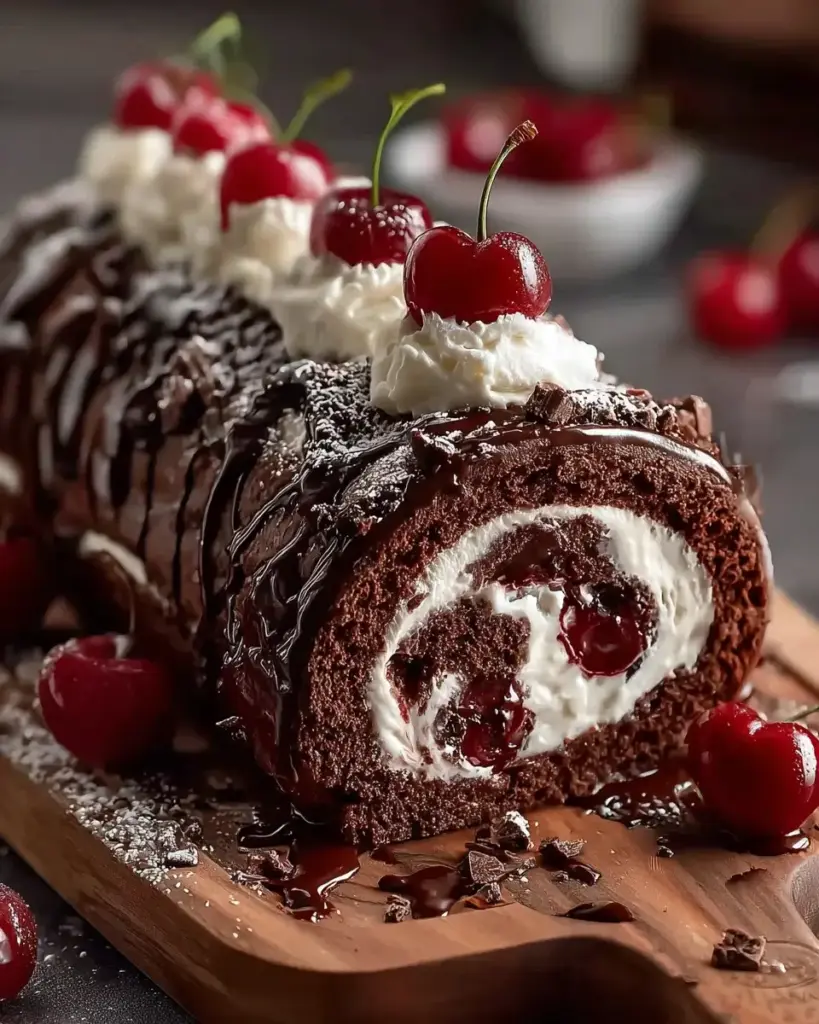
Introduction to Chocolate Cherry Roll
There’s something magical about desserts that bring back memories, isn’t there? The Chocolate Cherry Roll is one of those delightful treats that can transport you back to simpler times. Picture a warm kitchen filled with the rich aroma of chocolate, mingling with the sweet scent of cherries. This recipe is perfect for those busy days when you want to impress your loved ones without spending hours in the kitchen. With just a few simple ingredients and steps, you can create a stunning dessert that’s sure to be the star of any gathering. Let’s dive into this delicious adventure!
Why You’ll Love This Chocolate Cherry Roll
This Chocolate Cherry Roll is a game-changer for dessert lovers. It’s incredibly easy to whip up, making it perfect for those last-minute gatherings or family dinners. The combination of rich chocolate and tart cherries creates a flavor explosion that will leave everyone asking for seconds. Plus, it’s visually stunning, so you can impress your guests without breaking a sweat. Trust me, this dessert will quickly become a favorite in your home!
Ingredients for Chocolate Cherry Roll
Gathering the right ingredients is the first step to creating your Chocolate Cherry Roll masterpiece. Here’s what you’ll need:
- All-purpose flour: The backbone of your cake, providing structure and texture.
- Granulated sugar: Sweetens the cake and helps it rise, giving it that delightful fluffiness.
- Unsweetened cocoa powder: Adds rich chocolate flavor, making this dessert a chocolate lover’s dream.
- Baking powder and baking soda: These leavening agents ensure your cake rises perfectly, creating a light and airy texture.
- Salt: Just a pinch enhances the flavors and balances the sweetness.
- Large eggs: They bind the ingredients together and add moisture, contributing to the cake’s richness.
- Whole milk: Adds creaminess and helps create a tender crumb.
- Vegetable oil: Keeps the cake moist and adds a subtle richness.
- Vanilla extract: A must-have for flavor depth, enhancing the overall taste of the cake.
- Cherry pie filling: The star of the show! This sweet and tart filling brings a burst of flavor to each bite.
- Heavy whipping cream: Essential for the luscious whipped cream layer that complements the chocolate and cherries.
- Powdered sugar: Sweetens the whipped cream and helps it hold its shape.
- Chocolate shavings: Optional, but they add a touch of elegance and extra chocolatey goodness for garnish.
For those looking to mix things up, consider substituting the cherry pie filling with raspberry or strawberry for a fruity twist. You can find all the exact measurements at the bottom of the article, ready for printing!
How to Make Chocolate Cherry Roll
Now that you have all your ingredients ready, let’s get into the fun part—making your Chocolate Cherry Roll! Follow these simple steps, and you’ll have a stunning dessert that’s sure to impress.
Step 1: Preheat and Prepare
First things first, preheat your oven to 350°F (175°C). This ensures your cake bakes evenly. While that’s heating up, grab a 15×10-inch jelly roll pan. Grease it well and line it with parchment paper, leaving some overhang. This little trick will make it a breeze to remove the cake later.
Step 2: Mix Dry Ingredients
In a large mixing bowl, whisk together the all-purpose flour, granulated sugar, cocoa powder, baking powder, baking soda, and salt. Make sure everything is well combined. This step is crucial for a uniform texture in your Chocolate Cherry Roll. The dry ingredients are the foundation of your cake, so give them a good mix!
Step 3: Combine Wet Ingredients
In another bowl, beat together the eggs, whole milk, vegetable oil, and vanilla extract until smooth. This mixture adds moisture and richness to your cake. Gradually pour this wet mixture into the dry ingredients, stirring gently until just combined. Be careful not to overmix; a few lumps are perfectly fine!
Step 4: Combine and Bake
Now, pour the batter into your prepared pan, spreading it evenly. Bake for 12-15 minutes, or until a toothpick inserted in the center comes out clean. Keep an eye on it; you want a moist cake, not a dry one. The aroma of chocolate will fill your kitchen, and trust me, it’s heavenly!
Step 5: Roll the Cake
Once the cake is done, remove it from the oven and immediately invert it onto the prepared kitchen towel dusted with powdered sugar. Carefully peel off the parchment paper. Starting from one short end, roll the cake up tightly in the towel. This helps it maintain its shape. Let it cool completely in this rolled position for about 30-45 minutes.
Step 6: Fill and Roll Again
After the cake has cooled, gently unroll it. Spread the cherry pie filling evenly over the surface, leaving a small border around the edges. Next, whip the heavy cream with powdered sugar and vanilla extract until stiff peaks form. Spread this luscious whipped cream over the cherry filling. Now, roll the cake back up carefully, this time without the towel. Place it seam-side down on a serving platter.
Step 7: Garnish and Serve
To finish, garnish your Chocolate Cherry Roll with chocolate shavings if you like. This adds a touch of elegance and extra chocolatey goodness. Slice it up and serve chilled or at room temperature. Your guests will be in awe of this beautiful dessert!
Tips for Success
- Always preheat your oven for even baking.
- Use a clean kitchen towel dusted with powdered sugar to prevent sticking.
- Don’t overmix the batter; a few lumps are okay!
- Let the cake cool completely before filling to avoid a soggy roll.
- Experiment with different fruit fillings for a unique twist.
Equipment Needed
- 15×10-inch jelly roll pan: A must for baking; a rimmed baking sheet can work in a pinch.
- Parchment paper: Essential for easy cake removal; aluminum foil can be a substitute.
- Mixing bowls: Use any size; just ensure they’re large enough for your ingredients.
- Whisk: A hand whisk is great; an electric mixer speeds things up.
- Kitchen towel: A clean dish towel works perfectly for rolling the cake.
Variations
- Fruit Fillings: Swap the cherry pie filling for raspberry, strawberry, or blueberry for a different fruity flavor.
- Gluten-Free Option: Use a gluten-free all-purpose flour blend to make this dessert suitable for those with gluten sensitivities.
- Vegan Twist: Substitute eggs with flaxseed meal and use almond milk and coconut cream for a dairy-free version.
- Nutty Addition: Add chopped nuts like walnuts or pecans to the filling for an extra crunch.
- Chocolate Variations: Experiment with dark chocolate cocoa powder for a richer flavor or white chocolate for a sweeter twist.
Serving Suggestions
- Pair your Chocolate Cherry Roll with a scoop of vanilla ice cream for a delightful contrast.
- Serve alongside fresh berries to enhance the fruity flavor.
- A drizzle of chocolate sauce adds an extra touch of indulgence.
- For drinks, consider a rich coffee or a sweet dessert wine.
FAQs about Chocolate Cherry Roll
As you embark on your journey to create the perfect Chocolate Cherry Roll, you might have a few questions. Here are some common queries that can help you along the way:
Can I use fresh cherries instead of cherry pie filling?
Absolutely! Fresh cherries can be a delightful alternative. Just make sure to pit and chop them, then mix with a bit of sugar to enhance their sweetness. This will give your Chocolate Cherry Roll a fresh twist!
How do I store leftovers?
To keep your Chocolate Cherry Roll fresh, store it in an airtight container in the refrigerator. It should last for about 3-4 days. Just remember to slice it before serving for easy access!
Can I make this dessert ahead of time?
Yes, you can! The Chocolate Cherry Roll can be made a day in advance. Just keep it wrapped tightly in plastic wrap in the fridge. This allows the flavors to meld beautifully, making it even more delicious!
What can I substitute for heavy whipping cream?
If you’re looking for a lighter option, you can use whipped topping or even Greek yogurt. For a dairy-free version, coconut cream works wonderfully and adds a subtle coconut flavor to your Chocolate Cherry Roll.
Is this recipe suitable for special diets?
This Chocolate Cherry Roll can be adapted for various dietary needs. Use gluten-free flour for a gluten-free version, or substitute eggs with flaxseed meal for a vegan option. The possibilities are endless!
Final Thoughts
Creating a Chocolate Cherry Roll is more than just baking; it’s about crafting memories and sharing joy with those you love. The rich chocolate paired with the tart cherries creates a delightful harmony that dances on your taste buds. Each slice is a celebration, perfect for gatherings or a cozy night in. As you roll up this dessert, you’re not just rolling cake; you’re rolling in happiness. So, gather your ingredients, invite some friends, and let this Chocolate Cherry Roll be the star of your next dessert adventure. Trust me, it’s a treat you won’t forget!
Chocolate Cherry Roll: A Delightful Dessert Recipe!
Ingredients
Method
- Preheat your oven to 350°F (175°C). Grease and line a 15×10-inch jelly roll pan with parchment paper, allowing some overhang for easy removal later.
- In a large mixing bowl, whisk together the flour, granulated sugar, cocoa powder, baking powder, baking soda, and salt until well combined.
- In another bowl, beat the eggs, milk, vegetable oil, and 2 teaspoons of vanilla extract until smooth. Gradually add the wet ingredients to the dry ingredients, mixing until just combined.
- Pour the batter into the prepared pan, spreading it evenly. Bake for 12-15 minutes, or until a toothpick inserted in the center comes out clean.
- While the cake is baking, prepare a clean kitchen towel by dusting it with powdered sugar. Once the cake is done, remove it from the oven and immediately invert it onto the prepared towel. Carefully peel off the parchment paper.
- Starting from one short end, roll the cake up tightly in the towel. Let it cool completely in this rolled position, about 30-45 minutes.
- Once cooled, unroll the cake gently. Spread the cherry pie filling evenly over the surface, leaving a small border around the edges.
- In a separate bowl, whip the heavy cream with the powdered sugar and 1 teaspoon of vanilla extract until stiff peaks form. Spread the whipped cream over the cherry filling.
- Roll the cake back up carefully without the towel. Place seam-side down on a serving platter.
- Garnish with chocolate shavings if desired. Slice and serve chilled or at room temperature.
Nutrition
Notes
- For a richer flavor, add a splash of almond extract to the whipped cream.
- You can also substitute the cherry pie filling with raspberry or strawberry for a different fruit flavor.