Introduction to No-Bake Oreo Cheesecake Recipe
What Makes No-Bake Oreo Cheesecake Special?
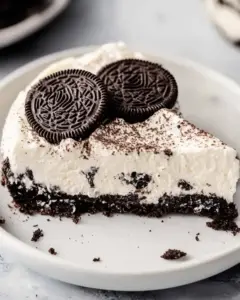
No-bake Oreo cheesecake is a delightful dessert that combines the rich flavors of cream cheese and the beloved Oreo cookie. What sets this cheesecake apart is its simplicity. You don’t need an oven, which means less hassle and more time to enjoy your creation. The creamy filling, paired with a crunchy Oreo crust, creates a perfect balance of textures. Plus, it’s incredibly easy to make, making it a favorite for both novice and experienced bakers alike.
Why You Should Try This No-Bake Oreo Cheesecake Recipe
If you’re looking for a dessert that impresses without the stress, this no-bake Oreo cheesecake recipe is for you. It’s perfect for gatherings, parties, or just a sweet treat at home. The best part? You can prepare it ahead of time! Just let it chill in the fridge, and it’s ready to serve when you are. With its rich flavor and creamy texture, this cheesecake is sure to be a hit with family and friends. So, grab your ingredients and get ready to whip up a dessert that everyone will love!
Ingredients for No-Bake Oreo Cheesecake Recipe
To create this delicious no-bake Oreo cheesecake, you’ll need a few simple ingredients. Each one plays a vital role in achieving that creamy texture and delightful flavor. Here’s what you’ll need:
- 8 ounces cream cheese, softened
- 1 cup powdered sugar
- 1 teaspoon vanilla extract
- 1 cup heavy whipping cream
- 15 Oreo cookies, crushed (plus extra for garnish)
- 1/4 cup unsalted butter, melted
- 1 cup sour cream
- 1/2 cup chocolate syrup (optional)
These ingredients come together to create a rich and creamy cheesecake that’s sure to please. The cream cheese provides a smooth base, while the crushed Oreos add a delightful crunch. The heavy whipping cream gives it that light and airy texture, making each bite a treat. If you want to add a little extra sweetness, the chocolate syrup is a great option. Feel free to get creative with your toppings and garnishes!
Step-by-Step Preparation of No-Bake Oreo Cheesecake Recipe
Step 1: Prepare the Crust
To start, you’ll need to prepare the crust. In a medium bowl, combine the crushed Oreo cookies with the melted butter. Mix them together until the cookies are evenly coated. This mixture will form the base of your cheesecake. Next, press the cookie mixture firmly into the bottom of a 9-inch springform pan. Make sure it’s packed tightly to create a sturdy crust. This step is crucial, as it will hold the cheesecake filling perfectly.
Step 2: Make the Cheesecake Filling
Now, let’s move on to the cheesecake filling. In a large mixing bowl, beat the softened cream cheese using an electric mixer. Mix it until it’s smooth and creamy. Gradually add the powdered sugar and vanilla extract, continuing to mix until everything is well combined. This will create a sweet and flavorful base for your cheesecake. The cream cheese should be free of lumps for the best texture.
Step 3: Combine and Layer
In another bowl, whip the heavy cream until stiff peaks form. This means the cream should hold its shape when you lift the beaters. Gently fold the whipped cream into the cream cheese mixture. Be careful not to deflate the whipped cream; you want to keep that light and airy texture. Once combined, add the sour cream and the remaining crushed Oreos. Fold everything together gently until it’s well mixed. This filling is what makes your cheesecake so delicious!
Step 4: Chill the Cheesecake
After combining the filling, pour it over the prepared crust in the springform pan. Use a spatula to smooth the top. Cover the cheesecake with plastic wrap and place it in the refrigerator. It needs to chill for at least 4 hours, but overnight is even better. This chilling time allows the cheesecake to set properly, making it easier to slice and serve.
Step 5: Serve and Enjoy
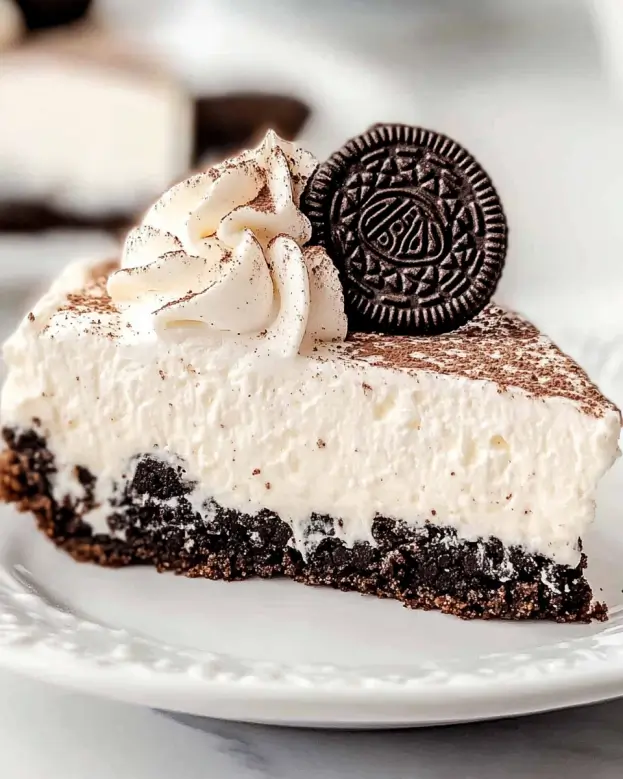
Once your cheesecake has chilled and set, it’s time to serve! Carefully remove the sides of the springform pan. If desired, drizzle chocolate syrup over the top for an extra touch of sweetness. Garnish with additional crushed Oreos for a beautiful presentation. Slice into pieces and enjoy this delightful no-bake Oreo cheesecake with family and friends. It’s sure to be a crowd-pleaser!
Variations of No-Bake Oreo Cheesecake Recipe
Different Flavors to Try
If you love the classic no-bake Oreo cheesecake, you might want to explore some exciting flavor variations. Each twist brings a unique taste that can surprise and delight your guests. Here are a few ideas:
- Mint Oreo Cheesecake: Add a few drops of peppermint extract to the filling. This will give your cheesecake a refreshing minty flavor that pairs perfectly with the chocolatey Oreos.
- Peanut Butter Oreo Cheesecake: Mix in half a cup of creamy peanut butter into the cheesecake filling. This adds a rich, nutty flavor that complements the sweetness of the Oreos.
- Chocolate Oreo Cheesecake: Use chocolate-flavored Oreos for both the crust and filling. This variation intensifies the chocolate flavor, making it a dream for chocolate lovers.
- Strawberry Oreo Cheesecake: Fold in some crushed strawberries or strawberry puree into the filling. This fruity twist adds a burst of freshness to the rich cheesecake.
These variations are simple to make and can be customized to suit your taste. Feel free to experiment with different flavors and find your favorite combination!
Alternative Crust Options
The crust is an essential part of any cheesecake, and there are many ways to switch it up! Here are some alternative crust options that can add a new dimension to your no-bake Oreo cheesecake:
- Graham Cracker Crust: Replace the Oreo crust with a classic graham cracker crust. Simply crush graham crackers and mix them with melted butter, then press into the pan.
- Chocolate Cookie Crust: Use chocolate wafer cookies instead of Oreos for a deeper chocolate flavor. This crust will enhance the overall richness of the cheesecake.
- Nut Crust: For a gluten-free option, consider using ground nuts like almonds or pecans mixed with melted butter. This adds a crunchy texture and a nutty flavor.
- Shortbread Crust: A buttery shortbread cookie crust can provide a delightful contrast to the creamy filling. Just crush the cookies and mix with butter to form the base.
These alternative crusts can make your no-bake Oreo cheesecake even more special. Choose one that fits your flavor profile or dietary needs, and enjoy a delicious twist on this classic dessert!
Cooking Note for No-Bake Oreo Cheesecake Recipe
When making a no-bake Oreo cheesecake, a few cooking notes can help ensure your dessert turns out perfectly every time. First, always use softened cream cheese. This makes it easier to blend and results in a smoother filling. If your cream cheese is too cold, it can create lumps in your mixture, which you want to avoid.
Next, be gentle when folding in the whipped cream. This step is crucial for maintaining the light and airy texture of the cheesecake. If you mix too vigorously, you may deflate the whipped cream, leading to a denser filling.
Additionally, chilling time is essential. While you can chill the cheesecake for a minimum of 4 hours, letting it sit overnight will enhance the flavors and improve the texture. The longer it chills, the firmer it will become, making it easier to slice.
Lastly, if you plan to add toppings like chocolate syrup or extra crushed Oreos, do so just before serving. This keeps the toppings fresh and prevents them from becoming soggy. With these tips in mind, you’re on your way to creating a delicious no-bake Oreo cheesecake that everyone will love!
Serving Suggestions for No-Bake Oreo Cheesecake Recipe
Ideal Pairings and Garnishes
When it comes to serving your no-bake Oreo cheesecake, the right pairings and garnishes can elevate the experience. Here are some delightful suggestions to enhance your dessert:
- Fresh Berries: Add a handful of fresh strawberries, raspberries, or blueberries on top of the cheesecake. Their natural sweetness and tartness create a beautiful contrast with the rich, creamy filling.
- Whipped Cream: A dollop of freshly whipped cream on each slice adds a light and airy touch. You can even pipe it on for a decorative flair!
- Chocolate Shavings: For a touch of elegance, sprinkle chocolate shavings over the cheesecake. This adds a nice visual appeal and a bit of extra chocolate flavor.
- Caramel Drizzle: A drizzle of caramel sauce can complement the chocolatey notes of the cheesecake. It adds a sweet, buttery flavor that pairs wonderfully.
- Mint Leaves: For a refreshing touch, garnish with fresh mint leaves. They not only look great but also add a hint of freshness to each bite.
These garnishes not only enhance the presentation but also add layers of flavor to your no-bake Oreo cheesecake. Feel free to mix and match these suggestions based on your preferences and the occasion. Whether it’s a casual family dinner or a festive gathering, these serving ideas will surely impress your guests!
Tips for Perfecting Your No-Bake Oreo Cheesecake Recipe
Common Mistakes to Avoid
Making a no-bake Oreo cheesecake can be simple, but there are a few common mistakes to watch out for. First, ensure your cream cheese is softened properly. If it’s too cold, it won’t blend smoothly, leading to lumps in your filling. Always let it sit at room temperature for about 30 minutes before mixing.
Another mistake is overmixing the whipped cream. When you whip the cream, stop as soon as stiff peaks form. Overmixing can turn it into butter, which is not what you want for a light cheesecake. Gently fold the whipped cream into the cream cheese mixture to keep that airy texture.
Also, don’t skip the chilling time! While it might be tempting to serve it right away, allowing the cheesecake to chill for at least 4 hours (or overnight) is crucial. This helps it set properly, making it easier to slice and enhancing the flavors.
Lastly, be careful with the crust. Make sure to press it down firmly in the pan. A loose crust can crumble when you try to slice the cheesecake. Take your time with this step to ensure a sturdy base for your delicious filling.
Storage Tips for Leftovers
If you have any leftovers (which is rare with this tasty treat!), storing them properly is key to maintaining freshness. First, cover the cheesecake tightly with plastic wrap or aluminum foil. This prevents it from absorbing any odors from the fridge.
For best results, store the cheesecake in the refrigerator. It can last for up to 5 days when stored correctly. If you want to keep it longer, consider freezing it. To freeze, slice the cheesecake into individual pieces and wrap each slice in plastic wrap. Then, place them in an airtight container or freezer bag. This way, you can enjoy a slice whenever you crave it!
When you’re ready to eat a frozen slice, simply transfer it to the fridge to thaw overnight. Avoid refreezing thawed cheesecake, as it can affect the texture. With these storage tips, you can savor your no-bake Oreo cheesecake for days to come!
Breakdown of Time for No-Bake Oreo Cheesecake Recipe
Prep Time
The prep time for this no-bake Oreo cheesecake recipe is quite manageable. You’ll need about 20 to 30 minutes to gather your ingredients and prepare the crust and filling. This includes crushing the Oreo cookies, mixing the ingredients, and assembling the cheesecake. It’s a quick process that allows you to enjoy the fun of baking without spending hours in the kitchen!
Chilling Time
After you’ve prepared the cheesecake, it’s essential to let it chill. The chilling time is crucial for the cheesecake to set properly. You should refrigerate it for at least 4 hours. However, for the best results, letting it chill overnight is highly recommended. This extra time allows the flavors to meld beautifully, resulting in a richer taste and a firmer texture.
Total Time
In total, you can expect to spend about 20 to 30 minutes on preparation, plus a minimum of 4 hours for chilling. If you choose to let it chill overnight, the total time will extend to about 24 hours. This makes it a perfect dessert to prepare ahead of time for parties or gatherings. Just remember to plan accordingly so you can enjoy your delicious no-bake Oreo cheesecake at its best!
Nutritional Information for No-Bake Oreo Cheesecake Recipe
Calories and Macronutrients
Understanding the nutritional content of your no-bake Oreo cheesecake can help you enjoy it mindfully. Each serving of this delightful dessert contains approximately 350 calories. Here’s a breakdown of the macronutrients:
- Calories: 350
- Net Carbs: 30g
- Protein: 5g
- Fat: 25g
This cheesecake is rich in flavor and texture, thanks to its creamy ingredients. The high fat content primarily comes from the cream cheese and heavy whipping cream, which contribute to its indulgent taste. While it’s a treat, being aware of the calorie count can help you enjoy it in moderation.
Health Considerations
When indulging in desserts like no-bake Oreo cheesecake, it’s essential to consider health factors. While this cheesecake is delicious, it’s also high in sugar and fat. If you’re watching your sugar intake or following a specific diet, you might want to enjoy this dessert occasionally rather than regularly.
For those looking for healthier options, consider these substitutions:
- Greek Yogurt: Substitute half of the cream cheese with Greek yogurt. This will lower the fat content while adding protein.
- Reduced-Fat Cream Cheese: Use reduced-fat cream cheese to cut down on calories without sacrificing too much flavor.
- Natural Sweeteners: Instead of powdered sugar, try using natural sweeteners like honey or maple syrup for a healthier alternative.
By making these adjustments, you can enjoy a lighter version of your favorite no-bake Oreo cheesecake. Remember, balance is key! Enjoying a slice occasionally can fit into a healthy lifestyle.
FAQs About No-Bake Oreo Cheesecake Recipe
Can I use different cookies for the crust?
Absolutely! While Oreos are a classic choice, you can get creative with your crust. For a different flavor, try using chocolate wafer cookies or graham crackers. If you prefer a gluten-free option, ground nuts mixed with butter can also work well. Each type of cookie will give your cheesecake a unique taste and texture, so feel free to experiment!
How long does the cheesecake need to chill?
The cheesecake needs to chill for at least 4 hours to set properly. However, for the best results, it’s recommended to let it chill overnight. This extra time allows the flavors to meld together beautifully, resulting in a richer taste and a firmer texture. So, if you can wait, letting it sit overnight is the way to go!
Can I make this cheesecake ahead of time?
Yes, you can! In fact, making this no-bake Oreo cheesecake ahead of time is a great idea. It’s perfect for parties or gatherings since it can be prepared a day or two in advance. Just make sure to store it in the refrigerator, covered tightly with plastic wrap or aluminum foil. This way, it stays fresh and ready to serve when you need it!
What can I substitute for cream cheese?
If you’re looking for alternatives to cream cheese, there are a few options. One popular choice is Greek yogurt, which can provide a similar creamy texture with added protein. You can also use mascarpone cheese for a rich and smooth filling. If you want a dairy-free option, consider using cashew cream or a vegan cream cheese substitute. Each alternative will slightly change the flavor, but they can still create a delicious cheesecake!
Conclusion on No-Bake Oreo Cheesecake Recipe
Final Thoughts and Encouragement to Try the Recipe
In conclusion, the no-bake Oreo cheesecake recipe is a delightful treat that combines simplicity with indulgence. Its creamy texture and rich flavor make it a favorite among dessert lovers. Whether you’re hosting a gathering or simply craving something sweet, this cheesecake is sure to impress.
Don’t hesitate to try this recipe! With just a few ingredients and minimal effort, you can create a dessert that looks and tastes like it came from a bakery. Remember, the best part is that you can customize it to suit your taste. From different flavors to alternative crusts, the possibilities are endless.
So, gather your ingredients, follow the steps, and enjoy the process of making this delicious no-bake Oreo cheesecake. Your friends and family will be thrilled to share in this delightful dessert. Happy baking, and enjoy every creamy, chocolatey bite!