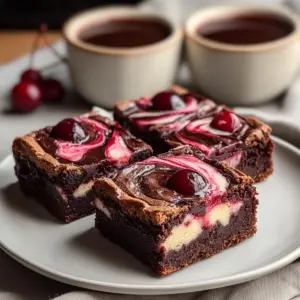
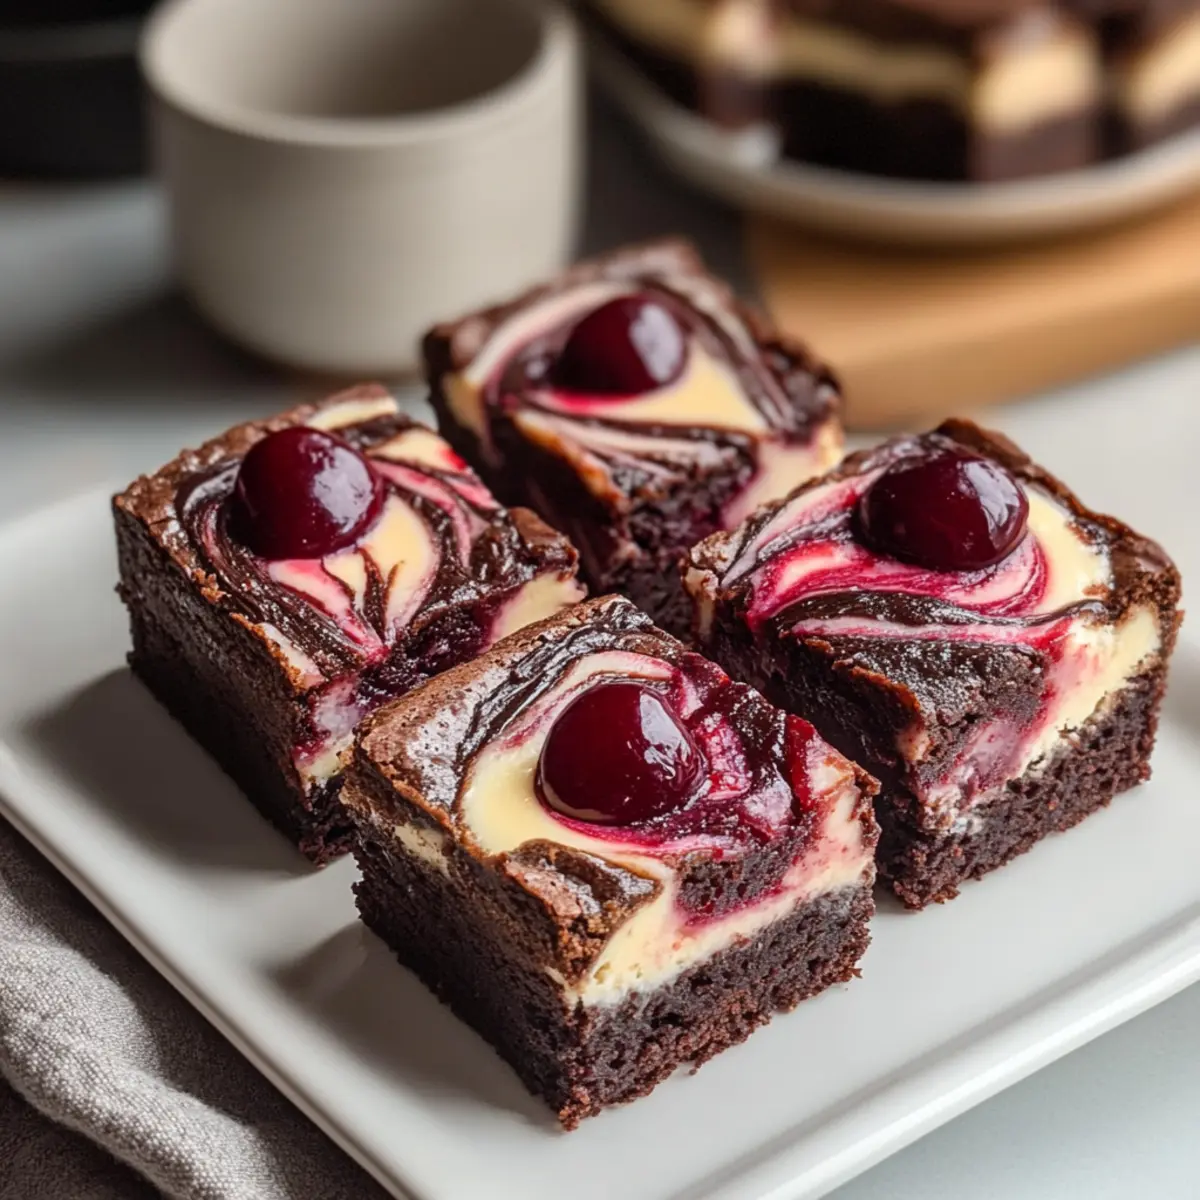
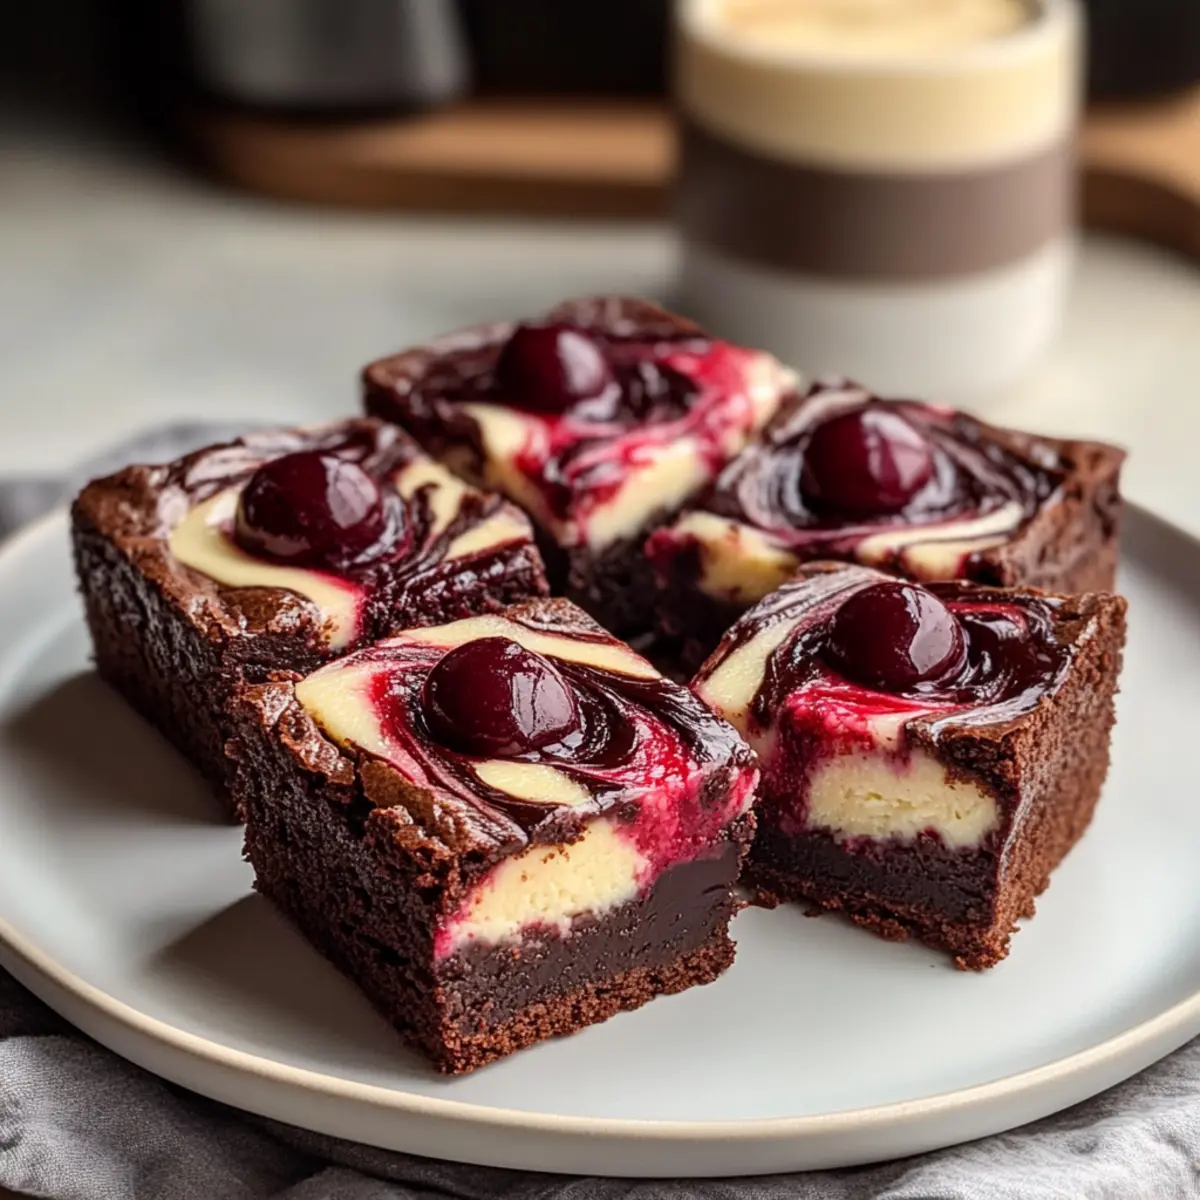
There’s nothing quite like the moment when you take a bite of a warm, gooey brownie and feel the rich chocolate melt in your mouth. But what if I told you that we can elevate that experience to a whole new level with Cherry Cheesecake Brownies? This recipe combines the best of both worlds: a fudgy brownie base topped with a creamy, tangy cheesecake layer swirled with vibrant cherries. Not only are these Cherry Cheesecake Brownies a delightful treat that’s easy to prepare, but they’re also a guaranteed showstopper at any gathering. Whether you want to impress guests or just crave a little homemade comfort, this recipe has you covered. Will you dare to resist diving into this heavenly dessert?
Why Will This Dessert Delight You?
Irresistible flavor combinations: The fusion of rich chocolate brownie and tangy cheesecake creates an unforgettable taste experience. Simple to make: With just a few ingredients and easy steps, anyone can whip these up at home. Showstopper appeal: Their stunning appearance and delightful flavors make them perfect for gatherings and celebrations. Versatile options: Try swapping cherries with other fruits to create your own spin, or add a chocolate twist to the cheesecake layer. Comforting, homemade goodness: Bring a sense of warmth to your kitchen while indulging in this decadent treat, sure to satisfy any sweet tooth! For more delicious desserts, check out our collection of easy dessert recipes and elevate your baking game!
Cherry Cheesecake Brownie Ingredients
• Get ready to indulge in the sweetness!
For the Brownie Layer
- Brownie mix – Provides the foundation of rich chocolate flavor; substitute with homemade brownie batter if desired.
For the Cheesecake Layer
- Cream cheese – Adds creaminess and tanginess to the cheesecake layer; use softened cream cheese for easier blending.
- Granulated sugar – Sweetens the cheesecake layer; brown sugar can be used for a richer flavor profile.
- Eggs – Binds the ingredients and adds moisture; ensure eggs are at room temperature for better incorporation.
- Vanilla extract – Enhances flavor; use fresh vanilla bean or paste for a more intense flavor.
For the Cherry Swirl
- Cherries (fresh or canned) – Adds fruity freshness; substitute with blueberries or raspberries for a different twist.
Step-by-Step Instructions for Decadent Cherry Cheesecake Brownies
Step 1: Prepare Brownie Layer
Preheat your oven to 350°F (175°C) and grease a baking pan. If using a store-bought brownie mix, follow package instructions to prepare the batter. Pour the rich brownie mixture evenly into the prepared pan, smoothing the top with a spatula. Ensure it covers the bottom completely, as this will be the decadent foundation for your Cherry Cheesecake Brownies.
Step 2: Make Cheesecake Filling
In a mixing bowl, beat 8 ounces of softened cream cheese until smooth—this will help avoid lumps. Gradually add granulated sugar while mixing, then incorporate 2 large eggs and a splash of vanilla extract, ensuring everything is well-combined. The result should be a creamy and tangy filling that contrasts beautifully with the fudgy brownie layer.
Step 3: Combine
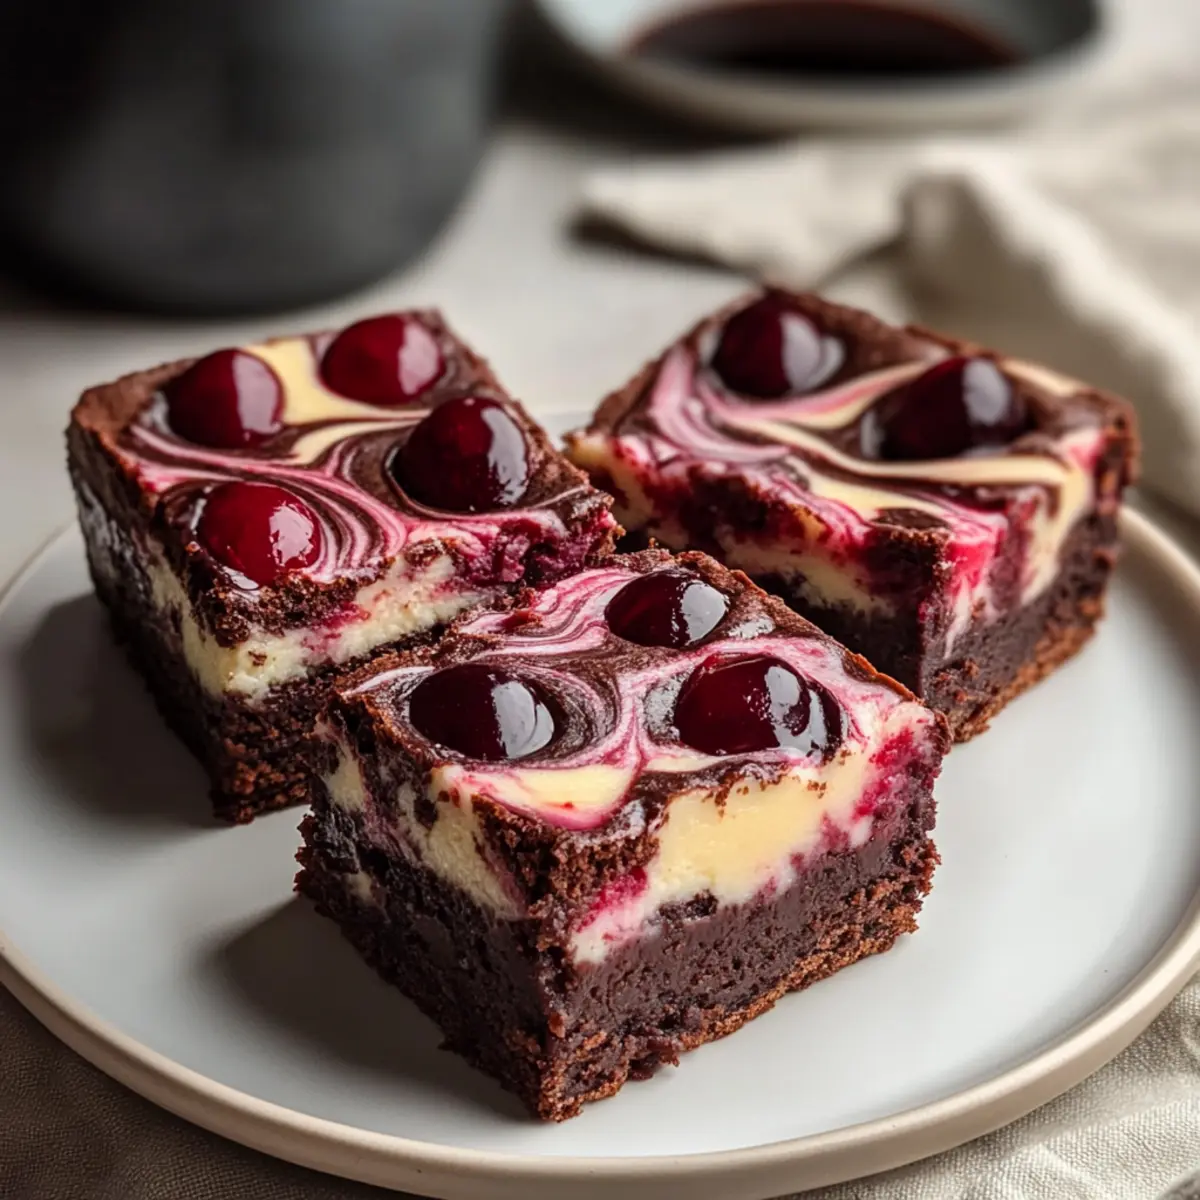
Once your brownie base is ready, carefully pour the cheesecake filling over it, spreading gently to cover. Now, take your cherries and swirl them into the cheesecake layer using a knife, creating a marbled effect. This step not only adds flavor but also gives your Cherry Cheesecake Brownies a visually appealing look that’s sure to impress!
Step 4: Bake
Place the pan in the preheated oven and bake for 30-35 minutes. Keep an eye on the edges; they should be set and slightly pulling away from the pan, while the center can remain slightly jiggly. This ensures that your brownies stay moist and fudgy, with the cheesecake layer perfectly softened.
Step 5: Cool and Serve
After baking, remove the pan from the oven and allow your Cherry Cheesecake Brownies to cool completely. Once cooled, slice into squares using a sharp knife for clean cuts. These rich brownies are best enjoyed after chilling in the refrigerator for a bit, as it enhances the flavors and makes them even more delightful to serve!
Make Ahead Options
These Decadent Cherry Cheesecake Brownies are perfect for meal prep lovers! You can prepare both the brownie base and cheesecake filling up to 24 hours in advance. Simply mix the brownie batter and pour it into the greased baking pan; wrap it tightly with plastic wrap and refrigerate. For the cheesecake layer, beat the cream cheese mixture and store it in an airtight container in the refrigerator. When you’re ready to bake, just pour the chilled cheesecake filling over the brownie base, swirl in the cherries, and bake as directed. This way, you’ll enjoy freshly baked brownies with minimal effort, leaving you more time to unwind!
Expert Tips for Cherry Cheesecake Brownies
-
Fully Soften Cream Cheese: To achieve a lump-free cheesecake filling, ensure your cream cheese is completely softened before mixing. This makes blending simpler and more effective.
-
Watch the Bake Time: Overbaking can lead to dry brownies. Keep a close eye on them around the 30-minute mark; the edges should be set while the center remains slightly jiggly for that perfect fudgy texture.
-
Chill Before Serving: For the best flavor and texture, let the Cherry Cheesecake Brownies chill in the refrigerator for at least an hour before serving. The coolness enhances their creaminess!
-
Use Room Temperature Ingredients: For optimal blending, make sure your eggs and any other refrigerated ingredients are at room temperature. This helps create a smooth and cohesive cheesecake layer.
-
Experiment with Flavors: Don’t hesitate to swap out cherries for other fruits or add chocolate to the cheesecake mixture for a flavor twist. This way, your Cherry Cheesecake Brownies can be your canvas for creativity!
How to Store and Freeze Cherry Cheesecake Brownies
Fridge: Store your Cherry Cheesecake Brownies in an airtight container in the refrigerator for up to 1 week to maintain freshness and flavor.
Freezer: For longer storage, freeze the brownies in individual airtight bags or containers for up to 3 months. Thaw in the fridge overnight before enjoying.
Reheating: To enjoy brownies warm, reheat in the microwave for about 10-15 seconds. This will bring back some of that gooey texture, making them even more irresistible.
Serving: For the best experience, let them chill in the fridge before serving; this enhances the flavor and creates a delightful contrast in textures!
What to Serve with Decadent Cherry Cheesecake Brownies
Indulging in these rich, creamy delights invites delightful pairings to elevate your dessert experience.
- Whipped Cream: A dollop of freshly whipped cream adds airy sweetness that balances the brownie’s richness perfectly.
- Vanilla Ice Cream: Creamy vanilla ice cream melts against the warm brownies, creating a blissful contrast of temperatures and textures.
- Fresh Berries: A side of mixed berries brings a burst of freshness, enhancing the cherry flavor and adding a pop of color.
- Chocolate Sauce: Drizzle some warm chocolate sauce for an extra layer of decadence that chocolate lovers will adore.
- Nutty Crumble Topping: A sprinkle of crushed nuts adds a delightful crunch, enhancing the brownies’ fudgy texture and taste.
- Espresso or Coffee: Pairing with a cup of smooth espresso or coffee deepens the chocolate flavors and makes for a sophisticated end to your meal.
- Mint Infused Cream: Serve with a light mint cream for a refreshing twist that cuts through the sweetness of the brownies.
- Chilled Milk: A tall glass of cold milk is a timeless pairing that quenches your thirst while complementing the rich flavors beautifully.
With these pairings, your Cherry Cheesecake Brownies will steal the show, no matter the occasion!
Cherry Cheesecake Brownies Variations
Customize these delectable Cherry Cheesecake Brownies to suit your taste, and let your creativity shine!
-
Fruit Swap: Substitute cherries with blueberries, raspberries, or strawberries for a fruity twist. Each fruit brings its unique flavor profile to the party!
-
Chocolate Cheesecake Layer: Add cocoa powder to the cream cheese mixture for a luscious chocolate twist. Imagine the harmony of chocolate with that creamy cheesecake!
-
Nutty Crunch: Fold in chopped nuts like walnuts or pecans into the brownie batter for added crunch and a delightful texture contrast. It’s the perfect blend of smooth and crunchy!
-
Dairy-Free Option: Use dairy-free cream cheese and vegan butter in the brownie mix for a dairy-free version. You won’t miss a thing with this creamy alternative!
-
Spicy Kick: Add a pinch of cayenne pepper or cinnamon to the brownie mix for a hint of warmth. It’s a surprising twist that can elevate the overall flavor experience!
-
Extra Creamy: Increase the cream cheese to 10 ounces for a richer cheesecake layer. Your brownies will become even more indulgent and creamy!
-
Caramel Drizzle: Drizzle melted caramel on top before serving for an extra indulgent treat. Just imagine the gooeyness paired with that tart cheesecake!
-
Oreo Base: Use crushed Oreos as the brownie base for a fun spin. This adds a chocolatey, crunchy bottom layer that pairs beautifully with the creamy cheesecake topping.
Feel free to explore these variations, or create your very own! If you enjoy experimenting in the kitchen, you might also love our collection of easy dessert recipes to inspire your next baking adventure!
Decadent Cherry Cheesecake Brownies Recipe FAQs
What type of cherries should I use for this recipe?
Absolutely! You can use fresh or canned cherries. If using fresh, look for plump, vibrant cherries without dark spots or blemishes. For canned cherries, opt for those in light syrup to avoid overwhelming sweetness. If cherries aren’t your favorite, feel free to substitute with blueberries or raspberries for a different berry twist!
How should I store my Cherry Cheesecake Brownies?
Very! To keep your brownies fresh, store them in an airtight container in the refrigerator for up to one week. This method preserves their rich flavors and fudgy texture. If you’re not going to finish them within that timeframe, freezing is a great option!
Can I freeze the Cherry Cheesecake Brownies?
Absolutely! To freeze, wrap the brownies tightly in plastic wrap, then place them in a freezer-safe bag or container. They will maintain their deliciousness for up to 3 months. When you’re ready to indulge again, simply thaw them in the refrigerator overnight for the best results.
What should I do if my cheesecake layer is lumpy?
No worries! If your cheesecake filling turns out lumpy, it likely means the cream cheese wasn’t softened sufficiently before mixing. Make sure to beat the cream cheese on its own until it’s smooth, then gradually add the sugar and other ingredients. If lumps persist, try using a hand mixer or blender to incorporate everything smoothly.
Are these brownies suitable for those with gluten intolerance?
Definitely! If you have gluten sensitivities, just swap the regular brownie mix for a gluten-free version. Many brands offer great gluten-free brownie mixes that will work perfectly in this recipe. Always check labels for potential allergens to ensure safety for everyone enjoying them!

Irresistible Cherry Cheesecake Brownies to Satisfy Your Cravings
Ingredients
Equipment
Method
- Preheat your oven to 350°F (175°C) and grease a baking pan. If using a store-bought brownie mix, follow package instructions to prepare the batter. Pour the rich brownie mixture evenly into the prepared pan, smoothing the top with a spatula.
- In a mixing bowl, beat 8 ounces of softened cream cheese until smooth. Gradually add granulated sugar while mixing, then incorporate 2 large eggs and a splash of vanilla extract, ensuring everything is well-combined.
- Carefully pour the cheesecake filling over the brownie base, spreading gently to cover. Swirl the cherries into the cheesecake layer using a knife, creating a marbled effect.
- Place the pan in the preheated oven and bake for 30-35 minutes. Check the edges to ensure they are set and slightly pulling away from the pan, while the center remains slightly jiggly.
- Once baked, remove from the oven and allow to cool completely before slicing into squares with a sharp knife. For best results, chill in the refrigerator before serving.