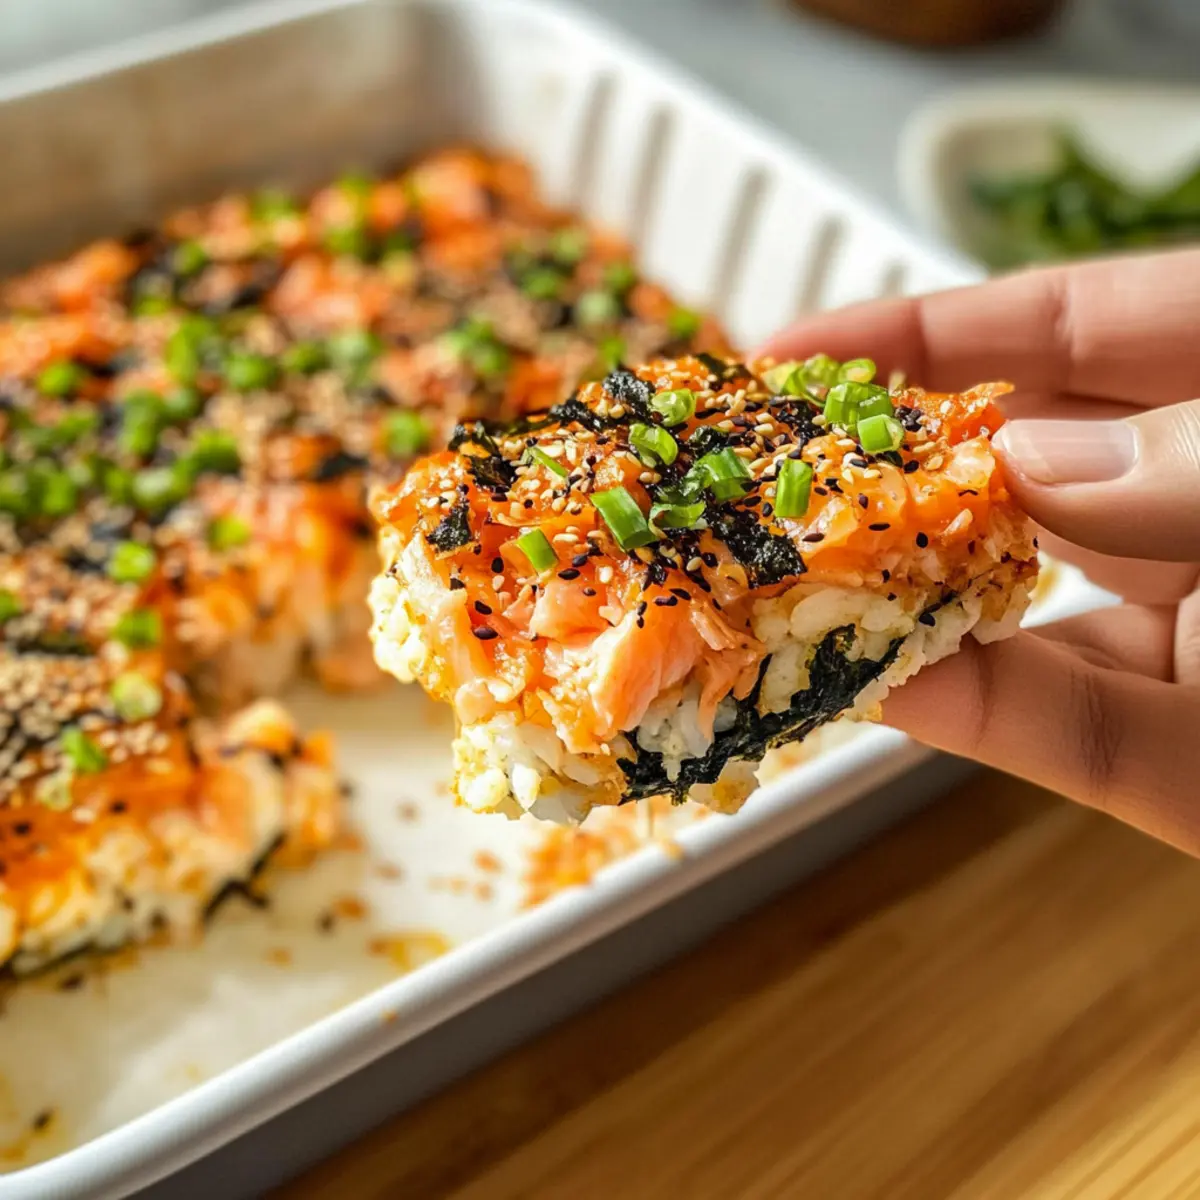
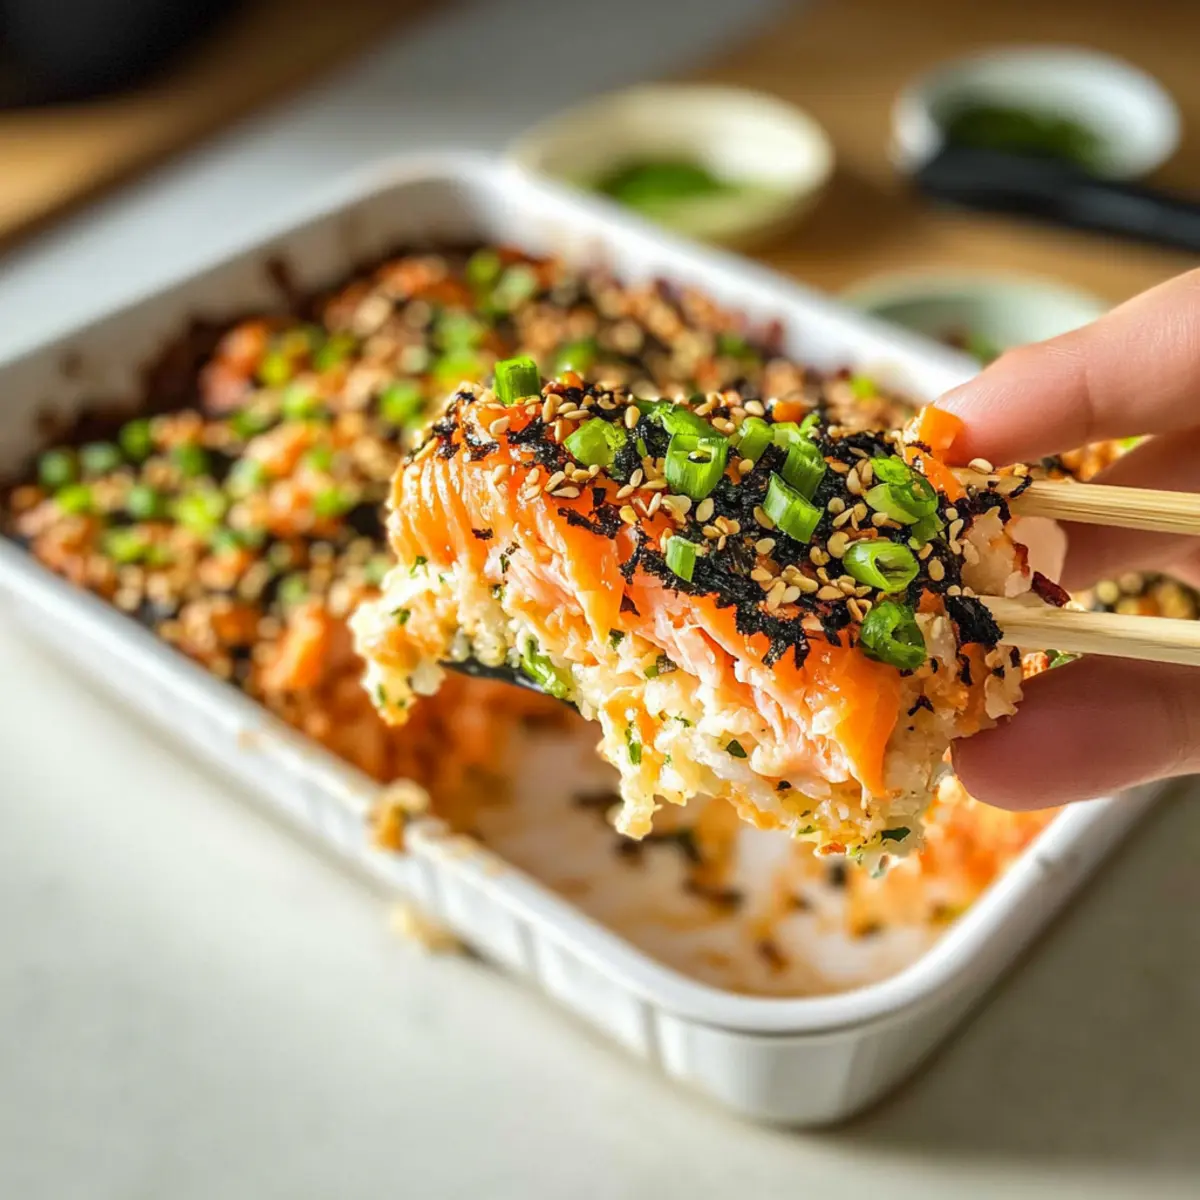
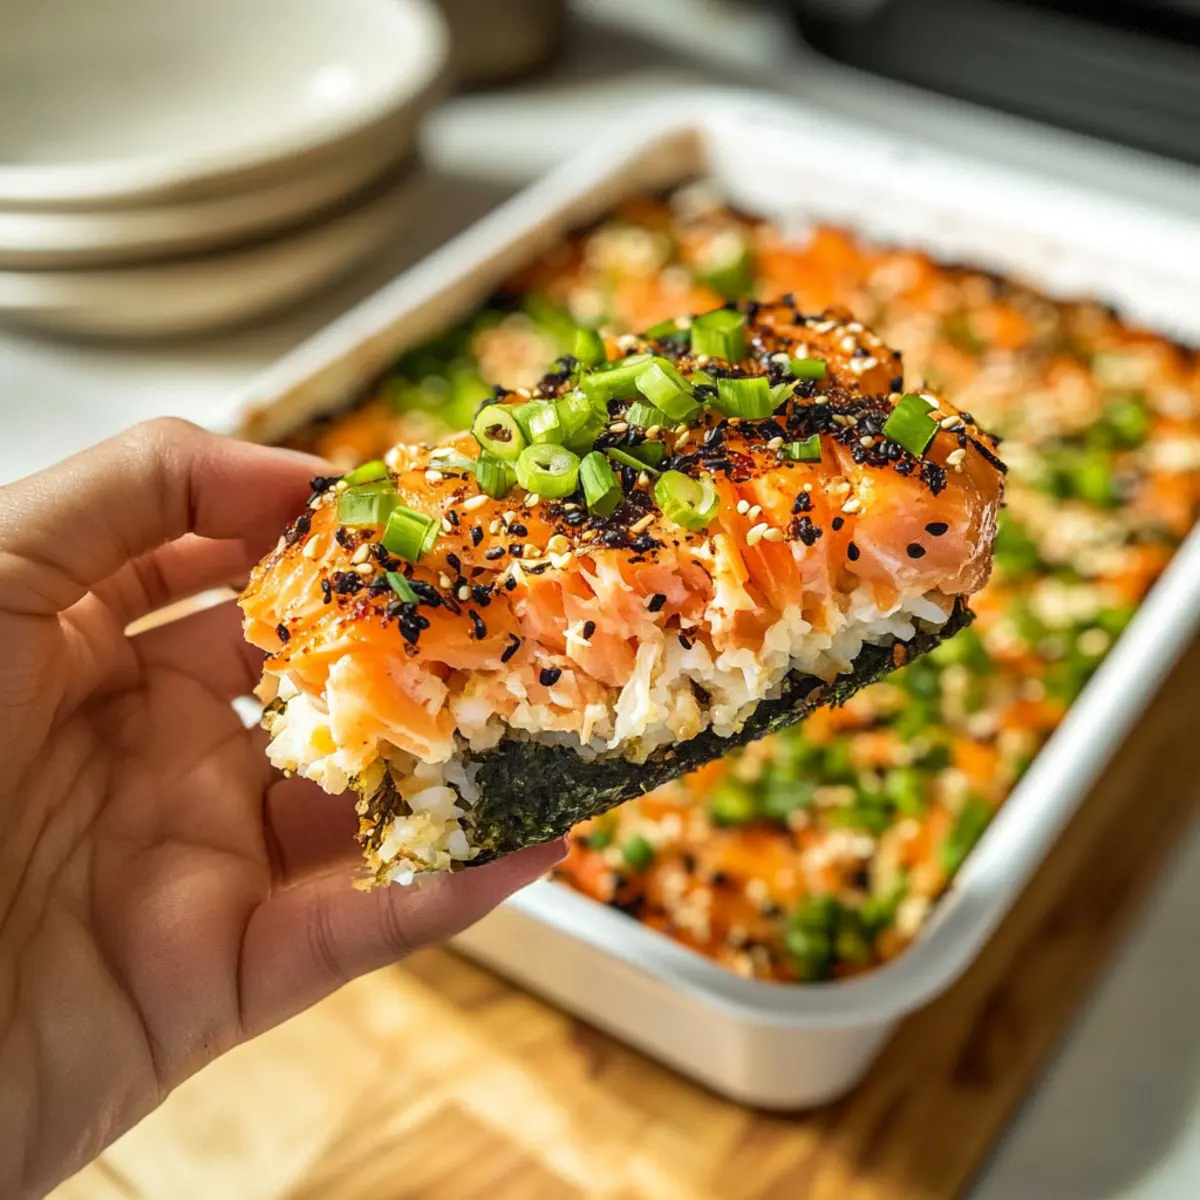
At first bite, it feels like a warm hug! My Easy Salmon Sushi Bake transforms classic sushi into a cozy family dish, inviting everyone to gather around the table. This deconstructed sushi delight layers sushi rice, creamy salmon, and a hint of spice under a golden crust—a perfect example of comfort food that doesn’t compromise on flavors. With a mere handful of ingredients, this recipe is not only simple but also incredibly customizable; you can easily swap salmon for tuna or shrimp, making it a versatile choice for any seafood lover. Plus, it’s family-friendly, ensuring everyone is satisfied and asking for seconds. Ready to dive into this delicious adventure? Let’s get cooking!
Why is Salmon Sushi Bake a Must-Try?
Family-Friendly: This dish is perfect for everyone at the table, appealing to kids and adults alike!
Customizable: Easily swap salmon for tuna or shrimp to suit your taste preferences. It makes dinner fun and engaging!
Simple Steps: With just a few straightforward steps, you’ll have a delicious meal ready in no time.
Comforting Layers: Enjoy warm, creamy goodness that combines the best of sushi with the comfort of a baked casserole—a delightful twist!
Crowd-Pleaser: Perfect for casual gatherings or family dinners, it’s a dish everyone will rave about and request time and again!
For an easy meal idea that’s sure to impress, check out this Easy Salmon Sushi Bake.
Easy Salmon Sushi Bake Ingredients
For the Sushi Rice
• Sushi Rice – the essential base for this dish that gives it structure and texture.
• Rice Vinegar – adds a delightful acidity that balances the flavors.
• Sugar – enhances the sweetness, making the rice even more delicious.
• Salt – important for seasoning the sushi rice perfectly.
For the Filling
• Salmon – the star protein offering rich flavor; feel free to substitute with tuna or shrimp for variety.
• Imitation Crab – contributes seafood flavor and texture, can be replaced with extra salmon or omitted.
• Sriracha Mayo – adds a creamy, spicy kick; swap with Kewpie mayo mixed with Sriracha if needed.
For Garnishing
• Furikake – a Japanese seasoning that delivers umami and elevates the dish.
• Sesame Seeds – provides a crunchy texture and enhances flavor.
• Chopped Green Onions – adds a fresh touch on top, lightening up the dish.
For Serving
• Seaweed Snacks – perfect for scooping, enhances the sushi experience while adding a nice touch.
Dive into this Easy Salmon Sushi Bake and enjoy the comforting layers that make meal time special!
Step-by-Step Instructions for Easy Salmon Sushi Bake
Step 1: Prepare the Sushi Rice
Begin by cooking your sushi rice according to the package instructions, typically about 15-20 minutes. Once done, let the rice cool slightly and become sticky, ensuring it will hold together nicely when layered in the dish. This foundational step is crucial for your Easy Salmon Sushi Bake.
Step 2: Season the Rice
In a microwave-safe bowl, combine rice vinegar, sugar, and salt. Microwave for about 30 seconds until the sugar dissolves completely. Mix this seasoned mixture into your warm sushi rice, folding gently to enhance flavor without squashing the rice. This step balances the rich ingredients to come.
Step 3: Cook the Salmon
Season the salmon fillet with salt and pepper for flavor, then cook it in an air fryer at 400°F for 10-12 minutes or bake in a preheated oven at 375°F for 15-17 minutes until it flakes easily with a fork. This perfectly cooked salmon is the heart of your Easy Salmon Sushi Bake, bringing depth to the dish.
Step 4: Flake the Salmon
Once the salmon is cooked, remove it and let it cool slightly. Use a fork to gently flake the salmon into bite-sized pieces, then combine it in a bowl with imitation crab and Sriracha mayo. This creates a creamy, flavorful filling that will elevates each bite of your sushi bake.
Step 5: Prepare the Baking Dish
Preheat your oven to 400°F. While it heats up, grab a baking dish (preferably 9″x9″ or 9″x13″) and lightly grease it with cooking spray or oil to prevent sticking. This ensures your Easy Salmon Sushi Bake releases easily and maintains its gorgeous layers.
Step 6: Layer the Ingredients
Start by spreading the seasoned sushi rice evenly in your prepared dish, creating a solid base layer. Then sprinkle a generous amount of furikake over the rice for added umami flavor. Finally, spoon the salmon-crab mixture on top and spread it out evenly, preparing for baking.
Step 7: Bake the Dish
Place your baking dish into the preheated oven and bake for 10-15 minutes, or until the top is beautifully golden and slightly crispy. Keep an eye on it; you want that perfect balance of a warm center with a delightful crust on top for your Easy Salmon Sushi Bake.
Step 8: Garnish and Cool
After baking, remove the dish from the oven and let it cool slightly for about 5 minutes. Drizzle more Sriracha mayo on top, then sprinkle with additional furikake, sesame seeds, and chopped green onions for a fresh finish. This adds flavor and visual appeal to the dish.
Step 9: Serve and Enjoy
Serve your Easy Salmon Sushi Bake warm, accompanied by seaweed snacks for scooping. This dish not only delights the taste buds but also elevates mealtime, inviting everyone to gather around the table and dig into a deconstructed sushi experience that never disappoints!
What to Serve with Easy Salmon Sushi Bake
Transform your delightful sushi bake into a full experience with these exquisite pairings that will tantalize your taste buds.
-
Crispy Tempura Vegetables: Lightly battered and fried, these add crunch and a delightful contrast to the creamy layers of your bake.
-
Miso Soup: A warm, umami-rich soup that complements the flavors of the sushi bake and brings warmth to the table.
-
Asian Cucumber Salad: This refreshing, tangy salad brings brightness and balances the richness of the sushi bake, perfect for cleansing the palate.
-
Steamed Edamame: A simple yet satisfying side that adds protein and a slight sweetness, ideal for nibbling alongside your meal.
-
Ginger Lime Sparkler: A refreshing drink that cuts through the richness with its zesty flavor, making it a delightful accompaniment.
-
Korean Kimchi: Adds an exciting, fermented punch that contrasts beautifully with the savory components of the dish, enhancing the meal’s complexity.
-
Chewy Mochi Ice Cream: For dessert, this sweet treat offers a delightful bite-sized finish, harmonizing with your sushi bake experience.
-
Green Tea: This calming beverage not only enhances flavor but also provides a gentle touch of warmth, elevating the dining journey.
How to Store and Freeze Salmon Sushi Bake
Fridge: Store any leftovers in an airtight container in the fridge for up to 3 days to keep it fresh and flavorful.
Freezer: For long-term storage, freeze portions in airtight containers for up to 2 months. Ensure they cool completely before freezing for better preservation.
Reheating: To enjoy leftovers, reheat in the oven at 350°F for about 15–20 minutes, or until heated through. This method maintains the texture of your Easy Salmon Sushi Bake without drying it out.
Defrosting: If frozen, defrost overnight in the refrigerator before reheating for best results.
Expert Tips for Easy Salmon Sushi Bake
-
Sticky Rice Secret: Ensure your sushi rice is sticky by properly mixing in the vinegar mixture. This holds the layers together beautifully.
-
Avoid Overbaking: Keep an eye on the oven—overbaking can dry out the Easy Salmon Sushi Bake. Aim for a golden crust without losing moisture!
-
Creamy Alternatives: For a richer texture, try blending low-fat cream cheese or Greek yogurt into the Sriracha mayo for added creaminess.
-
Mix Up the Fillings: Customize your bake with different seafood like tuna or shrimp, or add veggies such as diced cucumbers for freshness!
-
Season Generously: Don’t skimp on seasoning your salmon and sushi rice; it’s key to elevating the dish from good to fantastic.
Make Ahead Options
These Easy Salmon Sushi Bake preparations are perfect for busy cooks looking to save time without sacrificing flavor! You can prepare the sushi rice and the salmon filling (flaked with imitation crab and Sriracha mayo) up to 24 hours in advance. Store them separately in airtight containers in the refrigerator to maintain quality. Additionally, you can layer the sushi rice in the baking dish and refrigerate the assembled dish for up to 3 days before baking. When ready to serve, simply bake it from the refrigerator (adding an extra minute or two if needed) and enjoy a comforting meal that’s just as delicious as if made fresh! This make-ahead strategy allows you to focus on more enjoyable moments with your family.
Salmon Sushi Bake Variations & Substitutions
Feel free to customize your Easy Salmon Sushi Bake for a truly delightful experience that caters to your unique taste buds!
- Tuna or Shrimp: Swap the salmon with fresh tuna or shrimp for a deliciously different flavor. This change is perfect for seafood lovers looking to mix things up.
- Vegetable Boost: Add diced cucumbers or creamy avocados into the filling for a refreshing crunch. Not only do they bring texture, but they’ll also brighten up the dish’s overall flavor.
- Jalapeño Spice: For those who love a kick, mix in finely diced jalapeños with the seafood filling. This addition creates a beautiful spicy contrast, tantalizing those who like heat in their meals.
- Dairy-Free Delight: Opt for dairy-free cream cheese in place of traditional options to accommodate lactose intolerant guests. You’ll still enjoy that creamy richness without the dairy—perfect for a welcoming family meal.
- Mango Madness: For a fruity twist, fold in some diced ripe mango with your seafood filling. Sweetness from the mango pairs beautifully with the savory elements of the dish.
- Crispy Topping: Top your sushi bake with crushed potato chips or panko breadcrumbs before baking for an extra crunch! This twist adds a surprising texture contrast that’s sure to please everyone.
- Herb Infusion: Enhance flavor by adding fresh herbs like cilantro or dill into the filling. These fragrant herbs provide a burst of freshness and elevate your sushi bake’s tasting experience.
- Saucy Variation: If you enjoy an extra saucy bake, drizzle additional Sriracha mayo or spicy aioli on top before serving. This not only enhances the flavor but also adds an appealing finish!
By exploring these variations, you can create an unforgettable Easy Salmon Sushi Bake experience that keeps everyone coming back for more! For additional inspiration, don’t miss out on my tips for customizing this dish to your family’s preferences!
Easy Salmon Sushi Bake Recipe FAQs
What type of sushi rice should I use for this recipe?
Absolutely! Use short-grain sushi rice for the best texture, as it becomes sticky once cooked, allowing the layers of your Easy Salmon Sushi Bake to hold together beautifully. Look for packages labeled “sushi rice” or “short grain” at your local grocery store.
How should I store leftovers of my Salmon Sushi Bake?
To keep your delicious leftovers fresh, store them in an airtight container in the fridge for up to 3 days. Make sure to allow it to cool completely before sealing it to maintain its moisture and flavor.
Can I freeze my Easy Salmon Sushi Bake? If so, how?
Yes, you can freeze it! To do this, let the bake cool completely, then cut it into portions and wrap each one tightly in plastic wrap. Place the wrapped portions in an airtight container or a zip-top bag and freeze for up to 2 months. This way, you can enjoy your scrumptious dish anytime!
What if I want to incorporate some vegetables into my Salmon Sushi Bake?
Very! You can easily mix in diced vegetables like cucumbers, avocado, or even grated carrots into the filling. Just make sure to slice the veggies into small pieces so they blend well with the other ingredients and don’t overpower the dish.
Are there any dietary considerations I should keep in mind for this recipe?
Definitely! If anyone has seafood allergies, you can substitute seafood flavors with other proteins, such as chicken or tofu. For lactose intolerant guests, consider using dairy-free cream cheese instead of regular cream cheese in your filling to ensure everyone can enjoy this delicious treat!

Easy Salmon Sushi Bake: Comforting Family Dinner Delight
Ingredients
Equipment
Method
- Begin by cooking your sushi rice according to the package instructions, typically about 15-20 minutes.
- In a microwave-safe bowl, combine rice vinegar, sugar, and salt. Microwave for about 30 seconds until the sugar dissolves completely.
- Season the salmon fillet with salt and pepper, then cook it in an air fryer at 400°F for 10-12 minutes or bake in an oven at 375°F for 15-17 minutes.
- Once the salmon is cooked, remove and let it cool slightly. Flake the salmon into bite-sized pieces and combine it in a bowl with imitation crab and Sriracha mayo.
- Preheat your oven to 400°F and lightly grease a baking dish with cooking spray or oil.
- Spread the seasoned sushi rice evenly in your prepared dish, then sprinkle furikake over the rice. Spoon the salmon-crab mixture on top and spread it evenly.
- Place your baking dish into the preheated oven and bake for 10-15 minutes, or until the top is golden and slightly crispy.
- After baking, remove the dish and let it cool slightly for about 5 minutes. Drizzle more Sriracha mayo on top and sprinkle with sesame seeds and chopped green onions.
- Serve warm, accompanied by seaweed snacks for scooping.