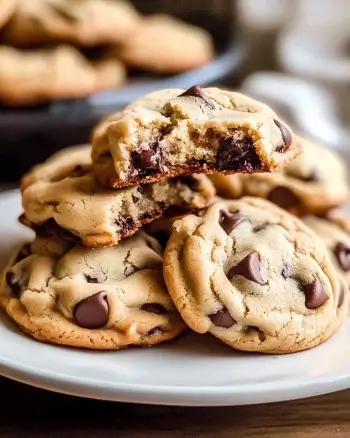
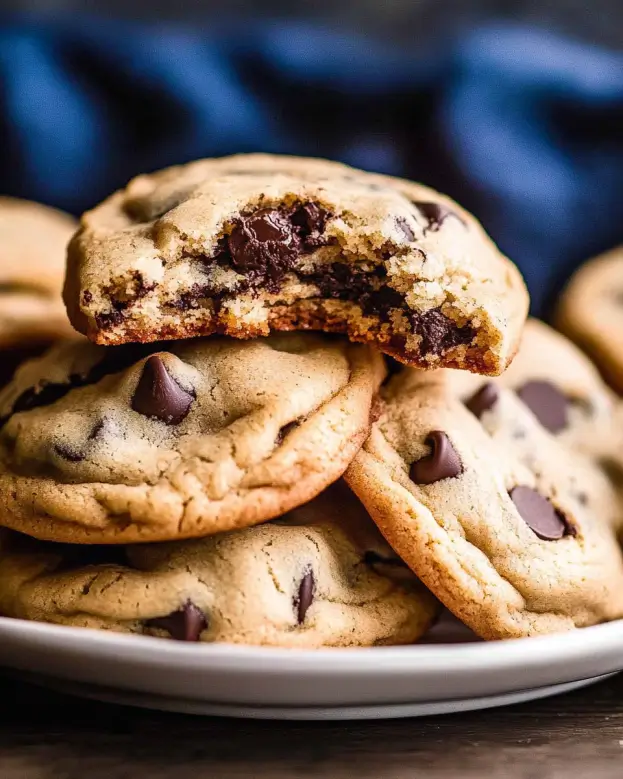
Introduction to Classic Chocolate Chip Cookies Recipe
The History of Chocolate Chip Cookies
Chocolate chip cookies have a delightful history that dates back to the 1930s. Ruth Wakefield, the inventor of this beloved treat, created them at her Toll House Inn in Massachusetts. She originally intended to make chocolate cookies but found herself out of baker’s chocolate. Instead, she chopped up a bar of semi-sweet chocolate, expecting it to melt into the dough. To her surprise, the chocolate held its shape, creating gooey pockets of chocolate in every bite. This happy accident led to the creation of the classic chocolate chip cookie we all adore today.
As word spread about these delicious cookies, they quickly gained popularity. In fact, Nestlé took notice and struck a deal with Wakefield to print her recipe on their chocolate bar packaging. This partnership helped the chocolate chip cookie become a staple in American households. Today, they are enjoyed worldwide, often associated with warm memories of baking with family and friends.
Why This Classic Chocolate Chip Cookies Recipe Stands Out
This classic chocolate chip cookies recipe stands out for several reasons. First, it combines simple, everyday ingredients that are easy to find. The balance of granulated and brown sugar gives the cookies a perfect sweetness and a chewy texture. Additionally, the use of semi-sweet chocolate chips creates a rich flavor that complements the buttery dough.
Moreover, this recipe is versatile. You can easily customize it by adding nuts, using different types of chocolate, or even adjusting the baking time for your preferred texture. Whether you like your cookies soft and chewy or crisp and crunchy, this recipe can accommodate your taste. Plus, it yields a generous batch of 24 cookies, making it perfect for sharing with friends or enjoying throughout the week.
In essence, this classic chocolate chip cookies recipe is not just about baking; it’s about creating memories. Each bite brings a sense of nostalgia, reminding us of the joy of homemade treats. So, let’s dive into the ingredients and preparation steps to create your own batch of these delightful cookies!
Ingredients for Classic Chocolate Chip Cookies Recipe
To make the perfect batch of classic chocolate chip cookies, you’ll need a few simple ingredients. Each one plays a vital role in creating that delicious flavor and texture we all love. Here’s what you’ll need:
- 2 1/4 cups all-purpose flour
- 1 teaspoon baking soda
- 1/2 teaspoon salt
- 1 cup unsalted butter, softened (2 sticks)
- 3/4 cup granulated sugar
- 3/4 cup packed brown sugar
- 1 teaspoon vanilla extract
- 2 large eggs
- 2 cups semi-sweet chocolate chips
- 1 cup chopped nuts (optional)
These ingredients are not only easy to find but also work together to create a delightful cookie. The all-purpose flour provides structure, while the baking soda helps the cookies rise. Salt enhances the flavors, and the combination of granulated and brown sugar gives the cookies their signature sweetness and chewiness.
Using unsalted butter allows you to control the saltiness of your cookies, ensuring a balanced taste. The vanilla extract adds a warm, inviting flavor that complements the chocolate chips perfectly. Finally, the chocolate chips are the star of the show, providing that rich, melty goodness we all crave. If you choose to add nuts, they will add a delightful crunch and extra flavor.
Now that you have all the ingredients ready, you’re one step closer to baking your own classic chocolate chip cookies!
Step-by-Step Preparation of Classic Chocolate Chip Cookies Recipe
Step 1: Prepping Your Ingredients
Before you start baking, it’s essential to prep your ingredients. First, gather all the items listed in the ingredients section. This makes the process smoother and more enjoyable. Measure out the flour, baking soda, and salt in a small bowl. Whisk them together to ensure they are well combined. This step helps distribute the baking soda and salt evenly throughout the dough.
Next, take the unsalted butter out of the fridge and let it soften at room temperature. Softened butter is crucial for achieving that creamy texture in your cookie dough. Also, crack the eggs into a separate bowl to make sure they are fresh and ready to use. Having everything prepped will make mixing the dough a breeze!
Step 2: Mixing the Dough
Now it’s time to mix the dough! In a large mixing bowl, add the softened butter, granulated sugar, brown sugar, and vanilla extract. Using an electric mixer or a sturdy wooden spoon, beat the mixture until it becomes creamy and smooth. This usually takes about 2-3 minutes. The goal is to incorporate air into the butter, which helps the cookies rise.
Once the mixture is creamy, add the eggs one at a time. Mix well after each addition. This ensures that the eggs are fully incorporated, giving your cookies a rich flavor. After the eggs are mixed in, gradually add the flour mixture to the wet ingredients. Stir gently until just combined. Be careful not to overmix, as this can lead to tough cookies.
Step 3: Chilling the Dough
Chilling the dough is an optional but highly recommended step. If you want chewier cookies, cover the bowl with plastic wrap and place it in the refrigerator for at least 30 minutes. Chilling allows the flavors to meld and helps the cookies maintain their shape while baking. If you’re short on time, you can skip this step, but the results may vary.
Step 4: Baking the Cookies
Preheat your oven to 375°F (190°C) while the dough chills. Line a baking sheet with parchment paper to prevent sticking. Once the dough is ready, use a tablespoon to drop rounded portions onto the prepared baking sheet. Make sure to space them about 2 inches apart, as they will spread while baking.
Bake the cookies for 9 to 11 minutes. Keep an eye on them! The edges should turn golden brown, while the centers may look slightly underbaked. This is perfect, as they will continue to cook as they cool. Once baked, remove the cookies from the oven and let them sit on the baking sheet for 5 minutes.
Step 5: Cooling and Storing
After 5 minutes, carefully transfer the cookies to a wire rack to cool completely. This step is crucial for achieving the right texture. If you leave them on the baking sheet too long, they may become too soft. Once cooled, store your classic chocolate chip cookies in an airtight container. They can last for up to a week, but we doubt they’ll last that long!
Now that you’ve mastered the preparation steps, you’re well on your way to enjoying delicious homemade classic chocolate chip cookies!
Variations of Classic Chocolate Chip Cookies Recipe
Gluten-Free Classic Chocolate Chip Cookies Recipe
If you or someone you know has a gluten intolerance, you can still enjoy classic chocolate chip cookies! This gluten-free variation uses a blend of gluten-free flours to achieve a similar texture and taste. Here’s how to make them:
- 2 cups gluten-free all-purpose flour (make sure it contains xanthan gum)
- 1 teaspoon baking soda
- 1/2 teaspoon salt
- 1 cup unsalted butter, softened
- 3/4 cup granulated sugar
- 3/4 cup packed brown sugar
- 1 teaspoon vanilla extract
- 2 large eggs
- 2 cups semi-sweet chocolate chips
- 1 cup chopped nuts (optional)
Follow the same preparation steps as the classic recipe. The gluten-free flour will provide a delightful texture, while the chocolate chips will still melt beautifully. Enjoy these cookies fresh out of the oven or store them in an airtight container for later!
Vegan Classic Chocolate Chip Cookies Recipe
For those following a vegan lifestyle, you can still indulge in classic chocolate chip cookies! This vegan version replaces eggs and butter with plant-based alternatives. Here’s what you’ll need:
- 2 1/4 cups all-purpose flour
- 1 teaspoon baking soda
- 1/2 teaspoon salt
- 1 cup coconut oil or vegan butter, softened
- 3/4 cup granulated sugar
- 3/4 cup packed brown sugar
- 1 teaspoon vanilla extract
- 1/4 cup unsweetened applesauce (as an egg substitute)
- 2 cups semi-sweet chocolate chips (ensure they are dairy-free)
- 1 cup chopped nuts (optional)
Mix the ingredients following the same steps as the classic recipe. The coconut oil or vegan butter will give your cookies a rich flavor, while the applesauce keeps them moist. These vegan cookies are just as delicious and perfect for sharing with friends and family!
Cooking Note for Classic Chocolate Chip Cookies Recipe
When it comes to baking classic chocolate chip cookies, a few cooking notes can make a big difference in your results. First, always use room temperature ingredients. This means letting your butter and eggs sit out for about 30 minutes before you start. Room temperature butter mixes more easily, creating a smoother dough.
Next, be mindful of your oven temperature. Ovens can vary, so it’s a good idea to use an oven thermometer to ensure accuracy. If your oven runs hot, your cookies may bake too quickly, leading to a dry texture. Conversely, if it’s too cool, they may spread too much and become flat.
Another important tip is to avoid overmixing the dough. Once you add the flour mixture, mix just until combined. Overmixing can develop gluten, resulting in tough cookies instead of the soft, chewy texture we all love.
Lastly, consider the baking time. Every oven is different, so keep an eye on your cookies as they bake. The edges should be golden brown, while the centers may look slightly underbaked. This is perfectly fine, as they will continue to cook on the baking sheet after being removed from the oven.
By following these cooking notes, you’ll be well on your way to baking the perfect batch of classic chocolate chip cookies. Happy baking!
Serving Suggestions for Classic Chocolate Chip Cookies Recipe
Once your classic chocolate chip cookies are baked to perfection, it’s time to think about how to serve them! These cookies are not only delicious on their own but can also be paired with various treats and beverages to enhance your experience. Here are some delightful serving suggestions:
- With a Glass of Milk: The classic pairing of cookies and milk is timeless. A cold glass of milk complements the rich chocolate and buttery flavor of the cookies perfectly. Whether you prefer whole, almond, or oat milk, it’s a match made in heaven!
- Ice Cream Sandwiches: For a fun twist, turn your cookies into ice cream sandwiches. Simply place a scoop of your favorite ice cream between two cookies. This combination creates a delightful treat that’s perfect for warm days.
- With Coffee or Tea: Enjoy your cookies with a warm cup of coffee or tea. The rich flavors of chocolate chip cookies pair beautifully with the bitterness of coffee or the soothing notes of tea. It’s a great way to unwind in the afternoon.
- As a Dessert Platter: Create a dessert platter by serving your cookies alongside other treats. Consider adding brownies, fruit, or mini cheesecakes. This variety will impress your guests and make any gathering feel special.
- With Fresh Fruit: Balance the sweetness of the cookies with fresh fruit. Slices of strawberries, apples, or bananas can provide a refreshing contrast to the rich flavors of the cookies.
These serving suggestions can elevate your classic chocolate chip cookies experience. Whether you’re enjoying them solo or sharing with friends, these ideas will make your cookie time even more enjoyable. So, grab a cookie, pour a drink, and savor every bite!
Tips for Perfecting Your Classic Chocolate Chip Cookies Recipe
Perfecting your classic chocolate chip cookies recipe is all about attention to detail and a few helpful tips. With these suggestions, you can elevate your cookie game and impress family and friends. Here are some essential tips to keep in mind:
- Use Quality Ingredients: The quality of your ingredients can significantly impact the flavor of your cookies. Opt for high-quality chocolate chips and pure vanilla extract. These small changes can make a big difference in taste.
- Measure Accurately: Accurate measurements are crucial for baking. Use a kitchen scale for precise measurements, especially for flour. Too much flour can lead to dry cookies, while too little can make them too gooey.
- Don’t Skip the Chilling: Chilling the dough is a game-changer. It helps the cookies maintain their shape and enhances the flavors. If you have time, chill the dough for at least 30 minutes or even overnight for the best results.
- Experiment with Mix-Ins: While chocolate chips are classic, don’t hesitate to experiment! Try adding different mix-ins like dried fruit, coconut flakes, or various types of chocolate. This can create unique flavor combinations that keep things exciting.
- Watch the Baking Time: Every oven is different, so keep a close eye on your cookies as they bake. Remove them from the oven when the edges are golden brown, even if the centers look slightly underbaked. They will continue to firm up as they cool.
- Use Parchment Paper: Lining your baking sheet with parchment paper prevents sticking and ensures even baking. It also makes cleanup a breeze!
- Store Properly: To keep your cookies fresh, store them in an airtight container at room temperature. If you want to keep them longer, consider freezing them. Just make sure to separate layers with parchment paper to prevent sticking.
By following these tips, you’ll be well on your way to baking the perfect batch of classic chocolate chip cookies. Each cookie will be a delightful treat, filled with rich flavors and a chewy texture. Happy baking!
Breakdown of Time for Classic Chocolate Chip Cookies Recipe
Prep Time
15 to 20 minutes to gather your ingredients, measure them out, and mix the dough. This includes the time it takes to whisk together the dry ingredients and cream the butter and sugars. If you choose to chill the dough, add an additional 30 minutes to this time. Chilling helps enhance the flavors and improves the texture of the cookies.
Cooking Time
9 to 11 minutes. Keep an eye on them as they bake. The edges should turn golden brown, while the centers may look slightly underbaked. This is perfectly fine, as they will continue to cook on the baking sheet after being removed from the oven.
Total Time
1 hour from start to finish. This includes 20 minutes for prep, 30 minutes for chilling (optional), and 10 minutes for baking. If you skip the chilling step, you can enjoy your freshly baked classic chocolate chip cookies in just 30 to 40 minutes!
With this breakdown, you can easily plan your baking session. Whether you’re making them for a special occasion or just a cozy night in, knowing the time involved helps you enjoy the process even more. Happy baking!
Nutritional Information for Classic Chocolate Chip Cookies Recipe
Calories
150 calories. This makes them a delightful treat, but moderation is key. Enjoying one or two cookies as a snack or dessert can fit nicely into a balanced diet.
Protein
2 grams of protein. While this isn’t a significant source of protein, it can contribute to your daily intake when enjoyed as part of a varied diet. Pairing cookies with a glass of milk can enhance the protein content of your snack!
Sodium
100 milligrams of sodium. This amount is relatively low, especially when compared to many processed snacks. However, if you’re watching your sodium intake, it’s good to keep this in mind. Enjoying these cookies as an occasional treat can help maintain a balanced diet without excessive sodium.
Overall, classic chocolate chip cookies can be a delightful addition to your dessert options. By being mindful of their nutritional information, you can enjoy these treats while still keeping your health goals in check. So go ahead, bake a batch, and savor every delicious bite!
FAQs about Classic Chocolate Chip Cookies Recipe
What makes a cookie chewy versus crispy?
The texture of a cookie can greatly depend on the ingredients and baking method used. Chewy cookies often contain more moisture, which can come from brown sugar or additional eggs. Brown sugar has more moisture than white sugar, contributing to a softer texture. Additionally, chilling the dough before baking can help create a chewier cookie by allowing the flavors to meld and the dough to firm up. On the other hand, cookies that are baked longer or at a higher temperature tend to be crispier. So, if you prefer chewy cookies, aim for a shorter baking time and consider using more brown sugar!
Can I use brown sugar instead of white sugar in the Classic Chocolate Chip Cookies Recipe?
Absolutely! You can use brown sugar instead of white sugar in your classic chocolate chip cookies recipe. In fact, many bakers prefer to use a combination of both sugars for the best flavor and texture. Brown sugar adds moisture and a rich, caramel-like flavor, while granulated sugar helps the cookies spread. If you want a chewier cookie, you can even replace all the granulated sugar with brown sugar. Just keep in mind that this may alter the final texture slightly, making them softer and denser.
How do I store leftover cookies?
Storing your leftover classic chocolate chip cookies properly is key to keeping them fresh. Place the cookies in an airtight container at room temperature. This will help maintain their softness and prevent them from becoming stale. If you want to keep them for a longer period, consider freezing them. Just make sure to separate layers with parchment paper to avoid sticking. When you’re ready to enjoy them, simply let them thaw at room temperature or warm them in the microwave for a few seconds for that fresh-baked taste!
Can I freeze the dough for the Classic Chocolate Chip Cookies Recipe?
Yes, you can definitely freeze the dough for your classic chocolate chip cookies! This is a great way to have fresh cookies on hand whenever you want. To freeze the dough, scoop rounded tablespoons onto a baking sheet lined with parchment paper. Freeze the dough balls until solid, then transfer them to a freezer-safe bag or container. When you’re ready to bake, you can bake them straight from the freezer. Just add a couple of extra minutes to the baking time. This way, you can enjoy warm, homemade cookies anytime!
Conclusion on Classic Chocolate Chip Cookies Recipe
In conclusion, the classic chocolate chip cookies recipe is a timeless treat that brings joy to many. With its simple ingredients and easy preparation, anyone can create a batch of delicious cookies right at home. Whether you’re baking for a special occasion or just to satisfy a sweet craving, these cookies are sure to please.
From the rich history of chocolate chip cookies to the delightful variations you can try, this recipe offers something for everyone. You can easily adapt it to suit dietary needs, whether gluten-free or vegan, without sacrificing flavor. The tips provided will help you perfect your baking skills, ensuring that each batch is just as delightful as the last.
As you enjoy your freshly baked cookies, remember that they are more than just a snack. They are a way to create memories with family and friends, whether you’re sharing them at a gathering or enjoying them with a glass of milk on a cozy evening. So, gather your ingredients, follow the steps, and indulge in the warm, gooey goodness of classic chocolate chip cookies.
Happy baking, and may your kitchen be filled with the sweet aroma of chocolate chip cookies for years to come!