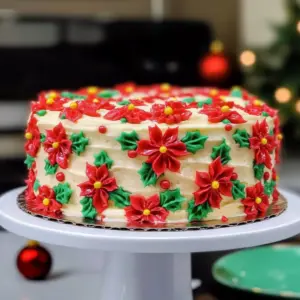
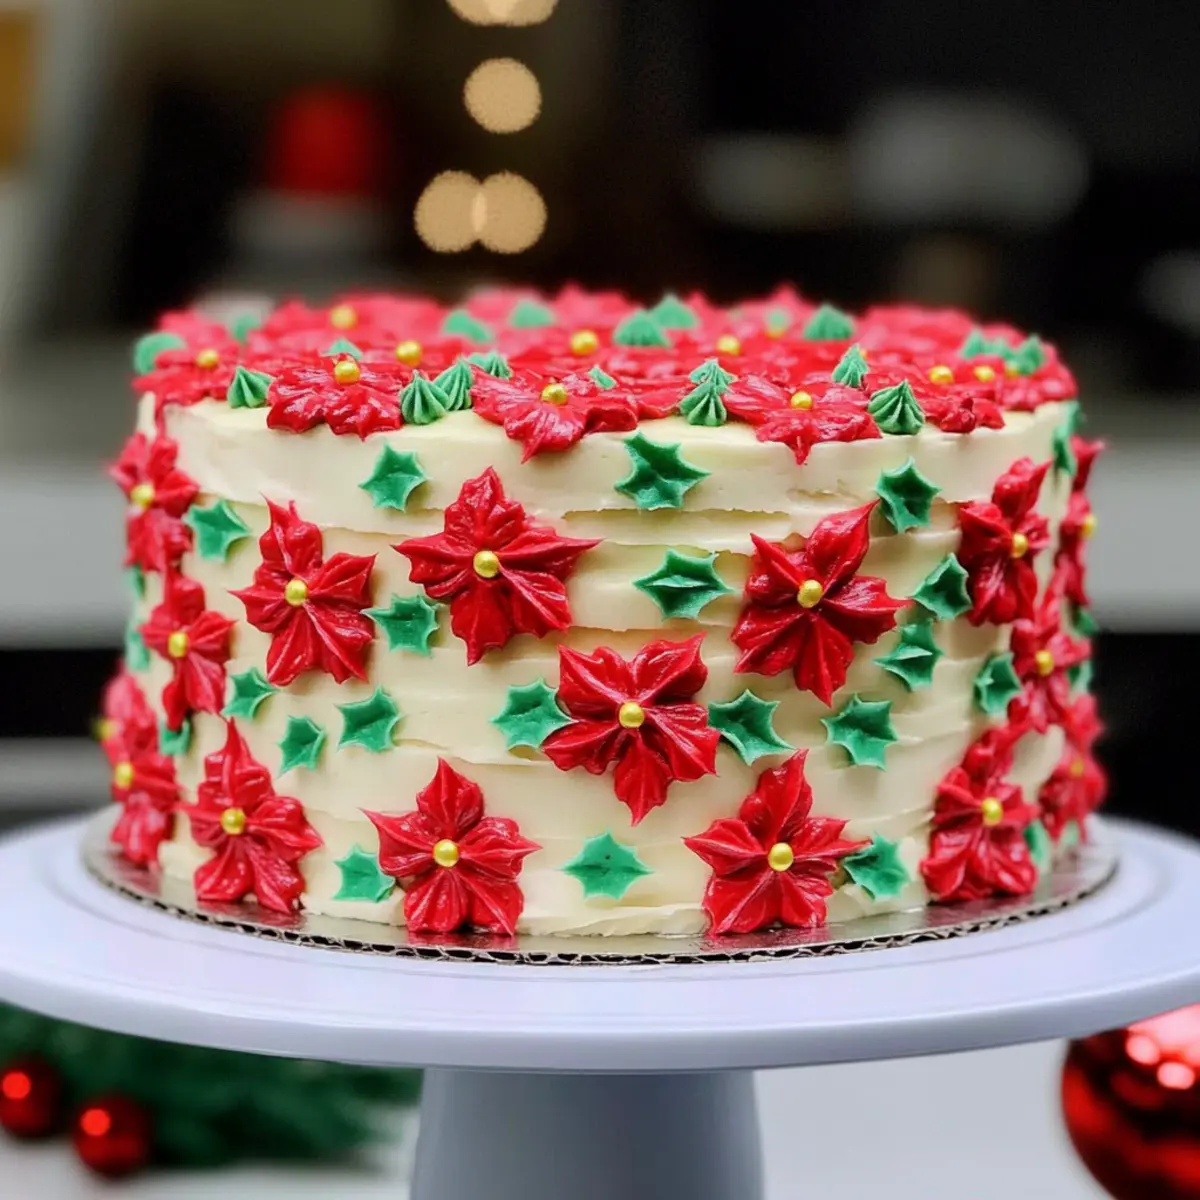
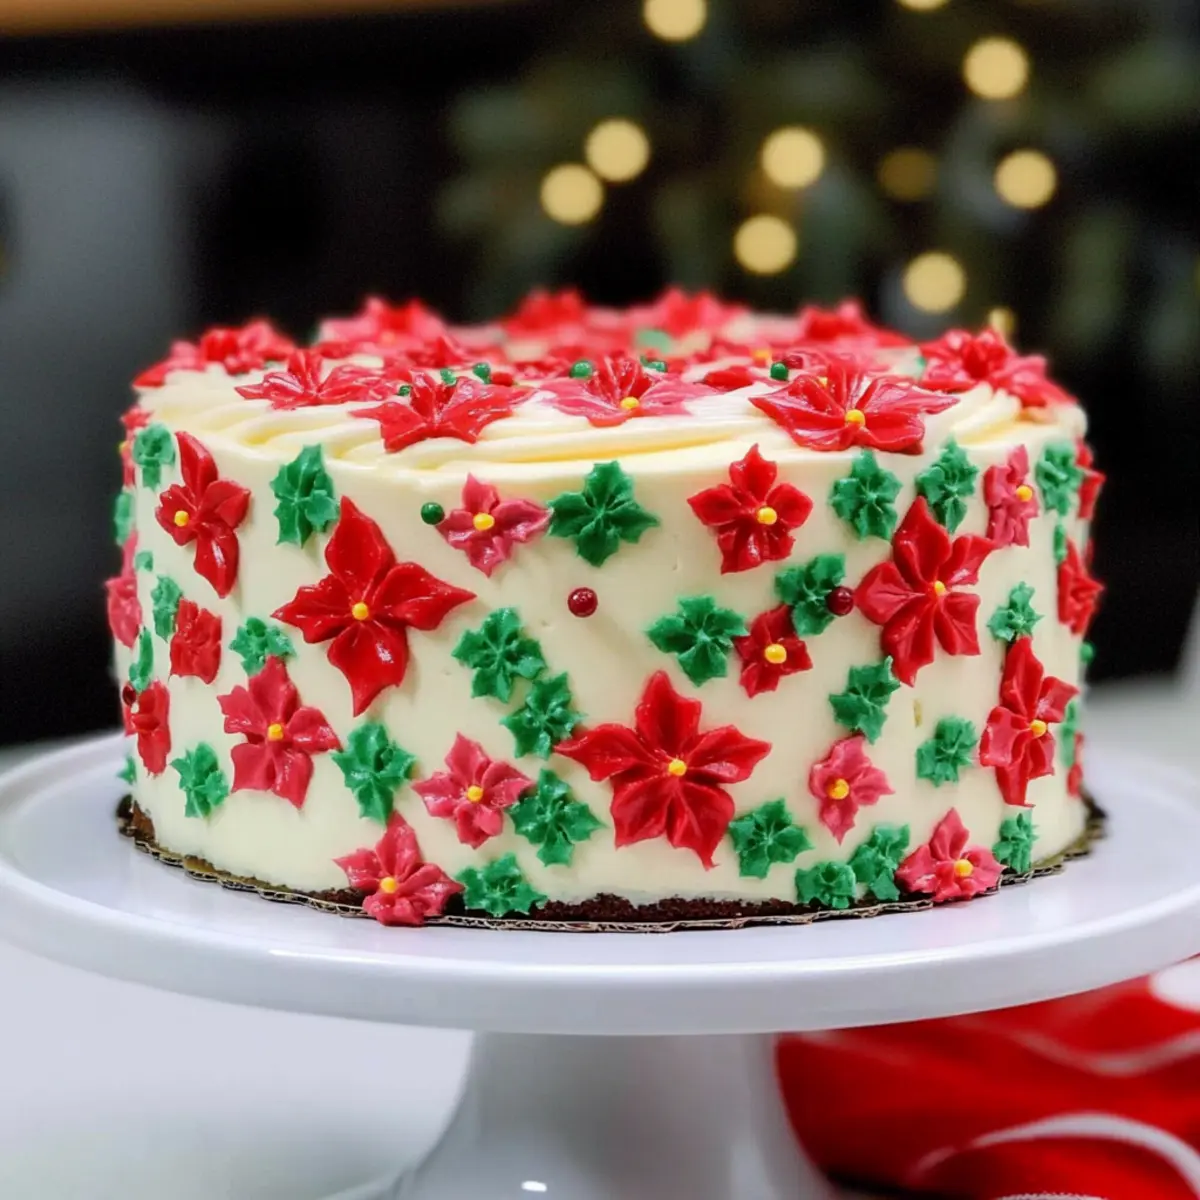
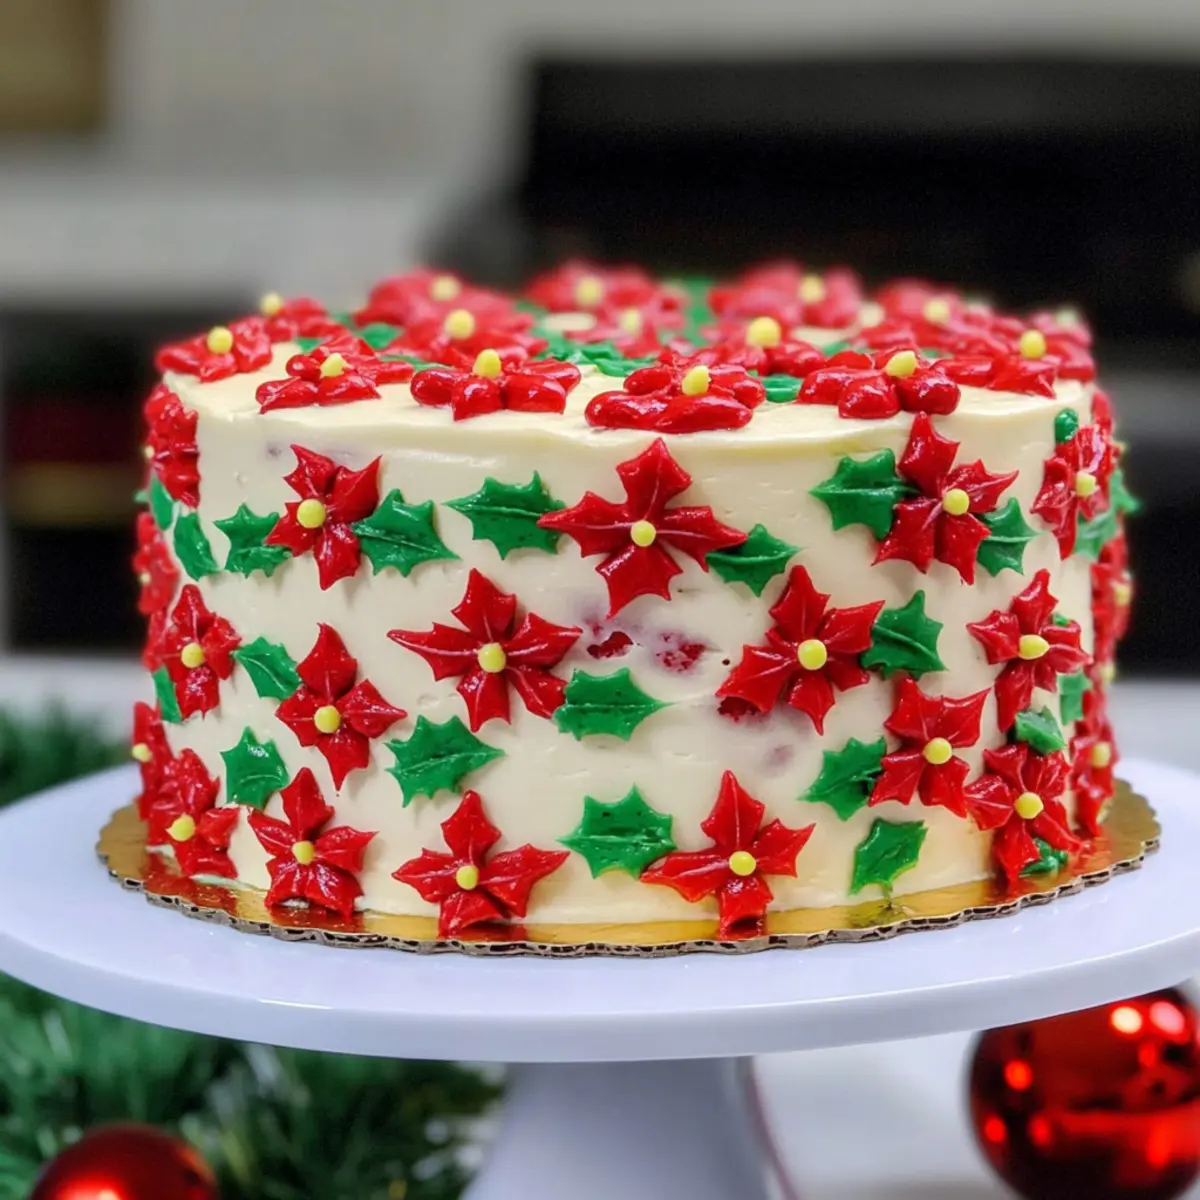
As I pulled the warm Poinsettia Cake from the oven, the enchanting aromas filled my kitchen, making it impossible to resist sneaking a taste. This festive Chocolate Poinsettia Cake, with its rich cocoa layers and peppermint buttercream, is a delightful twist on a holiday classic. Not only does it come together quickly, but it also serves as a stunning centerpiece for any celebration, ushering in the spirit of the season. Each slice offers a perfect balance of indulgence and cheer, making it a hit not just with the sweet-toothed. Ready to transform your holiday gatherings into unforgettable moments? Let’s dive into this festive treat that’s sure to impress!
Why Chocolate Poinsettia Cake is Irresistible?
Decadence in every slice: This delightful cake features rich cocoa layers paired with a fluffy, peppermint-infused buttercream that creates a blissful flavor experience.
Effortless preparation: Perfect for both novice bakers and seasoned chefs, this recipe brings festive cheer without any complicated techniques.
Versatile options: Whether you’re baking 6-inch layers, a sheet cake, or even cupcakes, this recipe caters to your needs.
Visually stunning: The vibrant decorations and unique flavors make it a showstopper at any holiday gathering, delighting both the eyes and palate.
Make-ahead friendly: You can bake your cake layers and frosting in advance and store them, making meal prep a breeze!
Get ready to impress your guests with this show-stopping cake!
Chocolate Poinsettia Cake Ingredients
• Transform your holidays with this rich dessert!
For the Cake
- All-Purpose Flour – Essential for structure; feel free to use a gluten-free flour blend for a gluten-free version.
- Granulated Sugar – Sweetens the cake while also ensuring moisture throughout.
- Unsweetened Cocoa Powder – Adds that rich chocolate flavor; don’t skip for a decadent taste.
- Baking Powder – This leavening agent ensures light and fluffy layers.
- Fine Salt – Balances the sweetness, making flavors pop.
- Unsalted Butter – Important for moistness and richness; ensure it’s softened for easy mixing.
- Egg Whites – Provide stability and structure; carton egg whites are a convenient option.
- Full-Fat Sour Cream – Keeps the cake wonderfully moist; can be swapped with yogurt if desired.
- Vegetable/Canola Oil – Keeps the layers tender without altering flavor.
- Vanilla Extract – Adds a warm sweetness; for a deeper flavor, consider using vanilla bean paste.
- Gel Food Coloring – Optional for adding vibrant color to your layers.
For the Frosting
- Unsalted Butter – The star ingredient for a creamy, rich frosting; let it soften first for the best texture.
- Powdered Sugar – Sweetens and gives the frosting a smooth, spreadable consistency.
- Heavy Whipping Cream – Enhances richness and body when mixed into the frosting.
- Peppermint Extract – Adds a festive twist; can be omitted or substituted for another flavor if preferred.
Indulge in this Chocolate Poinsettia Cake, perfect for bringing joy to your holiday celebrations!
Step‑by‑Step Instructions for Chocolate Poinsettia Cake
Step 1: Prepare Cake Layers
Preheat your oven to 350°F (175°C). Grease and line three 8-inch round cake pans with parchment paper for easy removal. In a large mixing bowl, whisk together the dry ingredients: flour, cocoa powder, baking powder, and salt. Then, beat in the softened butter until the mixture resembles coarse crumbs. Gradually incorporate the egg whites, sour cream, vegetable oil, and vanilla extract until the batter is smooth and well-combined, ready to bake.
Step 2: Bake Cake
Divide the batter evenly among the prepared pans and smooth the tops for an even bake. Place them in the preheated oven, baking for 32-35 minutes, or until a toothpick inserted in the center comes out clean. Once baked, remove the pans and let the cakes cool in them for about 10 minutes. Transfer the layers to a wire rack to cool completely, then place them in the freezer for 30 minutes to firm them up for assembly.
Step 3: Make Frosting
In a large mixing bowl, beat the unsalted butter with an electric mixer at medium speed until it’s creamy and smooth. Mix in the vanilla extract and peppermint extract, along with a pinch of salt to enhance flavor. Gradually add the powdered sugar, alternating with heavy whipping cream, mixing until you reach a fluffy and spreadable consistency. Your festive peppermint buttercream is now ready to adorn your Chocolate Poinsettia Cake!
Step 4: Assemble Cake
Level the cooled cake layers using a serrated knife to ensure a flat and stable base. Stack the first layer on a serving plate or cake stand, adding a generous layer of peppermint buttercream on top. Repeat the process with the second layer, and then place the final layer on top. Use the remaining buttercream to frost the top and sides of the entire cake, creating a smooth, inviting finish.
Step 5: Decorate
To create delightful poinsettia decorations, pipe the buttercream onto parchment paper to form flower shapes. Chill these decorations in the refrigerator until firm. Once ready, gently remove them and attach them to the frosted Chocolate Poinsettia Cake using small dollops of leftover cake frosting. For added flair, you can also pipe additional rosettes or leaves around the base of the cake.
Step 6: Chill and Serve
After decorating, place the assembled cake in the refrigerator for at least 30 minutes to let the buttercream set. This will ensure that your Chocolate Poinsettia Cake holds its shape during slicing. Once chilled, slice into layers, serve, and watch your guests delight in this festive treat that embodies the spirit of the season!
How to Store and Freeze Chocolate Poinsettia Cake
Fridge: Keep the frosted Chocolate Poinsettia Cake in an airtight container for up to 1 week. This will help maintain its moisture and flavor, ensuring every slice is as delightful as the first.
Freezer: For longer storage, wrap individual slices or unfrosted layers in plastic wrap, then place them in a freezer-safe bag for up to 1 month. Thaw slowly in the fridge before decorating or serving.
Make Ahead: Consider making the cake layers and peppermint frosting ahead of time. Store them separately in the freezer for up to 1 month, and simply frost and assemble when ready to enjoy.
Reheating: If you’ve frozen cake layers, allow them to thaw completely, then frost them cold for an easy assembly, preventing excess crumbs in the frosting.
Helpful Tricks for Chocolate Poinsettia Cake
-
Perfect Measurements: Always measure flour accurately using the spoon-and-level technique to prevent a dense cake. Precision is key in this Chocolate Poinsettia Cake!
-
Room Temperature Ingredients: Ensure all your ingredients, especially butter and eggs, are at room temperature. This helps create a smooth batter and fluffy cake layers.
-
Cooling Time: After baking, let your cake layers cool in the pans for just 10 minutes. This prevents them from becoming too dry when transferred to a wire rack.
-
Chill Before Decorating: Chill your assembled cake in the fridge for at least 30 minutes before decorating. This makes it easier to pipe the buttercream without disturbing the frosting underneath.
-
Pipe with Precision: When creating poinsettia decorations, use a piping bag fitted with a star tip for beautiful, professional-looking flowers. Practice on parchment if you’re nervous!
-
Store Properly: If you’re making the Chocolate Poinsettia Cake in advance, store it in an airtight container in the refrigerator for up to a week to maintain freshness.
Make Ahead Options
These Chocolate Poinsettia Cake layers and frosting are perfect for busy home cooks looking to save time during the holidays! You can bake the cake layers and make the peppermint buttercream up to 3 days in advance. Simply cool the layers completely, wrap each tightly in plastic wrap, and refrigerate. The frosting can be stored in an airtight container in the fridge as well. For an even longer option, both cake and frosting can be frozen for up to a month—thaw overnight in the refrigerator before serving. When ready to assemble, just frost the layers as directed and decorate with your pre-made buttercream for a stunning presentation that requires minimal last-minute effort!
What to Serve with Chocolate Poinsettia Cake
Indulge in this festive delight while you imagine the joyful gatherings it will bring to your holiday table.
-
Creamy Vanilla Ice Cream: The cool creaminess of vanilla ice cream beautifully contrasts the rich chocolate layers, enhancing the cake’s indulgence.
-
Warm Peppermint Tea: The gentle minty aroma of peppermint tea pairs perfectly with the cake’s flavors, creating a cozy, soothing atmosphere.
-
Rich Hot Chocolate: A cup of decadent hot chocolate adds a delightful warmth and extra chocolatey goodness, making every bite of cake even more enjoyable.
-
Fresh Berries: Bright red raspberries or strawberries introduce a refreshing tartness that balances the sweetness of the cake, creating a wonderful flavor harmony.
-
Whipped Cream: Light and airy whipped cream adds a touch of elegance while complementing the cake’s layers with its silky smooth texture.
-
Spiced Gingerbread Cookies: These cookies not only add a holiday touch but their warm spices will evoke the full essence of the season alongside your cake.
-
Sparkling Apple Cider: A bubbly glass of sparkling cider brings a festive flair and a crispness that beautifully complements the richness of the Poinsettia Cake.
Chocolate Poinsettia Cake Variations
Feel free to explore these delicious variations that will elevate your festive chocolate cake experience!
-
Gluten-Free: Substitute all-purpose flour with a gluten-free flour blend to make this cake accessible for everyone.
-
Mini Cakes: Bake in 4-inch round pans for adorable mini chocolate cakes, perfect for gifting or single servings.
-
Bundt Cake Twist: Use a Bundt pan for an impressive presentation and adjust baking time to 45-50 minutes for even cooking.
-
Chocolate Mint Frosting: For a sweeter twist, substitute peppermint extract in the frosting with mint extract for a burst of refreshing flavor.
-
Layer of Ganache: Drizzle a rich chocolate ganache over the frosted cake for an extra layer of indulgence. Simply melt chocolate with heavy cream and let cool slightly before pouring.
-
Candied Mint Leaves: For a sophisticated touch, decorate with candied mint leaves alongside your buttercream flowers, adding both crunch and a festive look.
You can have endless fun with this recipe! And for those who enjoy a rich chocolate flavor, you might want to check out my delightful Chocolate Cake with Mocha Buttercream for another impressive treat. Enjoy creating your masterpiece!
Chocolate Poinsettia Cake Recipe FAQs
How do I choose the best cocoa powder for my cake?
Absolutely! When selecting cocoa powder, look for high-quality Dutch-processed cocoa for a rich flavor and deep color. Unsweetened natural cocoa powder is a great choice too, but expect a slightly different taste. The brand you choose can also impact the flavor, so consider experimenting to find your favorite!
What’s the best way to store my Chocolate Poinsettia Cake?
To keep this luxurious cake fresh, store it in an airtight container in the fridge, where it can last up to 1 week. For longer storage, wrap individual slices or unfrosted layers tightly in plastic wrap and place them in a freezer-safe bag for up to 1 month. Thaw slowly in the fridge for the best texture before serving.
Can I freeze my Chocolate Poinsettia Cake? How?
Yes, you can! For freezing, wrap the cooled and unfrosted cake layers carefully in plastic wrap, ensuring there’s no air exposure. Place them in a freezer-safe bag or container. The cake can be frozen for up to 1 month. To use, let them defrost in the fridge overnight before frosting and assembling. Alternatively, you can freeze the buttercream in a separate container for the same duration.
What should I do if my cake layers are dry?
If your cake layers come out dry, it’s often due to overbaking or incorrect ingredient ratios. To avoid this, always check the cake about 2–3 minutes before the suggested time, sticking a toothpick into the center. For dry layers, you can moisten them with a simple syrup (equal parts sugar and water boiled together until dissolved) brushed lightly on each layer before frosting them.
Are there any dietary considerations I should be aware of for this cake?
Certainly! This Chocolate Poinsettia Cake contains gluten, dairy, and eggs. For gluten-free options, use a gluten-free flour blend and ensure your cocoa powder is also certified gluten-free. If there are egg allergies, consider substituting the egg whites with a flaxseed or chia seed egg, which can be made by mixing 1 tablespoon of ground seeds with 2.5 tablespoons of water; let it sit until it thickens.

Decadent Chocolate Poinsettia Cake for Festive Celebrations
Ingredients
Equipment
Method
- Preheat your oven to 350°F (175°C). Grease and line three 8-inch round cake pans with parchment paper. In a large mixing bowl, whisk together the dry ingredients: flour, cocoa powder, baking powder, and salt. Beat in the softened butter until the mixture resembles coarse crumbs.
- Gradually incorporate the egg whites, sour cream, vegetable oil, and vanilla extract until the batter is smooth and well-combined.
- Divide the batter evenly among the prepared pans and smooth the tops. Bake for 32-35 minutes, or until a toothpick comes out clean. Let the cakes cool in the pans for 10 minutes before transferring to a wire rack.
- While cooling, place the layers in the freezer for 30 minutes to firm them up for assembly.
- In a large mixing bowl, beat the unsalted butter until creamy. Mix in vanilla and peppermint extracts, then gradually add powdered sugar and heavy cream until fluffy.
- Level the cooled cake layers, stack them with peppermint buttercream in between, and frost the outside of the cake.
- Pipe decorations onto parchment paper, chill until firm, and attach to the frosted cake with dollops of frosting.
- Chill the assembled cake for at least 30 minutes before slicing and serving.