As I was digging through my pantry one crisp autumn afternoon, I stumbled upon an unexpected gem—black cocoa powder. Instantly, I knew I had to create something uniquely haunting for Halloween, leading me to these delightful Halloween Cinnamon Rolls. Infused with the rich, dark flavors of chocolate reminiscent of your favorite Oreos, these rolls are not just eye-catching but also incredibly soft and fluffy. They make for a perfect centerpiece, whether you’re serving them as a festive breakfast or a delightful dessert at your Halloween party. With their sweet, gooey filling and a luscious cream cheese frosting, these treats are sure to impress guests of all ages! Are you ready to transform your baking into a spooktacular experience?
Why are these rolls a Halloween must-try?
Incredible Flavor: The black cocoa adds a unique twist, giving these rolls a deep chocolatey taste reminiscent of Oreos that everyone will love.
Festive Appeal: Each roll features a spooky appearance that makes them a perfect addition to your Halloween festivities.
Easy to Make: With simple steps, even novice bakers can whip these up—check out our easy baking tips to ensure perfect results!
Versatile Treat: Whether you enjoy these for breakfast or as a dessert, they fit any occasion, making them a crowd-pleaser at Halloween gatherings.
Perfectly Gooey: The addition of heavy cream before baking creates a moist texture that can’t be beaten.
Transform your holiday baking with this delightful treat that’s not only scrumptious but visually fun!
Halloween Cinnamon Rolls Ingredients
For the Dough
• Whole Milk – Provides moisture and assists in blooming the yeast; substitution: Almond milk for a dairy-free version.
• Active Dry Yeast – A leavening agent essential for the dough structure; Note: Ensure it is not expired for proper rising.
• Granulated White Sugar – Activates the yeast and adds sweetness; use honey or agave for a natural alternative.
• All-Purpose Flour – The main structure for the rolls; substitution: Bread flour for a chewier texture.
• Black Cocoa Powder – Gives the rolls a dark color and chocolate flavor; use regular cocoa powder for a milder flavor.
• Salt – Enhances flavor and strengthens gluten in the dough; do not omit; it balances sweetness.
• Brown Sugar – Adds moisture and depth of flavor to the filling; substitution: Coconut sugar or maple sugar.
• Unsalted Butter – Provides richness and flavor to the dough and filling; use vegan butter for a plant-based option.
• Eggs – Adds richness and helps with the dough’s elasticity; substitution: Flaxseed meal mixed with water for a vegan version.
• Vanilla Extract – Enhances the overall flavor profile; use pure vanilla extract for best results.
For the Filling
• Heavy Cream – Poured between rolls to create a moist texture; substitution: Coconut cream for dairy-free.
For the Frosting
• Cream Cheese – Base for the frosting, providing tanginess and creaminess; use cashew cream for a dairy-free option.
• Powdered Sugar – Sweetens and thickens the cream cheese frosting; use a sugar alternative to reduce calories.
These delightful Halloween cinnamon rolls offer a perfect blend of spooky fun and deliciousness, making them an essential treat for your festive gatherings!
Step‑by‑Step Instructions for Halloween Cinnamon Rolls
Step 1: Prepare Dough
In a small bowl, warm the whole milk to about 110°F and stir in the granulated white sugar. Add the active dry yeast and let it bloom for 10 minutes, until foamy. Meanwhile, in a mixing bowl, combine all-purpose flour, black cocoa powder, and salt. Once the yeast is ready, mix it into the dry ingredients, along with eggs, vanilla extract, and softened unsalted butter. Knead the mixture until it forms a smooth, elastic dough, approximately 7–10 minutes.
Step 2: First Rise
Place the kneaded dough into a greased bowl, covering it with a kitchen towel. Leave it in a warm, draft-free area for about 1 to 1.5 hours, or until doubled in size. You’ll know it’s ready when the dough feels light and airy to the touch. This step is crucial for achieving the fluffy texture of your Halloween cinnamon rolls.
Step 3: Make Filling
In a medium bowl, combine softened unsalted butter, brown sugar, black cocoa powder, and a pinch of salt to create the filling. Mix until well combined and creamy, ensuring that all ingredients are incorporated smoothly. Set this delightful filling aside, as you’ll spread it over the rolled-out dough for that gooey Halloween treat your guests will love.
Step 4: Roll Out Dough
Once the dough has risen, gently punch it down and transfer it to a floured surface. Roll the dough into a large rectangle, approximately 18×12 inches, ensuring it’s evenly thick. With a spatula, spread the chocolate filling evenly across the surface of the dough, leaving a small border around the edges. This will ensure a delicious filling in every bite of your Halloween cinnamon rolls.
Step 5: Shape Rolls
Starting from one long edge, roll the dough tightly into a log, sealing the edge. Trim the ends to even out the roll for presentation. Using unflavored dental floss, cut the log into 12 equal pieces, ensuring a clean edge for each roll. These perfectly shaped rolls will bake up beautifully and become the centerpiece of your Halloween celebration.
Step 6: Second Rise
Grease a casserole dish and place the cut rolls inside, spaced slightly apart. Pour heavy cream carefully between the rolls, which will lead to a moist and decadent texture. Cover the dish with a kitchen towel and let it proof for about 1 hour, or until the rolls have doubled in size. You’ll know they’re ready when they look puffy and inviting, ready for the oven.
Step 7: Bake
Preheat your oven to 350°F. Place the casserole dish with the rolls in the oven and bake for 20–25 minutes, or until the tops are slightly golden and the rolls feel baked through. Keep an eye on them as they bake, as the spookiness of these Halloween cinnamon rolls deserves to be perfectly golden and fluffy.
Step 8: Make Frosting
While the rolls are baking, prepare the frosting by beating softened cream cheese and unsalted butter together until smooth and creamy. Gradually incorporate the black cocoa powder and powdered sugar, adding a splash of milk as needed to achieve your desired consistency. For an extra festive touch, feel free to add food coloring to your frosting to enhance its Halloween charm.
Step 9: Finish Rolls
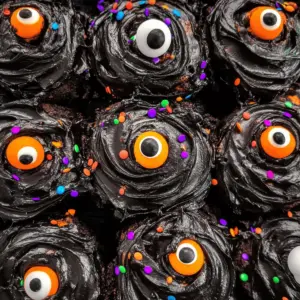
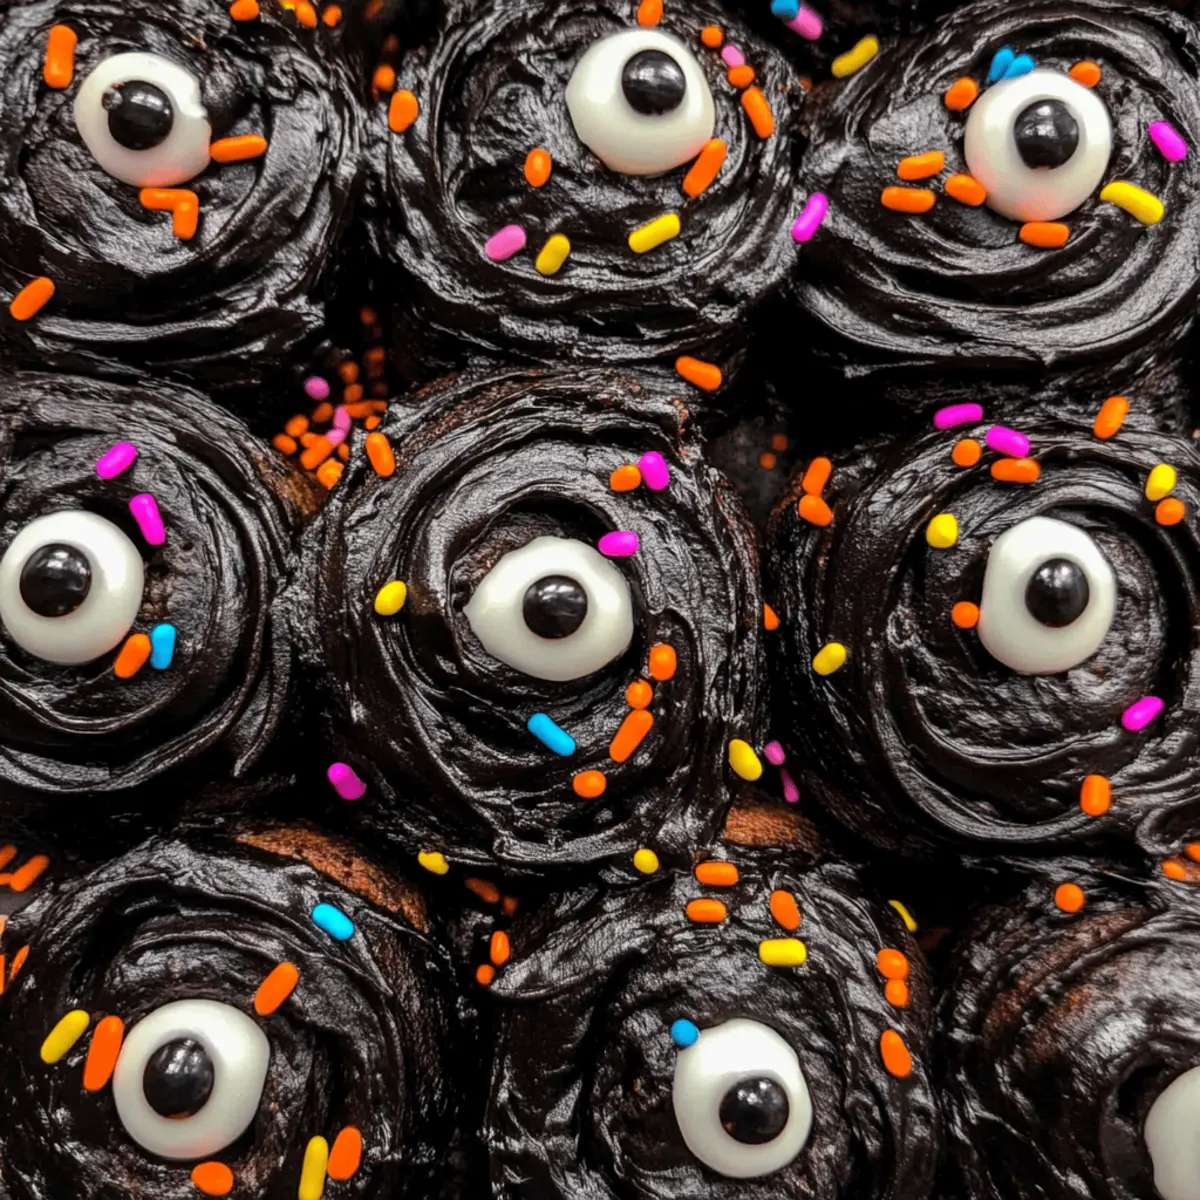
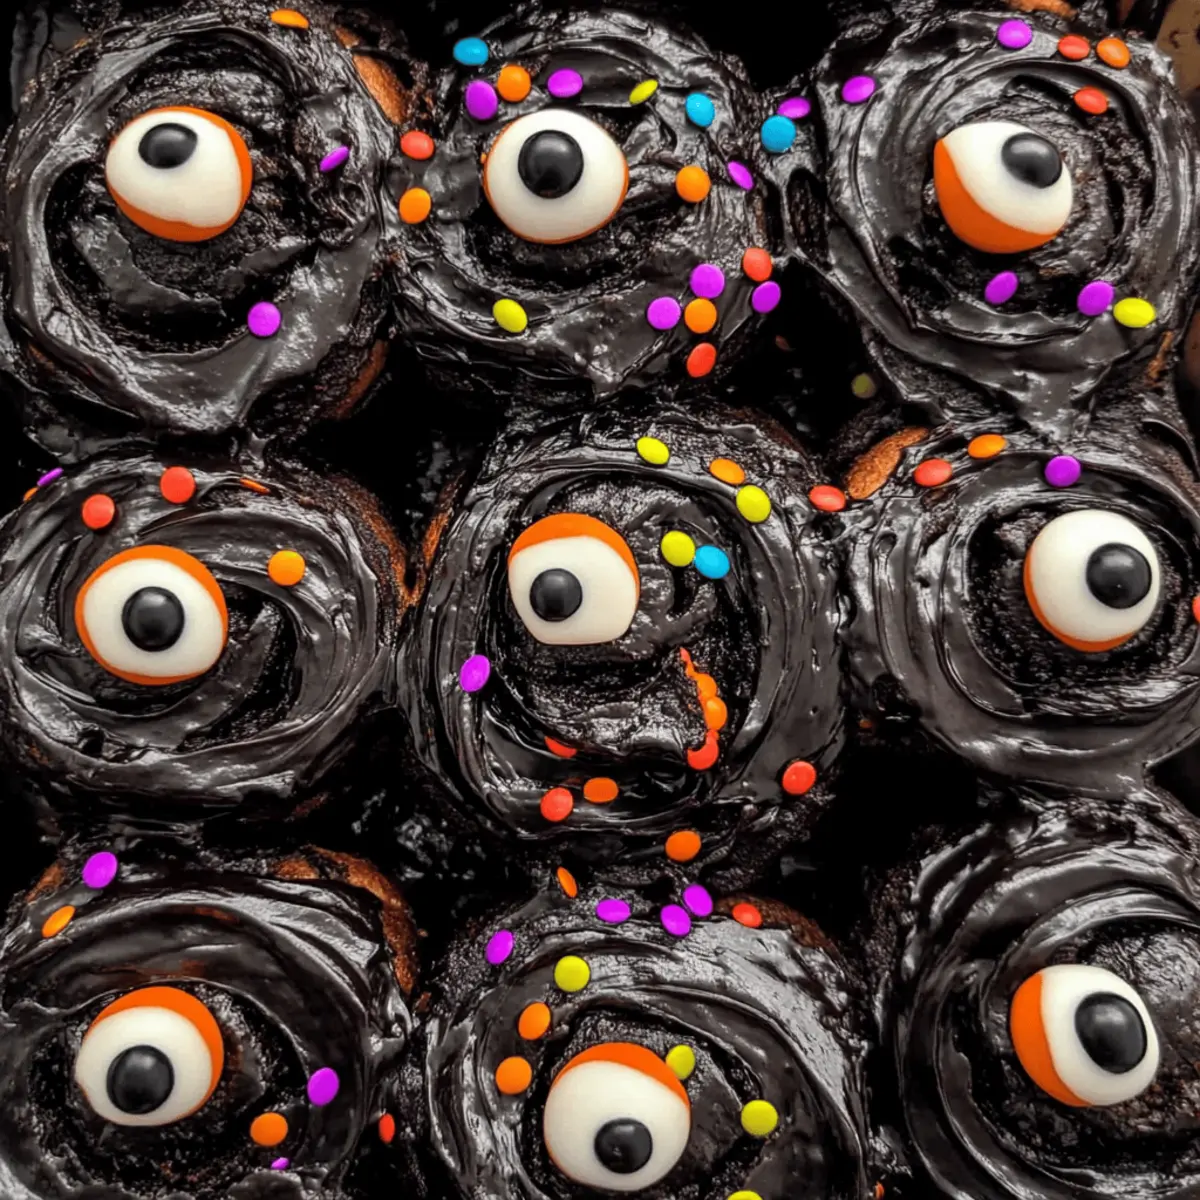
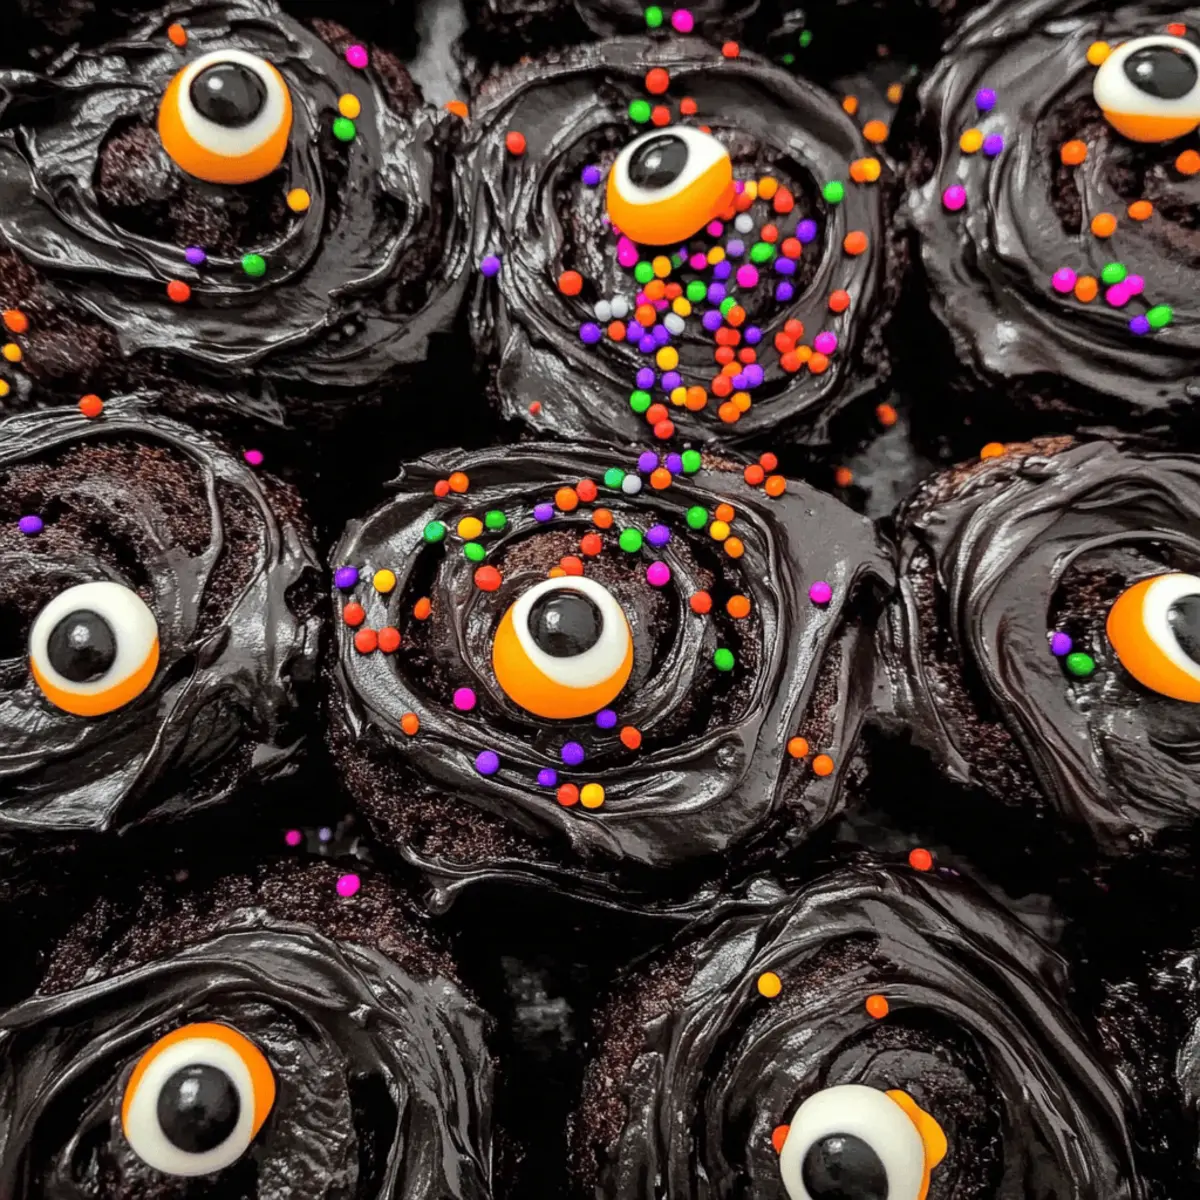
Once the rolls have baked and cooled for about 5 minutes, it’s time to frost them. Generously spread the cream cheese frosting over the warm rolls, allowing it to melt slightly into the grooves for a luscious finish. Top your whimsical Halloween cinnamon rolls with colorful sprinkles or candy eyeballs for a fun, festive presentation before serving!
Expert Tips for Halloween Cinnamon Rolls
-
Fresh Ingredients: Always check that your active dry yeast is fresh; using expired yeast can lead to flat rolls that don’t rise as they should.
-
Warm Rising: Place your dough in a warm environment for the first rise. If your kitchen is cold, consider turning your oven on for a few minutes to create a cozy space.
-
Cutting Rolls: For clean slices, use unflavored dental floss to cut the dough instead of a knife. This technique prevents squished rolls and keeps them perfectly shaped.
-
Heavy Cream Magic: Don’t skip the heavy cream between the rolls; it’s key to achieving that delightful moist texture in your Halloween cinnamon rolls.
-
Make-Ahead Strategy: Prepare the rolls up to the second rise the night before and refrigerate them. This allows for a stress-free baking experience in the morning!
-
Experiment with Flavors: Feel free to add different fillings or flavors to the cream cheese frosting, such as a hint of peppermint or orange zest, for delightful variations on this spooky treat!
Make Ahead Options
These Halloween Cinnamon Rolls are perfect for busy home cooks looking to streamline their meal prep! You can prepare the rolls up to the second rise and then refrigerate them overnight (up to 24 hours) before baking. Simply follow the steps until shaping the rolls, place them in a greased dish, and cover tightly with plastic wrap. In the morning, allow them to sit at room temperature for about 30 minutes to an hour to finish proofing before baking as directed. This method not only saves precious time but ensures your rolls come out just as fluffy and delicious! Enjoy the convenience of a scrumptious breakfast without the morning rush!
What to Serve with Halloween Cinnamon Rolls
Indulging in these spooktacular cinnamon rolls is just the beginning of your festive feast! Pair them with these delightful sides and beverages to create an unforgettable Halloween gathering.
-
Pumpkin Spice Latte: This seasonal favorite complements the rich chocolate flavor, adding warmth and comforting spices perfect for fall.
-
Caramel Apple Slices: The sweet and tart crunch of fresh apples drizzled with caramel provides a refreshing contrast to the gooey cinnamon rolls.
-
Crisp Green Salad: A blend of mixed greens with a tangy vinaigrette lightens the meal, balancing the sweetness of the rolls with freshness and crispness.
-
Chocolate Milk: For a nostalgic touch, serve a glass of chocolate milk alongside your rolls, enhancing their chocolaty richness in a fun way.
-
Cinnamon Cream Cheese Dip: Pair your rolls with a creamy dip for extra decadence. This delightful addition echoes the filling and enhances the flavor experience.
-
Hot Apple Cider: The warmth and spices of apple cider make for a comforting drink, creating a cozy atmosphere that complements your Halloween celebration beautifully.
Halloween Cinnamon Rolls: Fun Customizations
Feel free to make these Halloween cinnamon rolls uniquely yours with some delightful twists and changes!
- Dairy-Free: Substitute whole milk with almond or oat milk and use vegan butter to enjoy a plant-based version.
- Chewy Texture: Swap all-purpose flour for bread flour to create a more robust, chewy roll that will delight every bite.
- Additional Cocoa: For an even richer flavor, add a tablespoon of dark chocolate chips into your filling. They will melt delightfully while baking!
- Warm Spice: Incorporate a teaspoon of cinnamon or nutmeg into your filling for a warm, cozy flavor that complements the chocolate.
- Pumpkin Surprise: Use pumpkin puree as a filling instead of chocolate for a seasonal twist that screams autumn delight. Pair it with a cinnamon cream cheese frosting for extra comfort.
- Flavorful Frosting: Amplify your cream cheese frosting by adding a splash of peppermint extract or zest from an orange for a refreshing twist.
- Nutty Crunch: Consider mixing in some chopped walnuts or pecans into your filling for a delightful crunch that contrasts the softness of the rolls.
- Heat It Up: For those who love a kick, sprinkle a dash of cayenne pepper or chili powder into the frosting for a chocolatey spicy surprise that surprises the palate!
These variations not only keep things exciting but can also cater to dietary preferences. Whatever you choose, your Halloween gathering will be all the more sweeter! And if you need more ideas, check out our Make-Ahead Tips or explore how to incorporate Creative Fillings and Toppings for even more festive inspiration!
Storage Tips for Halloween Cinnamon Rolls
-
Room Temperature: Keep your Halloween cinnamon rolls in an airtight container at room temperature for up to 3 days to maintain their softness and flavor.
-
Fridge: If you’d like to extend their freshness, refrigerate the rolls in a covered container for up to 5 days. Just allow them to come to room temperature before serving.
-
Freezer: For longer storage, freeze the unfrosted rolls on a baking sheet until solid, then transfer them to a freezer bag for up to 3 months. Thaw overnight in the fridge and bake as needed.
-
Reheating: To reheat, pop the rolls in a microwave for about 10-15 seconds or warm them in a low oven (200°F) for 5-10 minutes, then add your cream cheese frosting for a fresh taste.
Halloween Cinnamon Rolls Recipe FAQs
What type of black cocoa should I use?
I recommend using high-quality Dutch-processed black cocoa powder for your Halloween cinnamon rolls. It has a rich flavor and gives the dough that spooky, dark color. If you can’t find black cocoa, regular cocoa powder will work in a pinch, but the flavor will be milder and less intense.
How can I store leftover cinnamon rolls?
To keep your Halloween cinnamon rolls fresh, store them in an airtight container at room temperature for up to 3 days. If you want them to last longer, you can refrigerate them for up to 5 days, but be sure to let them come back to room temperature before serving for the best texture.
Can I freeze the cinnamon rolls?
Absolutely! To freeze your Halloween cinnamon rolls, let them cool completely after baking. Then, place them on a baking sheet spaced apart and freeze until solid. After that, transfer them to a freezer bag and store them for up to 3 months. When you’re ready to enjoy, let them thaw overnight in the refrigerator and bake them at 350°F for about 10 minutes to freshen them up.
What should I do if my dough doesn’t rise?
If your dough isn’t rising, it might be due to cold temperatures or expired yeast. Make sure the environment is warm enough; you can create a cozy space by preheating your oven briefly. If the yeast has expired, it won’t activate, so always check the expiration date before using it. If the dough hasn’t risen after about an hour, consider moving it to a warmer area and giving it a bit more time.
Are these Halloween cinnamon rolls safe for my dog?
While cinnamon is generally safe for dogs in small quantities, the sugar and cream cheese frosting in this recipe are not advisable for pets. Always avoid sharing sweets with your furry friends. If you’re looking for pet-friendly options, consider making a special dog treat recipe without the harmful ingredients.

Halloween Cinnamon Rolls: Soft, Spooky Chocolate Delights
Ingredients
Equipment
Method
- Prepare Dough: Warm the whole milk to about 110°F, stir in sugar, add yeast and let it bloom for 10 minutes. Combine flour, cocoa, salt. Mix in yeast, eggs, vanilla, and butter. Knead until smooth, about 7–10 minutes.
- First Rise: Place dough in a greased bowl, cover with a towel, and leave in a warm area for 1 to 1.5 hours until doubled in size.
- Make Filling: Combine butter, brown sugar, cocoa, and a pinch of salt until creamy.
- Roll Out Dough: Punch down the risen dough, roll into a rectangle, and spread chocolate filling evenly.
- Shape Rolls: Roll tightly into a log, cut into 12 pieces using dental floss.
- Second Rise: Place rolls in a greased dish, pour heavy cream in between, cover, and let proof for 1 hour.
- Bake: Preheat oven to 350°F and bake rolls for 20–25 minutes until golden.
- Make Frosting: Beat cream cheese and butter until smooth, then mix in cocoa and powdered sugar.
- Finish Rolls: Frost warm rolls and top with sprinkles or candy eyeballs.