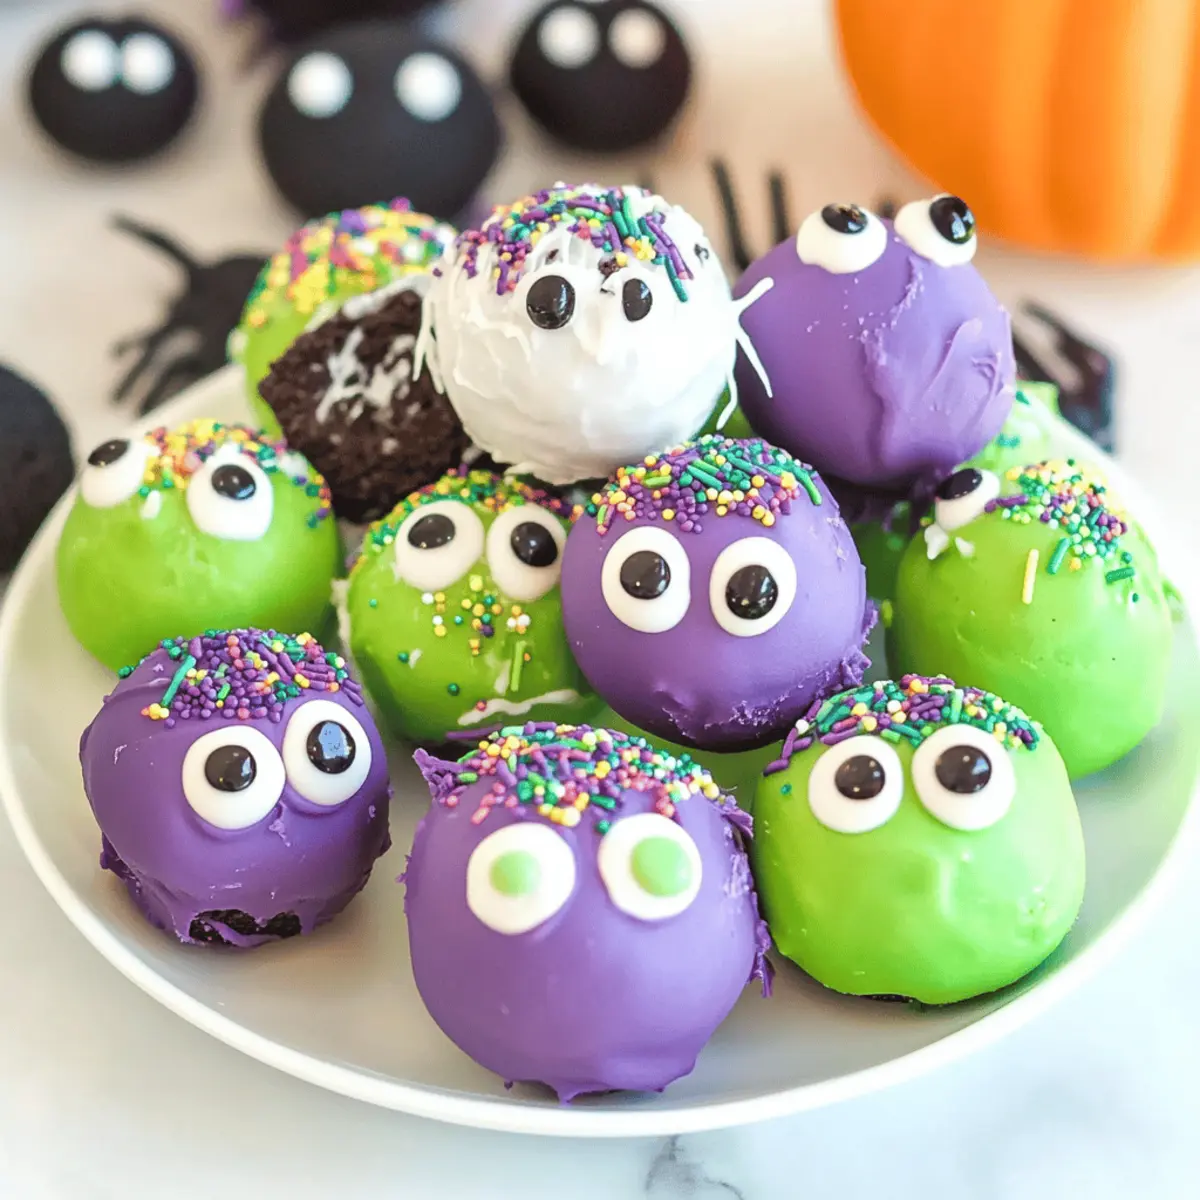
As I sifted through my Halloween-themed cookbook, a flash of nostalgia hit me. The sight of those vibrant, irresistible treats from my childhood spurred a memory: laughter-filled gatherings, sticky fingers reaching for something sweet. That’s the essence I want to capture with these Monster Oreo Balls. This no-bake dessert combines the familiar, creamy taste of Oreos with playful colors and sprinkles, making it the perfect crowd-pleaser for gatherings or fun seasonal gifts. With just a few simple ingredients, you’ll whip these up in no time, keeping fast food at bay and filling your home with cheerful, sweet aromas. Ready to dive into a Halloween adventure where dessert meets creativity?
Why Are Monster Oreo Balls So Fun?
No-Bake Delight: These Monster Oreo Balls are a breeze to make, requiring no oven time, so you can whip them up quickly to satisfy any sweet tooth!
Whimsical Presentation: With their vibrant colors and quirky decorations, they’re not just treats but delightful conversation starters for any gathering.
Crowd-Pleasing Flavor: The nostalgic combination of Oreos and cream cheese creates a rich, creamy filling that everyone will love, making them perfect for parties or gifts.
Versatile Creativity: Customize your Monster Oreo Balls with different colors and sprinkles to match your Halloween theme or personal preferences—every batch can be unique!
Fun for All Ages: Whether you’re baking with kids or impressing friends, these treats bring out the fun in the kitchen while keeping fast food at bay. For more tasty ideas, check out Garlic Butter Meatballs or Mushroom Chicken Meatballs.
Monster Oreo Balls Ingredients
For the Truffles
• Oreos – The base of the truffle; it provides sweetness and structure.
• Cream Cheese – Creates a rich, creamy filling; use full-fat for the best flavor.
• Vanilla Extract – Enhances the overall flavor of the truffles; opt for pure vanilla for superior taste.
For the Coating
• Melting Wafers (white, light green, purple) – Makes a colorful coating; ensure to melt properly for a silky finish.
• Crisco Shortening – Added to melted wafers; use 1 tablespoon per cup for improved texture.
For Decoration
• Sprinkles (green, purple, black) – Adds a festive touch; long jimmy sprinkles work best for a Halloween vibe.
• Candy Eyes – Enhances the “monster” appearance; available in various sizes, add before the coating sets for adherence.
These monster Oreo balls are sure to be a hit at your Halloween gathering!
Step‑by‑Step Instructions for Monster Oreo Balls
Step 1: Crush Oreos
Begin by placing the Oreos into a food processor. Pulse them until they achieve a fine crumb texture, resembling sand. This should take about 30 seconds to 1 minute. For those without a processor, you can also use a rolling pin to crush them in a sealed plastic bag. This crumbly mixture will be the base of your creamy Monster Oreo Balls.
Step 2: Mix Ingredients
In a large mixing bowl, combine the crushed Oreos, softened cream cheese, and pure vanilla extract. Use an electric mixer or a sturdy spatula to blend everything until a uniform dough forms with no visible lumps. This should take about 2-3 minutes. The mixture should be moist and sticky, ready for shaping into delightful truffles.
Step 3: Form Balls
Once your mixture is ready, take a cookie scoop and portion out the dough into uniform balls, approximately 1 inch in diameter. Place these balls on a parchment-lined baking sheet, ensuring they are spaced evenly apart. Aim for about 15-20 balls total. This uniformity will help them hold their shape nicely and look beautiful when coated.
Step 4: Chill
Cover the baking sheet with plastic wrap and refrigerate the formed balls for 2 hours. This chilling step is essential; it firms up the balls, making them easier to handle when coating. You’ll know they are ready when they feel solid to the touch and have a slightly matte finish instead of a sticky surface.
Step 5: Prepare Coatings
While your Monster Oreo Balls chill, it’s time to prepare the coatings. In a microwave-safe bowl, combine your melting wafers with Crisco shortening. Heat them in the microwave at 30-second intervals, stirring after each until fully melted and smooth. This should take about 1-2 minutes total. The mixture should be shiny and fluid—perfect for dipping.
Step 6: Dip Balls
Once the coating is ready, remove the chilled Oreo balls from the refrigerator. Dip each ball into the melted wafers, using a fork to coat them fully. Allow any excess to drip off before placing the coated balls back on the parchment-lined baking sheet. The coating should be even and thick enough to provide a delightful outer layer for your Monster Oreo Balls.
Step 7: Decorate
Before the coating sets, sprinkle your choice of colorful sprinkles and place candy eyes on top of each dipped ball. Be creative with your designs! This is where your Monster Oreo Balls come to life with a fun and whimsical touch. Work quickly, as the warm coating helps the decorations stick well.
Step 8: Final Chill
Once all the Monster Oreo Balls are decorated, return them to the refrigerator for an additional 30 minutes to let the coating set completely. This will ensure a perfect final texture, allowing you to enjoy these delightful treats fresh and firm. After chilling, your Monster Oreo Balls are ready to serve and share with friends and family!
Monster Oreo Balls: Fun Customizations
Ready to let your creativity shine in the kitchen? These variations will elevate your Monster Oreo Balls and add new flavors to your Halloween spread.
-
Colorful Wafers:
Switch up your melting wafers with vibrant shades for different holidays—think red and green for Christmas or pastels for Easter! -
Nutty Crunch:
Add crushed nuts like walnuts or almonds into your dough for added texture and flavor; just be sure to chop them finely for even distribution. -
Fruit Twists:
Incorporate dried fruit pieces like raisins or cranberries into the Oreo mixture for a chewy surprise with every bite. These additions introduce a delightful fruitiness to the rich chocolate base. -
Spicy Kick:
For a bold twist, add a pinch of cayenne pepper or chili powder to the melted coating for an unexpected heat that pairs wonderfully with chocolate. -
Vegan Delight:
Substitute the cream cheese with a vegan cream cheese alternative to make these horrors friendly for plant-based diets. Everyone should enjoy the fun! -
Flavor Extracts:
Experiment with flavored extracts like peppermint or almond for a unique taste! Just a few drops can transform the ordinary into the extraordinary. -
Decadent Drizzle:
After coating, drizzle melted chocolate over the top for an extra layer of richness. This decorative touch is both beautiful and delicious. -
Themed Sprinkles:
Tailor your sprinkles to specific occasions—use fall leaves for Thanksgiving or candy canes for a winter-themed treat. Personalizing them adds that extra special touch!
Each of these variations allows you to transform your Monster Oreo Balls into exciting new creations. Whether you’re aiming for a spooky gathering or a festive celebration, these simple ideas will help keep fast food at bay while bringing joy to your kitchen! For even more delicious ideas, check out Garlic Butter Meatballs and Mushroom Chicken Meatballs.
Storage Tips for Monster Oreo Balls
Fridge: Store leftover Monster Oreo Balls in an airtight container for up to 5 days to maintain their freshness and creamy texture.
Freezer: For longer storage, freeze uncoated Monster Oreo Balls in a container separated by wax paper for up to 2 months. Thaw them in the fridge before coating.
Reheating: These treats are best served chilled; no reheating is necessary. Just let them sit at room temperature for a few minutes before serving for optimal taste.
Expert Tips for Monster Oreo Balls
-
Cream Cheese Consistency: Ensure the cream cheese is fully softened to blend smoothly; this prevents lumps in your truffle mixture.
-
Mixing Method: Use an electric mixer for a perfectly smooth dough; hand mixing may lead to uneven texture, affecting the end result of your Monster Oreo Balls.
-
Dipping Technique: Remove excess melted coating from dipping tools before placing the truffles back on the sheet to avoid pooling around the bases.
-
Quick Decoration: Apply sprinkles and candy eyes immediately after dipping while the coating is still warm for the best adhesion; this keeps your decorations intact.
-
Chilling Time: Don’t rush the chilling process; letting the balls chill for the full 2 hours ensures they hold their shape and become easier to coat.
Make Ahead Options
These Monster Oreo Balls are fantastic for meal prep, allowing you to whip them up ahead of time and save precious minutes on busy days! You can easily prepare the truffle mixture and form the balls up to 24 hours in advance; simply refrigerate them tightly covered. This chilling step keeps their shape and texture intact. When ready to serve, all you need to do is melt the coating, dip the balls, and decorate them with sprinkles and candy eyes. Remember, for the best quality, dip and decorate your Monster Oreo Balls just before serving to ensure the coating remains fresh and vibrant. Enjoy the time-saving benefits while delighting in these festive treats!
What to Serve with Monster Oreo Balls?
When it comes to creating a whimsical Halloween gathering, the right sides can elevate the fun of your dessert table and keep the festive spirit alive.
-
Pumpkin Spice Latte: This seasonal favorite complements the sweetness of the Monster Oreo Balls, bringing warm flavors to your celebration. The creaminess of the latte perfectly balances the rich truffle texture.
-
Ghostly Cheese Platter: Create a spread with creamy cheeses shaped like ghosts, adding a savory contrast to the sweet treats. Pair with crunchy crackers for delightful textures!
-
Spooky Fruit Kabobs: Assemble vibrant skewers with grapes, bananas, and strawberries designed as spooky monsters. They add a fresh element to your table and encourage healthful snacking among guests.
-
Mummy Hot Dogs: Wrap hot dogs with crescent roll dough for adorable mummies that appeal to both kids and adults. The salty, savory bites will be a hit next to the sweet Oreo Balls.
-
Witch’s Brew Punch: Craft a refreshing punch using green soda and lime sherbet for a fizzy, eerie drink. It’s visually stunning and offers a refreshing respite against the sugary sweetness.
-
Candy Corn Jello Cups: Layered jello cups in Halloween colors subtly echo the colors of your Monster Oreo Balls, making for a cohesive dessert table. The wiggly texture adds fun for all ages!
-
Chocolate-Covered Pretzels: These salty-sweet snacks are perfect for pairing; their crunch will contrast beautifully with the creamy Oreo Balls, keeping guests coming back for more.
-
Harvest Salad: A colorful mix of spinach, apples, and nuts provides a delightful crunch and fresh flavor that balances the rich sweetness of your treats. Finish with a light dressing for zest!
Monster Oreo Balls Recipe FAQs
What kind of Oreos should I use for the Monster Oreo Balls?
Absolutely! Regular Oreos work best, as they provide the right sweetness and structure. Be sure not to remove the filling, as it adds creaminess to the truffle mixture. You can also experiment with other flavored Oreos, but the classic chocolate cookie is the most popular choice.
How should I store leftover Monster Oreo Balls?
For optimal freshness, store any leftover Monster Oreo Balls in an airtight container in the refrigerator for up to 5 days. This helps maintain their creamy texture and flavor, preventing them from drying out.
Can I freeze Monster Oreo Balls?
Yes, you can! For longer storage, freeze uncoated Monster Oreo Balls by placing them in a container, separated by wax paper, for up to 2 months. When you’re ready to enjoy them, simply thaw in the fridge overnight before coating them in the melting wafers.
What if my Monster Oreo Balls are too sticky to roll?
If your mixture is too sticky, it might be because the cream cheese wasn’t softened enough or the dough hasn’t chilled long enough. Make sure your cream cheese is at room temperature, and if it still feels too sticky, chill the dough for an additional 30 minutes before rolling it into balls.
Are Monster Oreo Balls safe for people with allergies?
Great question! These treats contain dairy (cream cheese) and gluten (from Oreos), making them unsuitable for those with lactose intolerance or gluten allergies. However, you can use gluten-free Oreos and a dairy-free cream cheese substitute to adapt the recipe for a vegan or gluten-free option.
What should I do if the coating is too thick?
If the melted wafers are too thick, it could be due to insufficient melting or not enough shortening. To remedy this, add a little more Crisco to the melted mixture and microwave in 10-15 second increments until you achieve a smoother, pourable consistency. This makes for easier dipping and a more even coating!
Monster Oreo Balls: Irresistibly Fun No-Bake Halloween Treats
Ingredients
Equipment
Method
- Crush Oreos in a food processor until fine like sand.
- Mix crushed Oreos, cream cheese, and vanilla extract until uniform dough forms.
- Form dough into 1-inch balls and place on a parchment-lined baking sheet.
- Chill the formed balls for 2 hours covered with plastic wrap.
- Prepare the coatings by melting wafers and shortening in the microwave.
- Dip the chilled Oreo balls in the melted wafers and let excess drip off.
- Decorate with sprinkles and candy eyes before the coating sets.
- Chill decorated balls for an additional 30 minutes to set the coating.